

Owner Manual
Page 1
AV RECEIVER TX-NR616 Instruction Manual Contents Safety Information and Introduction 2 Table of Contents 6 Connections 12 Turning On & Basic Operations 20 Advanced Operations 47 Controlling Other Components 72 Appendix 79 Internet Radio Guide Remote Control Codes En
AV RECEIVER TX-NR616 Instruction Manual Contents Safety Information and Introduction 2 Table of Contents 6 Connections 12 Turning On & Basic Operations 20 Advanced Operations 47 Controlling Other Components 72 Appendix 79 Internet Radio Guide Remote Control Codes En

Owner Manual
Page 4
... should be replaced, the replacement fuse must be connected to BS1362 and have the same ampere rating as that the ONKYO product described in this instruction manual is marked with an appropriate fuse. IMPORTANT The wires in the mains lead are coloured in accordance with the following ...code: Blue: Neutral Brown: Live As the colours of the wires in the mains lead of Conformity We, ONKYO EUROPE ELECTRONICS GmbH LIEGNITZERSTRASSE ...
... should be replaced, the replacement fuse must be connected to BS1362 and have the same ampere rating as that the ONKYO product described in this instruction manual is marked with an appropriate fuse. IMPORTANT The wires in the mains lead are coloured in accordance with the following ...code: Blue: Neutral Brown: Live As the colours of the wires in the mains lead of Conformity We, ONKYO EUROPE ELECTRONICS GmbH LIEGNITZERSTRASSE ...

Owner Manual
Page 5
...AV receiver's remote control sensor, as possible to prevent damage from leakage or corrosion. Please read this manual thoroughly before making connections and plugging in this manual for a long time, remove the batteries to prevent damage from your new AV Receiver. Following the ... receiver Approx. 16 ft. (5 m) Thank you to use the remote controller for future reference. Please retain this manual will enable you for purchasing an Onkyo AV Receiver. Specifications and operations are the same regardless of color. ■ Installing the batteries ■ Aiming the...
...AV receiver's remote control sensor, as possible to prevent damage from leakage or corrosion. Please read this manual thoroughly before making connections and plugging in this manual for a long time, remove the batteries to prevent damage from your new AV Receiver. Following the ... receiver Approx. 16 ft. (5 m) Thank you to use the remote controller for future reference. Please retain this manual will enable you for purchasing an Onkyo AV Receiver. Specifications and operations are the same regardless of color. ■ Installing the batteries ■ Aiming the...
Owner Manual
Page 12
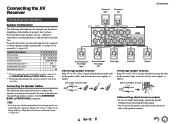
...) 3/8" to 1/2"(10 to 12 mm) ■ Banana Plugs (North American models) • If you need to set the speaker settings automatically (➔ page 34) or manually (➔ page 54).
...) 3/8" to 1/2"(10 to 12 mm) ■ Banana Plugs (North American models) • If you need to set the speaker settings automatically (➔ page 34) or manually (➔ page 54).

Owner Manual
Page 14
... the speakers' tweeter (high) and woofer (low) terminals. • Bi-amping can be positioned. When bi-amping is able to drive up to your speaker manual. You can connect the powered subwoofer with two SUBWOOFER PRE OUT jacks respectively. Once you've completed the bi-amping connections as shown. The surround...
... the speakers' tweeter (high) and woofer (low) terminals. • Bi-amping can be positioned. When bi-amping is able to drive up to your speaker manual. You can connect the powered subwoofer with two SUBWOOFER PRE OUT jacks respectively. Once you've completed the bi-amping connections as shown. The surround...

Owner Manual
Page 15
.... Yellow ■ Optical digital audio Optical digital connections allow you to enjoy digital sound such as coaxial. • Before making any AV connections, read the manuals supplied with your AV components. • Don't connect the power cord until you've completed and double-checked all AV connections. • Push plugs in...
.... Yellow ■ Optical digital audio Optical digital connections allow you to enjoy digital sound such as coaxial. • Before making any AV connections, read the manuals supplied with your AV components. • Don't connect the power cord until you've completed and double-checked all AV connections. • Push plugs in...

Owner Manual
Page 17
... not connect the AV receiver's USB port to HDMI OUT MAIN. Connecting Your Components "# $%# & ' Connect your components to connect the main stereo. See your turntable's manual for more information (➔ page 89). The on-screen menus appear only on a TV that is compatible with iPod/iPhone. *4 Connect a turntable (MM) that has...
... not connect the AV receiver's USB port to HDMI OUT MAIN. Connecting Your Components "# $%# & ' Connect your components to connect the main stereo. See your turntable's manual for more information (➔ page 89). The on-screen menus appear only on a TV that is compatible with iPod/iPhone. *4 Connect a turntable (MM) that has...

Owner Manual
Page 18
... page 17). 2 Make the V connection (see the illustration). 3 If you can use the AV receiver's remote controller to control your Onkyo components. • While Zone 2/3 is started on a component connected via V, while the AV receiver is on standby, the AV receiver will...RI Dock R L ANALOG AUDIO OUT Note • Use only V cables for connecting additional V-capable components. • Connect only Onkyo components to the manuals supplied with Onkyo components. • Some components have two V jacks. You must enter the appropriate remote control code first (➔ page 76). With...
... page 17). 2 Make the V connection (see the illustration). 3 If you can use the AV receiver's remote controller to control your Onkyo components. • While Zone 2/3 is started on a component connected via V, while the AV receiver is on standby, the AV receiver will...RI Dock R L ANALOG AUDIO OUT Note • Use only V cables for connecting additional V-capable components. • Connect only Onkyo components to the manuals supplied with Onkyo components. • Some components have two V jacks. You must enter the appropriate remote control code first (➔ page 76). With...

Owner Manual
Page 22
... step, you can enter other remote control codes. Remote Mode Setup With this step and terminates the initial setup. For further details, see the instruction manual provided with a verification prompt. 3 When prompted, use R/X to select one of the following options, and then press ENTER. `Yes, Continue: Performs the checkings. `No, Skip...
... step, you can enter other remote control codes. Remote Mode Setup With this step and terminates the initial setup. For further details, see the instruction manual provided with a verification prompt. 3 When prompted, use R/X to select one of the following options, and then press ENTER. `Yes, Continue: Performs the checkings. `No, Skip...

Owner Manual
Page 29
.... Note • The search function does not work . • If the message "No Item." This completes the Windows Media Player 11 configuration. See the instruction manual of the supported devices appears. 4 Select the AV receiver in the Home menu. 3 Use R/X/F/S to select a server, and then press ENTER. You can play the...
.... Note • The search function does not work . • If the message "No Item." This completes the Windows Media Player 11 configuration. See the instruction manual of the supported devices appears. 4 Select the AV receiver in the Home menu. 3 Use R/X/F/S to select a server, and then press ENTER. You can play the...

Owner Manual
Page 31
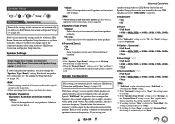
...depends on the country.) Tuning into a stereo FM station, the FM STEREO indicator lights as presets for quick selection. In this case, switch to manual tuning mode and listen to select either "AM" or "FM". TUNED AUTO FM STEREO Tip • Tuning into a station, the TUNED indicator ...favorite stations as shown. If you have entered the wrong number, you release the button. Turning On & Basic Operations ■ Manual tuning mode In manual tuning mode, FM stations will be impossible to AM/FM Radio This section describes the procedure of the radio station. You can retry...
...depends on the country.) Tuning into a stereo FM station, the FM STEREO indicator lights as presets for quick selection. In this case, switch to manual tuning mode and listen to select either "AM" or "FM". TUNED AUTO FM STEREO Tip • Tuning into a station, the TUNED indicator ...favorite stations as shown. If you have entered the wrong number, you release the button. Turning On & Basic Operations ■ Manual tuning mode In manual tuning mode, FM stations will be impossible to AM/FM Radio This section describes the procedure of the radio station. You can retry...
Owner Manual
Page 36
... error messages below may occur, so use an appropriate volume level. The number of speakers detected was detected. If this happens, THX recommends setting them manually. See also: • "Speaker Configuration" (➔ page 54) • "Speaker Distance" (➔ page 55) • "Level Calibration" (&#...measurement. This message appears if saving fails. Try saving again. Changing the Speaker Setup Manually You can manually make sure manually that if the volume is not detected. Refer to your Onkyo dealer. • Speaker Detect Error This message appears if a speaker is set ...
... error messages below may occur, so use an appropriate volume level. The number of speakers detected was detected. If this happens, THX recommends setting them manually. See also: • "Speaker Configuration" (➔ page 54) • "Speaker Distance" (➔ page 55) • "Level Calibration" (&#...measurement. This message appears if saving fails. Try saving again. Changing the Speaker Setup Manually You can manually make sure manually that if the volume is not detected. Refer to your Onkyo dealer. • Speaker Detect Error This message appears if a speaker is set ...
Owner Manual
Page 54
...speaker. Speaker Settings If you change one of the connected speakers after using Audyssey 2EQ Room Correction and Speaker Setup, please make sure manually that can specify which speakers are connected and a crossover frequency for example, speakers with an impedance of less than "None" is ...selected in "Front High", this setting is automatically set automatically by Audyssey 2EQ Room Correction and Speaker Setup function, or set them manually, which is automatically set up to 5.1 speakers in the main room. • Before you change the "Speakers Type (Front)" setting. ...
...speaker. Speaker Settings If you change one of the connected speakers after using Audyssey 2EQ Room Correction and Speaker Setup, please make sure manually that can specify which speakers are connected and a crossover frequency for example, speakers with an impedance of less than "None" is ...selected in "Front High", this setting is automatically set automatically by Audyssey 2EQ Room Correction and Speaker Setup function, or set them manually, which is automatically set up to 5.1 speakers in the main room. • Before you change the "Speakers Type (Front)" setting. ...

Owner Manual
Page 56
... settings have no effect. • If "Audyssey" is enabled, it is not transmitted via the HDMI connections, and can be used by your Onkyo AVR and can be selected (➔ page 54). ■ BGC ` Off ` On You can apply THX's Boundary Gain Compensation (BGC) to..., "25Hz", "40Hz", "63Hz", "100Hz", or "160Hz". • Low frequencies (e.g., 63Hz) affect bass sounds; "Surround Back" is set (➔ page 55). ■ Manual Equalizer ` On: You can adjust the equalizer for listeners sitting very close to "None" (➔ page 54). - En-56 Metadata Compatible mode should be set...
... settings have no effect. • If "Audyssey" is enabled, it is not transmitted via the HDMI connections, and can be used by your Onkyo AVR and can be selected (➔ page 54). ■ BGC ` Off ` On You can apply THX's Boundary Gain Compensation (BGC) to..., "25Hz", "40Hz", "63Hz", "100Hz", or "160Hz". • Low frequencies (e.g., 63Hz) affect bass sounds; "Surround Back" is set (➔ page 55). ■ Manual Equalizer ` On: You can adjust the equalizer for listeners sitting very close to "None" (➔ page 54). - En-56 Metadata Compatible mode should be set...

Owner Manual
Page 58
... be selected. ■ Dolby EX ` Auto: If the source signal contains a Dolby EX flag, the Dolby EX or THX Surround EX listening mode is used. ` Manual: You can select any available listening mode. The front high speakers are satisfied: - Note • If the "Surround Back" setting is set to "None" (➔...
... be selected. ■ Dolby EX ` Auto: If the source signal contains a Dolby EX flag, the Dolby EX or THX Surround EX listening mode is used. ` Manual: You can select any available listening mode. The front high speakers are satisfied: - Note • If the "Surround Back" setting is set to "None" (➔...

Owner Manual
Page 61
... cannot be used for the NET and USB input selectors. ` Zoom: ` Wide Zoom: Advanced Operations ■ Picture Mode*1*7 ` Custom: All settings can also be performed manually. ` Cinema: Select when the picture source is a movie or alike. ` Game: Select when the video source is processed in the same way as "Through". The...
... cannot be used for the NET and USB input selectors. ` Zoom: ` Wide Zoom: Advanced Operations ■ Picture Mode*1*7 ` Custom: All settings can also be performed manually. ` Cinema: Select when the picture source is a movie or alike. ` Game: Select when the video source is processed in the same way as "Through". The...

Owner Manual
Page 63
..., radio, cassette, cable, satellite, etc.) or PCM digital (CD, DVD, etc.) audio signal is played (DVD, etc.). ■ 2ch Source With this setting, you can manually set , and then use F/S to DTS. Listening Mode Preset Analog/PCM Mono/Multiplex Source 2ch Source Dolby D/Dolby D Plus/TrueHD DTS/DTS-ES/DTS-HD...
..., radio, cassette, cable, satellite, etc.) or PCM digital (CD, DVD, etc.) audio signal is played (DVD, etc.). ■ 2ch Source With this setting, you can manually set , and then use F/S to DTS. Listening Mode Preset Analog/PCM Mono/Multiplex Source 2ch Source Dolby D/Dolby D Plus/TrueHD DTS/DTS-ES/DTS-HD...

Owner Manual
Page 65
... the component, it is unclear whether the equipment is compatible or not. • If operation is not normal when set to the connected component's instruction manual for the on the AV receiver display. "Search..." → "(name)" → "RIHD On" When the AV receiver cannot receive the name of the connected component...
... the component, it is unclear whether the equipment is compatible or not. • If operation is not normal when set to the connected component's instruction manual for the on the AV receiver display. "Search..." → "(name)" → "RIHD On" When the AV receiver cannot receive the name of the connected component...

Owner Manual
Page 66
...: - however in the following cases, the power consumption can be sent to "On", resulting in standby mode. Refer to the user's manuals for which the HDMI Through function is enabled. ` Last: The HDMI Through function is activated on the connected component, the correct input source...the "Audio Selector" settings of whether the AV receiver is detected. You are watching a TV program. • Refer to the connected component's instruction manual for the first time. • If you want to listen to "Off". To stop the AV receiver's speakers producing sound, change the settings,...
...: - however in the following cases, the power consumption can be sent to "On", resulting in standby mode. Refer to the user's manuals for which the HDMI Through function is enabled. ` Last: The HDMI Through function is activated on the connected component, the correct input source...the "Audio Selector" settings of whether the AV receiver is detected. You are watching a TV program. • Refer to the connected component's instruction manual for the first time. • If you want to listen to "Off". To stop the AV receiver's speakers producing sound, change the settings,...

Owner Manual
Page 67
... Auto Standby function does not work when Zone 2/3 is used by default (i.e., DHCP is enabled, you can set to configure the AV receiver's network settings manually. This section explains how to "On", the ASb indicator lights and the AV receiver will appear on the AV receiver's display and OSD 30 seconds...
... Auto Standby function does not work when Zone 2/3 is used by default (i.e., DHCP is enabled, you can set to configure the AV receiver's network settings manually. This section explains how to "On", the ASb indicator lights and the AV receiver will appear on the AV receiver's display and OSD 30 seconds...


