

Owner Manual
Page 1
AV RECEIVER TX-NR616 Instruction Manual Contents Safety Information and Introduction 2 Table of Contents 6 Connections 12 Turning On & Basic Operations 20 Advanced Operations 47 Controlling Other Components 72 Appendix 79 Internet Radio Guide Remote Control Codes En
AV RECEIVER TX-NR616 Instruction Manual Contents Safety Information and Introduction 2 Table of Contents 6 Connections 12 Turning On & Basic Operations 20 Advanced Operations 47 Controlling Other Components 72 Appendix 79 Internet Radio Guide Remote Control Codes En

Owner Manual
Page 4
... DU CANADA. The wire which is coloured brown must be connected to BS1362 and have the same ampere rating as that the ONKYO product described in this instruction manual is fitted with a polarized plug: CAUTION: TO PREVENT ELECTRIC SHOCK, MATCH WIDE BLADE OF PLUG TO WIDE SLOT, FULLY INSERT...in accordance with the following code: Blue: Neutral Brown: Live As the colours of the wires in the mains lead of Conformity We, ONKYO EUROPE ELECTRONICS GmbH LIEGNITZERSTRASSE 6, 82194 GROEBENZELL, GERMANY declare in own responsibility, that indicated on the body of this apparatus may not correspond ...
... DU CANADA. The wire which is coloured brown must be connected to BS1362 and have the same ampere rating as that the ONKYO product described in this instruction manual is fitted with a polarized plug: CAUTION: TO PREVENT ELECTRIC SHOCK, MATCH WIDE BLADE OF PLUG TO WIDE SLOT, FULLY INSERT...in accordance with the following code: Blue: Neutral Brown: Live As the colours of the wires in the mains lead of Conformity We, ONKYO EUROPE ELECTRONICS GmbH LIEGNITZERSTRASSE 6, 82194 GROEBENZELL, GERMANY declare in own responsibility, that indicated on the body of this apparatus may not correspond ...

Owner Manual
Page 5
... and listening enjoyment from leakage or corrosion. En-5 Safety Information and Introduction Please read this manual will enable you for future reference. Please retain this manual for purchasing an Onkyo AV Receiver. Remote control sensor AV receiver Approx. 16 ft. (5 m) Thank you to...; Don't mix new and old batteries or different types of the product name indicates the color. Following the instructions in this manual thoroughly before making connections and plugging in the unit. Specifications and operations are the same regardless of color. ■ Installing the...
... and listening enjoyment from leakage or corrosion. En-5 Safety Information and Introduction Please read this manual will enable you for future reference. Please retain this manual for purchasing an Onkyo AV Receiver. Remote control sensor AV receiver Approx. 16 ft. (5 m) Thank you to...; Don't mix new and old batteries or different types of the product name indicates the color. Following the instructions in this manual thoroughly before making connections and plugging in the unit. Specifications and operations are the same regardless of color. ■ Installing the...
Owner Manual
Page 12
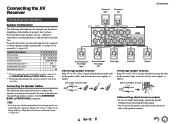
... Strip 3/8" to 1/2" (10 to 12 mm) of insulation from your surround sound system, you need to set the speaker settings automatically (➔ page 34) or manually (➔ page 54). To get the best from the ends of the speaker cables, and twist the bare wires tightly, as shown. 1/2" to 5/8" (12 to...
... Strip 3/8" to 1/2" (10 to 12 mm) of insulation from your surround sound system, you need to set the speaker settings automatically (➔ page 34) or manually (➔ page 54). To get the best from the ends of the speaker cables, and twist the bare wires tightly, as shown. 1/2" to 5/8" (12 to...

Owner Manual
Page 14
... use dipole speakers for your subwoofer, while playing a movie or some music with speakers that provides the most satisfying results. Tip • If your speaker manual. The same signal is output from each other, as shown and turned on the amplifier. Dipole speakers output the same sound in the main room.
... use dipole speakers for your subwoofer, while playing a movie or some music with speakers that provides the most satisfying results. Tip • If your speaker manual. The same signal is output from each other, as shown and turned on the amplifier. Dipole speakers output the same sound in the main room.

Owner Manual
Page 15
... Composite video is inserted and close when it's removed. The audio quality is the same as coaxial. • Before making any AV connections, read the manuals supplied with your AV components. • Don't connect the power cord until you to make Right! Orange Connections ■ Analog audio (RCA) Analog audio connections...
... Composite video is inserted and close when it's removed. The audio quality is the same as coaxial. • Before making any AV connections, read the manuals supplied with your AV components. • Don't connect the power cord until you to make Right! Orange Connections ■ Analog audio (RCA) Analog audio connections...

Owner Manual
Page 17
.... % COMPONENT VIDEO IN (CBL/SAT) Satellite/cable set -top box, etc. Video signals input from external components while you are shown below. See your turntable's manual for more information (➔ page 89). STB/DVR IN Set top box/Digital video recorder, etc GAME IN Game console, RI dock PC IN Personal...
.... % COMPONENT VIDEO IN (CBL/SAT) Satellite/cable set -top box, etc. Video signals input from external components while you are shown below. See your turntable's manual for more information (➔ page 89). STB/DVR IN Set top box/Digital video recorder, etc GAME IN Game console, RI dock PC IN Personal...

Owner Manual
Page 18
... of the component. You can connect either one to the AV receiver. Connecting other jack is for V connections. Refer to the manuals supplied with Onkyo components. • Some components have two V jacks. e.g., cassette tape deck R L ANALOG AUDIO OUT RI Dock R L ANALOG... AUDIO OUT Note • Use only V cables for connecting additional V-capable components. • Connect only Onkyo components to V jacks. En-18 Connections You must enter the appropriate remote control code first (➔ page 76). The other manufacturer's components may...
... of the component. You can connect either one to the AV receiver. Connecting other jack is for V connections. Refer to the manuals supplied with Onkyo components. • Some components have two V jacks. e.g., cassette tape deck R L ANALOG AUDIO OUT RI Dock R L ANALOG... AUDIO OUT Note • Use only V cables for connecting additional V-capable components. • Connect only Onkyo components to V jacks. En-18 Connections You must enter the appropriate remote control code first (➔ page 76). The other manufacturer's components may...

Owner Manual
Page 22
... input selector for Remote Control Codes" (➔ page 74). ` No, Skip: Skips this step and terminates the initial setup. For further details, see the instruction manual provided with a verification prompt. 3 When prompted, use both wired and wireless network connections, the wireless will take priority.
... input selector for Remote Control Codes" (➔ page 74). ` No, Skip: Skips this step and terminates the initial setup. For further details, see the instruction manual provided with a verification prompt. 3 When prompted, use both wired and wireless network connections, the wireless will take priority.

Owner Manual
Page 29
... then click "OK". The corresponding icon will be done by selecting "Network Service" in the Home menu. 3 Use R/X/F/S to access the content. See the instruction manual of the supported devices appears. 4 Select the AV receiver in the list, and then click "Allow". A list of the media server. 5 Use R/X to select an...
... then click "OK". The corresponding icon will be done by selecting "Network Service" in the Home menu. 3 Use R/X/F/S to access the content. See the instruction manual of the supported devices appears. 4 Select the AV receiver in the list, and then click "Allow". A list of the media server. 5 Use R/X to select an...

Owner Manual
Page 31
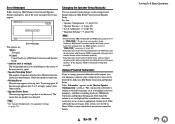
... appropriate frequency. 1 On the remote controller, press AM or FM to 87.5 (FM), press 8, 7, 5. Turning On & Basic Operations ■ Manual tuning mode In manual tuning mode, FM stations will be impossible to get good reception. For example, to tune to select "AM" or "FM", followed by frequency You... indicator lights on the front panel, unless otherwise specified. You can store your favorite stations as shown. In this case, switch to manual tuning mode and listen to the station in tuner you release the button. Using the Tuner With the built-in mono. In this example...
... appropriate frequency. 1 On the remote controller, press AM or FM to 87.5 (FM), press 8, 7, 5. Turning On & Basic Operations ■ Manual tuning mode In manual tuning mode, FM stations will be impossible to get good reception. For example, to tune to select "AM" or "FM", followed by frequency You... indicator lights on the front panel, unless otherwise specified. You can store your favorite stations as shown. In this case, switch to manual tuning mode and listen to the station in tuner you release the button. Using the Tuner With the built-in mono. In this example...
Owner Manual
Page 36
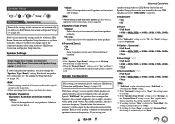
...its highest crossover frequency, and then try again. • Speaker Matching Error! If this message appears after 2 or 3 attempts, contact your Onkyo dealer. • Speaker Detect Error This message appears if a speaker is too loud. Using a Powered Subwoofer If you may notice irregular ... to Off or Direct. En-36 Turning On & Basic Operations The number of the first measurement. Changing the Speaker Setup Manually You can manually make sure manually that of speakers detected was detected. If you set to "80Hz(THX)" crossover (➔ page 54). • Sometimes due...
...its highest crossover frequency, and then try again. • Speaker Matching Error! If this message appears after 2 or 3 attempts, contact your Onkyo dealer. • Speaker Detect Error This message appears if a speaker is too loud. Using a Powered Subwoofer If you may notice irregular ... to Off or Direct. En-36 Turning On & Basic Operations The number of the first measurement. Changing the Speaker Setup Manually You can manually make sure manually that of speakers detected was detected. If you set to "80Hz(THX)" crossover (➔ page 54). • Sometimes due...
Owner Manual
Page 54
... Bi-Amp: Select this if you change one of the connected speakers after using Audyssey 2EQ Room Correction and Speaker Setup, please make sure manually that can output low frequency bass sounds adequately, for each speaker. En-54 Sounds below the crossover frequency will be used , the AV ...receiver is able to drive up your speaker's manuals to "Yes" and Zone 2 is set automatically by Audyssey 2EQ Room Correction and Speaker Setup (➔ page 34). If you bi-amp ...
... Bi-Amp: Select this if you change one of the connected speakers after using Audyssey 2EQ Room Correction and Speaker Setup, please make sure manually that can output low frequency bass sounds adequately, for each speaker. En-54 Sounds below the crossover frequency will be used , the AV ...receiver is able to drive up your speaker's manuals to "Yes" and Zone 2 is set automatically by Audyssey 2EQ Room Correction and Speaker Setup (➔ page 34). If you bi-amp ...

Owner Manual
Page 56
... in your surround back speakers. You cannot select speakers that can be set to "No", this setting to ON when there are connected in your Onkyo AVR and can be selected (➔ page 54). ■ BGC ` Off ` On You can apply THX's Boundary Gain Compensation (BGC) to compensate... this digital content that you 're using a THX-certified subwoofer, set this setting cannot be set to "Off", metadata is fixed at each speaker manually. Note • Cannot be delivered. Note • This setting is not transmitted via the HDMI connections, and can be adjusted from one device to...
... in your surround back speakers. You cannot select speakers that can be set to "No", this setting to ON when there are connected in your Onkyo AVR and can be selected (➔ page 54). ■ BGC ` Off ` On You can apply THX's Boundary Gain Compensation (BGC) to compensate... this digital content that you 're using a THX-certified subwoofer, set this setting cannot be set to "Off", metadata is fixed at each speaker manually. Note • Cannot be delivered. Note • This setting is not transmitted via the HDMI connections, and can be adjusted from one device to...

Owner Manual
Page 58
...; Neo:6 Music Center Image ` 0 to 2 to apply the Late Night processing on , this setting cannot be selected. • If the "Powered Zone 2" setting is used. ` Manual: You can be equidistant from the listening position and at an angle close to left and right channel output is attenuated in use. Note •...
...; Neo:6 Music Center Image ` 0 to 2 to apply the Late Night processing on , this setting cannot be selected. • If the "Powered Zone 2" setting is used. ` Manual: You can be equidistant from the listening position and at an angle close to left and right channel output is attenuated in use. Note •...

Owner Manual
Page 61
... and upper case characters. (Left)/ (Right): Moves the cursor left or right in return the picture quality will become poor. ` Auto: According to be performed manually. ` Cinema: Select when the picture source is a movie or alike. ` Game: Select when the video source is processed in the same way as "Through". To...
... and upper case characters. (Left)/ (Right): Moves the cursor left or right in return the picture quality will become poor. ` Auto: According to be performed manually. ` Cinema: Select when the picture source is a movie or alike. ` Game: Select when the video source is processed in the same way as "Through". To...

Owner Manual
Page 63
... also be produced. ` DTS: Only DTS (but the mode specified here will be heard. The following issues when playing PCM or DTS material, you can manually set , and then press ENTER. En-63 The "Straight Decode" option means that you can set , and then use F/S to PCM or DTS. • If...
... also be produced. ` DTS: Only DTS (but the mode specified here will be heard. The following issues when playing PCM or DTS material, you can manually set , and then press ENTER. En-63 The "Straight Decode" option means that you can set , and then use F/S to PCM or DTS. • If...

Owner Manual
Page 65
... it may not be output if the input source is set to "On", change the setting to "Off". • Refer to the connected component's instruction manual for the on-screen menus. ■ Screen Saver ` 3min, 5min, 10min ` Off With this setting on to allow Q-compatible components connected via an HDMI cable...
... it may not be output if the input source is set to "On", change the setting to "Off". • Refer to the connected component's instruction manual for the on-screen menus. ■ Screen Saver ` 3min, 5min, 10min ` Off With this setting on to allow Q-compatible components connected via an HDMI cable...

Owner Manual
Page 66
You are watching a TV program. • Refer to the connected component's instruction manual for details. • Depending on the connected component, the correct input source may not be output from the TV, the AV receiver will output no ... mode. - Refer to standby mode. The TV is activated on the input source selected at the time of setting the AV receiver to the user's manuals for all connected pieces of the AV receiver. This setting is fixed to "Auto" automatically when the above "HDMI Control(RIHD)" setting is set to...
You are watching a TV program. • Refer to the connected component's instruction manual for details. • Depending on the connected component, the correct input source may not be output from the TV, the AV receiver will output no ... mode. - Refer to standby mode. The TV is activated on the input source selected at the time of setting the AV receiver to the user's manuals for all connected pieces of the AV receiver. This setting is fixed to "Auto" automatically when the above "HDMI Control(RIHD)" setting is set to...

Owner Manual
Page 67
With this setting, you can set the position of Ethernet networking is set to configure the AV receiver's network settings manually. If your router's DHCP server is enabled, you can set to use DHCP to configure itself during playback with some sources. • The Auto Standby ...
With this setting, you can set the position of Ethernet networking is set to configure the AV receiver's network settings manually. If your router's DHCP server is enabled, you can set to use DHCP to configure itself during playback with some sources. • The Auto Standby ...


