Owner Manual
Page 5
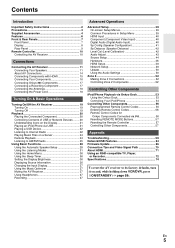
... the AV Receiver 11 Connecting Your Speakers 11 About AV Connections 14 Connecting Components with HDMI 15 Connecting Your Components 16 Connecting Onkyo V Components 17 Connecting a Recording Component 17 Connecting the Antennas 18 Connecting the Power Cord 18 Turning On & Basic Operations...Resetting REMOTE MODE Buttons 57 Resetting the Remote Controller 57 Controlling Other Components 57 Appendix Troubleshooting 59 Network/USB Features 64 Firmware Update 66 Connection Tips and Video Signal Path 70 About HDMI 71 Using an RIHD-compatible TV, Player, or Recorder 72 ...
... the AV Receiver 11 Connecting Your Speakers 11 About AV Connections 14 Connecting Components with HDMI 15 Connecting Your Components 16 Connecting Onkyo V Components 17 Connecting a Recording Component 17 Connecting the Antennas 18 Connecting the Power Cord 18 Turning On & Basic Operations...Resetting REMOTE MODE Buttons 57 Resetting the Remote Controller 57 Controlling Other Components 57 Appendix Troubleshooting 59 Network/USB Features 64 Firmware Update 66 Connection Tips and Video Signal Path 70 About HDMI 71 Using an RIHD-compatible TV, Player, or Recorder 72 ...
Owner Manual
Page 39
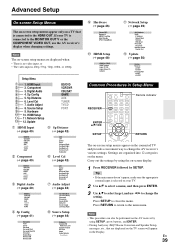
...LipSync L Network Setup (➔ page 49) MAC Address DHCP IP Address Subnet Mask Gateway DNS Server Proxy URL Proxy Port Network Control Control Port M Update (➔ page 50) Version Receiver via NET via USB Universal Port via NET via USB Common Procedures in the Display. Source Setup J 9. Settings... ENTER R/X/F/S SETUP RETURN The on-screen setup menus appear on the connected TV and provide a convenient way to change the setting. Digital Audio E 4. Update BD/DVD VCR/DVR CBL/SAT GAME AUX TUNER TV/CD PORT B HDMI Input (➔ page 40) F Sp Distance (➔ page 42) BD...
...LipSync L Network Setup (➔ page 49) MAC Address DHCP IP Address Subnet Mask Gateway DNS Server Proxy URL Proxy Port Network Control Control Port M Update (➔ page 50) Version Receiver via NET via USB Universal Port via NET via USB Common Procedures in the Display. Source Setup J 9. Settings... ENTER R/X/F/S SETUP RETURN The on-screen setup menus appear on the connected TV and provide a convenient way to change the setting. Digital Audio E 4. Update BD/DVD VCR/DVR CBL/SAT GAME AUX TUNER TV/CD PORT B HDMI Input (➔ page 40) F Sp Distance (➔ page 42) BD...
Owner Manual
Page 50
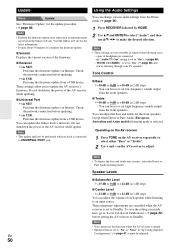
...is connected to select either of headphones is posted on the Onkyo web site. Check the network connection before setting the AV receiver to "Level Cal (Level Calibration)" (➔ page 42) before updating. `via USB: Performs the firmware update from a USB device. To save the setting you made here..., go to Standby. Visit the Onkyo web site for the latest information. • It takes about 30 minutes to ...
...is connected to select either of headphones is posted on the Onkyo web site. Check the network connection before setting the AV receiver to "Level Cal (Level Calibration)" (➔ page 42) before updating. `via USB: Performs the firmware update from a USB device. To save the setting you made here..., go to Standby. Visit the Onkyo web site for the latest information. • It takes about 30 minutes to ...

Owner Manual
Page 53
... UP-HT1 (North American models)/UP-DT1 (European, Australian and Asian models) with the iPod/iPhone still connected to this unit via Onkyo Dock Using the Onkyo Dock Dock is connected, the power consumption on standby mode slightly increases. Note • To use your iPod/iPhone models Alarm Clock... another input source, the AV receiver will automatically turn on your iPod/iPhone and the AV receiver at : http://www.onkyo.com Before using the Onkyo Dock components, update your iPod/iPhone when the AV receiver is fed to On or Standby. Using the AV receiver's Remote Controller You can...
... UP-HT1 (North American models)/UP-DT1 (European, Australian and Asian models) with the iPod/iPhone still connected to this unit via Onkyo Dock Using the Onkyo Dock Dock is connected, the power consumption on standby mode slightly increases. Note • To use your iPod/iPhone models Alarm Clock... another input source, the AV receiver will automatically turn on your iPod/iPhone and the AV receiver at : http://www.onkyo.com Before using the Onkyo Dock components, update your iPod/iPhone when the AV receiver is fed to On or Standby. Using the AV receiver's Remote Controller You can...
Owner Manual
Page 64
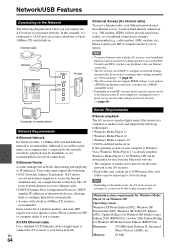
...8226; A router with a built-in . Although it 's connected to a LAN port on a router, which has a 4-port 100Base-TX switch built-in 100Base-TX switch is recommended to use wired connections. ■ Ethernet Router A router manages the network, data-routing and supplying of your computer is already...Windows XP Home Edition (SP2), Windows XP Professional (SP2), Windows XP Tablet PC Edition (SP2), Update Rollup 2 for Windows XP Media Center Edition 2005 (KB900325), October 2006 Update Rollup for the AV receiver (➔ page 49). Minimum system requirements for Windows Media Player 11 on...
...8226; A router with a built-in . Although it 's connected to a LAN port on a router, which has a 4-port 100Base-TX switch built-in 100Base-TX switch is recommended to use wired connections. ■ Ethernet Router A router manages the network, data-routing and supplying of your computer is already...Windows XP Home Edition (SP2), Windows XP Professional (SP2), Windows XP Tablet PC Edition (SP2), Update Rollup 2 for Windows XP Media Center Edition 2005 (KB900325), October 2006 Update Rollup for the AV receiver (➔ page 49). Minimum system requirements for Windows Media Player 11 on...
Owner Manual
Page 66
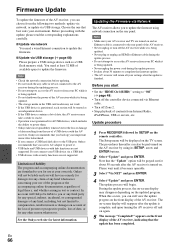
...devices with hub functions are furnished to power them. • Onkyo takes no responsibility whatsoever for the loss or damage of data resulting from the following two methods: update via network, or update via USB storage. Onkyo recommends that you back up your important music files beforehand. &#...8226; If you connect a USB hard disk drive to the USB port, Onkyo recommends that the update has been completed. Limitation of liability The program and accompanying online documentation are not supported. The Setup menu will be displayed...
...devices with hub functions are furnished to power them. • Onkyo takes no responsibility whatsoever for the loss or damage of data resulting from the following two methods: update via network, or update via USB storage. Onkyo recommends that you back up your important music files beforehand. &#...8226; If you connect a USB hard disk drive to the USB port, Onkyo recommends that the update has been completed. Limitation of liability The program and accompanying online documentation are not supported. The Setup menu will be displayed...
Owner Manual
Page 67
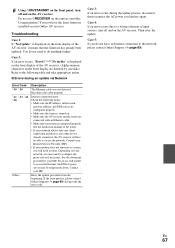
...following table and take appropriate action. ■ Errors during the update process, disconnect then reconnect the AC power cord and try again. Others Retry the update procedure from the beginning. If the error persists, please contact Onkyo Support (➔ page 69) and provide the error code.... denoted by your ISP. See the document provided by asterisks.) Refer to the network, please contact Onkyo Support (➔ page 69). Contact your ISP. Case 3: If an error occurs during an update via Network Error Code Description *-10, *-20 The Ethernet cable was not detected.
...following table and take appropriate action. ■ Errors during the update process, disconnect then reconnect the AC power cord and try again. Others Retry the update procedure from the beginning. If the error persists, please contact Onkyo Support (➔ page 69) and provide the error code.... denoted by your ISP. See the document provided by asterisks.) Refer to the network, please contact Onkyo Support (➔ page 69). Contact your ISP. Case 3: If an error occurs during an update via Network Error Code Description *-10, *-20 The Ethernet cable was not detected.
Owner Manual
Page 68
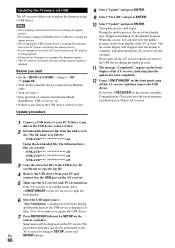
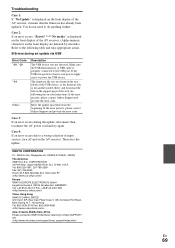
...in the USB device, remove it is being updated. • It takes about 30 minutes to copy the zip file. 4 Remove the USB device from the Onkyo web site. Be careful not to complete the firmware update. • The AV receiver will reappear after the update is finished. It takes 20 to 30 ...seconds to update the firmware using its SETUP, arrow and En ENTER buttons. 68...
...in the USB device, remove it is being updated. • It takes about 30 minutes to copy the zip file. 4 Remove the USB device from the Onkyo web site. Be careful not to complete the firmware update. • The AV receiver will reappear after the update is finished. It takes 20 to 30 ...seconds to update the firmware using its SETUP, arrow and En ENTER buttons. 68...
Owner Manual
Page 69
... table and take appropriate action. ■ Errors during the update, disconnect then reconnect the AC power cord and try again. ONKYO CORPORATION 2-1, Nisshin-cho, Neyagawa-shi, OSAKA 572-8540, JAPAN The Americas ONKYO U.S.A. Troubleshooting Case 1: If "No Update" is displayed on the front display of the AV receiver...properly connected to do not need to the USB port. If the error persists, please contact Onkyo Support and provide the error code. Case 3: If an error occurs during an update via USB Error Code *-10, *-20 *-14 Others Description The USB device was not ...
... table and take appropriate action. ■ Errors during the update, disconnect then reconnect the AC power cord and try again. ONKYO CORPORATION 2-1, Nisshin-cho, Neyagawa-shi, OSAKA 572-8540, JAPAN The Americas ONKYO U.S.A. Troubleshooting Case 1: If "No Update" is displayed on the front display of the AV receiver...properly connected to do not need to the USB port. If the error persists, please contact Onkyo Support and provide the error code. Case 3: If an error occurs during an update via USB Error Code *-10, *-20 *-14 Others Description The USB device was not ...


