Owner Manual
Page 6
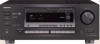
... Audio Connection Cable OUTPUT (PLAY) INPUT (REC) Tape deck / MD recorder / DAT 6 Doing so may degrade sound quality. Optial fiber cable TX-DS777 / TX-DS676 DIGITAL INPUT R AMP IN COAXIAL 1 COAXIAL 2 OPTICAL 1 FRONT PRE OUT FRONT SUB WOOFER CENTER OPTICAL 2 SURROUND ...IN VIDEO-2 VIDEO-3 OUT IN IN ANTENNA AM FM 75 DVD IN (REC) OUT TAPE MONITOR OUT V S IN (PLAY) R L VIDEO S VIDEO OSD SELECTOR TX-DS777 SURROUND SPEAKERS FRONT SPEAKERS A R L R L CENTER SPEAKER R L FRONT SPEAKERS B AC OUTLETS SWITCHED TOTAL 100W MAX. nections. • Insert the plugs ...
... Audio Connection Cable OUTPUT (PLAY) INPUT (REC) Tape deck / MD recorder / DAT 6 Doing so may degrade sound quality. Optial fiber cable TX-DS777 / TX-DS676 DIGITAL INPUT R AMP IN COAXIAL 1 COAXIAL 2 OPTICAL 1 FRONT PRE OUT FRONT SUB WOOFER CENTER OPTICAL 2 SURROUND ...IN VIDEO-2 VIDEO-3 OUT IN IN ANTENNA AM FM 75 DVD IN (REC) OUT TAPE MONITOR OUT V S IN (PLAY) R L VIDEO S VIDEO OSD SELECTOR TX-DS777 SURROUND SPEAKERS FRONT SPEAKERS A R L R L CENTER SPEAKER R L FRONT SPEAKERS B AC OUTLETS SWITCHED TOTAL 100W MAX. nections. • Insert the plugs ...

Owner Manual
Page 7
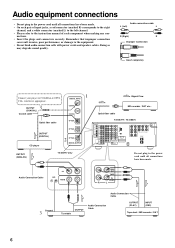
...DIGITAL OUTPUT connector (TX-DS777 only) If you have Onkyo z connectors. With some players, connecting a ground wire results in use the remote controller of the DVD player or MD recorder. 7 When not in larger noise. REMOTE CONTROL Worldwide and European models U.S.A. TX-DS777/TX-DS676 DIGITAL INPUT R ..., number, and total capacity of purchase. Make sure that is designed for use the remote controller for clear and dynamic sound play. • This unit provides four digital input connectors to this receiver and the connected audio devices. DIGITAL INPUT connectors...
...DIGITAL OUTPUT connector (TX-DS777 only) If you have Onkyo z connectors. With some players, connecting a ground wire results in use the remote controller of the DVD player or MD recorder. 7 When not in larger noise. REMOTE CONTROL Worldwide and European models U.S.A. TX-DS777/TX-DS676 DIGITAL INPUT R ..., number, and total capacity of purchase. Make sure that is designed for use the remote controller for clear and dynamic sound play. • This unit provides four digital input connectors to this receiver and the connected audio devices. DIGITAL INPUT connectors...

Owner Manual
Page 10
..., place a subwoofer. Left and Right surround speakers • Place these three speakers at the listening position. Connecting speakers The TX-DS777/676 allows you use a THX speaker system that is certified by consulting the instruction manuals that their height is aimed at...Left front speakers • Center speaker Produces a rich sound image by serving as Onkyo HTS SYSTEM-2). Minimum speaker configuration for surround sound playback: • Right and Left front speakers • Right and Left surround speakers The sound recorded for the center speaker and the subwoofer will be...
..., place a subwoofer. Left and Right surround speakers • Place these three speakers at the listening position. Connecting speakers The TX-DS777/676 allows you use a THX speaker system that is certified by consulting the instruction manuals that their height is aimed at...Left front speakers • Center speaker Produces a rich sound image by serving as Onkyo HTS SYSTEM-2). Minimum speaker configuration for surround sound playback: • Right and Left front speakers • Right and Left surround speakers The sound recorded for the center speaker and the subwoofer will be...

Owner Manual
Page 11
Note: To prevent damage to connect a second pair of front speakers. Center Speaker Surround Speaker R ch. REMOTE CONTROL TX-DS777/TX-DS676 Front SpeakerA L ch. Connecting the speaker cable 1. Insert wire 4. Screw No! SURROUND SPEAKERS FRONT SPEAKERS A R L R L CENTER SPEAKER ...OUT TAPE MONITOR OUT V S AV RECEIVER MODEL NO. Connecting speakers • This receiver is designed to produce optimum sound quality when speakers with appropriate impedances for the connections. Please check the following information and choose speakers with impedances within ...
Note: To prevent damage to connect a second pair of front speakers. Center Speaker Surround Speaker R ch. REMOTE CONTROL TX-DS777/TX-DS676 Front SpeakerA L ch. Connecting the speaker cable 1. Insert wire 4. Screw No! SURROUND SPEAKERS FRONT SPEAKERS A R L R L CENTER SPEAKER ...OUT TAPE MONITOR OUT V S AV RECEIVER MODEL NO. Connecting speakers • This receiver is designed to produce optimum sound quality when speakers with appropriate impedances for the connections. Please check the following information and choose speakers with impedances within ...
Owner Manual
Page 15
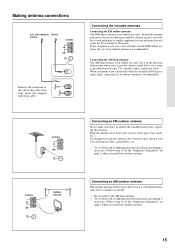
Making antenna connections U.S. Put it with push pins or similar implements in the position that you receive the clearest sound. Keep it in the direction and position where you follow the considerations below regarding the location. Extend the antenna and move it well away from ...
Making antenna connections U.S. Put it with push pins or similar implements in the position that you receive the clearest sound. Keep it in the direction and position where you follow the considerations below regarding the location. Extend the antenna and move it well away from ...
Owner Manual
Page 16
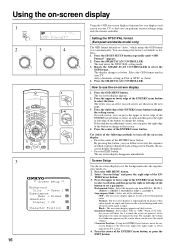
... -screen display disappears immediately. When set to turn off the on-screen display. • Press the center of the operation every time you increase the sound volume. For example, the volume level indicator appears on the screen when you operate the unit. Press the SP/SYS SETUP button repeatedly until "OSD...
... -screen display disappears immediately. When set to turn off the on-screen display. • Press the center of the operation every time you increase the sound volume. For example, the volume level indicator appears on the screen when you operate the unit. Press the SP/SYS SETUP button repeatedly until "OSD...
Owner Manual
Page 17
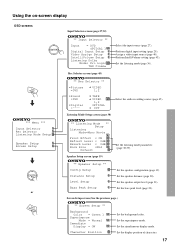
... 20). Assign a video input source (page 40). Perform IntelliVolume setting (page 43). Set the listening mode (page 36). ** Rec Selector ** •Picture =DVD VIDEO 1,2 •Sound =DVD •Digital =---- Set the speaker output level (page 21). Set the simultaneous display mode. Perform digital input setting (page 29). Set the bass peak...
... 20). Assign a video input source (page 40). Perform IntelliVolume setting (page 43). Set the listening mode (page 36). ** Rec Selector ** •Picture =DVD VIDEO 1,2 •Sound =DVD •Digital =---- Set the speaker output level (page 21). Set the simultaneous display mode. Perform digital input setting (page 29). Set the bass peak...
Owner Manual
Page 21
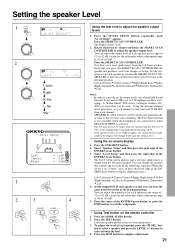
... output level. appears. Each time you read 75 dB SPL from the speaker that produces a test tone changes as the test tone starts sounding. A Radio Shack® SPL meter (catalogue number 3302055) or equivalent can adjust the output level of each channel so that you press ... = 0dB) 1 2 3 4 Using the test tone to complete adjustment. 21 Press the TEST button. buttons to correctly set the output levels, use a hand-held Sound Pressure Level meter (SPL), set each speaker in the range of the ENTER/Cursor button to C-Weighting and Slow averaging. Left (Left front) Center (Center...
... output level. appears. Each time you read 75 dB SPL from the speaker that produces a test tone changes as the test tone starts sounding. A Radio Shack® SPL meter (catalogue number 3302055) or equivalent can adjust the output level of each channel so that you press ... = 0dB) 1 2 3 4 Using the test tone to complete adjustment. 21 Press the TEST button. buttons to correctly set the output levels, use a hand-held Sound Pressure Level meter (SPL), set each speaker in the range of the ENTER/Cursor button to C-Weighting and Slow averaging. Left (Left front) Center (Center...

Owner Manual
Page 22
...Bass Peak Level Manager is a registered trademark of Lucasfilm LTD. Note: • Allowing the speakers to produce distorted sound for a long time may cause damage to the speakers. • To disable the bass peak level limiter, select ... SMART SCAN CONTROLLER to select "Yes" or "No." Gently rotate the SMART SCAN CONTROLLER clockwise and, just before sound is output and "Turn SSC Up" appears. 4. If you select "Yes" and then press the SMART SCAN ...SPEAKERS A Setting the bass peak level (Bass Peak Level Manager* TX-DS777 only) To prevent damage to your subwoofer, you can set -
...Bass Peak Level Manager is a registered trademark of Lucasfilm LTD. Note: • Allowing the speakers to produce distorted sound for a long time may cause damage to the speakers. • To disable the bass peak level limiter, select ... SMART SCAN CONTROLLER to select "Yes" or "No." Gently rotate the SMART SCAN CONTROLLER clockwise and, just before sound is output and "Turn SSC Up" appears. 4. If you select "Yes" and then press the SMART SCAN ...SPEAKERS A Setting the bass peak level (Bass Peak Level Manager* TX-DS777 only) To prevent damage to your subwoofer, you can set -
Owner Manual
Page 23
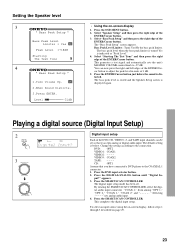
... VOLUME control knob to the connection. CD: OPT1 Assume that it accepts analog or digital audio input. Press the ENTER/Cursor button just before the sound is displayed again. Press the DIGITAL/ANALOG button until "Digital In- Press the SMART SCAN CONTROLLER. You can be set . DVD: OPT2 VIDEO1: COAX1 VIDEO2... the Speaker level 3 * Bass Peak Setup * Bass Peak Level Limiter = Yes Peak Level =+18dB Starting The Test Tone 4 * Bass Peak Setup * 1.Turn Volume Up. 2.When Sound Distorts. 3.Press ENTER.
... VOLUME control knob to the connection. CD: OPT1 Assume that it accepts analog or digital audio input. Press the ENTER/Cursor button just before the sound is displayed again. Press the DIGITAL/ANALOG button until "Digital In- Press the SMART SCAN CONTROLLER. You can be set . DVD: OPT2 VIDEO1: COAX1 VIDEO2... the Speaker level 3 * Bass Peak Setup * Bass Peak Level Limiter = Yes Peak Level =+18dB Starting The Test Tone 4 * Bass Peak Setup * 1.Turn Volume Up. 2.When Sound Distorts. 3.Press ENTER.
Owner Manual
Page 26
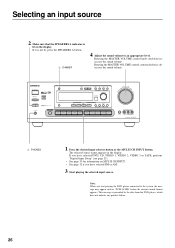
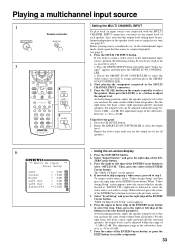
... VIDEO-3 VIDEO-4 TAPE FM AM PHONO C D DOWN MASTER VOLUME UP VIDEO 4/VIDEO CAM INPUT S VIDEO VIDEO L AUDIO R(MONO) AV RECEIVER TX-DS777 4 PHONES 1. Note: When you have selected FM or AM. 3. Start playing the selected input source. Press the desired input selector button or... the MULTI CH INPUT button. Rotating the MASTER VOLUME control knob clockwise increases the sound volume. The selected source name appears on MULTI CH INPUT. • See page 32 if you have selected DVD, CD, VIDEO ...
... VIDEO-3 VIDEO-4 TAPE FM AM PHONO C D DOWN MASTER VOLUME UP VIDEO 4/VIDEO CAM INPUT S VIDEO VIDEO L AUDIO R(MONO) AV RECEIVER TX-DS777 4 PHONES 1. Note: When you have selected FM or AM. 3. Start playing the selected input source. Press the desired input selector button or... the MULTI CH INPUT button. Rotating the MASTER VOLUME control knob clockwise increases the sound volume. The selected source name appears on MULTI CH INPUT. • See page 32 if you have selected DVD, CD, VIDEO ...
Owner Manual
Page 27
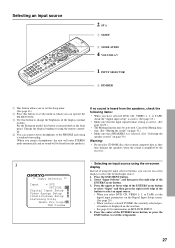
... on-screen display Instead of the ENTER/Cursor button. 3. Press the center of the display (normal or dim). Cancel the Muting function. (See "Muting the sound" on page 31.) • Make sure that SPEAKERS A is selected. (See "Selecting the speaker system" on the front panel. Press the upper or lower ...the button to select an input source. • When you select DVD, CD, VIDEO 1- 3, or TAPE, set the mode in which you can operate the TX-DS777/676. 3 Use this button to set the digital input parameters on the Digital Input Setup screen. (See page 29.) • When you have selected...
... on-screen display Instead of the ENTER/Cursor button. 3. Press the center of the display (normal or dim). Cancel the Muting function. (See "Muting the sound" on page 31.) • Make sure that SPEAKERS A is selected. (See "Selecting the speaker system" on the front panel. Press the upper or lower ...the button to select an input source. • When you select DVD, CD, VIDEO 1- 3, or TAPE, set the mode in which you can operate the TX-DS777/676. 3 Use this button to set the digital input parameters on the Digital Input Setup screen. (See page 29.) • When you have selected...
Owner Manual
Page 28
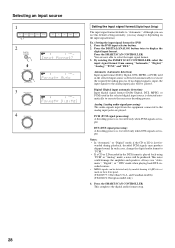
...DTS format is detected automatically to the analog input jacks will be produced. This noise could damage the amplifier and speakers. and Canadian models) (TX-DS676: European model only) 4. Press the DVD input selector button. 2. DTS (DTS signal processing) A decoding process is executed only when PCM ..." DTS" mode when playing back DTS-encoded sources. • MPEG signals can use this default setting normally, you may produce skipped sound. Press the DIGITAL/ANALOG button twice to execute the required decoding process. In such cases, change it depending on their front panel...
...DTS format is detected automatically to the analog input jacks will be produced. This noise could damage the amplifier and speakers. and Canadian models) (TX-DS676: European model only) 4. Press the DVD input selector button. 2. DTS (DTS signal processing) A decoding process is executed only when PCM ..." DTS" mode when playing back DTS-encoded sources. • MPEG signals can use this default setting normally, you may produce skipped sound. Press the DIGITAL/ANALOG button twice to execute the required decoding process. In such cases, change it depending on their front panel...
Owner Manual
Page 31
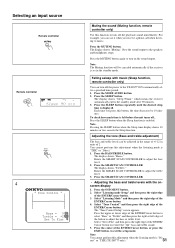
...SLEEP STEREO AUTO BASS/ TREBLE 4 * Tone Control * Bass = 0 Treble = +2 Set To Flat Muting the sound (Muting function, remote controller only) Use this function to turn off the power to the TX-DS777/676 automatically after 90 minutes. 3. Press the MUTING button. Press the MODE AUDIO button. 2. To check how... Flat" and then press the right edge of the ENTER/Cursor button. Select "Set to restore the "flat" bass and treble sound. 5. rect" or "THX (TX-DS777 only)." The display shows "Muting." Press the SLEEP button repeatedly until the desired sleep time is left edge of the ENTER...
...SLEEP STEREO AUTO BASS/ TREBLE 4 * Tone Control * Bass = 0 Treble = +2 Set To Flat Muting the sound (Muting function, remote controller only) Use this function to turn off the power to the TX-DS777/676 automatically after 90 minutes. 3. Press the MUTING button. Press the MODE AUDIO button. 2. To check how... Flat" and then press the right edge of the ENTER/Cursor button. Select "Set to restore the "flat" bass and treble sound. 5. rect" or "THX (TX-DS777 only)." The display shows "Muting." Press the SLEEP button repeatedly until the desired sleep time is left edge of the ENTER...
Owner Manual
Page 33
... output levels for all speakers. For the right front, left front, center, right surround and left surround speakers, the output levels can hear the same sound volume from all speakers. 6 ** Multi Ch Input ** Level Setup Left Center Right Left Sur Left Sur Subwoofer = 0dB = +5dB = 0dB = 0dB = 0dB =+10dB • Using..., proceed to the previous screen. 5. For the right front, left front, center, right surround and left surround speakers, the output levels can hear the same sound volume from all speakers. Press the center of -12 dB/+12 dB.
... output levels for all speakers. For the right front, left front, center, right surround and left surround speakers, the output levels can hear the same sound volume from all speakers. 6 ** Multi Ch Input ** Level Setup Left Center Right Left Sur Left Sur Subwoofer = 0dB = +5dB = 0dB = 0dB = 0dB =+10dB • Using..., proceed to the previous screen. 5. For the right front, left front, center, right surround and left surround speakers, the output levels can hear the same sound volume from all speakers. Press the center of -12 dB/+12 dB.
Owner Manual
Page 34
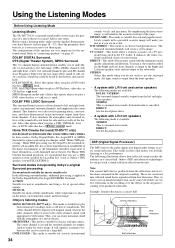
... clarity of a TV program being aired in the theaters and concert halls. Surround mode is suitable for the low-range effect sound. Onkyo's DSP and advanced technologies let you do not wish to use a THX speaker system certified by the surround engineers at Lucasfilm Ltd....heard in the TV studio. Thus, in a well-furnished movie theater. Using the Listening Modes Before Using Listening Mode Listening Modes The TX-DS777/676's surround sound enables you to individu- The configuration of four channels (left and right front, center, two surround channels) plus an LFE channel ...
... clarity of a TV program being aired in the theaters and concert halls. Surround mode is suitable for the low-range effect sound. Onkyo's DSP and advanced technologies let you do not wish to use a THX speaker system certified by the surround engineers at Lucasfilm Ltd....heard in the TV studio. Thus, in a well-furnished movie theater. Using the Listening Modes Before Using Listening Mode Listening Modes The TX-DS777/676's surround sound enables you to individu- The configuration of four channels (left and right front, center, two surround channels) plus an LFE channel ...
Owner Manual
Page 35
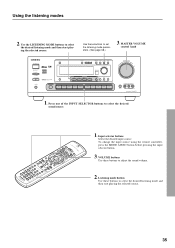
... AM PHONO C D DOWN MASTER VOLUME UP VIDEO 4/VIDEO CAM INPUT S VIDEO VIDEO L AUDIO R(MONO) AV RECEIVER TX-DS777 1. Input selector buttons Select the desired input source. Listening mode button Use these buttons to adjust the sound volume. 2. Using the listening modes 2. ing the selected source. Use these buttons to select the desired...
... AM PHONO C D DOWN MASTER VOLUME UP VIDEO 4/VIDEO CAM INPUT S VIDEO VIDEO L AUDIO R(MONO) AV RECEIVER TX-DS777 1. Input selector buttons Select the desired input source. Listening mode button Use these buttons to adjust the sound volume. 2. Using the listening modes 2. ing the selected source. Use these buttons to select the desired...
Owner Manual
Page 36
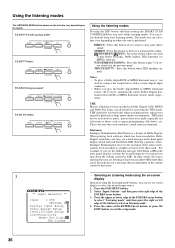
...EXIT button, to exit the setup mode. 36 Notes: • To play Dolby ProLogic, Dolby Digital, DTS Surround, (or MPEG) software. 5CH STEREO(TX-DS676) : Press this button if you may vary depending on where the unit is necessary. 3 ** Input Selector ** Input = DVD OPTICAL 1 Digital Input Setup...of Dolby Digital. In other words, the source material that were made especially for playback in Dolby Digital, sometimes you wish to connect the sound source with a correct digital input connector. • When you see the previous page). Press the OSD MENU button. 2. If you ...
...EXIT button, to exit the setup mode. 36 Notes: • To play Dolby ProLogic, Dolby Digital, DTS Surround, (or MPEG) software. 5CH STEREO(TX-DS676) : Press this button if you may vary depending on where the unit is necessary. 3 ** Input Selector ** Input = DVD OPTICAL 1 Digital Input Setup...of Dolby Digital. In other words, the source material that were made especially for playback in Dolby Digital, sometimes you wish to connect the sound source with a correct digital input connector. • When you see the previous page). Press the OSD MENU button. 2. If you ...

Owner Manual
Page 39
... is used to adjust the level of the Late Night effect is narrowed down to allow you wish to hear easily minute sound at large sound volumes. The recommended setting is selected, the following screen appears. * LFE Level Setup * Dolby Digital DTS Cinema Group Music...sound, compensating for the fact that sound mixed for European model only. 1. With some software, this parameter is "0dB." 2. You can adjust the strength of 1 dB. Adjust the depth of acoustic reverberation, depending on the playback source material, your audio room conditions, and so on . • Reverb Level (TX...
... is used to adjust the level of the Late Night effect is narrowed down to allow you wish to hear easily minute sound at large sound volumes. The recommended setting is selected, the following screen appears. * LFE Level Setup * Dolby Digital DTS Cinema Group Music...sound, compensating for the fact that sound mixed for European model only. 1. With some software, this parameter is "0dB." 2. You can adjust the strength of 1 dB. Adjust the depth of acoustic reverberation, depending on the playback source material, your audio room conditions, and so on . • Reverb Level (TX...
Owner Manual
Page 43
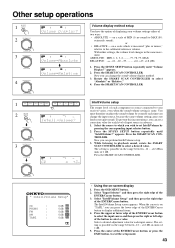
... DSP PUSH TO ENTER SPEAKERS DSP A 4 PRESET/MODE ADJ Volume display method setup You have the option of displaying your receiver varies, even when the sound volume setting is measured "plus or minus," relative to the calibrated reference volume. ABSOLUTE: MIN, 1, 2, 3, 4, ......., 77, 78, 79, MAX ...2. To prevent this inconvenience, you can set IntelliVolume by yourself each input source. Select the source to MAX (80: extremely sound); Press the SP/SYS SETUP button repeatedly until "Volume Display?" Press the SMART SCAN CONTROLLER. Now you can perform IntelliVolume setup...
... DSP PUSH TO ENTER SPEAKERS DSP A 4 PRESET/MODE ADJ Volume display method setup You have the option of displaying your receiver varies, even when the sound volume setting is measured "plus or minus," relative to the calibrated reference volume. ABSOLUTE: MIN, 1, 2, 3, 4, ......., 77, 78, 79, MAX ...2. To prevent this inconvenience, you can set IntelliVolume by yourself each input source. Select the source to MAX (80: extremely sound); Press the SP/SYS SETUP button repeatedly until "Volume Display?" Press the SMART SCAN CONTROLLER. Now you can perform IntelliVolume setup...


