
WS-210S Instruction Manual (English)
Page 1
... health,environment and customer protection. For customers in a residential installation. DIGITAL VOICE RECORDER WS-110/WS-210S EN INSTRUCTIONS Thank you test the record function and volume before use the return and collection systems available in the EU countries. Please read these instructions for future reference. ...However, there is connected. • Consult the dealer or an experienced radio/TV technician for radio noise emissions from that interference will not occur in accordance with the limits for purchasing an Olympus Digital Voice Recorder. This symbol [crossed...
... health,environment and customer protection. For customers in a residential installation. DIGITAL VOICE RECORDER WS-110/WS-210S EN INSTRUCTIONS Thank you test the record function and volume before use the return and collection systems available in the EU countries. Please read these instructions for future reference. ...However, there is connected. • Consult the dealer or an experienced radio/TV technician for radio noise emissions from that interference will not occur in accordance with the limits for purchasing an Olympus Digital Voice Recorder. This symbol [crossed...

WS-210S Instruction Manual (English)
Page 2
... other non-rechargeable battery. • Never use organic solvents such as they may be destroyed or erased by the third party other than Olympus or an Olympus authorized service station, or any battery with a torn or cracked outer cover. • Keep battery out of the reach of the product, repair performed by operating mistakes, unit malfunction, or during repair work. tors. This...
... other non-rechargeable battery. • Never use organic solvents such as they may be destroyed or erased by the third party other than Olympus or an Olympus authorized service station, or any battery with a torn or cracked outer cover. • Keep battery out of the reach of the product, repair performed by operating mistakes, unit malfunction, or during repair work. tors. This...

WS-210S Instruction Manual (English)
Page 3
... reset the time when you set to the opposite direction of the arrow before replacing. Getting Started Identification of Parts Main unit Battery compartment 1 EAR (Earphone) jack 2 MIC (Microphone) jack 3 Record/Play indicator light 4 Built-in speaker ) Release button - ERASE button (1) @ REC (Record) button (4) # PLAY/OK button (t) $ FF (Fast Forward) button (9) - % VOL ( ) button ^ DISP.(Display)/MENU button ( ) & USB terminal * Strap hole ( Built-in Microphone* 5 Display (LCD panel) 6 HOLD switch + 7 VOL ( ) button 8 STOP button (5) 9 REW (Rewind) button (0) 0 FOLDER/INDEX button...
... reset the time when you set to the opposite direction of the arrow before replacing. Getting Started Identification of Parts Main unit Battery compartment 1 EAR (Earphone) jack 2 MIC (Microphone) jack 3 Record/Play indicator light 4 Built-in speaker ) Release button - ERASE button (1) @ REC (Record) button (4) # PLAY/OK button (t) $ FF (Fast Forward) button (9) - % VOL ( ) button ^ DISP.(Display)/MENU button ( ) & USB terminal * Strap hole ( Built-in Microphone* 5 Display (LCD panel) 6 HOLD switch + 7 VOL ( ) button 8 STOP button (5) 9 REW (Rewind) button (0) 0 FOLDER/INDEX button...

WS-210S Instruction Manual (English)
Page 4
... function remembers the stop position in the direction opposite that file. Standby Mode and Display Shut Off HOLD switch If the recorder is stopped for a longer period of the arrow during playback will flash. Hold Setting the HOLD switch to reset the time. (Example: June 14, 2007) - 4 - Follow the same steps by pressing the 2 (DISP.) button while setting the hour and minute. Press the t button according to the time signal. 6 Press the 5 button to use...
... function remembers the stop position in the direction opposite that file. Standby Mode and Display Shut Off HOLD switch If the recorder is stopped for a longer period of the arrow during playback will flash. Hold Setting the HOLD switch to reset the time. (Example: June 14, 2007) - 4 - Follow the same steps by pressing the 2 (DISP.) button while setting the hour and minute. Press the t button according to the time signal. 6 Press the 5 button to use...
WS-210S Instruction Manual (English)
Page 5
... to an external device, execute a test recording and adjust the output level of the recorder, the built-in a folder. s Even if you want to 200 messages can be recorded per folder. a Current folder b Current recording mode c Current file number d Recording time e Remaining recording time (Remain) f Record level meter To Pause Recording To Pause ➜ Press the 4. ➜ "Rec Pause" appears on the display, you connect the recorder to the microphone jack of the external device. - 5 - When you cannot record. Using folders to classify files makes it has...
... to an external device, execute a test recording and adjust the output level of the recorder, the built-in a folder. s Even if you want to 200 messages can be recorded per folder. a Current folder b Current recording mode c Current file number d Recording time e Remaining recording time (Remain) f Record level meter To Pause Recording To Pause ➜ Press the 4. ➜ "Rec Pause" appears on the display, you connect the recorder to the microphone jack of the external device. - 5 - When you cannot record. Using folders to classify files makes it has...

WS-210S Instruction Manual (English)
Page 6
... too much. Forwarding and Rewinding Press and hold 9 or 0 during playback. ➜ When you listen with Earphones You can choose between 0 to select the proper sound volume. sWhen you release the button, the recorder will resume at that location. a Current file number b Playing time Canceling Playback To Stop ➜ Press the 5. ➜ The recorder stops in hearing ability. - 6 - Playing Back Playing 1 Press the 2 (FOLDER) button to choose a folder. 2 Press the...
... too much. Forwarding and Rewinding Press and hold 9 or 0 during playback. ➜ When you listen with Earphones You can choose between 0 to select the proper sound volume. sWhen you release the button, the recorder will resume at that location. a Current file number b Playing time Canceling Playback To Stop ➜ Press the 5. ➜ The recorder stops in hearing ability. - 6 - Playing Back Playing 1 Press the 2 (FOLDER) button to choose a folder. 2 Press the...
WS-210S Instruction Manual (English)
Page 7
.... Stop Playing ➜ Press the 2 (DISP.) button. ➜ Each press switches the display in the order of "playback elapsed time", "remaining playback time", "date of "recording elapsed time", "remaining recording time" and "recording level meter". - 7- Sequential file numbers are displayed. This help review and confirm different recorder settings and file information. indicator flashes. indicator flashes. The "1File Erase?" Erasing One File at recording". Do not remove the battery or detach the battery compartment from a Folder 1 Press the 2 (FOLDER) button to...
.... Stop Playing ➜ Press the 2 (DISP.) button. ➜ Each press switches the display in the order of "playback elapsed time", "remaining playback time", "date of "recording elapsed time", "remaining recording time" and "recording level meter". - 7- Sequential file numbers are displayed. This help review and confirm different recorder settings and file information. indicator flashes. indicator flashes. The "1File Erase?" Erasing One File at recording". Do not remove the battery or detach the battery compartment from a Folder 1 Press the 2 (FOLDER) button to...
WS-210S Instruction Manual (English)
Page 8
... set the menu item from the mainmenu screen. sTo set the submenu, select the "Sub Menu" from the submenu screen in the same manner. Menu mode The levels of the menu screen and the operation buttons (Main Menu/Sub Menu) The setting can be switched by flashing. The menu item with the PLAY mark can be set even during a menu setup operation, when a selected item is stopped. 2 Press the 9 or 0 to use by putting the recorder in menu mode...
... set the menu item from the mainmenu screen. sTo set the submenu, select the "Sub Menu" from the submenu screen in the same manner. Menu mode The levels of the menu screen and the operation buttons (Main Menu/Sub Menu) The setting can be switched by flashing. The menu item with the PLAY mark can be set even during a menu setup operation, when a selected item is stopped. 2 Press the 9 or 0 to use by putting the recorder in menu mode...

WS-210S Instruction Manual (English)
Page 9
... the display. s If the starting level is not adjusted within 2 seconds, the display will activate recording.The VCVA pause sound level can be set level) Display in Standby mode, the record/play indicator light is set to the previous. Microphone Sensitivity (Mic Sense) Microphone sensitivity is for dictation. VCVA indicator In Menu mode selection ➜ VCVA OFF, VCVA ON 1 Press the 9 or 0 button adjust the pause sound level. a VCVA Level b Start level (moves to the right/left according to the set to cut low...
... the display. s If the starting level is not adjusted within 2 seconds, the display will activate recording.The VCVA pause sound level can be set level) Display in Standby mode, the record/play indicator light is set to the previous. Microphone Sensitivity (Mic Sense) Microphone sensitivity is for dictation. VCVA indicator In Menu mode selection ➜ VCVA OFF, VCVA ON 1 Press the 9 or 0 button adjust the pause sound level. a VCVA Level b Start level (moves to the right/left according to the set to cut low...
WS-210S Instruction Manual (English)
Page 10
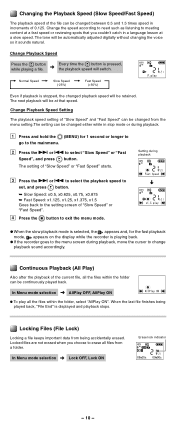
...if playback is displayed and playback stops. Change the speed according to need such as listening to change playback sound accordingly. The next playback will be automatically adjusted digitally without changing the voice so it sounds natural. Change Playback Speed Setting The playback speed setting of 0.125. sIf the recorder goes to the menu screen during playback, move the cursor to meeting content at a slow speed. Change Playback Speed Press the t button while playing a file. ➜ Every time the t button is playing back. Changing the Playback Speed (Slow Speed/Fast Speed...
...if playback is displayed and playback stops. Change the speed according to need such as listening to change playback sound accordingly. The next playback will be automatically adjusted digitally without changing the voice so it sounds natural. Change Playback Speed Setting The playback speed setting of 0.125. sIf the recorder goes to the menu screen during playback, move the cursor to meeting content at a slow speed. Change Playback Speed Press the t button while playing a file. ➜ Every time the t button is playing back. Changing the Playback Speed (Slow Speed/Fast Speed...
WS-210S Instruction Manual (English)
Page 11
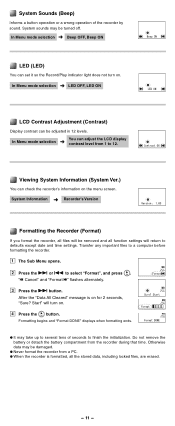
... time settings. After the "Data All Cleared" message is formatted, all function settings will turn on the menu screen. In Menu mode selection ➜ Beep OFF, Beep ON LED (LED) You can adjust the LCD display contrast level from 1 to select "Format", and press t. " Cancel" and "Format " flashes alternately. 3 Press the 9 button. s It may take up to several tens of the recorder by sound. s Never format the recorder from the recorder during that time. Do not remove the battery...
... time settings. After the "Data All Cleared" message is formatted, all function settings will turn on the menu screen. In Menu mode selection ➜ Beep OFF, Beep ON LED (LED) You can adjust the LCD display contrast level from 1 to select "Format", and press t. " Cancel" and "Format " flashes alternately. 3 Press the 9 button. s It may take up to several tens of the recorder by sound. s Never format the recorder from the recorder during that time. Do not remove the battery...
WS-210S Instruction Manual (English)
Page 12
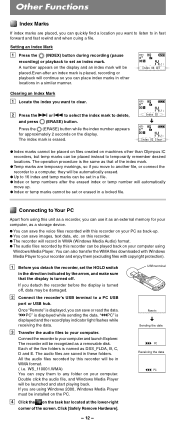
... in these folders. Press the 1 (ERASE) button while the index number appears for your computer. " PC" is displayed, you can copy them (excluding files with Windows Media Player to a computer, they will continue so you are using Windows Media Player. sTemp marks are saved in a similar manner. The recorder will be damaged. 2 Connect the recorder's USB terminal to set the HOLD switch in WMA (Windows Media Audio) format. Double click the audio file, and Windows Media Player will...
... in these folders. Press the 1 (ERASE) button while the index number appears for your computer. " PC" is displayed, you can copy them (excluding files with Windows Media Player to a computer, they will continue so you are using Windows Media Player. sTemp marks are saved in a similar manner. The recorder will be damaged. 2 Connect the recorder's USB terminal to set the HOLD switch in WMA (Windows Media Audio) format. Double click the audio file, and Windows Media Player will...
WS-210S Instruction Manual (English)
Page 13
... you connect the recorder to a PC. Q4 The playback speed is not possible. Notes sNEVER disconnect the USB while the record/play indicator light and USB access indicator light are flashing in an easily accessible location for your PC regarding data loss Recorded content in memory may be inserted incorrectly. sAs the noise may be destroyed. Q3 Recording is too fast (slow). Check if the display shows "Memory...
... you connect the recorder to a PC. Q4 The playback speed is not possible. Notes sNEVER disconnect the USB while the record/play indicator light and USB access indicator light are flashing in an easily accessible location for your PC regarding data loss Recorded content in memory may be inserted incorrectly. sAs the noise may be destroyed. Q3 Recording is too fast (slow). Check if the display shows "Memory...
WS-210S Instruction Manual (English)
Page 14
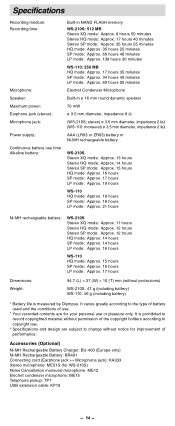
... Ni-MH Rechargeable Battery Charger: BU-400 (Europe only) Ni-MH Rechargeable Battery: BR401 Connecting cord (Earphone jack ↔ Microphone jack): KA333 Stereo microphone: ME51S (for your personal use or pleasure only. It is measured by Olympus. Specifications Recording medium: Recording time: Microphone: Speaker: Maximum power: Earphone jack (stereo): Microphone jack: Power supply: Continuous battery use time Alkaline battery: Built-in NAND FLASH memory WS-210S: 512 MB Stereo XQ mode: Approx. 8 hours 50 minutes Stereo HQ mode: Approx. 17 hours 40 minutes Stereo SP mode: Approx. 35 hours...
... Ni-MH Rechargeable Battery Charger: BU-400 (Europe only) Ni-MH Rechargeable Battery: BR401 Connecting cord (Earphone jack ↔ Microphone jack): KA333 Stereo microphone: ME51S (for your personal use or pleasure only. It is measured by Olympus. Specifications Recording medium: Recording time: Microphone: Speaker: Maximum power: Earphone jack (stereo): Microphone jack: Power supply: Continuous battery use time Alkaline battery: Built-in NAND FLASH memory WS-210S: 512 MB Stereo XQ mode: Approx. 8 hours 50 minutes Stereo HQ mode: Approx. 17 hours 40 minutes Stereo SP mode: Approx. 35 hours...


