Instruction Manual
Page 1
... this product complies with the European requirements for a Class B digital device, pursuant to part 15 of Communications. Applicable Product : WS-110/WS-210S - 1 - For customers in North and South America USA RFI This equipment has been tested and found to comply with the ...; Connect the equipment into the domestic refuse. Please read these instructions for purchasing an Olympus Digital Voice Recorder. DIGITAL VOICE RECORDER WS-110/WS-210S EN INSTRUCTIONS Thank you test the record function and volume before use the return and collection systems available in your country for ...
... this product complies with the European requirements for a Class B digital device, pursuant to part 15 of Communications. Applicable Product : WS-110/WS-210S - 1 - For customers in North and South America USA RFI This equipment has been tested and found to comply with the ...; Connect the equipment into the domestic refuse. Please read these instructions for purchasing an Olympus Digital Voice Recorder. DIGITAL VOICE RECORDER WS-110/WS-210S EN INSTRUCTIONS Thank you test the record function and volume before use the return and collection systems available in your country for ...
Instruction Manual
Page 2
... content to operate it is excluded from the Olympus's liability. G Avoid recording or playing back near electric appliances such as a bicycle, motorcycle, or gocart). G Do not disassemble, repair or modify the unit yourself. Recorded content in an easily accessible location for future ...Warning • Under no circumstances insert any other parts than Olympus or an Olympus authorized service station, or any other reasons is essential that you experience noise, move to another place, or move the recorder further away from personal injury or damage to data loss incurred ...
... content to operate it is excluded from the Olympus's liability. G Avoid recording or playing back near electric appliances such as a bicycle, motorcycle, or gocart). G Do not disassemble, repair or modify the unit yourself. Recorded content in an easily accessible location for future ...Warning • Under no circumstances insert any other parts than Olympus or an Olympus authorized service station, or any other reasons is essential that you experience noise, move to another place, or move the recorder further away from personal injury or damage to data loss incurred ...
Instruction Manual
Page 3
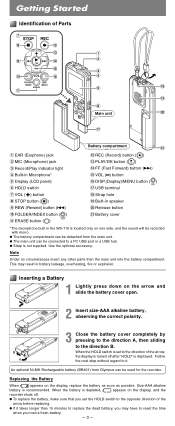
ERASE button (1) @ REC (Record) button (4) # PLAY/OK button (t) $ FF (Fast Forward) button (9) - % VOL ( ) button ^ DISP.(Display)/MENU button ( ) & USB terminal * Strap hole ( Built-in the WS-110 is depleted, appears on the arrow and slide the battery cover open. 2 Insert size-AAA alkaline battery,...) Release button - s The battery compartment can be detached from Olympus can be connected to the direction B. An optional Ni-MH Rechargeable battery (BR401) from the main unit. s The main unit can be recorded with mono. Use the optional accessory. Follow the next step without...
ERASE button (1) @ REC (Record) button (4) # PLAY/OK button (t) $ FF (Fast Forward) button (9) - % VOL ( ) button ^ DISP.(Display)/MENU button ( ) & USB terminal * Strap hole ( Built-in the WS-110 is depleted, appears on the arrow and slide the battery cover open. 2 Insert size-AAA alkaline battery,...) Release button - s The battery compartment can be detached from Olympus can be connected to the direction B. An optional Ni-MH Rechargeable battery (BR401) from the main unit. s The main unit can be recorded with mono. Use the optional accessory. Follow the next step without...

Instruction Manual
Page 4
... to when a sound file was turned off . This completes the time/date setup procedure. Power ON ➜ The display will bring the recorder back to set . The resume function remembers the stop position in the direction opposite that file. Press the or button to the stop position ...before power was recorded is stored automatically with a flashing point. 4 + - sIf you may have set date and time. In such a case, be turned on the display,...
... to when a sound file was turned off . This completes the time/date setup procedure. Power ON ➜ The display will bring the recorder back to set . The resume function remembers the stop position in the direction opposite that file. Press the or button to the stop position ...before power was recorded is stored automatically with a flashing point. 4 + - sIf you may have set date and time. In such a case, be turned on the display,...
Instruction Manual
Page 5
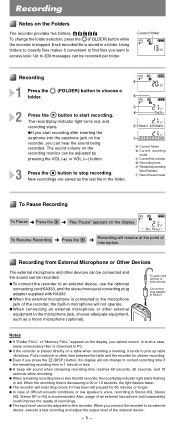
... connected and the sound can be recorded per folder. a Current folder b Current recording mode c Current file number d Recording time e Remaining recording time (Remain) f Record level meter To Pause Recording To Pause ➜ Press the 4. ➜ "Rec Pause" appears on this recorder. When the recording time is decreasing to current recording time if the remaining recording time is less than 60...
... connected and the sound can be recorded per folder. a Current folder b Current recording mode c Current file number d Recording time e Remaining recording time (Remain) f Record level meter To Pause Recording To Pause ➜ Press the 4. ➜ "Rec Pause" appears on this recorder. When the recording time is decreasing to current recording time if the remaining recording time is less than 60...
Instruction Manual
Page 6
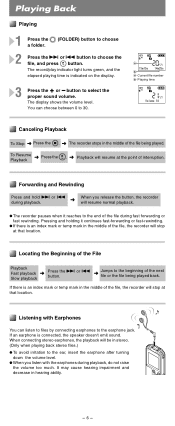
... the point of the next file or the file being played. button to choose the file, and press t button. sWhen you release the button, the recorder will stop at that location. Playing Back Playing 1 Press the 2 (FOLDER) button to choose a folder. 2 Press the 9 or 0 button to... select the proper sound volume. The record/play indicator light turns green, and the elapsed playing time is connected, the speaker doesn't emit sound. You can listen to files by connecting earphones...
... the point of the next file or the file being played. button to choose the file, and press t button. sWhen you release the button, the recorder will stop at that location. Playing Back Playing 1 Press the 2 (FOLDER) button to choose a folder. 2 Press the 9 or 0 button to... select the proper sound volume. The record/play indicator light turns green, and the elapsed playing time is connected, the speaker doesn't emit sound. You can listen to files by connecting earphones...
Instruction Manual
Page 7
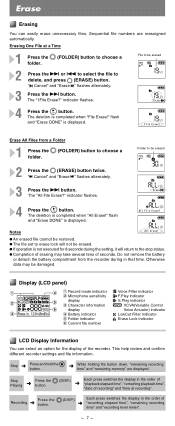
...File Erase?" The deletion is displayed. Stop ➜ Press and hold the 5 button. ➜ While holding the button down, "remaining recording time" and "remaining memory" are reassigned automatically. The "1File Erase?" File to be erased 4 Press the t button. Notes sAn ... compartment from a Folder 1 Press the 2 (FOLDER) button to delete, and press 1 (ERASE) button. Display (LCD panel) 1 Record mode indicator 2 Microphone sensitivity display 3 Character information display 4 Battery indicator 5 Folder indicator 6 Current file number Voice Filter indicator F.Play indicator...
...File Erase?" The deletion is displayed. Stop ➜ Press and hold the 5 button. ➜ While holding the button down, "remaining recording time" and "remaining memory" are reassigned automatically. The "1File Erase?" File to be erased 4 Press the t button. Notes sAn ... compartment from a Folder 1 Press the 2 (FOLDER) button to delete, and press 1 (ERASE) button. Display (LCD panel) 1 Record mode indicator 2 Microphone sensitivity display 3 Character information display 4 Battery indicator 5 Folder indicator 6 Current file number Voice Filter indicator F.Play indicator...
Instruction Manual
Page 8
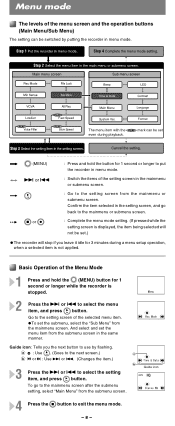
... setting. (If pressed while the setting screen is displayed, the item being selected will stop if you the next button to use by putting the recorder in the same manner. The menu item with the PLAY mark can be switched by flashing. Go to select the menu item, and press t button... setting, select "Main Menu" from the mainmenu or submenu screen. Guide icon Confirm the item selected in the setting screen, and go to put the recorder in menu mode. 9 or 0 : Switch the items of the setting screen in the mainmenu or submenu screen. Basic Operation of the Menu Mode 1 Press and...
... setting. (If pressed while the setting screen is displayed, the item being selected will stop if you the next button to use by putting the recorder in the same manner. The menu item with the PLAY mark can be switched by flashing. Go to select the menu item, and press t button... setting, select "Main Menu" from the mainmenu or submenu screen. Guide icon Confirm the item selected in the setting screen, and go to put the recorder in menu mode. 9 or 0 : Switch the items of the setting screen in the mainmenu or submenu screen. Basic Operation of the Menu Mode 1 Press and...
Instruction Manual
Page 9
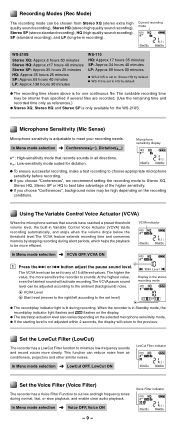
... is only available for the WS-210S. This function can reduce noise from Stereo XQ (stereo extra high quality sound recording), Stereo HQ (stereo high quality sound recording), Stereo SP (stereo standard recording), HQ (high quality sound recording), SP (standard recording), and LP (long-term recording). In Menu mode selection &#... on the display. At the highest value, even the faintest sound will return to any of the higher sensitivity. Current recording mode WS-210S Stereo XQ: Approx.8 hours 50 minutes Stereo HQ: Approx.x17 hours 40 minutes Stereo SP: Approx.35 hours 25 minutes...
... is only available for the WS-210S. This function can reduce noise from Stereo XQ (stereo extra high quality sound recording), Stereo HQ (stereo high quality sound recording), Stereo SP (stereo standard recording), HQ (high quality sound recording), SP (standard recording), and LP (long-term recording). In Menu mode selection &#... on the display. At the highest value, even the faintest sound will return to any of the higher sensitivity. Current recording mode WS-210S Stereo XQ: Approx.8 hours 50 minutes Stereo HQ: Approx.x17 hours 40 minutes Stereo SP: Approx.35 hours 25 minutes...
Instruction Manual
Page 10
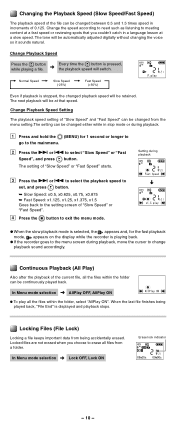
...in stop mode or during playback. 1 Press and hold the 2 (MENU) for the fast playback mode, appears on the display while the recorder is stopped, the changed playback speed will be automatically adjusted digitally without changing the voice so it sounds natural. Locking Files (File Lock) Locking ... mainmenu. 2 Press the 9 or 0 to erase all the files within the folder can be continuously played back. The setting of 0.125. sIf the recorder goes to the menu screen during playback ➜ 3 Press the 9 or 0 to select the playback speed to set, and press t button. ➥...
...in stop mode or during playback. 1 Press and hold the 2 (MENU) for the fast playback mode, appears on the display while the recorder is stopped, the changed playback speed will be automatically adjusted digitally without changing the voice so it sounds natural. Locking Files (File Lock) Locking ... mainmenu. 2 Press the 9 or 0 to erase all the files within the folder can be continuously played back. The setting of 0.125. sIf the recorder goes to the menu screen during playback ➜ 3 Press the 9 or 0 to select the playback speed to set, and press t button. ➥...
Instruction Manual
Page 11
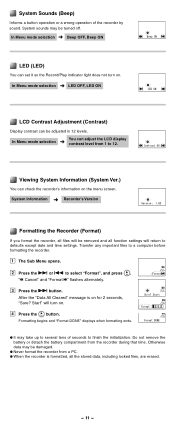
...button. Formatting begins and "Format DONE" displays when formatting ends. s Never format the recorder from a PC. s When the recorder is on the menu screen. Viewing System Information (System Ver.) You can set it so the Record/Play indicator light does not turn on . In Menu mode selection ➜ Beep OFF,... Beep ON LED (LED) You can check the recorder's information on for 2 seconds, "Sure? System Sounds (Beep) Informs a button operation or a wrong operation of seconds to finish the ...
...button. Formatting begins and "Format DONE" displays when formatting ends. s Never format the recorder from a PC. s When the recorder is on the menu screen. Viewing System Information (System Ver.) You can set it so the Record/Play indicator light does not turn on . In Menu mode selection ➜ Beep OFF,... Beep ON LED (LED) You can check the recorder's information on for 2 seconds, "Sure? System Sounds (Beep) Informs a button operation or a wrong operation of seconds to finish the ...
Instruction Manual
Page 12
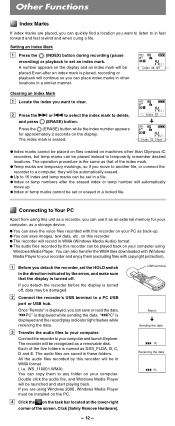
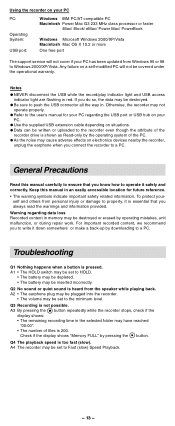
... computer using Windows 2000, Windows Media Player must be recognized as DSS_FLDA, B, C, D and E. sYou can copy them (excluding files with this recorder can place index marks in other than Olympus IC recorders, but temp marks can be automatically erased. " PC" is named as a removable disk. If you can be launched and start playing...
... computer using Windows 2000, Windows Media Player must be recognized as DSS_FLDA, B, C, D and E. sYou can copy them (excluding files with this recorder can place index marks in other than Olympus IC recorders, but temp marks can be automatically erased. " PC" is named as a removable disk. If you can be launched and start playing...
Instruction Manual
Page 13
...destroyed or erased by operating mistakes, unit malfunction, or during repair work. self and others from the speaker while playing back. For important recorded content, we recommend you know how to operate it down somewhere or make a back-up by downloading to a PC. Q4 The ...Memory FULL" by pressing the 4 button. General Precautions Read this manual in . A2 • The earphone plug may be plugged into the recorder. • The volume may be destroyed. If you always read the warnings and information provided. sUse the supplied USB extension cable depending on situations...
...destroyed or erased by operating mistakes, unit malfunction, or during repair work. self and others from the speaker while playing back. For important recorded content, we recommend you know how to operate it down somewhere or make a back-up by downloading to a PC. Q4 The ...Memory FULL" by pressing the 4 button. General Precautions Read this manual in . A2 • The earphone plug may be plugged into the recorder. • The volume may be destroyed. If you always read the warnings and information provided. sUse the supplied USB extension cable depending on situations...
Instruction Manual
Page 14
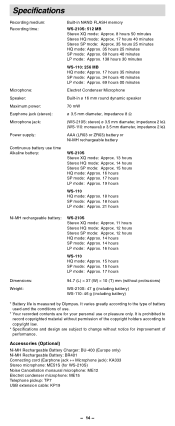
... copyright holders according to change without protrusions) WS-210S: 47 g (including battery) WS-110: 46 g (including battery) * Battery life is measured by Olympus. Specifications Recording medium: Recording time: Microphone: Speaker: Maximum power: Earphone jack (stereo): Microphone jack: Power supply: Continuous battery use time Alkaline battery: Built-in NAND FLASH memory WS-210S: 512 MB Stereo XQ mode: Approx...
... copyright holders according to change without protrusions) WS-210S: 47 g (including battery) WS-110: 46 g (including battery) * Battery life is measured by Olympus. Specifications Recording medium: Recording time: Microphone: Speaker: Maximum power: Earphone jack (stereo): Microphone jack: Power supply: Continuous battery use time Alkaline battery: Built-in NAND FLASH memory WS-210S: 512 MB Stereo XQ mode: Approx...


