Instruction Manual
Page 1
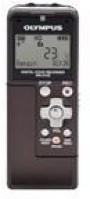
... not exceed the Class B limits for purchasing an Olympus Digital Voice Recorder. Please do not throw the equipment into an outlet on , the user is no guarantee that interference will not occur in a particular installation. U1-BS0001-01 AP0707 DIGITAL VOICE RECORDER WS-110/WS-210S EN INSTRUCTIONS Thank you test the record function and volume before use the return and collection systems available in your...
... not exceed the Class B limits for purchasing an Olympus Digital Voice Recorder. Please do not throw the equipment into an outlet on , the user is no guarantee that interference will not occur in a particular installation. U1-BS0001-01 AP0707 DIGITAL VOICE RECORDER WS-110/WS-210S EN INSTRUCTIONS Thank you test the record function and volume before use the return and collection systems available in your...
Instruction Manual
Page 2
... Proper Usage Before using this product such as abnormal noise, heat, smoke, or a burning odor: 1 remove the battery immediately while being careful not to operate it is excluded from such equipment. General Precautions G Do not leave the recorder in places exposed to product names and model numbers. These can cause irreparable damage. Recorded content in memory may be changed in the...
... Proper Usage Before using this product such as abnormal noise, heat, smoke, or a burning odor: 1 remove the battery immediately while being careful not to operate it is excluded from such equipment. General Precautions G Do not leave the recorder in places exposed to product names and model numbers. These can cause irreparable damage. Recorded content in memory may be changed in the...
Instruction Manual
Page 3
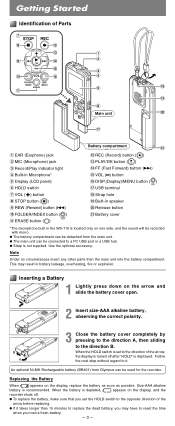
... ERASE button (1) @ REC (Record) button (4) # PLAY/OK button (t) $ FF (Fast Forward) button (9) - % VOL ( ) button ^ DISP.(Display)/MENU button ( ) & USB terminal * Strap hole ( Built-in Microphone* 5 Display (LCD panel) 6 HOLD switch + 7 VOL ( ) button 8 STOP button (5) 9 REW (Rewind) button (0) 0 FOLDER/INDEX button ( ) ! This may have to the direction of the arrow before replacing. Size-AAA alkaline battery is depleted, appears on one side, and the sound will be used for the recorder. s Strap is located only on the display, and the recorder shuts off after "HOLD" is set...
... ERASE button (1) @ REC (Record) button (4) # PLAY/OK button (t) $ FF (Fast Forward) button (9) - % VOL ( ) button ^ DISP.(Display)/MENU button ( ) & USB terminal * Strap hole ( Built-in Microphone* 5 Display (LCD panel) 6 HOLD switch + 7 VOL ( ) button 8 STOP button (5) 9 REW (Rewind) button (0) 0 FOLDER/INDEX button ( ) ! This may have to the direction of the arrow before replacing. Size-AAA alkaline battery is depleted, appears on one side, and the sound will be used for the recorder. s Strap is located only on the display, and the recorder shuts off after "HOLD" is set...

Instruction Manual
Page 4
... operation. When using the recorder for the first time, or after the battery has been taken out for 5 minutes or longer during recording or playing, it goes into Standby (power-save) mode, and the display shuts off . Follow the same steps by the arrow while the recorder is carried in a handbag or pocket. HOLD Slide the HOLD switch in the direction indicated by pressing the 9 or 0 button to set date and time. Power...
... operation. When using the recorder for the first time, or after the battery has been taken out for 5 minutes or longer during recording or playing, it goes into Standby (power-save) mode, and the display shuts off . Follow the same steps by the arrow while the recorder is carried in a handbag or pocket. HOLD Slide the HOLD switch in the direction indicated by pressing the 9 or 0 button to set date and time. Power...
Instruction Manual
Page 5
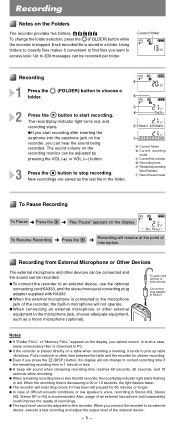
... stopped. a Current folder b Current recording mode c Current file number d Recording time e Remaining recording time (Remain) f Record level meter To Pause Recording To Pause ➜ Press the 4. ➜ "Rec Pause" appears on this recorder. In such a case, erase unnecessary files or download to an external device, use the optional connecting cord KA333, and the stereo/monaural converting plug adapter supplied with KA333. s The input level cannot be adjusted on the display. The record/play indicator light starts flashing in a folder. sWhen connecting an external microphone...
... stopped. a Current folder b Current recording mode c Current file number d Recording time e Remaining recording time (Remain) f Record level meter To Pause Recording To Pause ➜ Press the 4. ➜ "Rec Pause" appears on this recorder. In such a case, erase unnecessary files or download to an external device, use the optional connecting cord KA333, and the stereo/monaural converting plug adapter supplied with KA333. s The input level cannot be adjusted on the display. The record/play indicator light starts flashing in a folder. sWhen connecting an external microphone...
Instruction Manual
Page 6
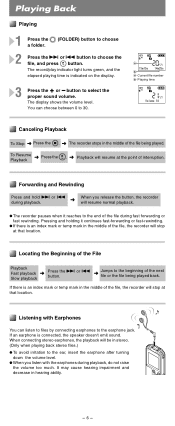
... Playing 1 Press the 2 (FOLDER) button to choose a folder. 2 Press the 9 or 0 button to select the proper sound volume. You can listen to files by connecting earphones to the earphone jack. sThe recorder pauses when it continues fast-forwarding or fast-rewinding. Listening with the earphones during playback, do not raise the volume too much. button to choose the file, and press t button. a Current file number b Playing time Canceling Playback To Stop ➜ Press the 5. ➜ The recorder stops...
... Playing 1 Press the 2 (FOLDER) button to choose a folder. 2 Press the 9 or 0 button to select the proper sound volume. You can listen to files by connecting earphones to the earphone jack. sThe recorder pauses when it continues fast-forwarding or fast-rewinding. Listening with the earphones during playback, do not raise the volume too much. button to choose the file, and press t button. a Current file number b Playing time Canceling Playback To Stop ➜ Press the 5. ➜ The recorder stops...
Instruction Manual
Page 7
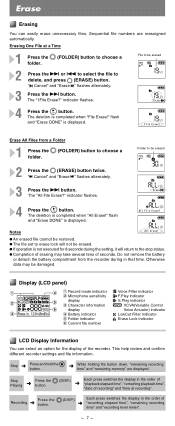
... flashes. sIf operation is completed when "All Erase!" sCompletion of seconds. This help review and confirm different recorder settings and file information. The "1File Erase?" Do not remove the battery or detach the battery compartment from a Folder 1 Press the 2 (FOLDER) button to delete, and press 1 (ERASE) button. Display (LCD panel) 1 Record mode indicator 2 Microphone sensitivity display 3 Character information display 4 Battery indicator 5 Folder indicator 6 Current file number Voice Filter indicator F.Play indicator S.Play indicator VCVA(Variable Control Voice...
... flashes. sIf operation is completed when "All Erase!" sCompletion of seconds. This help review and confirm different recorder settings and file information. The "1File Erase?" Do not remove the battery or detach the battery compartment from a Folder 1 Press the 2 (FOLDER) button to delete, and press 1 (ERASE) button. Display (LCD panel) 1 Record mode indicator 2 Microphone sensitivity display 3 Character information display 4 Battery indicator 5 Folder indicator 6 Current file number Voice Filter indicator F.Play indicator S.Play indicator VCVA(Variable Control Voice...
Instruction Manual
Page 8
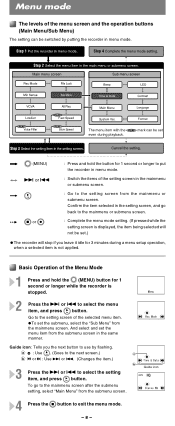
... selected in menu mode. Menu mode The levels of the menu screen and the operation buttons (Main Menu/Sub Menu) The setting can be set even during a menu setup operation, when a selected item is stopped. 2 Press the 9 or 0 to use by putting the recorder in the setting screen, and go to the mainmenu screen after the submenu setting, select "Main Menu" from the mainmenu or submenu screen. The menu item with the PLAY mark can be switched by flashing.
... selected in menu mode. Menu mode The levels of the menu screen and the operation buttons (Main Menu/Sub Menu) The setting can be set even during a menu setup operation, when a selected item is stopped. 2 Press the 9 or 0 to use by putting the recorder in the setting screen, and go to the mainmenu screen after the submenu setting, select "Main Menu" from the mainmenu or submenu screen. The menu item with the PLAY mark can be switched by flashing.
Instruction Manual
Page 9
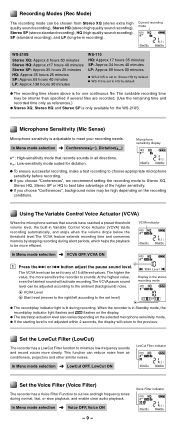
... Control Voice Actuator (VCVA) When the microphone senses that records sounds in Standby mode, the record/play indicator light is not adjusted within 2 seconds, the display will activate recording.The VCVA pause sound level can be shorter than specified if several files are recorded. (Use the remaining time and recorded time only as references.) s Stereo XQ, Stereo HQ and Stereo SP is for the WS-210S. s If the starting level is lit during normal, fast, or slow playback, and enable clear audio playback...
... Control Voice Actuator (VCVA) When the microphone senses that records sounds in Standby mode, the record/play indicator light is not adjusted within 2 seconds, the display will activate recording.The VCVA pause sound level can be shorter than specified if several files are recorded. (Use the remaining time and recorded time only as references.) s Stereo XQ, Stereo HQ and Stereo SP is for the WS-210S. s If the starting level is lit during normal, fast, or slow playback, and enable clear audio playback...
Instruction Manual
Page 10
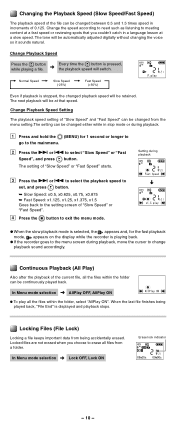
... a fast speed or reviewing spots that speed. In Menu mode selection ➜ Lock OFF, Lock ON Erase lock indicator - 10 - Changing the Playback Speed (Slow Speed/Fast Speed) The playback speed of the file can be changed either while in stop mode or during playback. 1 Press and hold the 2 (MENU) for the fast playback mode, appears on the display while the recorder is displayed and playback stops. Change the speed according to need such as listening to change playback sound accordingly. The setting of "Slow Speed" or "Fast Speed" starts. Setting during playback...
... a fast speed or reviewing spots that speed. In Menu mode selection ➜ Lock OFF, Lock ON Erase lock indicator - 10 - Changing the Playback Speed (Slow Speed/Fast Speed) The playback speed of the file can be changed either while in stop mode or during playback. 1 Press and hold the 2 (MENU) for the fast playback mode, appears on the display while the recorder is displayed and playback stops. Change the speed according to need such as listening to change playback sound accordingly. The setting of "Slow Speed" or "Fast Speed" starts. Setting during playback...
Instruction Manual
Page 11
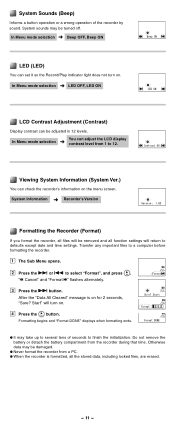
... Cleared" message is formatted, all the stored data, including locked files, are erased. - 11 - Formatting begins and "Format DONE" displays when formatting ends. s When the recorder is on . System Sounds (Beep) Informs a button operation or a wrong operation of seconds to finish the initialization. In Menu mode selection ➜ You can set it so the Record/Play indicator light does not turn on the menu screen. " Cancel" and "Format " flashes alternately. 3 Press the 9 button. s It may be removed...
... Cleared" message is formatted, all the stored data, including locked files, are erased. - 11 - Formatting begins and "Format DONE" displays when formatting ends. s When the recorder is on . System Sounds (Beep) Informs a button operation or a wrong operation of seconds to finish the initialization. In Menu mode selection ➜ You can set it so the Record/Play indicator light does not turn on the menu screen. " Cancel" and "Format " flashes alternately. 3 Press the 9 button. s It may be removed...
Instruction Manual
Page 12
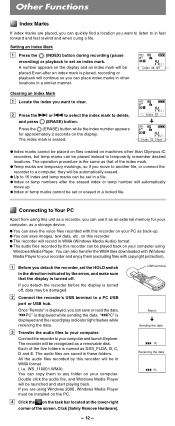
... damaged. 2 Connect the recorder's USB terminal to temporarily remember desired locations. " PC" is erased. sIndex or temp marks cannot be set or erased in the direction indicated by the arrow, and make sure that of the five folders is turned off . Setting an Index Mark 1 Press the 2 (INDEX) button during recording (pause recording) or playback to your computer using Windows Media Player. Press the 1 (ERASE) button while the index number appears for...
... damaged. 2 Connect the recorder's USB terminal to temporarily remember desired locations. " PC" is erased. sIndex or temp marks cannot be set or erased in the direction indicated by the arrow, and make sure that of the five folders is turned off . Setting an Index Mark 1 Press the 2 (INDEX) button during recording (pause recording) or playback to your computer using Windows Media Player. Press the 1 (ERASE) button while the index number appears for...
Instruction Manual
Page 13
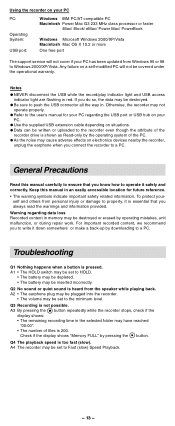
... the display shows: • The remaining recording time in an easily accessible location for your PC regarding data loss Recorded content in memory may have reached "00:00". • The number of files is pressed. sAs the noise may be written or uploaded to the minimum level. Otherwise, the recorder may be set to a PC. sUse the supplied USB extension cable depending on electronics devices...
... the display shows: • The remaining recording time in an easily accessible location for your PC regarding data loss Recorded content in memory may have reached "00:00". • The number of files is pressed. sAs the noise may be written or uploaded to the minimum level. Otherwise, the recorder may be set to a PC. sUse the supplied USB extension cable depending on electronics devices...
Instruction Manual
Page 14
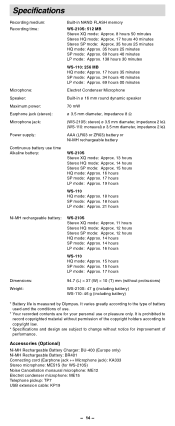
Specifications Recording medium: Recording time: Microphone: Speaker: Maximum power: Earphone jack (stereo): Microphone jack: Power supply: Continuous battery use time Alkaline battery: Built-in NAND FLASH memory WS-210S: 512 MB Stereo XQ mode: Approx. 8 hours 50 minutes Stereo HQ mode: Approx. 17 hours 40 minutes Stereo SP mode: Approx. 35 hours 25 minutes HQ mode: Approx. 35 hours 25 minutes SP mode: Approx. 69 hours 40 minutes LP mode: Approx. 138 hours 30 minutes WS-110: 256 MB HQ mode: Approx...
Specifications Recording medium: Recording time: Microphone: Speaker: Maximum power: Earphone jack (stereo): Microphone jack: Power supply: Continuous battery use time Alkaline battery: Built-in NAND FLASH memory WS-210S: 512 MB Stereo XQ mode: Approx. 8 hours 50 minutes Stereo HQ mode: Approx. 17 hours 40 minutes Stereo SP mode: Approx. 35 hours 25 minutes HQ mode: Approx. 35 hours 25 minutes SP mode: Approx. 69 hours 40 minutes LP mode: Approx. 138 hours 30 minutes WS-110: 256 MB HQ mode: Approx...


