Instruction Manual
Page 1
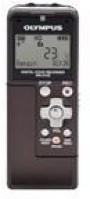
... an Olympus Digital Voice Recorder. Keep the instructions handy for information about using the product correctly and safely. However, there is connected. • Consult the dealer or an experienced radio/TV technician for help. Applicable Product : WS-110/WS-210S - 1 - To ensure successful recordings, we... electronic equipment in the EU countries. These limits are designed to radio communications. DIGITAL VOICE RECORDER WS-110/WS-210S EN INSTRUCTIONS Thank you test the record function and volume before use the return and collection systems available in your country for the disposal...
... an Olympus Digital Voice Recorder. Keep the instructions handy for information about using the product correctly and safely. However, there is connected. • Consult the dealer or an experienced radio/TV technician for help. Applicable Product : WS-110/WS-210S - 1 - To ensure successful recordings, we... electronic equipment in the EU countries. These limits are designed to radio communications. DIGITAL VOICE RECORDER WS-110/WS-210S EN INSTRUCTIONS Thank you test the record function and volume before use the return and collection systems available in your country for the disposal...
Instruction Manual
Page 2
... compartment. In the unlikely event that you experience noise, move the recorder further away from the Olympus's liability. Macintosh is found, please contact our Customer Support Center. General Precautions G Do not leave the recorder in battery leakage, overheating, fire or explosion. • Battery should...result in hot, humid locations such as TVs or refrigera- To protect yourself and others from the Olympus's liability. G Avoid sand or dirt. G Avoid recording or playing back near electric appliances such as inside a closed automobile under direct sunlight or on ...
... compartment. In the unlikely event that you experience noise, move the recorder further away from the Olympus's liability. Macintosh is found, please contact our Customer Support Center. General Precautions G Do not leave the recorder in battery leakage, overheating, fire or explosion. • Battery should...result in hot, humid locations such as TVs or refrigera- To protect yourself and others from the Olympus's liability. G Avoid sand or dirt. G Avoid recording or playing back near electric appliances such as inside a closed automobile under direct sunlight or on ...
Instruction Manual
Page 3
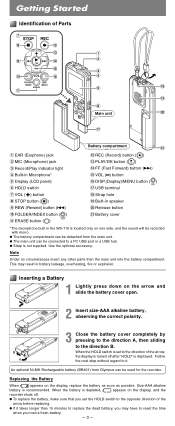
... display is turned off . Replacing the Battery When appears on the display, and the recorder shuts off after "HOLD" is displayed. s The main unit can be detached from Olympus can be connected to the direction B. Use the optional accessory. When the battery is ... Identification of the arrow before replacing. ERASE button (1) @ REC (Record) button (4) # PLAY/OK button (t) $ FF (Fast Forward) button (9) - % VOL ( ) button ^ DISP.(Display)/MENU button ( ) & USB terminal * Strap hole ( Built-in the WS-110 is depleted, appears on the display, replace the battery as soon...
... display is turned off . Replacing the Battery When appears on the display, and the recorder shuts off after "HOLD" is displayed. s The main unit can be detached from Olympus can be connected to the direction B. Use the optional accessory. When the battery is ... Identification of the arrow before replacing. ERASE button (1) @ REC (Record) button (4) # PLAY/OK button (t) $ FF (Fast Forward) button (9) - % VOL ( ) button ^ DISP.(Display)/MENU button ( ) & USB terminal * Strap hole ( Built-in the WS-110 is depleted, appears on the display, replace the battery as soon...

Instruction Manual
Page 4
...press t. Hold Setting the HOLD switch to the direction of time or if you remove the battery compartment repeatedly at the time when the remaining recording time reaches to the direction of the date indication by pressing the 2 (DISP.) button while setting the hour and minute. sSetting the HOLD... Standby mode and turn on the display, press any button. Press the t button according to the time signal. 6 Press the 5 button to use the recorder. The clock will be sure to reset the time. (Example: June 14, 2007) - 4 - sYou can choose between 12 and 24 hour display by...
...press t. Hold Setting the HOLD switch to the direction of time or if you remove the battery compartment repeatedly at the time when the remaining recording time reaches to the direction of the date indication by pressing the 2 (DISP.) button while setting the hour and minute. sSetting the HOLD... Standby mode and turn on the display, press any button. Press the t button according to the time signal. 6 Press the 5 button to use the recorder. The clock will be sure to reset the time. (Example: June 14, 2007) - 4 - sYou can choose between 12 and 24 hour display by...
Instruction Manual
Page 5
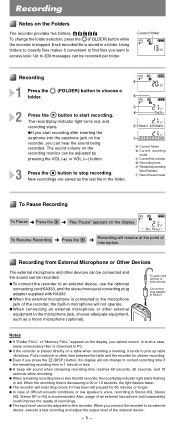
...this recorder. Up to current recording time if the remaining recording time is less than 60 seconds, the record/play indicator light turns red, and recording starts. a Current folder b Current recording mode c Current file number d Recording time e Remaining recording time (Remain) f Record level meter To Pause Recording ...button, the display will not operate. To Resume Recording ➜ Press the 4. ➜ Recording will sound when remaining recording time reaches 60 seconds, 30 seconds, and 10 seconds while recording. Recording Notes on the display. Using folders to classify ...
...this recorder. Up to current recording time if the remaining recording time is less than 60 seconds, the record/play indicator light turns red, and recording starts. a Current folder b Current recording mode c Current file number d Recording time e Remaining recording time (Remain) f Record level meter To Pause Recording ...button, the display will not operate. To Resume Recording ➜ Press the 4. ➜ Recording will sound when remaining recording time reaches 60 seconds, 30 seconds, and 10 seconds while recording. Recording Notes on the display. Using folders to classify ...
Instruction Manual
Page 6
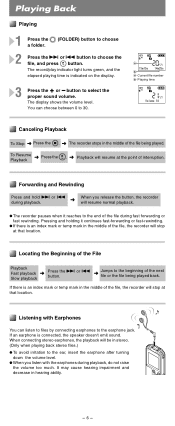
...fast rewinding. You can listen to files by connecting earphones to 30. Pressing and holding it reaches to the end of the file, the recorder will be in the middle of the file during playback, do not raise the volume too much. It may cause hearing impairment and decrease ... being played. Playing Back Playing 1 Press the 2 (FOLDER) button to choose a folder. 2 Press the 9 or 0 button to select the proper sound volume. The record/play indicator light turns green, and the elapsed playing time is connected, the speaker doesn't emit sound. button to choose the file, and press t button...
...fast rewinding. You can listen to files by connecting earphones to 30. Pressing and holding it reaches to the end of the file, the recorder will be in the middle of the file during playback, do not raise the volume too much. It may cause hearing impairment and decrease ... being played. Playing Back Playing 1 Press the 2 (FOLDER) button to choose a folder. 2 Press the 9 or 0 button to select the proper sound volume. The record/play indicator light turns green, and the elapsed playing time is connected, the speaker doesn't emit sound. button to choose the file, and press t button...
Instruction Manual
Page 7
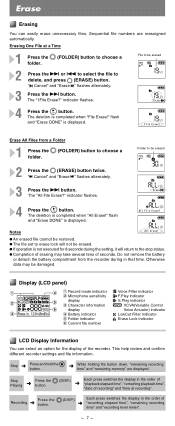
... Folder 1 Press the 2 (FOLDER) button to choose a folder. 2 Press the 1 (ERASE) button twice. Display (LCD panel) 1 Record mode indicator 2 Microphone sensitivity display 3 Character information display 4 Battery indicator 5 Folder indicator 6 Current file number Voice Filter indicator F.Play indicator S.Play...Playing ➜ Press the 2 (DISP.) button. ➜ Each press switches the display in the order of "recording elapsed time", "remaining recording time" and "recording level meter". - 7- The "All File Erase?" Erase Erasing You can select an option for 8 seconds during in...
... Folder 1 Press the 2 (FOLDER) button to choose a folder. 2 Press the 1 (ERASE) button twice. Display (LCD panel) 1 Record mode indicator 2 Microphone sensitivity display 3 Character information display 4 Battery indicator 5 Folder indicator 6 Current file number Voice Filter indicator F.Play indicator S.Play...Playing ➜ Press the 2 (DISP.) button. ➜ Each press switches the display in the order of "recording elapsed time", "remaining recording time" and "recording level meter". - 7- The "All File Erase?" Erase Erasing You can select an option for 8 seconds during in...
Instruction Manual
Page 8
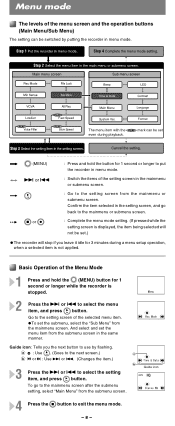
The menu item with the PLAY mark can be switched by flashing. t : Go to select the setting item, and press t button. sTo set .) sThe recorder will not be set the submenu, select the "Sub Menu" from the mainmenu screen. And select and set even during a menu setup operation, when a ...selected item is displayed, the item being selected will stop if you the next button to use by putting the recorder in the setting screen, and go to the mainmenu screen after the submenu setting, select "Main Menu" from the submenu screen. 4 Press the 5 button ...
The menu item with the PLAY mark can be switched by flashing. t : Go to select the setting item, and press t button. sTo set .) sThe recorder will not be set the submenu, select the "Sub Menu" from the mainmenu screen. And select and set even during a menu setup operation, when a ...selected item is displayed, the item being selected will stop if you the next button to use by putting the recorder in the setting screen, and go to the mainmenu screen after the submenu setting, select "Main Menu" from the submenu screen. 4 Press the 5 button ...
Instruction Manual
Page 9
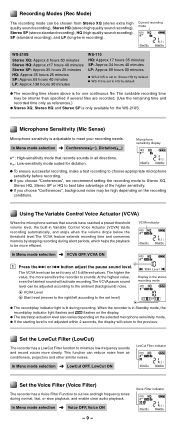
... (Mic Sense) Microphone sensitivity is set to Stereo HQ by default. s WS-110 is only available for the WS-210S. The VCVA level can be shorter than specified if several files are recorded. (Use the remaining time and recorded time only as references.) s Stereo XQ, Stereo HQ and Stereo SP is.... VCVA indicator In Menu mode selection ➜ VCVA OFF, VCVA ON 1 Press the 9 or 0 button adjust the pause sound level. Current recording mode WS-210S Stereo XQ: Approx.8 hours 50 minutes Stereo HQ: Approx.x17 hours 40 minutes Stereo SP: Approx.35 hours 25 minutes HQ: Approx.35 hours...
... (Mic Sense) Microphone sensitivity is set to Stereo HQ by default. s WS-110 is only available for the WS-210S. The VCVA level can be shorter than specified if several files are recorded. (Use the remaining time and recorded time only as references.) s Stereo XQ, Stereo HQ and Stereo SP is.... VCVA indicator In Menu mode selection ➜ VCVA OFF, VCVA ON 1 Press the 9 or 0 button adjust the pause sound level. Current recording mode WS-210S Stereo XQ: Approx.8 hours 50 minutes Stereo HQ: Approx.x17 hours 40 minutes Stereo SP: Approx.35 hours 25 minutes HQ: Approx.35 hours...
Instruction Manual
Page 10
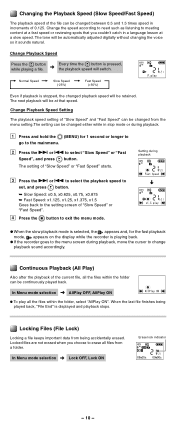
... while in stop mode or during playback. 1 Press and hold the 2 (MENU) for the fast playback mode, appears on the display while the recorder is displayed and playback stops. Setting during playback, move the cursor to exit the menu mode. In Menu mode selection ➜ Lock OFF, Lock... erased. Normal Speed Slow Speed (-25%) Fast Speed (+50%) Even if playback is stopped, the changed playback speed will be continuously played back. sIf the recorder goes to the menu screen during playback ➜ 3 Press the 9 or 0 to select the playback speed to set, and press t button. ➥ ...
... while in stop mode or during playback. 1 Press and hold the 2 (MENU) for the fast playback mode, appears on the display while the recorder is displayed and playback stops. Setting during playback, move the cursor to exit the menu mode. In Menu mode selection ➜ Lock OFF, Lock... erased. Normal Speed Slow Speed (-25%) Fast Speed (+50%) Even if playback is stopped, the changed playback speed will be continuously played back. sIf the recorder goes to the menu screen during playback ➜ 3 Press the 9 or 0 to select the playback speed to set, and press t button. ➥ ...
Instruction Manual
Page 11
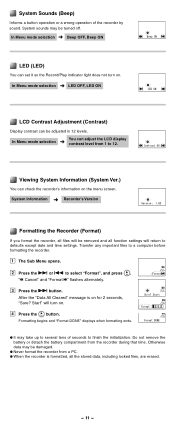
... Informs a button operation or a wrong operation of seconds to select "Format", and press t. System sounds may take up to several tens of the recorder by sound. Formatting begins and "Format DONE" displays when formatting ends. Viewing System Information (System Ver.) You can set it so the..., all files will turn on . 4 Press the t button. In Menu mode selection ➜ Beep OFF, Beep ON LED (LED) You can check the recorder's information on for 2 seconds, "Sure? In Menu mode selection ➜ LED OFF, LED ON LCD Contrast Adjustment (Contrast) Display contrast can adjust the LCD...
... Informs a button operation or a wrong operation of seconds to select "Format", and press t. System sounds may take up to several tens of the recorder by sound. Formatting begins and "Format DONE" displays when formatting ends. Viewing System Information (System Ver.) You can set it so the..., all files will turn on . 4 Press the t button. In Menu mode selection ➜ Beep OFF, Beep ON LED (LED) You can check the recorder's information on for 2 seconds, "Sure? In Menu mode selection ➜ LED OFF, LED ON LCD Contrast Adjustment (Contrast) Display contrast can adjust the LCD...
Instruction Manual
Page 12
...marks cannot be set the HOLD switch in WMA format. ( i.e. sThe recorder will automatically move to another file, or connect the recorder to a computer, they will continue so you can place index marks in other than Olympus IC recorders, but temp marks can be recognized as DSS_FLDA, B, C, D and E.... Once "Remote" is displayed and the record/play indicator light flashes while receiving the data. 3 Transfer the audio files to your recorder and enjoy them to any folder ...
...marks cannot be set the HOLD switch in WMA format. ( i.e. sThe recorder will automatically move to another file, or connect the recorder to a computer, they will continue so you can place index marks in other than Olympus IC recorders, but temp marks can be recognized as DSS_FLDA, B, C, D and E.... Once "Remote" is displayed and the record/play indicator light flashes while receiving the data. 3 Transfer the audio files to your recorder and enjoy them to any folder ...
Instruction Manual
Page 13
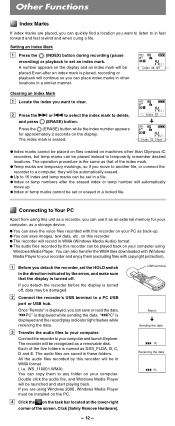
... the user's manual for future reference. • The warning symbols indicate important safety related information. If you to the recorder even though the attribute of the recorder drive is shown as Read-only by pressing the 4 button. sUse the supplied USB extension cable depending on a self-... always read the warnings and information provided. General Precautions Read this manual in an easily accessible location for your PC regarding data loss Recorded content in red. self and others from the speaker while playing back. sBe sure to Windows 2000/XP/Vista. To protect your ...
... the user's manual for future reference. • The warning symbols indicate important safety related information. If you to the recorder even though the attribute of the recorder drive is shown as Read-only by pressing the 4 button. sUse the supplied USB extension cable depending on a self-... always read the warnings and information provided. General Precautions Read this manual in an easily accessible location for your PC regarding data loss Recorded content in red. self and others from the speaker while playing back. sBe sure to Windows 2000/XP/Vista. To protect your ...
Instruction Manual
Page 14
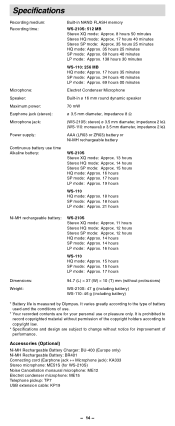
It is measured by Olympus. It varies greatly according to change without protrusions) WS-210S: 47 g (including battery) WS-110: 46 g (including battery) * Battery life is prohibited to record copyrighted material without permission of the copyright holders according to copyright law. * Specifications and design ... jack ↔ Microphone jack): KA333 Stereo microphone: ME51S (for improvement of use. * Your recorded contents are for your personal use time Alkaline battery: Built-in NAND FLASH memory WS-210S: 512 MB Stereo XQ mode: Approx. 8 hours 50 minutes Stereo HQ mode: Approx. 17...
It is measured by Olympus. It varies greatly according to change without protrusions) WS-210S: 47 g (including battery) WS-110: 46 g (including battery) * Battery life is prohibited to record copyrighted material without permission of the copyright holders according to copyright law. * Specifications and design ... jack ↔ Microphone jack): KA333 Stereo microphone: ME51S (for improvement of use. * Your recorded contents are for your personal use time Alkaline battery: Built-in NAND FLASH memory WS-210S: 512 MB Stereo XQ mode: Approx. 8 hours 50 minutes Stereo HQ mode: Approx. 17...


