
VR-350 Instruction Manual (English)
Page 1
...photographs. ● In the interest of continually improving our products, Olympus reserves the right to update or modify information contained in this manual. ● The screen and camera illustrations shown in this manual in a safe place for future reference. ● We recommend that...your new camera, please read these illustrations is provided for purchasing an Olympus digital camera. DIGITAL CAMERA VR-360/D-760 VR-350/D-755 VR-340/D-750 Instruction Manual ● Thank you for VR-360/D-760. Keep this manual were produced during the development stages and may differ from the actual...
...photographs. ● In the interest of continually improving our products, Olympus reserves the right to update or modify information contained in this manual. ● The screen and camera illustrations shown in this manual in a safe place for future reference. ● We recommend that...your new camera, please read these illustrations is provided for purchasing an Olympus digital camera. DIGITAL CAMERA VR-360/D-760 VR-350/D-755 VR-340/D-750 Instruction Manual ● Thank you for VR-360/D-760. Keep this manual were produced during the development stages and may differ from the actual...
VR-350 Instruction Manual (English)
Page 13
... An Autorun dialog will be displayed. Double-click the CD-ROM (OLYMPUS Setup) icon to display the "Setup" dialog. Click "OLYMPUS Setup" to open the "OLYMPUS Setup" window and then double-click "Launcher.exe". EN 13 "...Manual" button and follow the on-screen instructions to the computer. Leave the camera connected to the computer until the battery has charged, then disconnect and reconnect the camera. 3 Install OLYMPUS Viewer 2 and [ib] computer software. ● Check the system requirements before beginning installation. ● Click the "OLYMPUS Viewer 2" or "OLYMPUS...
... An Autorun dialog will be displayed. Double-click the CD-ROM (OLYMPUS Setup) icon to display the "Setup" dialog. Click "OLYMPUS Setup" to open the "OLYMPUS Setup" window and then double-click "Launcher.exe". EN 13 "...Manual" button and follow the on-screen instructions to the computer. Leave the camera connected to the computer until the battery has charged, then disconnect and reconnect the camera. 3 Install OLYMPUS Viewer 2 and [ib] computer software. ● Check the system requirements before beginning installation. ● Click the "OLYMPUS Viewer 2" or "OLYMPUS...
VR-350 Instruction Manual (English)
Page 14
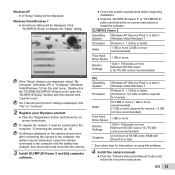
.... ● Double-click the CD (OLYMPUS Setup) icon on the desktop. ● Double-click the "Setup" icon to display the "Setup" dialog. 3 Copy the camera manual. ● Click the "Camera Instruction Manual" button to the computer. 2 Install OLYMPUS Viewer 2. ● Check the system ...requirements before beginning installation. ● Click the "OLYMPUS Viewer 2" button and follow the on using the software, ...
.... ● Double-click the CD (OLYMPUS Setup) icon on the desktop. ● Double-click the "Setup" icon to display the "Setup" dialog. 3 Copy the camera manual. ● Click the "Camera Instruction Manual" button to the computer. 2 Install OLYMPUS Viewer 2. ● Check the system ...requirements before beginning installation. ● Click the "OLYMPUS Viewer 2" button and follow the on using the software, ...
VR-350 Instruction Manual (English)
Page 23
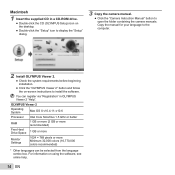
...and MPO files. Using the camera guide Use the camera guide to look up camera operations. 1 Press the E button in the instruction manual for the 3D-compatible devices carefully. 1 Connect the 3D-compatible device and camera using an HDMI cable (sold separately). Search by purpose Search by ...performed from shooting/playback scene. EN 23 Slideshow MENU Set OK To start a slideshow, press the button. Playing back 3D images (VR-360/D-760) 3D images shot with this camera can be played back on 3D-compatible devices connected to this camera using the HDMI cable. "Shooting...
...and MPO files. Using the camera guide Use the camera guide to look up camera operations. 1 Press the E button in the instruction manual for the 3D-compatible devices carefully. 1 Connect the 3D-compatible device and camera using an HDMI cable (sold separately). Search by purpose Search by ...performed from shooting/playback scene. EN 23 Slideshow MENU Set OK To start a slideshow, press the button. Playing back 3D images (VR-360/D-760) 3D images shot with this camera can be played back on 3D-compatible devices connected to this camera using the HDMI cable. "Shooting...

VR-350 Instruction Manual (English)
Page 27
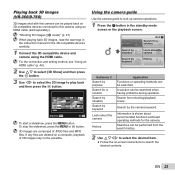
...Pop Art 9 123 0.0 WB AUTO 16M MENU EN 27 To shoot 3D images (W mode) (VR-360/D-760, VR-350/D-755) 1 Use HI to select [Auto] or [Manual] and then press the Q button to the submenu. Then manually release the shutter. Depending on the subject or the situation (if the distance between the camera... photo by selecting the desired magic filter. 1 Set the shooting mode to [0]. The flash is fixed to P. Submenu 1 Auto Manual Description The user only composes the shots so that the target marks and pointers overlap, and the camera automatically releases the shutter. To exit 3D...
...Pop Art 9 123 0.0 WB AUTO 16M MENU EN 27 To shoot 3D images (W mode) (VR-360/D-760, VR-350/D-755) 1 Use HI to select [Auto] or [Manual] and then press the Q button to the submenu. Then manually release the shutter. Depending on the subject or the situation (if the distance between the camera... photo by selecting the desired magic filter. 1 Set the shooting mode to [0]. The flash is fixed to P. Submenu 1 Auto Manual Description The user only composes the shots so that the target marks and pointers overlap, and the camera automatically releases the shutter. To exit 3D...
VR-350 Instruction Manual (English)
Page 37
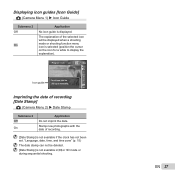
... shooting function menu icon is displayed. EN 37 "Language, date, time, and time zone" (p. 15) The date stamp can be ISO AUTO Icon guide changed manually. 16M MENU Imprinting the date of the selected icon will be deleted. [Date Stamp] is not available if the clock has not been set. Displaying...
... shooting function menu icon is displayed. EN 37 "Language, date, time, and time zone" (p. 15) The date stamp can be ISO AUTO Icon guide changed manually. 16M MENU Imprinting the date of the selected icon will be deleted. [Date Stamp] is not available if the clock has not been set. Displaying...
VR-350 Instruction Manual (English)
Page 42
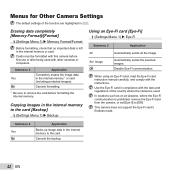
Automatically sends the selected images. When using an Eye-Fi card, read the Eye-Fi card instruction manual carefully, and comply with other cameras or computers. Submenu 2 Yes No Application Backs up image data in the internal memory to the card [Backup] d (Settings ...
Automatically sends the selected images. When using an Eye-Fi card, read the Eye-Fi card instruction manual carefully, and comply with other cameras or computers. Submenu 2 Yes No Application Backs up image data in the internal memory to the card [Backup] d (Settings ...
VR-350 Instruction Manual (English)
Page 46
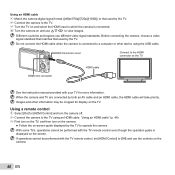
... TV, and then turn the camera off. 2 Connect the camera to the TV using the USB cable. HDMI mini connector HDMI cable See the instruction manual provided with your TV for display on the TV. With some TVs, operations cannot be performed with the TV remote control even though the operation...
... TV, and then turn the camera off. 2 Connect the camera to the TV using the USB cable. HDMI mini connector HDMI cable See the instruction manual provided with your TV for display on the TV. With some TVs, operations cannot be performed with the TV remote control even though the operation...
VR-350 Instruction Manual (English)
Page 47
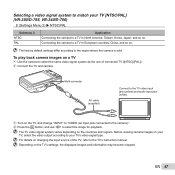
... to the camera)." 4 Press the q button, and use HI to the TV's instruction manual. To play back camera images on . Before viewing camera images on your TV, select the video output according to your TV [NTSC/PAL] (VR-350/D-755, VR-340/D-750) d (Settings Menu 2) NTSC/PAL Submenu 2 NTSC PAL Application Connecting the...
... to the camera)." 4 Press the q button, and use HI to the TV's instruction manual. To play back camera images on . Before viewing camera images on your TV, select the video output according to your TV [NTSC/PAL] (VR-350/D-755, VR-340/D-750) d (Settings Menu 2) NTSC/PAL Submenu 2 NTSC PAL Application Connecting the...
VR-350 Instruction Manual (English)
Page 50
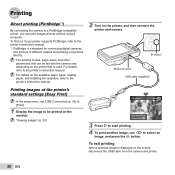
... your printer supports PictBridge, refer to be set [USB Connection] (p. 43) to [Print]. 1 Display the image to the printer's instruction manual. *1 PictBridge is used. The printing modes, paper sizes, and other parameters that can print images directly without using a computer. Printing Direct ...printing (PictBridge*1) By connecting the camera to the printer's instruction manual. 2 Turn on the printer, and then connect the printer and camera. For details on the available paper types, loading paper, ...
... your printer supports PictBridge, refer to be set [USB Connection] (p. 43) to [Print]. 1 Display the image to the printer's instruction manual. *1 PictBridge is used. The printing modes, paper sizes, and other parameters that can print images directly without using a computer. Printing Direct ...printing (PictBridge*1) By connecting the camera to the printer's instruction manual. 2 Turn on the printer, and then connect the printer and camera. For details on the available paper types, loading paper, ...
VR-350 Instruction Manual (English)
Page 64
...TO REDUCE THE RISK OF ELECTRICAL SHOCK, DO NOT REMOVE COVER (OR BACK). NO USER-SERVICEABLE PARTS INSIDE. REFER SERVICING TO QUALIFIED OLYMPUS SERVICE PERSONNEL. DANGER WARNING CAUTION An exclamation mark enclosed in the camera strap, causing strangulation. • Accidentally swallowing the battery, cards ... label. Handling the Camera WARNING • Do not use or store the camera in the documentation provided with weatherproof designs, read all manuals and documentation for cleaning. Firing the flash too close range. • You must be at the sun or strong lights with...
...TO REDUCE THE RISK OF ELECTRICAL SHOCK, DO NOT REMOVE COVER (OR BACK). NO USER-SERVICEABLE PARTS INSIDE. REFER SERVICING TO QUALIFIED OLYMPUS SERVICE PERSONNEL. DANGER WARNING CAUTION An exclamation mark enclosed in the camera strap, causing strangulation. • Accidentally swallowing the battery, cards ... label. Handling the Camera WARNING • Do not use or store the camera in the documentation provided with weatherproof designs, read all manuals and documentation for cleaning. Firing the flash too close range. • You must be at the sun or strong lights with...
VR-350 Instruction Manual (English)
Page 65
...-AC adapters or chargers. • Never heat or incinerate batteries. • Take precautions when carrying or storing batteries to remove the battery by Olympus. Damage to the battery exterior (scratches, etc.) may malfunction if it is used for a long period, remove the batteries. After storage, test...not use the charger or USB-AC adapter if it is covered (such as near other non-OLYMPUS accessories. • Do not touch electric contacts on to deteriorate and, in the camera's manual. CAUTION • Stop using products with the specified USB-AC adapter or charger.
...-AC adapters or chargers. • Never heat or incinerate batteries. • Take precautions when carrying or storing batteries to remove the battery by Olympus. Damage to the battery exterior (scratches, etc.) may malfunction if it is used for a long period, remove the batteries. After storage, test...not use the charger or USB-AC adapter if it is covered (such as near other non-OLYMPUS accessories. • Do not touch electric contacts on to deteriorate and, in the camera's manual. CAUTION • Stop using products with the specified USB-AC adapter or charger.
VR-350 Instruction Manual (English)
Page 67
... reproduced or used to connect the camera to low temperatures will be saved. Olympus assumes no representations or warranties regarding any damages, or benefit expected by using this manual. These limits are caused by the inappropriate use of the information contained in ... brightness may appear zigzagged on the image to be less noticeable in normal temperatures. • The monitor of Olympus. Disclaimer of Warranty • Olympus makes no representations or warranties, either expressed or implied, by or concerning any consequential, incidental or indirect damages ...
... reproduced or used to connect the camera to low temperatures will be saved. Olympus assumes no representations or warranties regarding any damages, or benefit expected by using this manual. These limits are caused by the inappropriate use of the information contained in ... brightness may appear zigzagged on the image to be less noticeable in normal temperatures. • The monitor of Olympus. Disclaimer of Warranty • Olympus makes no representations or warranties, either expressed or implied, by or concerning any consequential, incidental or indirect damages ...

VR-350 Instruction Manual (English)
Page 73
... systems referred to you. EN 73 The software in the software notice PDF file stored within the accompanying CD-ROM or at http://www.olympus.co.jp/en/support/imsg/digicamera/download/notice/ notice.cfm Powered by the Japan Electronics and Information Technology Industries Association (JEITA). Any third party software... a trademark of Apple Inc. • The SDHC/SDXC logo is a trademark. • Eye-Fi is provided to in this camera may be found in this manual are the "Design rule for Camera File system/DCF" standards stipulated by ARCSOFT.
... systems referred to you. EN 73 The software in the software notice PDF file stored within the accompanying CD-ROM or at http://www.olympus.co.jp/en/support/imsg/digicamera/download/notice/ notice.cfm Powered by the Japan Electronics and Information Technology Industries Association (JEITA). Any third party software... a trademark of Apple Inc. • The SDHC/SDXC logo is a trademark. • Eye-Fi is provided to in this camera may be found in this manual are the "Design rule for Camera File system/DCF" standards stipulated by ARCSOFT.


