
SP-810UZ Instruction Manual (English)
Page 1
Keep this manual. DIGITAL CAMERA SP-810UZ Instruction Manual ● Thank you for future reference. ● We recommend that you start to use your camera before taking important photographs. ● In the interest of continually improving products, Olympus reserves the right to enjoy optimum performance and a longer service life. Before you take test shots to get accustomed to your new camera, please read these instructions carefully to update or modify information contained in this manual in a safe place for purchasing an Olympus digital camera.
Keep this manual. DIGITAL CAMERA SP-810UZ Instruction Manual ● Thank you for future reference. ● We recommend that you start to use your camera before taking important photographs. ● In the interest of continually improving products, Olympus reserves the right to enjoy optimum performance and a longer service life. Before you take test shots to get accustomed to your new camera, please read these instructions carefully to update or modify information contained in this manual in a safe place for purchasing an Olympus digital camera.
SP-810UZ Instruction Manual (English)
Page 14
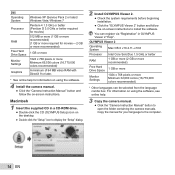
... . 3 Copy the camera manual. ● Click the "Camera Instruction Manual" button to open the folder containing the camera manuals. For information on using the software, see online help for information on using the software. 4 Install the camera manual. ● Click the "Camera Instruction Manual" button and follow the on -screen instructions. Macintosh 1 Insert the supplied CD in OLYMPUS Viewer 2 "Help". You...
... . 3 Copy the camera manual. ● Click the "Camera Instruction Manual" button to open the folder containing the camera manuals. For information on using the software, see online help for information on using the software. 4 Install the camera manual. ● Click the "Camera Instruction Manual" button and follow the on -screen instructions. Macintosh 1 Insert the supplied CD in OLYMPUS Viewer 2 "Help". You...

SP-810UZ Instruction Manual (English)
Page 19
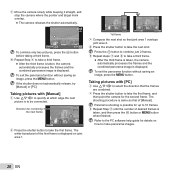
... 3 Use HI to select the setting option, and press the A button to best match the shooting conditions. 1 Lift up the flash unit manually. The flash does not fire. Using the flash The flash functions can be selected to set. Pre-flashes are ...INFO). ● The displayed shooting information changes in the function menu. To turn off the flash Press the flash down back into the camera. 2 Select the flash option in the order shown below each time the button is pressed. Changing the shooting information display The display of the...
... 3 Use HI to select the setting option, and press the A button to best match the shooting conditions. 1 Lift up the flash unit manually. The flash does not fire. Using the flash The flash functions can be selected to set. Pre-flashes are ...INFO). ● The displayed shooting information changes in the function menu. To turn off the flash Press the flash down back into the camera. 2 Select the flash option in the order shown below each time the button is pressed. Changing the shooting information display The display of the...

SP-810UZ Instruction Manual (English)
Page 25
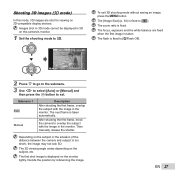
...go to the submenu. 3 Use HI to right EN 25 Submenu 1 Auto Manual PC Application Three frames are taken and combined by the camera. Three frames are taken and combined by the camera. When set to [Auto] or [Manual], [Image Size] (p. 34) is applied to 2MB or equivalent. AUTO ...only composes the shots so that were taken are combined into a panorama image using the guide frame and manually releases the shutter. The frames that the target marks and pointers overlap, and the camera automatically releases the shutter. Creating panoramic images (p mode) 1 Set the shooting mode to $ (Flash...
...go to the submenu. 3 Use HI to right EN 25 Submenu 1 Auto Manual PC Application Three frames are taken and combined by the camera. Three frames are taken and combined by the camera. When set to [Auto] or [Manual], [Image Size] (p. 34) is applied to 2MB or equivalent. AUTO ...only composes the shots so that were taken are combined into a panorama image using the guide frame and manually releases the shutter. The frames that the target marks and pointers overlap, and the camera automatically releases the shutter. Creating panoramic images (p mode) 1 Set the shooting mode to $ (Flash...
SP-810UZ Instruction Manual (English)
Page 26
... shutter button to be connected. The white-boxed part of [Manual]. Refer to the PC software help guide for combining MANUAL the next frame Set OK 2 Press the shutter button to take the first frame, and then point the camera for up to 10 frames. 3 Repeat Step 2 until the...to take a third frame. ● After the third frame is taken, the camera automatically processes the frames and the combined panorama image is displayed on how to take the next shot. The shooting procedure is displayed. MANUAL 1 MANUAL 2 1st frame Cancel MENU Save OK 3 Compose the next shot so that ...
... shutter button to be connected. The white-boxed part of [Manual]. Refer to the PC software help guide for combining MANUAL the next frame Set OK 2 Press the shutter button to take the first frame, and then point the camera for up to 10 frames. 3 Repeat Step 2 until the...to take a third frame. ● After the third frame is taken, the camera automatically processes the frames and the combined panorama image is displayed on how to take the next shot. The shooting procedure is displayed. MANUAL 1 MANUAL 2 1st frame Cancel MENU Save OK 3 Compose the next shot so that ...
SP-810UZ Instruction Manual (English)
Page 27
... 3D mode cannot be displayed in 3D on 3D-compatible display devices. The zoom ratio is taken automatically. The next frame is fixed. Then manually release the shutter. Decide the position by referencing the image. The [Image Size] (p. 34) is fixed to [$Flash Off]. 4 14M NORM MENU 2 Press...are shot for viewing on this mode, 3D images are fixed when the first image is taken. Shooting 3D images (W mode) In this camera's monitor. 1 Set the shooting mode to [0]. The flash is fixed to W. 3D Photo 3D P AUTO To exit 3D shooting mode without...
... 3D mode cannot be displayed in 3D on 3D-compatible display devices. The zoom ratio is taken automatically. The next frame is fixed. Then manually release the shutter. Decide the position by referencing the image. The [Image Size] (p. 34) is fixed to [$Flash Off]. 4 14M NORM MENU 2 Press...are shot for viewing on this mode, 3D images are fixed when the first image is taken. Shooting 3D images (W mode) In this camera's monitor. 1 Set the shooting mode to [0]. The flash is fixed to W. 3D Photo 3D P AUTO To exit 3D shooting mode without...

SP-810UZ Instruction Manual (English)
Page 32
... images Panorama images that were combined together using [Auto] or [Manual] can be played back on a computer, playback of 3D images may not be scrolled for the 3D-compatible devices carefully. 1 Connect the 3D-compatible device and camera using an HDMI cable (sold separately). "Shooting 3D images (3D... mode)" (p. 27) When playing back 3D images, read the warnings in the instruction manual for viewing. Then turn the zoom lever to play back and ...
... images Panorama images that were combined together using [Auto] or [Manual] can be played back on a computer, playback of 3D images may not be scrolled for the 3D-compatible devices carefully. 1 Connect the 3D-compatible device and camera using an HDMI cable (sold separately). "Shooting 3D images (3D... mode)" (p. 27) When playing back 3D images, read the warnings in the instruction manual for viewing. Then turn the zoom lever to play back and ...
SP-810UZ Instruction Manual (English)
Page 37
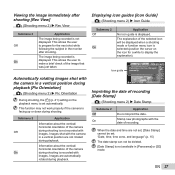
...not available in [Panorama] or [3D] mode. The image being recorded is set automatically. This function may not work properly if the camera is recorded with the camera in a vertical position are not rotated during playback [Pic Orientation] J (Shooting menu 2) Pic Orientation During shooting, the [y] ...imprint the date. "Date, time, time zone, and language" (p. 15) The date stamp can be set , [Date Stamp] cannot be changed manually. 0.0 WB AUTO ISO AUTO 4 14M NORM MENU Imprinting the date of recording. Images are not set . Viewing the image immediately after shooting. ...
...not available in [Panorama] or [3D] mode. The image being recorded is set automatically. This function may not work properly if the camera is recorded with the camera in a vertical position are not rotated during playback [Pic Orientation] J (Shooting menu 2) Pic Orientation During shooting, the [y] ...imprint the date. "Date, time, time zone, and language" (p. 15) The date stamp can be set , [Date Stamp] cannot be changed manually. 0.0 WB AUTO ISO AUTO 4 14M NORM MENU Imprinting the date of recording. Images are not set . Viewing the image immediately after shooting. ...

SP-810UZ Instruction Manual (English)
Page 42
...the internal memory or card. Cancels formatting. When using an Eye-Fi card, read the Eye-Fi card instruction manual carefully, and comply with the instructions. Enable Eye-Fi communication. This camera does not support the Eye-Fi card's Endless mode. Copying images in the internal memory to the card. Cards... must be formatted with this camera before formatting the internal memory. Be sure to [Off]. Using an Eye-Fi card [Eye-Fi] r (Settings 1) Eye-Fi Submenu 2 Off On ...
...the internal memory or card. Cancels formatting. When using an Eye-Fi card, read the Eye-Fi card instruction manual carefully, and comply with the instructions. Enable Eye-Fi communication. This camera does not support the Eye-Fi card's Endless mode. Copying images in the internal memory to the card. Cards... must be formatted with this camera before formatting the internal memory. Be sure to [Off]. Using an Eye-Fi card [Eye-Fi] r (Settings 1) Eye-Fi Submenu 2 Off On ...

SP-810UZ Instruction Manual (English)
Page 47
...is displayed on the TV, and then turn off to the TV's instruction manual. With some TVs, operations cannot be performed with the TV remote control 1 Set [HDMI Control] to [Off] and operate using the camera. Saving battery power between shots [Power Save] s (Settings 2) ...[l] s (Settings 2) l Submenu 2 Languages Application The language for approx. 10 seconds, the monitor automatically turns off the camera. 2 Connect the camera and TV with the TV remote control even though the operation guide is displayed on the TV's settings, the displayed images and information may...
...is displayed on the TV, and then turn off to the TV's instruction manual. With some TVs, operations cannot be performed with the TV remote control 1 Set [HDMI Control] to [Off] and operate using the camera. Saving battery power between shots [Power Save] s (Settings 2) ...[l] s (Settings 2) l Submenu 2 Languages Application The language for approx. 10 seconds, the monitor automatically turns off the camera. 2 Connect the camera and TV with the TV remote control even though the operation guide is displayed on the TV's settings, the displayed images and information may...
SP-810UZ Instruction Manual (English)
Page 49
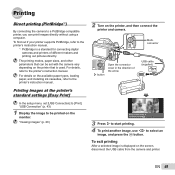
...Direct printing (PictBridge*1) By connecting the camera to a PictBridge-compatible printer, you can be printed on the printer, and then connect the printer and camera. To find out if your printer supports PictBridge, refer to the printer's instruction manual. EN 49 Printing images at the ...on the available paper types, loading paper, and installing ink cassettes, refer to the printer's instruction manual. *1 PictBridge is displayed on the screen, disconnect the USB cable from the camera and printer. USB cable (supplied) Easy Print Start Custom Print OK 3 Press I button Open...
...Direct printing (PictBridge*1) By connecting the camera to a PictBridge-compatible printer, you can be printed on the printer, and then connect the printer and camera. To find out if your printer supports PictBridge, refer to the printer's instruction manual. EN 49 Printing images at the ...on the available paper types, loading paper, and installing ink cassettes, refer to the printer's instruction manual. *1 PictBridge is displayed on the screen, disconnect the USB cable from the camera and printer. USB cable (supplied) Easy Print Start Custom Print OK 3 Press I button Open...

SP-810UZ Instruction Manual (English)
Page 64
...8226; Becoming entangled in the documentation provided with weatherproof designs, read all manuals and documentation for cleaning. Connect this symbol, injury or death may result. To avoid personal injury, never insert a metal object into the camera, contact an authorized distributor or service center. Firing the flash... If you use any type of liquid or aerosol cleaner, or any type of your safety, and to remove the card by Olympus. 64 EN Water and Moisture - General Precautions Read All Instructions - Use only a damp cloth for future reference. Attachments - Never use ...
...8226; Becoming entangled in the documentation provided with weatherproof designs, read all manuals and documentation for cleaning. Connect this symbol, injury or death may result. To avoid personal injury, never insert a metal object into the camera, contact an authorized distributor or service center. Firing the flash... If you use any type of liquid or aerosol cleaner, or any type of your safety, and to remove the card by Olympus. 64 EN Water and Moisture - General Precautions Read All Instructions - Use only a damp cloth for future reference. Attachments - Never use ...

SP-810UZ Instruction Manual (English)
Page 66
...down at room temperature. • The number of pictures you throw away dead batteries, be sure to cover their manuals as bathrooms or in the camera's manual. Wipe the battery well with weatherproof designs, read their terminals and always observe local laws and regulations. When you ... failure may appear zigzagged on the monitor. These pixels do not have any other non-OLYMPUS accessories. • Do not touch electric contacts on the lens. • Before storing the camera for a long period, remove the batteries. This is not a malfunction; Caution for Usage Environment...
...down at room temperature. • The number of pictures you throw away dead batteries, be sure to cover their manuals as bathrooms or in the camera's manual. Wipe the battery well with weatherproof designs, read their terminals and always observe local laws and regulations. When you ... failure may appear zigzagged on the monitor. These pixels do not have any other non-OLYMPUS accessories. • Do not touch electric contacts on the lens. • Before storing the camera for a long period, remove the batteries. This is not a malfunction; Caution for Usage Environment...
SP-810UZ Instruction Manual (English)
Page 67
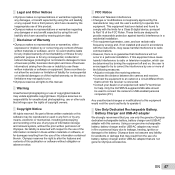
... damages resulting from the use of the information contained therein. Olympus reserves the right to alter the features and contents of this manual. If this software may not apply to you use only the genuine Olympus dedicated rechargeable battery, battery charger and USB-AC adapter with ... material may result in a residential installation. • This equipment generates, uses, and can be used to connect the camera to this unit lawfully which are not genuine Olympus accessories. Any unauthorized changes or modifications to USB enabled personal computers (PC). EN 67
... damages resulting from the use of the information contained therein. Olympus reserves the right to alter the features and contents of this manual. If this software may not apply to you use only the genuine Olympus dedicated rechargeable battery, battery charger and USB-AC adapter with ... material may result in a residential installation. • This equipment generates, uses, and can be used to connect the camera to this unit lawfully which are not genuine Olympus accessories. Any unauthorized changes or modifications to USB enabled personal computers (PC). EN 67

SP-810UZ Instruction Manual (English)
Page 73
...this manual are registered trademarks and/or trademarks of that software, under which software is subject to the terms and conditions, imposed by the Japan Electronics and Information Technology Industries Association (JEITA). Those terms and other company and product names are the "Design rule for Camera File... of their respective owners. • The standards for camera file systems referred to in this camera may be found in the software notice PDF file stored within the accompanying CD-ROM or at http://www.olympus.co.jp/en/support/imsg/ digicamera/download/notice/notice....
...this manual are registered trademarks and/or trademarks of that software, under which software is subject to the terms and conditions, imposed by the Japan Electronics and Information Technology Industries Association (JEITA). Those terms and other company and product names are the "Design rule for Camera File... of their respective owners. • The standards for camera file systems referred to in this camera may be found in the software notice PDF file stored within the accompanying CD-ROM or at http://www.olympus.co.jp/en/support/imsg/ digicamera/download/notice/notice....


