SP-320 Advanced Manual (English)
Page 6
... Selecting an album cover (SELECT TITLE IMAGE 83 Undoing album entries (UNDO ENTRY 84 Erasing pictures from albums 85 Slideshow 86 Adding sound to the default (RESET 106 Selecting a display language 106 Changing the startup screen and shutdown screen (PW ON SETUP/PW OFF SETUP 107 Screen setup 107 Viewing pictures immediately (REC VIEW...
... Selecting an album cover (SELECT TITLE IMAGE 83 Undoing album entries (UNDO ENTRY 84 Erasing pictures from albums 85 Slideshow 86 Adding sound to the default (RESET 106 Selecting a display language 106 Changing the startup screen and shutdown screen (PW ON SETUP/PW OFF SETUP 107 Screen setup 107 Viewing pictures immediately (REC VIEW...
SP-320 Advanced Manual (English)
Page 16
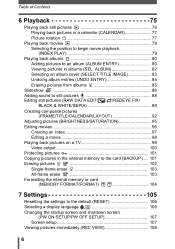
...screen is displayed when [EDIT] is in the camera. • For a list of mode menu items, see "Menu list" (P. 173). 16 The [CARD] tab is displayed when a card is inserted in use. SETUP tab For setting basic camera functions and settings that make the camera... menu 1 (Shooting mode Basic operation SET MEM PIC CAMERA ESP/ DRIVE ISO 1/2/3/4 ESP OFF AUTO CAMERA For setting shooting-related functions. tab PICTURE For setting picture... and white tab balance. SETUP tab For setting basic camera functions and settings that make the camera easier to use . (Playback mode OFF 0° ...
...screen is displayed when [EDIT] is in the camera. • For a list of mode menu items, see "Menu list" (P. 173). 16 The [CARD] tab is displayed when a card is inserted in use. SETUP tab For setting basic camera functions and settings that make the camera... menu 1 (Shooting mode Basic operation SET MEM PIC CAMERA ESP/ DRIVE ISO 1/2/3/4 ESP OFF AUTO CAMERA For setting shooting-related functions. tab PICTURE For setting picture... and white tab balance. SETUP tab For setting basic camera functions and settings that make the camera easier to use . (Playback mode OFF 0° ...
SP-320 Advanced Manual (English)
Page 29
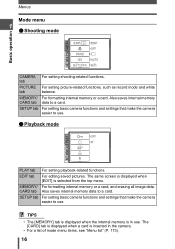
...; 240 (30 frames/sec.) 39 sec. 40 sec. 3 min. 10 sec. 3 min. 13 sec. sound 14 sec. SQ2 320 × 240 1 min. (15 frames/sec.) 18 sec. 1 min. 20 sec. 6 min. 15 sec. 6 min. 26 sec. 1/200 F4.0 0.0 0.0 Tips before you start taking pictures ...SQ1 1600×1200 4 Number of 1,024 × 768 fills the screen if you take new pictures or erase stored pictures. 29 Record mode For movies Remaining recording time Record mode Image size Internal memory Using a 128 MB card With Without With Without SHQ 640 × 480 (30...
...; 240 (30 frames/sec.) 39 sec. 40 sec. 3 min. 10 sec. 3 min. 13 sec. sound 14 sec. SQ2 320 × 240 1 min. (15 frames/sec.) 18 sec. 1 min. 20 sec. 6 min. 15 sec. 6 min. 26 sec. 1/200 F4.0 0.0 0.0 Tips before you start taking pictures ...SQ1 1600×1200 4 Number of 1,024 × 768 fills the screen if you take new pictures or erase stored pictures. 29 Record mode For movies Remaining recording time Record mode Image size Internal memory Using a 128 MB card With Without With Without SHQ 640 × 480 (30...
SP-320 Advanced Manual (English)
Page 31
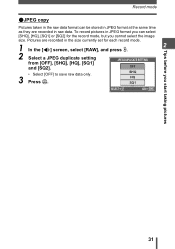
Record mode (JPEG copy Pictures taken in the raw data format can select [SHQ], [HQ], [SQ1] or [SQ2] for each record mode. 1 In the [K] screen, select [RAW], and press q. 2 2 Select a JPEG duplicate setting from [OFF], [SHQ], [HQ], [SQ1] and [SQ2]. To record pictures in raw data. Pictures are recorded in ... in JPEG format at the same time as they are recorded in the size currently set for the record mode, but you cannot select the image size.
Record mode (JPEG copy Pictures taken in the raw data format can select [SHQ], [HQ], [SQ1] or [SQ2] for each record mode. 1 In the [K] screen, select [RAW], and press q. 2 2 Select a JPEG duplicate setting from [OFF], [SHQ], [HQ], [SQ1] and [SQ2]. To record pictures in raw data. Pictures are recorded in ... in JPEG format at the same time as they are recorded in the size currently set for the record mode, but you cannot select the image size.

SP-320 Advanced Manual (English)
Page 39
The highlighted picture is enlarged. 1 Press pq to erase, and press s. Repeat Step 1 to select a scene, and press Z. 1 D IMAGE STABILIZATION SELECT GO OK 3 2 Take the picture. • For shoot & select, hold down the shutter button. • To change the scene, press r. SELECT..., press Z to display the top menu and select [SCENE]. (When [SHOOT & SELECT1] or [SHOOT & SELECT2] is selected • After taking your pictures, the screen for selecting which pictures to erase is displayed on the selected picture. 2 When you want to select the picture you have selected all the unwanted...
The highlighted picture is enlarged. 1 Press pq to erase, and press s. Repeat Step 1 to select a scene, and press Z. 1 D IMAGE STABILIZATION SELECT GO OK 3 2 Take the picture. • For shoot & select, hold down the shutter button. • To change the scene, press r. SELECT..., press Z to display the top menu and select [SCENE]. (When [SHOOT & SELECT1] or [SHOOT & SELECT2] is selected • After taking your pictures, the screen for selecting which pictures to erase is displayed on the selected picture. 2 When you want to select the picture you have selected all the unwanted...

SP-320 Advanced Manual (English)
Page 48
... [ON]. g"Using the menus" (P. 17) 0.0 Displayed during recording. HQ 00:36 Note • When the camera moves a lot or the subject is set [h] to [OFF], otherwise the movement of the subject may cause the image on the screen to movement of the subject, thereby enabling recording of the subject. Recording movies Note •...
... [ON]. g"Using the menus" (P. 17) 0.0 Displayed during recording. HQ 00:36 Note • When the camera moves a lot or the subject is set [h] to [OFF], otherwise the movement of the subject may cause the image on the screen to movement of the subject, thereby enabling recording of the subject. Recording movies Note •...

SP-320 Advanced Manual (English)
Page 80
...can be entered in albums. You can enter up to 100 pictures into each of the available 12 albums. Using the provided OLYMPUS Master software, you can enter pictures from a computer into albums. Pictures stored in the internal memory cannot be set in [...ALBUM MENU] Function 0 y SELECT TITLE IMAGE UNDO ENTRY Ref. Playing back albums Pictures recorded to the card can be organized by sorting them into an album on a ...playback mode top menu. Press Z in album playback mode to display the [ALBUM MENU] screen.
...can be entered in albums. You can enter up to 100 pictures into each of the available 12 albums. Using the provided OLYMPUS Master software, you can enter pictures from a computer into albums. Pictures stored in the internal memory cannot be set in [...ALBUM MENU] Function 0 y SELECT TITLE IMAGE UNDO ENTRY Ref. Playing back albums Pictures recorded to the card can be organized by sorting them into an album on a ...playback mode top menu. Press Z in album playback mode to display the [ALBUM MENU] screen.

SP-320 Advanced Manual (English)
Page 83
... album to display GO OK the picture you want. ALBUM 1 2 3 4 5 6 7 8 9 10 11 12 SELECT 4 Use the arrow pad to change the title image (first frame in album) displayed on the [SEL. ALBUM] from other albums, select [SEL. During close -up playback, use the arrow pad to scroll. 5 To... the top menu, and select [CLOSE ALBUM]. 6 TIPS • To display pictures from the top menu, and select the album to view. ALBUM] screen. SEL. s : Jumps to the picture 10 frames back. Playing back albums 3 Press srpq to select an album to view, and press Z. • The...
... album to display GO OK the picture you want. ALBUM 1 2 3 4 5 6 7 8 9 10 11 12 SELECT 4 Use the arrow pad to change the title image (first frame in album) displayed on the [SEL. ALBUM] from other albums, select [SEL. During close -up playback, use the arrow pad to scroll. 5 To... the top menu, and select [CLOSE ALBUM]. 6 TIPS • To display pictures from the top menu, and select the album to view. ALBUM] screen. SEL. s : Jumps to the picture 10 frames back. Playing back albums 3 Press srpq to select an album to view, and press Z. • The...

SP-320 Advanced Manual (English)
Page 94
Repeat this step and select additional pictures until the screen in Step 3 is displayed. • Press sr to select the day, and press Z. CALENDAR SEL. ALBUM 1 2 3 4 5 6 7 8 6 9 10 11 12 SELECT GO OK Playback When [CALENDAR] ... the layout by day from the monthly display. Creating composite pictures (FRAME/TITLE/CALENDAR/LAYOUT) (When [LAYOUT] is selected 1 Press pq to Step 3. LAYOUT ALL IMAGES All pictures in the SELECT GO OK selected album are added to the layout. gGo to select a layout, and press Z. 2 Select the type of layout...
Repeat this step and select additional pictures until the screen in Step 3 is displayed. • Press sr to select the day, and press Z. CALENDAR SEL. ALBUM 1 2 3 4 5 6 7 8 6 9 10 11 12 SELECT GO OK Playback When [CALENDAR] ... the layout by day from the monthly display. Creating composite pictures (FRAME/TITLE/CALENDAR/LAYOUT) (When [LAYOUT] is selected 1 Press pq to Step 3. LAYOUT ALL IMAGES All pictures in the SELECT GO OK selected album are added to the layout. gGo to select a layout, and press Z. 2 Select the type of layout...
SP-320 Advanced Manual (English)
Page 108
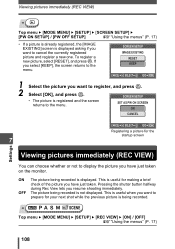
... Rec View lets you resume shooting immediately. The picture being recorded is displayed. SCREEN SETUP IMAGE EXISTING RESET KEEP CANCEL SELECT GO OK 1 Select the picture you want to the menu. SCREEN SETUP • The picture is registered and the screen returns to cancel the currently registered picture and register a new one. Viewing pictures...
... Rec View lets you resume shooting immediately. The picture being recorded is displayed. SCREEN SETUP IMAGE EXISTING RESET KEEP CANCEL SELECT GO OK 1 Select the picture you want to the menu. SCREEN SETUP • The picture is registered and the screen returns to cancel the currently registered picture and register a new one. Viewing pictures...

SP-320 Advanced Manual (English)
Page 112
Settings SETUP MEM PIC CAM Adjusting the monitor brightness 1 Press q. PIXEL MAPPING START DUAL TIME SETUP m/ft Note • If you turn the camera off during pixel mapping. When pixel mapping is displayed during pixel mapping, check must be performed again. Adjusting the monitor brightness This function lets you ... adjust the brightness of the monitor to make it . SELECT GO OK 112 When [START] is displayed, press Z. • The [BUSY] bar is finished, the screen returns to see the image.
Settings SETUP MEM PIC CAM Adjusting the monitor brightness 1 Press q. PIXEL MAPPING START DUAL TIME SETUP m/ft Note • If you turn the camera off during pixel mapping. When pixel mapping is displayed during pixel mapping, check must be performed again. Adjusting the monitor brightness This function lets you ... adjust the brightness of the monitor to make it . SELECT GO OK 112 When [START] is displayed, press Z. • The [BUSY] bar is finished, the screen returns to see the image.

SP-320 Advanced Manual (English)
Page 121
... manufacturer. What is also possible to print out pictures using the print reservation data. If [STANDARD] is selected on the settings screens (P. 124 to 129), pictures are sufficiently charged. Print modes and settings Available printing modes, paper sizes etc., vary depending on...your printer is the standard for connecting digital cameras and printers of different manufacturers and printing out pictures directly. If the camera stops operating while communicating with the printer, the printer may malfunction or image data may be lost. • Images recorded in movie mode and raw data...
... manufacturer. What is also possible to print out pictures using the print reservation data. If [STANDARD] is selected on the settings screens (P. 124 to 129), pictures are sufficiently charged. Print modes and settings Available printing modes, paper sizes etc., vary depending on...your printer is the standard for connecting digital cameras and printers of different manufacturers and printing out pictures directly. If the camera stops operating while communicating with the printer, the printer may malfunction or image data may be lost. • Images recorded in movie mode and raw data...

SP-320 Advanced Manual (English)
Page 124
... on the monitor. Select [ALL IMAGES] or [ALBUM], and press Z. To select an album, select [ALBUM], and press Z. 3 Select [PRINT], and press Z. • The [PRINTPAPER] screen is displayed. • When the [PRINTPAPER] screen is displayed. The USB P C EASY PRINT [PRINT MODE SELECT] screen is CUSTOM PRINT displayed on the camera's monitor. • Select [EASY PRINT...
... on the monitor. Select [ALL IMAGES] or [ALBUM], and press Z. To select an album, select [ALBUM], and press Z. 3 Select [PRINT], and press Z. • The [PRINTPAPER] screen is displayed. • When the [PRINTPAPER] screen is displayed. The USB P C EASY PRINT [PRINT MODE SELECT] screen is CUSTOM PRINT displayed on the camera's monitor. • Select [EASY PRINT...

SP-320 Advanced Manual (English)
Page 127
...and border settings can be set in the internal EXIT SELECT GO OK memory or the card. ALL IMAGES ALBUM Operation guide SELECT GO OK Selecting a print mode PRINT ALL PRINT Prints the selected picture. ...Selecting the picture to print (available only when a card is inserted) ALL IMAGES ALBUM Allows you to select from all pictures in the album to print reservations. ALL PRINT MULTI ...INDEX pictures stored in the same print mode. If the following screen is not available. Prints one picture in PRINT MODE SELECT the internal memory or the PRINT MULTI...
...and border settings can be set in the internal EXIT SELECT GO OK memory or the card. ALL IMAGES ALBUM Operation guide SELECT GO OK Selecting a print mode PRINT ALL PRINT Prints the selected picture. ...Selecting the picture to print (available only when a card is inserted) ALL IMAGES ALBUM Allows you to select from all pictures in the album to print reservations. ALL PRINT MULTI ...INDEX pictures stored in the same print mode. If the following screen is not available. Prints one picture in PRINT MODE SELECT the internal memory or the PRINT MULTI...

SP-320 Advanced Manual (English)
Page 143
... screen for the first time, the iPhoto application starts automatically, so close this application and start OLYMPUS Master. The camera is recognized as a "Removable Disk". • Macintosh The iPhoto program is recognized by the computer. When you connect the camera to your digital camera ... the camera. 1 Make sure the camera is turned off. • The monitor is off. • The lens is displayed. USB P C EASY PRINT • Windows CUSTOM PRINT When you connect your computer for managing digital images. Connecting the camera to a computer Connect the camera to ...
... screen for the first time, the iPhoto application starts automatically, so close this application and start OLYMPUS Master. The camera is recognized as a "Removable Disk". • Macintosh The iPhoto program is recognized by the computer. When you connect the camera to your digital camera ... the camera. 1 Make sure the camera is turned off. • The monitor is off. • The lens is displayed. USB P C EASY PRINT • Windows CUSTOM PRINT When you connect your computer for managing digital images. Connecting the camera to a computer Connect the camera to ...
SP-320 Advanced Manual (English)
Page 149
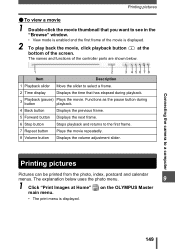
Connecting the camera to a computer Printing pictures (To view a movie 1 Double-click the movie thumbnail that you want to see in the "Browse" window....has elapsed during playback. 3 Playback (pause) button Plays the movie. The explanation below uses the photo menu. 9 1 Click "Print Images at Home" on the OLYMPUS Master main menu. • The print menu is displayed. 2 To play back the movie, click playback button at the bottom of the.... 7 Repeat button Plays the movie repeatedly. 8 Volume button Displays the volume adjustment slider. The names and functions of the screen.
Connecting the camera to a computer Printing pictures (To view a movie 1 Double-click the movie thumbnail that you want to see in the "Browse" window....has elapsed during playback. 3 Playback (pause) button Plays the movie. The explanation below uses the photo menu. 9 1 Click "Print Images at Home" on the OLYMPUS Master main menu. • The print menu is displayed. 2 To play back the movie, click playback button at the bottom of the.... 7 Repeat button Plays the movie repeatedly. 8 Volume button Displays the volume adjustment slider. The names and functions of the screen.
SP-320 Advanced Manual (English)
Page 150
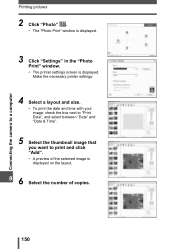
Make the necessary printer settings. 4 Select a layout and size. • To print the date and time with your image, check the box next to "Print Date", and select between "Date" and "Date & Time". 5 Select the thumbnail image that you want to a computer Printing pictures 2 Click "Photo" . • The "Photo Print" window is displayed. 3 Click "Settings" in the "Photo Print" window. • The printer settings screen is displayed on the layout. 6 9 Select the number of copies. 150 Connecting the camera to print and click "Add". • A preview of the selected image is displayed.
Make the necessary printer settings. 4 Select a layout and size. • To print the date and time with your image, check the box next to "Print Date", and select between "Date" and "Date & Time". 5 Select the thumbnail image that you want to a computer Printing pictures 2 Click "Photo" . • The "Photo Print" window is displayed. 3 Click "Settings" in the "Photo Print" window. • The printer settings screen is displayed on the layout. 6 9 Select the number of copies. 150 Connecting the camera to print and click "Add". • A preview of the selected image is displayed.
SP-320 Advanced Manual (English)
Page 156
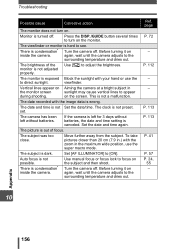
... the DISP./GUIDE button several times to turn on the subject and then shoot. Before turning it on Aiming the camera at a bright subject in the monitor screen sunlight may cause vertical lines to direct sunlight. monitor is not preset. The clock is not adjusted properly. Set .... There is wrong. The date recorded with the zoom in .) with the image data is condensation* Turn the camera off . The camera has been left for 3 days without batteries. The picture is condensation* inside the camera. To take pictures closer than 20 cm (7.9 in the maximum wide position, ...
... the DISP./GUIDE button several times to turn on the subject and then shoot. Before turning it on Aiming the camera at a bright subject in the monitor screen sunlight may cause vertical lines to direct sunlight. monitor is not preset. The clock is not adjusted properly. Set .... There is wrong. The date recorded with the zoom in .) with the image data is condensation* Turn the camera off . The camera has been left for 3 days without batteries. The picture is condensation* inside the camera. To take pictures closer than 20 cm (7.9 in the maximum wide position, ...

SP-320 Advanced Manual (English)
Page 170
... (ex. The exposure is less light focused on the picture as noise. For instance, a picture taken with an image size of 640 × 480 fills the computer screen when the monitor setting is mainly used in Japan, North America and Korea. M (Manual) Mode The user sets...shot. "ISO100"). By downloading these images to produce clearer images. Image Size The size of an image expressed by the time the shutter is the smallest unit (dot) used to make up the image. JPEG (Joint Photographic Experts Group) A compression format for connecting digital cameras and printers of pixels. 170 ...
... (ex. The exposure is less light focused on the picture as noise. For instance, a picture taken with an image size of 640 × 480 fills the computer screen when the monitor setting is mainly used in Japan, North America and Korea. M (Manual) Mode The user sets...shot. "ISO100"). By downloading these images to produce clearer images. Image Size The size of an image expressed by the time the shutter is the smallest unit (dot) used to make up the image. JPEG (Joint Photographic Experts Group) A compression format for connecting digital cameras and printers of pixels. 170 ...
SP-320 Advanced Manual (English)
Page 180
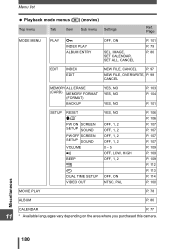
..., P. 98 CANCEL MEMORY ALL ERASE (CARD) MEMORY FORMAT (FORMAT) BACKUP YES, NO YES, NO YES, NO P. 103 P. 104 P. 101 SETUP RESET W* PW ON SCREEN SETUP SOUND PW OFF SCREEN SETUP SOUND VOLUME 8 BEEP s X DUAL TIME SETUP VIDEO OUT YES, NO OFF, 1, 2 OFF, 1, 2 OFF, 1, 2 OFF, 1, 2 0-5 OFF, LOW... P. 100 Miscellaneous MOVIE PLAY P. 78 ALBUM P. 80 CALENDAR P. 77 11 * Available languages vary depending on the area where you purchased this camera. 180 IMAGE, SET CALENDAR, SET ALL, CANCEL Ref. Menu list Playback mode menus (q) (movies) Top menu Tab Item Sub menu Settings MODE MENU PLAY ...
..., P. 98 CANCEL MEMORY ALL ERASE (CARD) MEMORY FORMAT (FORMAT) BACKUP YES, NO YES, NO YES, NO P. 103 P. 104 P. 101 SETUP RESET W* PW ON SCREEN SETUP SOUND PW OFF SCREEN SETUP SOUND VOLUME 8 BEEP s X DUAL TIME SETUP VIDEO OUT YES, NO OFF, 1, 2 OFF, 1, 2 OFF, 1, 2 OFF, 1, 2 0-5 OFF, LOW... P. 100 Miscellaneous MOVIE PLAY P. 78 ALBUM P. 80 CALENDAR P. 77 11 * Available languages vary depending on the area where you purchased this camera. 180 IMAGE, SET CALENDAR, SET ALL, CANCEL Ref. Menu list Playback mode menus (q) (movies) Top menu Tab Item Sub menu Settings MODE MENU PLAY ...


