FE-200 Advanced Manual (English)
Page 3
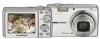
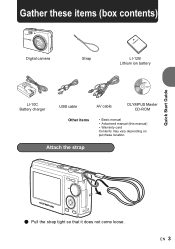
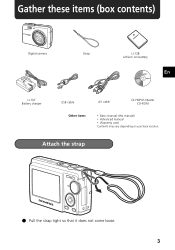
Gather these items (box contents) Digital camera Strap LI-12B Lithium ion battery LI-10C Battery charger USB cable AV cable OLYMPUS Master CD-ROM Other items • Basic manual • Advanced manual (this manual) • Warranty card Contents may vary depending on purchase location. EN 3 Attach the strap Quick Start Guide ( Pull the strap tight so that it does not come loose.
Gather these items (box contents) Digital camera Strap LI-12B Lithium ion battery LI-10C Battery charger USB cable AV cable OLYMPUS Master CD-ROM Other items • Basic manual • Advanced manual (this manual) • Warranty card Contents may vary depending on purchase location. EN 3 Attach the strap Quick Start Guide ( Pull the strap tight so that it does not come loose.
FE-200 Advanced Manual (English)
Page 29
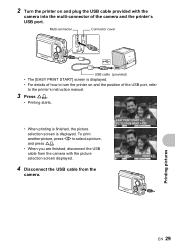
Multi-connector Connector cover USB cable (provided) • The [EASY PRINT START] screen is displayed. • For details of how to turn the printer on and plug the USB cable provided with the camera into the multi-connector of the USB port, refer to the printer's instruction manual. 3 Press O 2 Turn the printer on and the position of the camera and the printer's USB port.
Multi-connector Connector cover USB cable (provided) • The [EASY PRINT START] screen is displayed. • For details of how to turn the printer on and plug the USB cable provided with the camera into the multi-connector of the USB port, refer to the printer's instruction manual. 3 Press O 2 Turn the printer on and the position of the camera and the printer's USB port.
FE-200 Advanced Manual (English)
Page 30
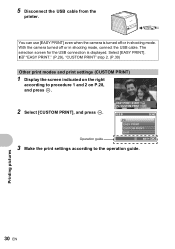
... OK 3 Make the print settings according to procedure 1 and 2 on P.28, and press i. 2 Select [CUSTOM PRINT], and press i. 5 Disconnect the USB cable from the printer. g"EASY PRINT." (P.29), "CUSTOM PRINT" step 2. (P.30) Other print modes and print settings (CUSTOM PRINT) 1 Display the screen indicated... on the right according to the operation guide. With the camera turned off or in shooting mode, connect the USB cable. You can use [EASY PRINT] even when the camera is displayed. The selection screen for the USB connection is turned off or in shooting mode.
... OK 3 Make the print settings according to procedure 1 and 2 on P.28, and press i. 2 Select [CUSTOM PRINT], and press i. 5 Disconnect the USB cable from the printer. g"EASY PRINT." (P.29), "CUSTOM PRINT" step 2. (P.30) Other print modes and print settings (CUSTOM PRINT) 1 Display the screen indicated... on the right according to the operation guide. With the camera turned off or in shooting mode, connect the USB cable. You can use [EASY PRINT] even when the camera is displayed. The selection screen for the USB connection is turned off or in shooting mode.
FE-200 Advanced Manual (English)
Page 33
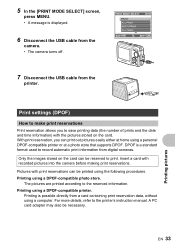
... supports DPOF. Insert a card with recorded pictures into the camera before making print reservations. Printing using a computer. Printing is possible directly from digital cameras. PRINT MODE SELECT PRINT ALL PRINT MULTI PRINT ALL INDEX EXIT MENU SET OK 7 Disconnect the USB cable from the camera. • The camera turns off. The pictures are printed according to the...
... supports DPOF. Insert a card with recorded pictures into the camera before making print reservations. Printing using a computer. Printing is possible directly from digital cameras. PRINT MODE SELECT PRINT ALL PRINT MULTI PRINT ALL INDEX EXIT MENU SET OK 7 Disconnect the USB cable from the camera. • The camera turns off. The pictures are printed according to the...
FE-200 Advanced Manual (English)
Page 37
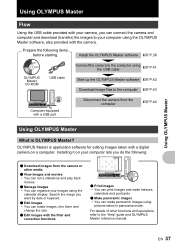
..., refer to the computer gP.43 Computer equipped with a digital camera on your images using the calendar display. OLYMPUS Master is OLYMPUS Master? Install the OLYMPUS Master software gP.38 OLYMPUS Master CD-ROM USB cable Connect the camera to the computer using the USB cable gP.41 Start up the OLYMPUS Master software gP.42 Download image files to the "Help...
..., refer to the computer gP.43 Computer equipped with a digital camera on your images using the calendar display. OLYMPUS Master is OLYMPUS Master? Install the OLYMPUS Master software gP.38 OLYMPUS Master CD-ROM USB cable Connect the camera to the computer using the USB cable gP.41 Start up the OLYMPUS Master software gP.42 Download image files to the "Help...
FE-200 Advanced Manual (English)
Page 39
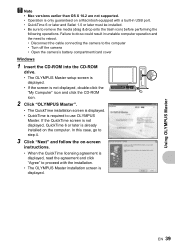
...and the need to reboot. • Disconnect the cable connecting the camera to the computer • Turn off the camera • Open the camera's battery compartment/card cover Windows 1 Insert the CD-ROM into the CD-ROM drive. • The OLYMPUS Master setup screen is displayed. • If the...QuickTime is displayed, read the agreement and click "Agree" to proceed with a built-in USB port. • QuickTime 6 or later and Safari 1.0 or later must be installed. • Be sure to use OLYMPUS Master. Using OLYMPUS Master Note • Mac versions earlier than OS X 10.2 are not supported. &#...
...and the need to reboot. • Disconnect the cable connecting the camera to the computer • Turn off the camera • Open the camera's battery compartment/card cover Windows 1 Insert the CD-ROM into the CD-ROM drive. • The OLYMPUS Master setup screen is displayed. • If the...QuickTime is displayed, read the agreement and click "Agree" to proceed with a built-in USB port. • QuickTime 6 or later and Safari 1.0 or later must be installed. • Be sure to use OLYMPUS Master. Using OLYMPUS Master Note • Mac versions earlier than OS X 10.2 are not supported. &#...
FE-200 Advanced Manual (English)
Page 41
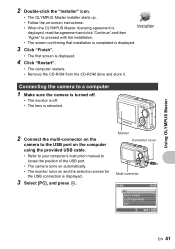
...drive and store it. Monitor Connector cover Multi-connector USB PC EASY PRINT CUSTOM PRINT EXIT SET OK EN 41 Using OLYMPUS Master 2 Connect the multi-connector on the camera to the USB port on the computer using the provided USB cable. • Refer to your computer's instruction manual ...to locate the position of the USB port. • The camera turns on automatically. • The ...
...drive and store it. Monitor Connector cover Multi-connector USB PC EASY PRINT CUSTOM PRINT EXIT SET OK EN 41 Using OLYMPUS Master 2 Connect the multi-connector on the camera to the USB port on the computer using the provided USB cable. • Refer to your computer's instruction manual ...to locate the position of the USB port. • The camera turns on automatically. • The ...
FE-200 Advanced Manual (English)
Page 44
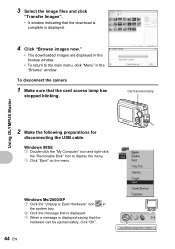
...click the "Removable Disk" icon to the main menu, click "Menu" in the "Browse" window. To disconnect the camera 1 Make sure that the download is complete is displayed saying that the hardware can be ejected safely, click "OK".... Select the image files and click "Transfer Images". • A window indicating that the card access lamp has stopped blinking. Using OLYMPUS Master Windows Me/2000/XP 1 Click the "Unplug or Eject Hardware" icon in the system tray. 2 Click the message that...Eject" on the menu. Card access lamp 2 Make the following preparations for disconnecting the USB cable.
...click the "Removable Disk" icon to the main menu, click "Menu" in the "Browse" window. To disconnect the camera 1 Make sure that the download is complete is displayed saying that the hardware can be ejected safely, click "OK".... Select the image files and click "Transfer Images". • A window indicating that the card access lamp has stopped blinking. Using OLYMPUS Master Windows Me/2000/XP 1 Click the "Unplug or Eject Hardware" icon in the system tray. 2 Click the message that...Eject" on the menu. Card access lamp 2 Make the following preparations for disconnecting the USB cable.
FE-200 Advanced Manual (English)
Page 45
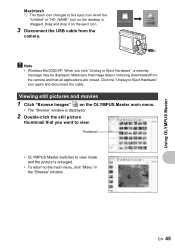
... you want to view. Viewing still pictures and movies 1 Click "Browse Images" on the eject icon. 3 Disconnect the USB cable from the camera and that all applications are closed. Drag and drop it on the OLYMPUS Master main menu. • The "Browse" window is displayed. 2 Double-click the still picture thumbnail that image data...
... you want to view. Viewing still pictures and movies 1 Click "Browse Images" on the eject icon. 3 Disconnect the USB cable from the camera and that all applications are closed. Drag and drop it on the OLYMPUS Master main menu. • The "Browse" window is displayed. 2 Double-click the still picture thumbnail that image data...

FE-200 Advanced Manual (English)
Page 48
... the following folders on the provided OLYMPUS Master CD-ROM. (Drive name): \USB\INSTALL.EXE • Data transfer is required to use the USB cable to connect the camera to install the USB driver. You can connect the camera to your computer using the USB cable provided with the camera to your computer with the USB cable, double-click the files from...
... the following folders on the provided OLYMPUS Master CD-ROM. (Drive name): \USB\INSTALL.EXE • Data transfer is required to use the USB cable to connect the camera to install the USB driver. You can connect the camera to your computer using the USB cable provided with the camera to your computer with the USB cable, double-click the files from...
FE-200 Advanced Manual (English)
Page 49
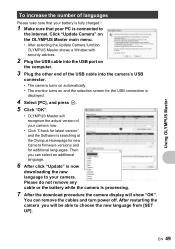
... downloading the new language to your camera. Click "Update Camera" on the OLYMPUS Master main menu. • After selecting the Update Camera function OLYMPUS Master shows a Window with security advices. 2 Plug the USB cable into the USB port on the computer. 3 Plug the other end of the USB cable into the camera's USB connector. • The camera turns on automatically. • The monitor...
... downloading the new language to your camera. Click "Update Camera" on the OLYMPUS Master main menu. • After selecting the Update Camera function OLYMPUS Master shows a Window with security advices. 2 Plug the USB cable into the USB port on the computer. 3 Plug the other end of the USB cable into the camera's USB connector. • The camera turns on automatically. • The monitor...

FE-200 Advanced Manual (English)
Page 67
...prior written permission of Olympus. Only the OLYMPUS-supplied USB cable should be determined by one or more of the following measures: - Disclaimer of Warranty • Olympus makes no representations or ...to provide reasonable protection against harmful interference in a residential installation. Olympus assumes no responsibility for a Class B digital device, pursuant to Part 15 of copyright owners. No part... communications. This equipment generates, uses, and can be used to connect the camera to correct the interference by turning the equipment off and on a circuit different...
...prior written permission of Olympus. Only the OLYMPUS-supplied USB cable should be determined by one or more of the following measures: - Disclaimer of Warranty • Olympus makes no representations or ...to provide reasonable protection against harmful interference in a residential installation. Olympus assumes no responsibility for a Class B digital device, pursuant to Part 15 of copyright owners. No part... communications. This equipment generates, uses, and can be used to connect the camera to correct the interference by turning the equipment off and on a circuit different...
FE-200 Basic Manual (English, Français, Español, Português)
Page 3
Gather these items (box contents) Digital camera Strap LI-12B Lithium ion battery En LI-10C Battery charger USB cable Other items AV cable OLYMPUS Master CD-ROM • Basic manual (this manual) • Advanced manual • Warranty card Contents may vary depending on purchase location. Attach the strap ( Pull the strap tight so that it does not come loose. 3
Gather these items (box contents) Digital camera Strap LI-12B Lithium ion battery En LI-10C Battery charger USB cable Other items AV cable OLYMPUS Master CD-ROM • Basic manual (this manual) • Advanced manual • Warranty card Contents may vary depending on purchase location. Attach the strap ( Pull the strap tight so that it does not come loose. 3
FE-200 Basic Manual (English, Français, Español, Português)
Page 17
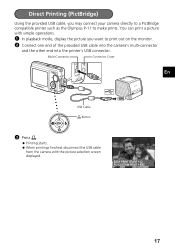
Multi-Connector Connector Cover En USB Cable < Button 3 Press Direct Printing (PictBridge) Using the provided USB cable, you want to make prints. You can print a picture with simple operations. 1 In playback mode, display the picture you may connect your camera directly to a PictBridge compatible printer such as the Olympus P-11 to print out on the monitor. 2 Connect one end of the provided USB cable into the camera's multi-connector and the other end into the printer's USB connector.
Multi-Connector Connector Cover En USB Cable < Button 3 Press Direct Printing (PictBridge) Using the provided USB cable, you want to make prints. You can print a picture with simple operations. 1 In playback mode, display the picture you may connect your camera directly to a PictBridge compatible printer such as the Olympus P-11 to print out on the monitor. 2 Connect one end of the provided USB cable into the camera's multi-connector and the other end into the printer's USB connector.
FE-200 Basic Manual (English, Français, Español, Português)
Page 18
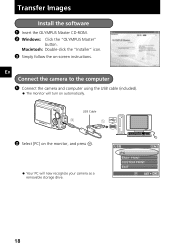
En Connect the camera to the computer 1 Connect the camera and computer using the USB cable (included). USB PC EASY PRINT CUSTOM PRINT EXIT SET OK 18 Your PC will turn on the monitor, and press i. The monitor will now recognize your camera as a removable storage drive. USB Cable 2 1 2 Select [PC] on automatically. Transfer Images Install the software 1 Insert the OLYMPUS Master CD-ROM. 2 Windows: Click the "OLYMPUS Master" button. Macintosh: Double-click the "Installer" icon. 3 Simply follow the on-screen instructions.
En Connect the camera to the computer 1 Connect the camera and computer using the USB cable (included). USB PC EASY PRINT CUSTOM PRINT EXIT SET OK 18 Your PC will turn on the monitor, and press i. The monitor will now recognize your camera as a removable storage drive. USB Cable 2 1 2 Select [PC] on automatically. Transfer Images Install the software 1 Insert the OLYMPUS Master CD-ROM. 2 Windows: Click the "OLYMPUS Master" button. Macintosh: Double-click the "Installer" icon. 3 Simply follow the on-screen instructions.
FE-200 Quick Start Guide (English, Português)
Page 1
...mode dial to select [D]. Press the O< button and the NY button to h When shooting movies Digital camera Strap LI-12B Lithium ion battery LI-10C Battery charger USB cable AV cable OLYMPUS Master CD-ROM Other items • Basic manual • Advanced manual • Warranty card Contents...contents) Prepare the batteries Turn on the camera in a. Press the O< button and NY button to select [Y]. Suitable for taking pictures. To turn on the power Quick Start Guide FE-200 Start Here a. Press the q button. Hold the camera Horizontal grip Vertical grip b. a. CANCEL MENU...
...mode dial to select [D]. Press the O< button and the NY button to h When shooting movies Digital camera Strap LI-12B Lithium ion battery LI-10C Battery charger USB cable AV cable OLYMPUS Master CD-ROM Other items • Basic manual • Advanced manual • Warranty card Contents...contents) Prepare the batteries Turn on the camera in a. Press the O< button and NY button to select [Y]. Suitable for taking pictures. To turn on the power Quick Start Guide FE-200 Start Here a. Press the q button. Hold the camera Horizontal grip Vertical grip b. a. CANCEL MENU...


