

DS-5000iD Detailed Instructions (English)
Page 4
... AC Adapter 21 Turning ON the Recorder 22 Power Save Mode (Power Save 22 Inserting and Ejecting a SD card .......... 23 Setting Time and Date (Time & Date) ... 24 Setting Recording Destination (Card Select 26 2 Basic Operations Recording 27 Microphone Sensitivity (Mic Sense) ...... 31 Recording Modes (Rec Mode 32 Using the Variable Control Voice Actuator (VCVA 33 Hands-free Recording 34 Recording Monitor 34 Playing 35 Erasing 37 3 Advanced Operations Menu List 41 Learning to Use the Menu 43 Selecting Folders and Files 44 Displaying File Information 45 Device Lock Function 46...
... AC Adapter 21 Turning ON the Recorder 22 Power Save Mode (Power Save 22 Inserting and Ejecting a SD card .......... 23 Setting Time and Date (Time & Date) ... 24 Setting Recording Destination (Card Select 26 2 Basic Operations Recording 27 Microphone Sensitivity (Mic Sense) ...... 31 Recording Modes (Rec Mode 32 Using the Variable Control Voice Actuator (VCVA 33 Hands-free Recording 34 Recording Monitor 34 Playing 35 Erasing 37 3 Advanced Operations Menu List 41 Learning to Use the Menu 43 Selecting Folders and Files 44 Displaying File Information 45 Device Lock Function 46...
DS-5000iD Detailed Instructions (English)
Page 11
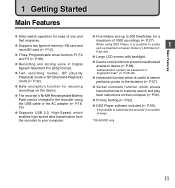
... Features ● Large LCD screen with backlight. ● Device Lock function to prevent unauthorized access to customize the recorder in a number of ways. *DS-5000iD only 11 High-Speed, which allows transcriptionists to a maximum of seven folders (1,400 files) (☞ P.68, 69). 1 Getting Started Main Features ● Slide switch operation for ease of use and fast response. ● Supports two types of memory: SD card and microSD card (☞ P.12). ●...
... Features ● Large LCD screen with backlight. ● Device Lock function to prevent unauthorized access to customize the recorder in a number of ways. *DS-5000iD only 11 High-Speed, which allows transcriptionists to a maximum of seven folders (1,400 files) (☞ P.68, 69). 1 Getting Started Main Features ● Slide switch operation for ease of use and fast response. ● Supports two types of memory: SD card and microSD card (☞ P.12). ●...
DS-5000iD Detailed Instructions (English)
Page 14
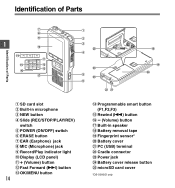
...q Power jack w Battery cover release button e microSD card cover *DS-5000iD only Identification of Parts Identification of Parts 1 $ % ^ 7 8 9 0 ! @ # & 1 2 3 e 4 w 5 q 6 =- * ( ) 1 SD card slot 2 Built-in microphone 3 NEW button 4 Slide (REC/STOP/PLAY/REV) switch 5 POWER (ON/OFF) switch 6 ERASE button 7 EAR (Earphone) jack 8 MIC (Microphone) jack 9 Record/Play indicator light 0 Display (LCD panel) ! + (Volume) button @ Fast Forward (9) button # OK/MENU button 14 $ Programmable smart button (F1,F2,F3) % Rewind (0) button ^ - (Volume) button & Built-in speaker * Battery removal tape...
...q Power jack w Battery cover release button e microSD card cover *DS-5000iD only Identification of Parts Identification of Parts 1 $ % ^ 7 8 9 0 ! @ # & 1 2 3 e 4 w 5 q 6 =- * ( ) 1 SD card slot 2 Built-in microphone 3 NEW button 4 Slide (REC/STOP/PLAY/REV) switch 5 POWER (ON/OFF) switch 6 ERASE button 7 EAR (Earphone) jack 8 MIC (Microphone) jack 9 Record/Play indicator light 0 Display (LCD panel) ! + (Volume) button @ Fast Forward (9) button # OK/MENU button 14 $ Programmable smart button (F1,F2,F3) % Rewind (0) button ^ - (Volume) button & Built-in speaker * Battery removal tape...

DS-5000iD Detailed Instructions (English)
Page 17
... pulling up the tape. Installing Batteries Unusable batteries Batteries for an extended period of the recorder's battery compartment. The battery indicator on the display changes as shown in the battery icon. • Be sure to press down and [ Battery Low] appears on the display. Replacing Batteries When appears on the display, replace the batteries as soon as shown in the direction inscribed on the inside of time. 17 AAA Alkaline Batteries 1 Lightly press down...
... pulling up the tape. Installing Batteries Unusable batteries Batteries for an extended period of the recorder's battery compartment. The battery indicator on the display changes as shown in the battery icon. • Be sure to press down and [ Battery Low] appears on the display. Replacing Batteries When appears on the display, replace the batteries as soon as shown in the direction inscribed on the inside of time. 17 AAA Alkaline Batteries 1 Lightly press down...
DS-5000iD Detailed Instructions (English)
Page 18
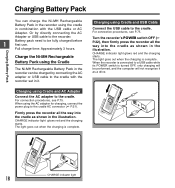
... charging starts. Or by connecting the AC adapter or USB cable to the cradle. Full charge time: Approximately 3 hours. When using the AC adapter for charging, connect the power plug to be performed, and the computer will not recognize it . CHARGE indicator light glows red and the charging starts. Charging Battery Pack You can be charged by directly connecting the AC Adapter or USB cable to a USB cable while its POWER switch is turned OFF, only charging will be fully charged before 1 first use. Battery pack need...
... charging starts. Or by connecting the AC adapter or USB cable to the cradle. Full charge time: Approximately 3 hours. When using the AC adapter for charging, connect the power plug to be performed, and the computer will not recognize it . CHARGE indicator light glows red and the charging starts. Charging Battery Pack You can be charged by directly connecting the AC Adapter or USB cable to a USB cable while its POWER switch is turned OFF, only charging will be fully charged before 1 first use. Battery pack need...
DS-5000iD Detailed Instructions (English)
Page 19
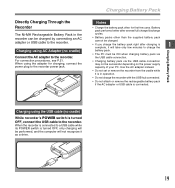
... turned OFF, connect the USB cable to charge the battery pack. When using AC Adapter (no cradle) While recorder's POWER switch is connected. Charging using the USB cable (no cradle) Connect the AC adapter to a USB cable while its POWER switch is 1 complete, it as a drive. 19 Use the AC adapter instead. • Do not set or remove the recorder from the cradle while it is in the recorder can be charged by connecting an AC adapter or USB cable to the recorder power jack. Charging Battery...
... turned OFF, connect the USB cable to charge the battery pack. When using AC Adapter (no cradle) While recorder's POWER switch is connected. Charging using the USB cable (no cradle) Connect the AC adapter to a USB cable while its POWER switch is 1 complete, it as a drive. 19 Use the AC adapter instead. • Do not set or remove the recorder from the cradle while it is in the recorder can be charged by connecting an AC adapter or USB cable to the recorder power jack. Charging Battery...

DS-5000iD Detailed Instructions (English)
Page 24
... hour indicator will go to the time and date set screen after the recorder hasn't been used for a long time. Time & Date 1 M 14 D 2008 Y 5: 00 PM BACK 24H EXIT 2 + - Time & Date 01 M 14 D 2008 Y 5 : 45 PM BACK 24H EXIT • You can choose between 12 and 24 hour display by pressing the 9 or 0 button to set as part of the file header. However, when a Password or Fingerprint (DS-5000iD only...
... hour indicator will go to the time and date set screen after the recorder hasn't been used for a long time. Time & Date 1 M 14 D 2008 Y 5: 00 PM BACK 24H EXIT 2 + - Time & Date 01 M 14 D 2008 Y 5 : 45 PM BACK 24H EXIT • You can choose between 12 and 24 hour display by pressing the 9 or 0 button to set as part of the file header. However, when a Password or Fingerprint (DS-5000iD only...

DS-5000iD Detailed Instructions (English)
Page 27
... the F1(FOLDER) button. 2 Basic Operations Recording By default, the recorder has five folders, A, Recording Related Settings B, C, D, E and you can be selectively used to store • Microphone Sensitivity (Mic Sense) (☞ P.31) private information, while Folder B might be used to configured to record at the current position in the file (☞ P.30). 27 Up to 200 messages can select folder by default, the Recording Mode is QP. • Using the Variable Control Voice Actuator...
... the F1(FOLDER) button. 2 Basic Operations Recording By default, the recorder has five folders, A, Recording Related Settings B, C, D, E and you can be selectively used to store • Microphone Sensitivity (Mic Sense) (☞ P.31) private information, while Folder B might be used to configured to record at the current position in the file (☞ P.30). 27 Up to 200 messages can select folder by default, the Recording Mode is QP. • Using the Variable Control Voice Actuator...

DS-5000iD Detailed Instructions (English)
Page 29
... DISPLY INDEX 3 3 Move the slide switch to the STOP position to stop overwriting. Note • You cannot select a different recording mode (QP, SP) than that the overwritten recordings will be erased. 2 1 Select and play indicator light glows red. QP DICT MIKE 2 The record/play the file you want to start overwriting. aRecording elapsed time bTotal recording time of overwrite. 2 Recording 2 Move the slide switch to the REC position to overwrite.
... DISPLY INDEX 3 3 Move the slide switch to the STOP position to stop overwriting. Note • You cannot select a different recording mode (QP, SP) than that the overwritten recordings will be erased. 2 1 Select and play indicator light glows red. QP DICT MIKE 2 The record/play the file you want to start overwriting. aRecording elapsed time bTotal recording time of overwrite. 2 Recording 2 Move the slide switch to the REC position to overwrite.

DS-5000iD Detailed Instructions (English)
Page 30
... the slide switch to the STOP position to stop inserting the QP DICT MIKE 4 additional recording. 134 /134 E F 00 M 12s Insert Rec VERBAL DISPLY INDEX Notes • If you want to insert an additional recording into previously recorded file. 1 Select and play indicator light glows red. Recording Insert Recording 1 Additional recording can be cancelled. • The recording time and date of the file is updated to start inserting an additional...
... the slide switch to the STOP position to stop inserting the QP DICT MIKE 4 additional recording. 134 /134 E F 00 M 12s Insert Rec VERBAL DISPLY INDEX Notes • If you want to insert an additional recording into previously recorded file. 1 Select and play indicator light glows red. Recording Insert Recording 1 Additional recording can be cancelled. • The recording time and date of the file is updated to start inserting an additional...

DS-5000iD Detailed Instructions (English)
Page 31
... M 10 s 3H 08M 05s FOLDER PRIOR INFO 31 Mic Sense Conference Dictation 2 Microphone Sensitivity BACK EXIT 3 Press the OK/MENU button to complete the setup screen. [Conference Set] or [Dictation Set] will light up on the display, and it will appear on the display as CONF or DICT . Microphone Sensitivity (Mic Sense) You can switch between two microphone sensitivities to meet recording needs: [Dictation] for oral dictation and...
... M 10 s 3H 08M 05s FOLDER PRIOR INFO 31 Mic Sense Conference Dictation 2 Microphone Sensitivity BACK EXIT 3 Press the OK/MENU button to complete the setup screen. [Conference Set] or [Dictation Set] will light up on the display, and it will appear on the display as CONF or DICT . Microphone Sensitivity (Mic Sense) You can switch between two microphone sensitivities to meet recording needs: [Dictation] for oral dictation and...

DS-5000iD Detailed Instructions (English)
Page 34
... jack and use an external microphone. To setup the recorder for DSS Player (☞P.73). button to control the volume level. + / - (Volume) button Note • Insert the plugs to the online help for hands-free operation, connect the optional Olympus foot switch (RS27/28) to Foot Pedal. Center REC STOP Right REV PLAY Left Center Right RS28 Press and hold Release Left NEW - Recording Monitor It is possible to monitor your recording by using the hands-free recording function, set Hands-free operation of DSS Player...
... jack and use an external microphone. To setup the recorder for DSS Player (☞P.73). button to control the volume level. + / - (Volume) button Note • Insert the plugs to the online help for hands-free operation, connect the optional Olympus foot switch (RS27/28) to Foot Pedal. Center REC STOP Right REV PLAY Left Center Right RS28 Press and hold Release Left NEW - Recording Monitor It is possible to monitor your recording by using the hands-free recording function, set Hands-free operation of DSS Player...

DS-5000iD Detailed Instructions (English)
Page 35
You can start QP DICT MIKE playback. 101 /133 The record/play indicator light glows green. 00 M 05 s 27M 58s 1 2 + - The display shows the volume level. Press the or button to adjust the volume. Playing You can INSERT SPEED INDEX QP DICT MIKE 101 /133 2 Playing choose between 0 to 30. 2 aVolume level 00 M 07 s a Volume 15 INSERT SPEED INDEX 3 Move the slide switch to the STOP position at any point. 1 1 Select the file, then move the slide switch to the PLAY position to start playing a file at any point you want to stop 3 the playback. 35
You can start QP DICT MIKE playback. 101 /133 The record/play indicator light glows green. 00 M 05 s 27M 58s 1 2 + - The display shows the volume level. Press the or button to adjust the volume. Playing You can INSERT SPEED INDEX QP DICT MIKE 101 /133 2 Playing choose between 0 to 30. 2 aVolume level 00 M 07 s a Volume 15 INSERT SPEED INDEX 3 Move the slide switch to the STOP position at any point. 1 1 Select the file, then move the slide switch to the PLAY position to start playing a file at any point you want to stop 3 the playback. 35

DS-5000iD Detailed Instructions (English)
Page 42
... the DS-5000). • Items appear in bold letters in the "Setting" column to their initial state. System Info. USB Class Time & Date Power Save Reset Settings Card Info. Returns the menu settings to indicate that they are the initial settings. 42 Menu List Menu List Main Menu Device Menu 3 File Menu (To the page 41) Second layer Setting Fingerprint Enroll, Verify Card Select SD, microSD Beep On, Off Format Initializes the card (SD...
... the DS-5000). • Items appear in bold letters in the "Setting" column to their initial state. System Info. USB Class Time & Date Power Save Reset Settings Card Info. Returns the menu settings to indicate that they are the initial settings. 42 Menu List Menu List Main Menu Device Menu 3 File Menu (To the page 41) Second layer Setting Fingerprint Enroll, Verify Card Select SD, microSD Beep On, Off Format Initializes the card (SD...

DS-5000iD Detailed Instructions (English)
Page 54
... [Work Type] at the [File Menu] screen, then press the OK/MENU or 9 button. The Work Types and Option Items can be registered in the DSS Player software and uploaded to the recorder. Setting the Author ID and Work Type Setting the Work Type Up to 10 Work Types can be used on the recorder to populate the recording file header information.Refer to the online help for DSS Player (☞ P.73). 54 Editing the Work Type The Work Type information of the recorded...
... [Work Type] at the [File Menu] screen, then press the OK/MENU or 9 button. The Work Types and Option Items can be registered in the DSS Player software and uploaded to the recorder. Setting the Author ID and Work Type Setting the Work Type Up to 10 Work Types can be used on the recorder to populate the recording file header information.Refer to the online help for DSS Player (☞ P.73). 54 Editing the Work Type The Work Type information of the recorded...

DS-5000iD Detailed Instructions (English)
Page 65
... formatting process. Device Menu 3 USB Class Time & Date Format Power Save SD Reset Settings Card Info. System Info. Format SD Format ! Notes • The time required to be cleared purchase (initial settings), perform the setting from the card. Remove the card. - Do not interrupt the formatting process by using DSS Player. 5 + - Remove the batteries. • When the card is formatted, all the stored data, including locked files, are erased. • If an unformatted card is inserted, the recorder automatically displays the format...
... formatting process. Device Menu 3 USB Class Time & Date Format Power Save SD Reset Settings Card Info. System Info. Format SD Format ! Notes • The time required to be cleared purchase (initial settings), perform the setting from the card. Remove the card. - Do not interrupt the formatting process by using DSS Player. 5 + - Remove the batteries. • When the card is formatted, all the stored data, including locked files, are erased. • If an unformatted card is inserted, the recorder automatically displays the format...

DS-5000iD Detailed Instructions (English)
Page 68
..., STOP, REC, PLAY, CUE/REV, FF/REW or ERASE mode. The Recorder's Customized Settings ❏ Button settings You can change the allocated functions for the Programmable Smart Buttons (F1, F2, F3 buttons), the NEW button, and the slide switch. 3 ❏ Hands-Free settings You can perform settings related to the online help for DSS Player (☞ P.73). Customizing the Recorder You can customize various specifications of Author ID which is currently displayed in the message which indicates...
..., STOP, REC, PLAY, CUE/REV, FF/REW or ERASE mode. The Recorder's Customized Settings ❏ Button settings You can change the allocated functions for the Programmable Smart Buttons (F1, F2, F3 buttons), the NEW button, and the slide switch. 3 ❏ Hands-Free settings You can perform settings related to the online help for DSS Player (☞ P.73). Customizing the Recorder You can customize various specifications of Author ID which is currently displayed in the message which indicates...

DS-5000iD Detailed Instructions (English)
Page 71
Select the language you are running Windows 2000/XP/Vista or Mac OS X on the screen. 5 You will start automatically, browse your name, company name, and license ID number (serial number). If the installation program does not start automatically. Installing DSS Player Software 71 An explanation of the installation method for administrators to install on a single PC will startup. Macintosh 1 Insert Olympus DSS Player CD into the CD-ROM drive...
Select the language you are running Windows 2000/XP/Vista or Mac OS X on the screen. 5 You will start automatically, browse your name, company name, and license ID number (serial number). If the installation program does not start automatically. Installing DSS Player Software 71 An explanation of the installation method for administrators to install on a single PC will startup. Macintosh 1 Insert Olympus DSS Player CD into the CD-ROM drive...

DS-5000iD Detailed Instructions (English)
Page 79
The recorder is locked. The batteries are dead. Unable to change the PC's USB with some PCs running Windows XP or settings. Erase unnecessary files or insert another card. Unlock the SD card lock (☞ P.12). Adjust the + (Volume) button. Unlock the SD card lock (☞ P.12). The file is in power off mode. Cannot connect to a PC using a cradle Sometimes a connection cannot be made You need to record The card does not have enough memory. on the display The batteries are...
The recorder is locked. The batteries are dead. Unable to change the PC's USB with some PCs running Windows XP or settings. Erase unnecessary files or insert another card. Unlock the SD card lock (☞ P.12). Adjust the + (Volume) button. Unlock the SD card lock (☞ P.12). The file is in power off mode. Cannot connect to a PC using a cradle Sometimes a connection cannot be made You need to record The card does not have enough memory. on the display The batteries are...

DS-5000iD Detailed Instructions (English)
Page 80
... a radio or other sound source. Foot switch: RS27/28 Connect to the USB cradle with a PC-footswitch, a headset and DSS Player Pro Transcription Module for PC based transcription. Ni-MH rechargeable battery: BR403 High-efficiency rechargeable long life batteries. PC transcription kit: AS-5000 The AS-5000 transcription kit provides you with DS-5000/DS-5000iD for hands-free transcription. 6 Connecting cord: KA333 Use to connect the microphone jack...
... a radio or other sound source. Foot switch: RS27/28 Connect to the USB cradle with a PC-footswitch, a headset and DSS Player Pro Transcription Module for PC based transcription. Ni-MH rechargeable battery: BR403 High-efficiency rechargeable long life batteries. PC transcription kit: AS-5000 The AS-5000 transcription kit provides you with DS-5000/DS-5000iD for hands-free transcription. 6 Connecting cord: KA333 Use to connect the microphone jack...


