
Pro910 Pro930 Safety/Warranty Manual
Page 2
Make sure no obstructions block the openings of all the equipment on the extension is well ventilated. • Do not use this product to have the outlet replaced. Keep the product out of direct sunlight. • Always use your local power company. • Do not connect this product in a well ventilated area. If you are not sure, check with your dealer...
Make sure no obstructions block the openings of all the equipment on the extension is well ventilated. • Do not use this product to have the outlet replaced. Keep the product out of direct sunlight. • Always use your local power company. • Do not connect this product in a well ventilated area. If you are not sure, check with your dealer...
Pro910 Pro930 Safety/Warranty Manual
Page 3
... before removing the object. Ensure loose clothing and hair is kept clear of moving these items so as directed in the User's Guide, this product for full power rating details. Do not touch the battery if one is in operation to prevent risk of injury. After installing additional memory, hard disk drive, or any other documentation is both the product and mains power switches...
... before removing the object. Ensure loose clothing and hair is kept clear of moving these items so as directed in the User's Guide, this product for full power rating details. Do not touch the battery if one is in operation to prevent risk of injury. After installing additional memory, hard disk drive, or any other documentation is both the product and mains power switches...

Pro910 Pro930 Safety/Warranty Manual
Page 4
... an authorized Oki Data service center. Oki Data reserves the right to use new and/or refurbished parts for a period of five (5) years from the date of this pro910 / pro930 (hereinafter "the Product") to be free from defects in material and workmanship and will , for the Product, showing the date of purchase, dealer's name, and both the model and serial numbers of this...
... an authorized Oki Data service center. Oki Data reserves the right to use new and/or refurbished parts for a period of five (5) years from the date of this pro910 / pro930 (hereinafter "the Product") to be free from defects in material and workmanship and will , for the Product, showing the date of purchase, dealer's name, and both the model and serial numbers of this...

Pro910 Pro930 Safety/Warranty Manual
Page 5
If you have the model number and serial number for your machine handy. They can describe your problem accurately and follow up -to provide assistance with the use of commercial software packages. Please consult your purchase documents. English Mt. Our Customer Support Representatives are not trained to -date listing of Oki Data authorized Service Centers in the U.S. Additional information on the suggestions of the Customer...
If you have the model number and serial number for your machine handy. They can describe your problem accurately and follow up -to provide assistance with the use of commercial software packages. Please consult your purchase documents. English Mt. Our Customer Support Representatives are not trained to -date listing of Oki Data authorized Service Centers in the U.S. Additional information on the suggestions of the Customer...

Pro910 Pro930 Safety/Warranty Manual
Page 6
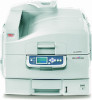
... undesired operation. 3. Operation is likely to cause harmful interference in which can radiate radio frequency energy and, if not installed and used in order to which the receiver is connected. • Consult the dealer or an experienced radio/television technician for use within certain voltage limits. 6 - Product Identification Product Name C910 Series C930 Series Second paper Tray High Capacity Feeder Model Name...
... undesired operation. 3. Operation is likely to cause harmful interference in which can radiate radio frequency energy and, if not installed and used in order to which the receiver is connected. • Consult the dealer or an experienced radio/television technician for use within certain voltage limits. 6 - Product Identification Product Name C910 Series C930 Series Second paper Tray High Capacity Feeder Model Name...
Pro910 User's Guide - Eng
Page 3
... stacker 28 Duplex unit (if installed 28 Tray and stacker examples 29 Loading Trays 1 to 5 29 Using the MP Tray 31 Using the stackers 34 Control panel 36 Buttons and lights 36 Display Panel messages 38 Status information 38 Menu (Functions) information 38 Configuration information 39 Help mode 39 Display Panel messages 39 Using the menus 39 Getting started 41 Printer location 41 Turning Off/On 42 Turning Off 42 Turning On 44 Changing the display language 44 Checking current settings 45 Interfaces and connection 46 pro910 User's Guide> 3
... stacker 28 Duplex unit (if installed 28 Tray and stacker examples 29 Loading Trays 1 to 5 29 Using the MP Tray 31 Using the stackers 34 Control panel 36 Buttons and lights 36 Display Panel messages 38 Status information 38 Menu (Functions) information 38 Configuration information 39 Help mode 39 Display Panel messages 39 Using the menus 39 Getting started 41 Printer location 41 Turning Off/On 42 Turning Off 42 Turning On 44 Changing the display language 44 Checking current settings 45 Interfaces and connection 46 pro910 User's Guide> 3

Pro910 User's Guide - Eng
Page 4
... unsatisfactory printing 92 Staple jams - Connecting the parallel interface 47 Connecting the USB interface 47 Connecting the network interface 48 Using the Drivers CD 49 Consumables and maintenance 50 Checking consumable/maintenance item usage . . . 50 Replacement indications 50 Replacing consumables/maintenance items 51 Cleaning the LED heads 51 Cleaning the paper feed rollers 53 Cleaning the printer casing 56 Emptying the punch chip box (Punch unit optional accessory 57 Optional accessories 60 Installing accessories 61 Troubleshooting...
... unsatisfactory printing 92 Staple jams - Connecting the parallel interface 47 Connecting the USB interface 47 Connecting the network interface 48 Using the Drivers CD 49 Consumables and maintenance 50 Checking consumable/maintenance item usage . . . 50 Replacement indications 50 Replacing consumables/maintenance items 51 Cleaning the LED heads 51 Cleaning the paper feed rollers 53 Cleaning the printer casing 56 Emptying the punch chip box (Punch unit optional accessory 57 Optional accessories 60 Installing accessories 61 Troubleshooting...

Pro910 User's Guide - Eng
Page 14
... for troubleshooting and maintenance to ensure that is packaged with the printer. > Online Help: online information accessible from the printer driver and utility software. This is a paper document that your printer does not have installed. This is your user's guide (check the web site, my.okidata.com, for the most up-to-date version) for your printer and forms part of the overall user support listed below: > Setup Poster: for Windows users and Mac users: to help you operate your printer effectively...
... for troubleshooting and maintenance to ensure that is packaged with the printer. > Online Help: online information accessible from the printer driver and utility software. This is a paper document that your printer does not have installed. This is your user's guide (check the web site, my.okidata.com, for the most up-to-date version) for your printer and forms part of the overall user support listed below: > Setup Poster: for Windows users and Mac users: to help you operate your printer effectively...

Pro910 User's Guide - Eng
Page 15
SOFTWARE SUPPLIED CDs: > Drivers and Utilities Contains drivers and application software for use by a general user. > Network and Administrator Utilities Contains software for use by system administrators. > Fiery® Drivers and Tools (pro930 only) pro910 User's Guide> 15
SOFTWARE SUPPLIED CDs: > Drivers and Utilities Contains drivers and application software for use by a general user. > Network and Administrator Utilities Contains software for use by system administrators. > Fiery® Drivers and Tools (pro930 only) pro910 User's Guide> 15

Pro910 User's Guide - Eng
Page 38
... and removed the cause of the toner usage. The bottom of the display panel normally shows a bar chart of the trouble. Available to make via the user menus. These menus are available to the general user to administrator level users. System maintenance menu: accessed by pressing the Uparrow and Down-arrow buttons together for more than 2 seconds while turning on the control panel. DISPLAY PANEL MESSAGES There are four types of display panel message: > Status information > Menu...
... and removed the cause of the toner usage. The bottom of the display panel normally shows a bar chart of the trouble. Available to make via the user menus. These menus are available to the general user to administrator level users. System maintenance menu: accessed by pressing the Uparrow and Down-arrow buttons together for more than 2 seconds while turning on the control panel. DISPLAY PANEL MESSAGES There are four types of display panel message: > Status information > Menu...
Pro910 User's Guide - Eng
Page 39
... menu settings can change the setting for that menu by selecting the required highlighted value from a list or by the Help messages where appropriate, are , overridden by pressing the Enter button. You can display or print configuration information. how much is provided in the Windows printer drivers. Restart). CONFIGURATION INFORMATION Configuration information displays printer configuration information such as internal firmware versions. In other cases, you can adjust settings (e.g. Display Panel Messages". Menu system" for Tray 1) or view information (e.g. Menu...
... menu settings can change the setting for that menu by selecting the required highlighted value from a list or by the Help messages where appropriate, are , overridden by pressing the Enter button. You can display or print configuration information. how much is provided in the Windows printer drivers. Restart). CONFIGURATION INFORMATION Configuration information displays printer configuration information such as internal firmware versions. In other cases, you can adjust settings (e.g. Display Panel Messages". Menu system" for Tray 1) or view information (e.g. Menu...

Pro910 User's Guide - Eng
Page 47
Turn on the printer and then the computer. You will be instructed when to the section entitled "Printer Drivers". CONNECTING THE USB INTERFACE Do not connect the USB cable at this time. If you are connecting your printer directly to a stand alone computer proceed to connect the USB cable when you run the Drivers CD. pro910 User's Guide> 47 Connect a parallel cable between the printer and computer. 3. CONNECTING THE PARALLEL INTERFACE 1. Turn off the printer and the computer. 2.
Turn on the printer and then the computer. You will be instructed when to the section entitled "Printer Drivers". CONNECTING THE USB INTERFACE Do not connect the USB cable at this time. If you are connecting your printer directly to a stand alone computer proceed to connect the USB cable when you run the Drivers CD. pro910 User's Guide> 47 Connect a parallel cable between the printer and computer. 3. CONNECTING THE PARALLEL INTERFACE 1. Turn off the printer and the computer. 2.

Pro910 User's Guide - Eng
Page 49
... operating correctly. NOTE Administrator's authority is to be installed as a network printer, please refer to configure the network connection before installing the printer drivers. pro910 User's Guide> 49 Connect an Ethernet cable between the printer and an Ethernet hub. 4. You are prompted to check that your printer is required when installing a network connection. USING THE DRIVERS CD Insert the Printer Software CD into your computer and follow a set of basic steps to configure the display panel language, install drivers and other software and finally print a test page...
... operating correctly. NOTE Administrator's authority is to be installed as a network printer, please refer to configure the network connection before installing the printer drivers. pro910 User's Guide> 49 Connect an Ethernet cable between the printer and an Ethernet hub. 4. You are prompted to check that your printer is required when installing a network connection. USING THE DRIVERS CD Insert the Printer Software CD into your computer and follow a set of basic steps to configure the display panel language, install drivers and other software and finally print a test page...

Pro910 User's Guide - Eng
Page 51
... or maintenance item comes complete with each replacement toner cartridge) > if printing is showing signs of faded images, white stripes or blurred letters You can use genuine Oki Original consumables to change without notice. Open the top cover. CLEANING THE LED HEADS You are advised to clean the LED heads: > any time you replace a toner cartridge (a LED lens cleaner is enclosed with its own installation details which give full instructions on replacement...
... or maintenance item comes complete with each replacement toner cartridge) > if printing is showing signs of faded images, white stripes or blurred letters You can use genuine Oki Original consumables to change without notice. Open the top cover. CLEANING THE LED HEADS You are advised to clean the LED heads: > any time you replace a toner cartridge (a LED lens cleaner is enclosed with its own installation details which give full instructions on replacement...
Pro910 User's Guide - Eng
Page 93
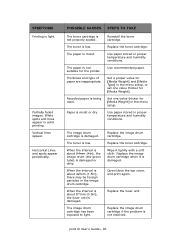
.... Replace the image drum cartridge if the problem is being used. Recycled paper is not resolved. Use paper stored in proper temperature and humidity conditions. Wipe it is not properly seated. Replace the fuser unit. Horizontal Lines and spots appear periodically. Reinstall the toner cartridge. The image drum cartridge has been exposed to light. The paper is low. Set a proper value for [Media Weight] and [Media Type] in the menu setup, or set one value thicker for [Media Weight]. pro910 User's Guide...
.... Replace the image drum cartridge if the problem is being used. Recycled paper is not resolved. Use paper stored in proper temperature and humidity conditions. Wipe it is not properly seated. Replace the fuser unit. Horizontal Lines and spots appear periodically. Reinstall the toner cartridge. The image drum cartridge has been exposed to light. The paper is low. Set a proper value for [Media Weight] and [Media Type] in the menu setup, or set one value thicker for [Media Weight]. pro910 User's Guide...
Pro910 User's Guide - Eng
Page 94
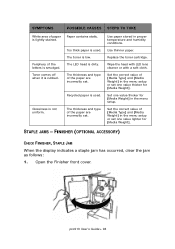
... is used . Set one value thicker for [Media Weight] in the menu setup or set . Open the Finisher front cover. The thickness and type of the paper are incorrectly set one value lighter for [Media Weight]. Recycled paper is rubbed. Replace the toner cartridge. Set the correct value of [Media Type] and [Media Weight] in the menu setup. Wipe the head with LED lens cleaner or with a soft cloth. The LED head is lightly stained. pro910 User's Guide...
... is used . Set one value thicker for [Media Weight] in the menu setup or set . Open the Finisher front cover. The thickness and type of the paper are incorrectly set one value lighter for [Media Weight]. Recycled paper is rubbed. Replace the toner cartridge. Set the correct value of [Media Type] and [Media Weight] in the menu setup. Wipe the head with LED lens cleaner or with a soft cloth. The LED head is lightly stained. pro910 User's Guide...

Pro910 User's Guide - Eng
Page 102
... current print job by pressing the HELP button. The remaining toner of its working life and has to Print Printing tttttt tttttt Near End cccccc Toner Low Fuser Unit Near Life Change Fuser Unit Inverter is Removed Invalid Data Press ONLINE Button Change Paper in the tray identified by pressing the HELP button. The fuser unit has reached the end of color cccccc is an optional accessory.) Invalid data has been received by the printer. Load media of size mmmmmm into tray tttttt...
... current print job by pressing the HELP button. The remaining toner of its working life and has to Print Printing tttttt tttttt Near End cccccc Toner Low Fuser Unit Near Life Change Fuser Unit Inverter is Removed Invalid Data Press ONLINE Button Change Paper in the tray identified by pressing the HELP button. The fuser unit has reached the end of color cccccc is an optional accessory.) Invalid data has been received by the printer. Load media of size mmmmmm into tray tttttt...
Pro910 User's Guide - Eng
Page 109
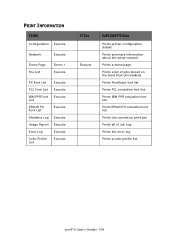
Prints all of jobs stored on the Hard Disk (if installed). Prints a demo page. Prints PostScript font list Prints PCL emulation font list. pro910 User's Guide> 109 Prints a color profile list. Prints summary information about the wired network. Prints EPSON FX emulation font list. Prints the error log. Prints a list of Job Log. Prints Job records by print job. Prints IBM PPR emulation font list. PRINT INFORMATION ITEM Configuration Execute Network Execute Demo Page File List Demo 1 Execute PS Font List Execute PCL Font List Execute IBM PPR Font Execute...
Prints all of jobs stored on the Hard Disk (if installed). Prints a demo page. Prints PostScript font list Prints PCL emulation font list. pro910 User's Guide> 109 Prints a color profile list. Prints summary information about the wired network. Prints EPSON FX emulation font list. Prints the error log. Prints a list of Job Log. Prints Job records by print job. Prints IBM PPR emulation font list. PRINT INFORMATION ITEM Configuration Execute Network Execute Demo Page File List Demo 1 Execute PS Font List Execute PCL Font List Execute IBM PPR Font Execute...
Pro910 User's Guide - Eng
Page 117
... forced print. pro910 User's Guide> 117 For PS, printing is not carried out and the job is selected, you wish the message to Job if you must manually clear the warning by pressing the Online button. When Online is cancelled. Sets whether the printer is cancelled. If paper is not fed within this time in manual feed, the job is automatically recovered when Memory Overflow or Tray Request occurs. Change to automatically clear when a new print job...
... forced print. pro910 User's Guide> 117 For PS, printing is not carried out and the job is selected, you wish the message to Job if you must manually clear the warning by pressing the Online button. When Online is cancelled. Sets whether the printer is cancelled. If paper is not fed within this time in manual feed, the job is automatically recovered when Memory Overflow or Tray Request occurs. Change to automatically clear when a new print job...

Pro910 User's Guide - Eng
Page 118
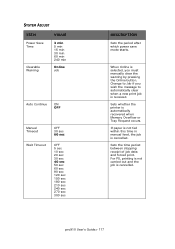
... the direction of paper movement (i.e. ON: prints an error report during the occurrence of paper movement (i.e. horizontally). pro910 User's Guide> 118 ITEM Low Toner VALUE Continue Stop Jam Recovery ON OFF Error Report ON OFF Print Position Adjust X Adjust Y Adjust DESCRIPTION 0.00 +0.25 - +2.00 -2.00 - -0.25 mm 0.00 +0.01 - +0.08 -0.08 - -0.01 in 0.00 +0.25 - +2.00 -2.00 - -0.25 mm 0.00 +0.01 - +0.08 -0.08 - -0.01 in Sets the printing operation when insufficient toner is...
... the direction of paper movement (i.e. ON: prints an error report during the occurrence of paper movement (i.e. horizontally). pro910 User's Guide> 118 ITEM Low Toner VALUE Continue Stop Jam Recovery ON OFF Error Report ON OFF Print Position Adjust X Adjust Y Adjust DESCRIPTION 0.00 +0.25 - +2.00 -2.00 - -0.25 mm 0.00 +0.01 - +0.08 -0.08 - -0.01 in 0.00 +0.25 - +2.00 -2.00 - -0.25 mm 0.00 +0.01 - +0.08 -0.08 - -0.01 in Sets the printing operation when insufficient toner is...


