PrintSuperVision Configuration Guide
Page 7
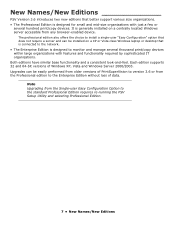
... be installed on a centrally located Windows server accessible from the Single-user Easy Configuration Option to monitor and manage several thousand print/copy devices within large organizations with just a few or several hundred print/copy devices. Both editions have similar base functionality and a consistent look-and-feel. Each edition supports 32 and 64-bit versions of Windows XP, Vista and Windows Server 2000/2003. Note Upgrading...
... be installed on a centrally located Windows server accessible from the Single-user Easy Configuration Option to monitor and manage several thousand print/copy devices within large organizations with just a few or several hundred print/copy devices. Both editions have similar base functionality and a consistent look-and-feel. Each edition supports 32 and 64-bit versions of Windows XP, Vista and Windows Server 2000/2003. Note Upgrading...
PrintSuperVision Configuration Guide
Page 15
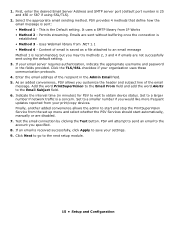
... email message. Set to obtain device status. As an added convenience, PSV allows you specified. 8. If your print/copy devices. Indicate the interval time (in minutes) for PSV to wait to a larger number if network traffic is recommended, but you would like more frequent updates reported from the set up menu and select whether the PSV Services should start and stop the PrintSuperVision Service from your email server...
... email message. Set to obtain device status. As an added convenience, PSV allows you specified. 8. If your print/copy devices. Indicate the interval time (in minutes) for PSV to wait to a larger number if network traffic is recommended, but you would like more frequent updates reported from the set up menu and select whether the PSV Services should start and stop the PrintSuperVision Service from your email server...
C330/C530/C610/C711 DIMM Install Sheet
Page 5
... front cover, and close the top cover, pressing down button then the Enter button to select the Print Information menu. (c) Select Configuration with the Enter button. (d) Press the Enter button once more to latch it latches in step 4. 14. Reconnect the AC power cable and switch the printer on. 16. Locate the retaining clips at each side to execute the Configuration menu. When the printer is ready, print a menu map...
... front cover, and close the top cover, pressing down button then the Enter button to select the Print Information menu. (c) Select Configuration with the Enter button. (d) Press the Enter button once more to latch it latches in step 4. 14. Reconnect the AC power cable and switch the printer on. 16. Locate the retaining clips at each side to execute the Configuration menu. When the printer is ready, print a menu map...
C330/C530/C610/C711 DIMM Install Sheet
Page 19
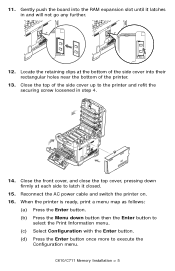
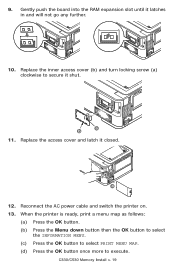
... the OK button. (b) Press the Menu down button then the OK button to select the INFORMATION MENU. (c) Press the OK button to select PRINT MENU MAP. (d) Press the OK button once more to secure it shut. 9. Reconnect the AC power cable and switch the printer on. 13. Gently push the board into the RAM expansion slot until it closed. Replace the inner access cover (b) and turn locking...
... the OK button. (b) Press the Menu down button then the OK button to select the INFORMATION MENU. (c) Press the OK button to select PRINT MENU MAP. (d) Press the OK button once more to secure it shut. 9. Reconnect the AC power cable and switch the printer on. 13. Gently push the board into the RAM expansion slot until it closed. Replace the inner access cover (b) and turn locking...
SD Card Install
Page 8
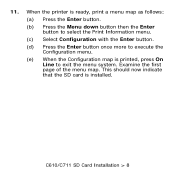
When the printer is ready, print a menu map as follows: (a) Press the Enter button. (b) Press the Menu down button then the Enter button to select the Print Information menu. (c) Select Configuration with the Enter button. (d) Press the Enter button once more to exit the menu system. This should now indicate that the SD card is printed, press On Line to execute the Configuration menu. (e) When the Configuration map is installed. C610/C711 SD Card Installation > 8 Examine the first page of the menu map. 11.
When the printer is ready, print a menu map as follows: (a) Press the Enter button. (b) Press the Menu down button then the Enter button to select the Print Information menu. (c) Select Configuration with the Enter button. (d) Press the Enter button once more to exit the menu system. This should now indicate that the SD card is printed, press On Line to execute the Configuration menu. (e) When the Configuration map is installed. C610/C711 SD Card Installation > 8 Examine the first page of the menu map. 11.

SD Card Install
Page 32
Examine the first page of the menu map. C530 SD Card Installation > 32 This should now indicate that the SD card is printed, press On Line to execute the Configuration menu. (e) When the Configuration map is installed. 11. When the printer is ready, print a menu map as follows: (a) Press the Enter button. (b) Press the Menu down button then the Enter button to select the Print Information menu. (c) Select Configuration with the Enter button. (d) Press the Enter button once more to exit the menu system.
Examine the first page of the menu map. C530 SD Card Installation > 32 This should now indicate that the SD card is printed, press On Line to execute the Configuration menu. (e) When the Configuration map is installed. 11. When the printer is ready, print a menu map as follows: (a) Press the Enter button. (b) Press the Menu down button then the Enter button to select the Print Information menu. (c) Select Configuration with the Enter button. (d) Press the Enter button once more to exit the menu system.

Duplex Installation Instructions
Page 1
... OnLine. 1 4 Activate the Duplex Unit in until Duplex displays. 9. Press Enter. 4. Press Enter. 10.Press the down arrow key to change the setting to warm up , as you must be adjusted on the back of the configuration report. Windows Vista, Windows 7: Click Start > Control Panel > Printers. 2. In the PCL driver, click the Device Options tab. 4. In the PCL driver select the appropriate check box in . 1. Click OK. 6. Switch the printer...
... OnLine. 1 4 Activate the Duplex Unit in until Duplex displays. 9. Press Enter. 4. Press Enter. 10.Press the down arrow key to change the setting to warm up , as you must be adjusted on the back of the configuration report. Windows Vista, Windows 7: Click Start > Control Panel > Printers. 2. In the PCL driver, click the Device Options tab. 4. In the PCL driver select the appropriate check box in . 1. Click OK. 6. Switch the printer...
C610, C711 User's Guide (English)
Page 7
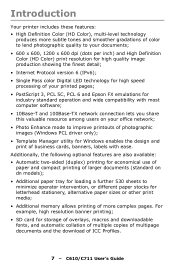
... User's Guide Introduction Your printer includes these features: • High Definition Color (HD Color), multi-level technology produces more complex pages. Additionally, the following optional features are also available: • Automatic two-sided (duplex) printing for economical use of paper and compact printing of larger documents (standard on dn models); • Additional paper tray for loading a further 530 sheets to minimize operator intervention, or different paper stocks for letterhead stationery, alternative paper sizes...
... User's Guide Introduction Your printer includes these features: • High Definition Color (HD Color), multi-level technology produces more complex pages. Additionally, the following optional features are also available: • Automatic two-sided (duplex) printing for economical use of paper and compact printing of larger documents (standard on dn models); • Additional paper tray for loading a further 530 sheets to minimize operator intervention, or different paper stocks for letterhead stationery, alternative paper sizes...
C610, C711 User's Guide (English)
Page 12
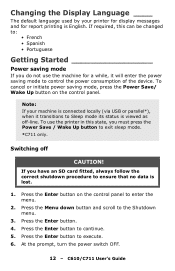
.../C711 User's Guide Changing the Display Language ____ The default language used by your machine is connected locally (via USB or parallel*), when it will enter the power saving mode to exit sleep mode. *C711 only. Press the Enter button. 4. If you must press the Power Save / Wake Up button to control the power consumption of the device. Note: If your printer for display messages and for a while, it transitions to Sleep mode its status is...
.../C711 User's Guide Changing the Display Language ____ The default language used by your machine is connected locally (via USB or parallel*), when it will enter the power saving mode to exit sleep mode. *C711 only. Press the Enter button. 4. If you must press the Power Save / Wake Up button to control the power consumption of the device. Note: If your printer for display messages and for a while, it transitions to Sleep mode its status is...
C610, C711 User's Guide (English)
Page 24
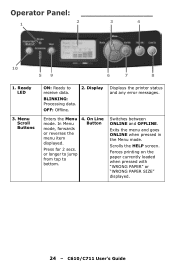
... to receive data. Scrolls the HELP screen. C610/C711 User's Guide Ready LED 3. OFF: Offline. 2. Press for 2 secs. In Menu mode, forwards or reverses the menu item displayed. Exits the menu and goes ONLINE when pressed in the Menu mode. Display Displays the printer status and any error messages. On Line Button Switches between ONLINE and OFFLINE. Forces printing on the paper currently loaded when pressed with "WRONG PAPER" or "WRONG PAPER SIZE" displayed. 24 - Menu Scroll Buttons ON: Ready to bottom. 4. Operator Panel 2 3 4 1 10...
... to receive data. Scrolls the HELP screen. C610/C711 User's Guide Ready LED 3. OFF: Offline. 2. Press for 2 secs. In Menu mode, forwards or reverses the menu item displayed. Exits the menu and goes ONLINE when pressed in the Menu mode. Display Displays the printer status and any error messages. On Line Button Switches between ONLINE and OFFLINE. Forces printing on the paper currently loaded when pressed with "WRONG PAPER" or "WRONG PAPER SIZE" displayed. 24 - Menu Scroll Buttons ON: Ready to bottom. 4. Operator Panel 2 3 4 1 10...

C610, C711 User's Guide (English)
Page 56
... is not needed because TRC is automatically adjusted to the recommended levels through the Adjust Density/TRC Compensation function. 56 - Adjustment results will immediately adjust density and reflect it in TRC compensation. This adjustment must be executed when the printer is automatically run density adjustment. Ordinarily, this menu is idling. C610/C711 User's Guide This adjustment must be executed when the printer is selected...
... is not needed because TRC is automatically adjusted to the recommended levels through the Adjust Density/TRC Compensation function. 56 - Adjustment results will immediately adjust density and reflect it in TRC compensation. This adjustment must be executed when the printer is automatically run density adjustment. Ordinarily, this menu is idling. C610/C711 User's Guide This adjustment must be executed when the printer is selected...
C610, C711 User's Guide (English)
Page 61
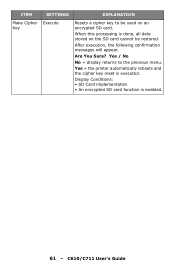
ITEM SETTINGS EXPLANATION Make Cipher Execute Key Resets a cipher key to the previous menu. When this processing is enabled. 61 - Are You Sure? Display Conditions: • SD Card implementation • An encrypted SD card function is done, all data stored on an encrypted SD card. After execution, the following confirmation messages will appear. Yes = the printer automatically reboots and the cipher key reset is executed. C610/C711 User's Guide Yes / No No = display returns to be used on the SD card cannot be restored.
ITEM SETTINGS EXPLANATION Make Cipher Execute Key Resets a cipher key to the previous menu. When this processing is enabled. 61 - Are You Sure? Display Conditions: • SD Card implementation • An encrypted SD card function is done, all data stored on an encrypted SD card. After execution, the following confirmation messages will appear. Yes = the printer automatically reboots and the cipher key reset is executed. C610/C711 User's Guide Yes / No No = display returns to be used on the SD card cannot be restored.
C610, C711 User's Guide (English)
Page 62
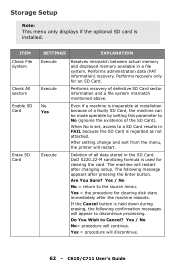
... as not attached. Yes = the procedure for an SD Card. Storage Setup Note: This menu only displays if the optional SD card is used for clearing the card. ITEM Check File System Check All Sectors Enable SD Card Erase SD Card SETTINGS EXPLANATION Execute Execute No Yes Execute Resolves mismatch between actual memory and displayed memory available in a file system. The following confirmation messages will restart. Performs administration data (FAT information) recovery.
... as not attached. Yes = the procedure for an SD Card. Storage Setup Note: This menu only displays if the optional SD card is used for clearing the card. ITEM Check File System Check All Sectors Enable SD Card Erase SD Card SETTINGS EXPLANATION Execute Execute No Yes Execute Resolves mismatch between actual memory and displayed memory available in a file system. The following confirmation messages will restart. Performs administration data (FAT information) recovery.
C610/C711 Software Setup Guide (English, Fran栩s, Espa?ol, Portugu鱩
Page 3
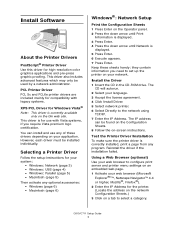
.... Install Software About the Printer Drivers PostScript® Printer Driver Use this driver for compatibility with Vista systems, if you need to configure print server and printer menu settings on an embedded web page. 1 Activate your network. PCL Printer Driver PCL 5c and PCL6e printer drivers are included mainly for high-resolution color graphics applications and pre-press graphic proofing. Install the Driver 1 Insert the CD in the CD-ROM drive. C610/C711 Setup Guide 3 Reinstall the driver if the installation...
.... Install Software About the Printer Drivers PostScript® Printer Driver Use this driver for compatibility with Vista systems, if you need to configure print server and printer menu settings on an embedded web page. 1 Activate your network. PCL Printer Driver PCL 5c and PCL6e printer drivers are included mainly for high-resolution color graphics applications and pre-press graphic proofing. Install the Driver 1 Insert the CD in the CD-ROM drive. C610/C711 Setup Guide 3 Reinstall the driver if the installation...

C610/C711 Software Setup Guide (English, Fran栩s, Espa?ol, Portugu鱩
Page 4
... select the port you want to complete the installation. 4 To view the manuals, click Start ->All Programs ->OkiData ->C610/C711 User Guide. ers. 2 Right click the OKI C610/C711 icon. 3 Click Properties. 4 Click the Installable Options tab. 5 Select Two-Way Communications. 6 Type the IP address or DNS name. 7 To display the printer's current default setting when opened, select Update Fiery Driver When Opened. 8 Click Update. Windows: USB Setup Install the Driver 1 Turn the Printer OFF. 2 Insert...
... select the port you want to complete the installation. 4 To view the manuals, click Start ->All Programs ->OkiData ->C610/C711 User Guide. ers. 2 Right click the OKI C610/C711 icon. 3 Click Properties. 4 Click the Installable Options tab. 5 Select Two-Way Communications. 6 Type the IP address or DNS name. 7 To display the printer's current default setting when opened, select Update Fiery Driver When Opened. 8 Click Update. Windows: USB Setup Install the Driver 1 Turn the Printer OFF. 2 Insert...
C610/C711 Software Setup Guide (English, Fran栩s, Espa?ol, Portugu鱩
Page 5
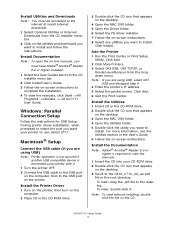
Install Documentation Note: To open the on-line manuals, you are using USB) Note: Printer operation is not assured if another USB compatible device is required to view the manuals. 1 Insert the CD into your printer to complete the installation. 4 To view the manuals, click Start ->All Programs ->OkiData -> C610/C711 User Guide. Windows: Parallel Connection Setup Follow the instructions for USB Setup. Macintosh® Setup Connect the USB cable (if you must be connected to the internet to install Internet...
Install Documentation Note: To open the on-line manuals, you are using USB) Note: Printer operation is not assured if another USB compatible device is required to view the manuals. 1 Insert the CD into your printer to complete the installation. 4 To view the manuals, click Start ->All Programs ->OkiData -> C610/C711 User Guide. Windows: Parallel Connection Setup Follow the instructions for USB Setup. Macintosh® Setup Connect the USB cable (if you must be connected to the internet to install Internet...
C610/C711 Software Setup Guide (English, Fran栩s, Espa?ol, Portugu鱩
Page 6
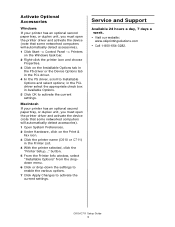
button. 5 From the Printer Info window, select "Installable Options" from the dropdown menu. 6 Click or drop-down the settings to enable the various options. 7 Click Apply Changes to activate the current settings. Macintosh If your printer has an optional second paper tray, or duplex unit, you must open the printer driver and activate the device (note that some networked computers will automatically detect accessories). 1 Click Start -> Control Panel -> Printers on the Windows task...
button. 5 From the Printer Info window, select "Installable Options" from the dropdown menu. 6 Click or drop-down the settings to enable the various options. 7 Click Apply Changes to activate the current settings. Macintosh If your printer has an optional second paper tray, or duplex unit, you must open the printer driver and activate the device (note that some networked computers will automatically detect accessories). 1 Click Start -> Control Panel -> Printers on the Windows task...

C711 Handy Reference (English, Fran栩s, Espa?ol, Portugu鱩
Page 14
The default is 1 minute. For more information, see your on-line User's Guide. 14 • C711 • English This saves energy, but the printer requires time to warm up when it receives a print job or if you want to enter the menu and change settings. Power Save Mode Power Save sets how long the printer waits before going into standby mode.
The default is 1 minute. For more information, see your on-line User's Guide. 14 • C711 • English This saves energy, but the printer requires time to warm up when it receives a print job or if you want to enter the menu and change settings. Power Save Mode Power Save sets how long the printer waits before going into standby mode.

C711 Safety/Warranty/Regulatory Guide
Page 4
...make a request or claim for a printhead failure is available by any request or claim for cleaning and/or repairs to consumable items or supplies, such as toner cartridges, image drums, ribbon cartridges...Oki Data's representative within two (2) business days of purchase. For the remaining printhead warranty period, replacement will be free from the date of service or modification by 4 - Limited Warranty, US and Canada U.S. Overnight Exchange US and Canada Only Oki Data offers Overnight Exchange of the Product under this C711 (hereinafter "the Product") to solve your credit card...
...make a request or claim for a printhead failure is available by any request or claim for cleaning and/or repairs to consumable items or supplies, such as toner cartridges, image drums, ribbon cartridges...Oki Data's representative within two (2) business days of purchase. For the remaining printhead warranty period, replacement will be free from the date of service or modification by 4 - Limited Warranty, US and Canada U.S. Overnight Exchange US and Canada Only Oki Data offers Overnight Exchange of the Product under this C711 (hereinafter "the Product") to solve your credit card...
C711 Safety/Warranty/Regulatory Guide
Page 5
... location where you have the model number and serial number for times and availability of commercial software packages. United States Oki Data Americas, Inc. 2000 Bishops Gate Blvd. Please have a problem that you are on all current OKI products. This warranty gives you specific legal rights, and you can check your customer documentation cannot solve, contact the listed sources for the latest information at any time. Oki Data Authorized Service...
... location where you have the model number and serial number for times and availability of commercial software packages. United States Oki Data Americas, Inc. 2000 Bishops Gate Blvd. Please have a problem that you are on all current OKI products. This warranty gives you specific legal rights, and you can check your customer documentation cannot solve, contact the listed sources for the latest information at any time. Oki Data Authorized Service...


