Oki B4350 Research
Related Manual Pages


Similar Questions

My Printer Won't Print It Says Error.it Says A Document Stuck In Pending Mode
My printer doesn't print it can't even print out a test page. I have the Okie b4600 printer so I hav...
My printer doesn't print it can't even print out a test page. I have the Okie b4600 printer so I hav...
(Posted by matfew8 1 year ago)

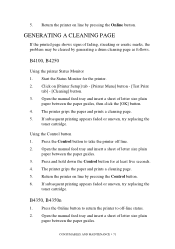
How Do I Change The Darkness Settings On A Oki B4350 Laser Printer
(Posted by Warrilcoh 9 years ago)

I Am Having Oki Printer But Enable Printe Pdf Format Error Please Do The Needful
(Posted by samicpksa 10 years ago)

How Do You Align The Printer To Correctly Print On Hcfa 1500 Forms?
(Posted by lmosssespine 11 years ago)