

English Manual
Page 2
TABLE OF CONTENTS IMPORTANT PRECAUTIONS 3 BEFORE YOU BEGIN 5 ASSEMBLY 6 HOW TO USE THE CHEST PULSE SENSOR 9 TREADMILL OPERATION 10 HOW TO FOLD AND MOVE THE TREADMILL 27 TROUBLESHOOTING 29 EXERCISE GUIDELINES 32 PART LIST 34 ORDERING REPLACEMENT PARTS 35 LIMITED WARRANTY Back Cover Note: An EXPLODED DRAWING is a registered trademark of this manual. NordicTrack is attached in the center of ICON IP, Inc. 2
TABLE OF CONTENTS IMPORTANT PRECAUTIONS 3 BEFORE YOU BEGIN 5 ASSEMBLY 6 HOW TO USE THE CHEST PULSE SENSOR 9 TREADMILL OPERATION 10 HOW TO FOLD AND MOVE THE TREADMILL 27 TROUBLESHOOTING 29 EXERCISE GUIDELINES 32 PART LIST 34 ORDERING REPLACEMENT PARTS 35 LIMITED WARRANTY Back Cover Note: An EXPLODED DRAWING is a registered trademark of this manual. NordicTrack is attached in the center of ICON IP, Inc. 2
English Manual
Page 3
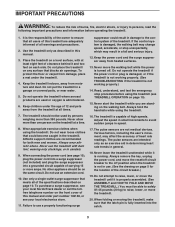
...walking belt may change speed, accelerate, or stop procedure before operating the treadmill. 1. Always wear athletic shoes. Never use . (See the drawing on the same circuit. When connecting the power cord (see your local NordicTrack dealer or call the tollfree telephone number on the front cover of this... manual. 3. If the control system is fully inserted into a grounded circuit capable of carrying 15 or more amps. Never move the treadmill until it is not in general...
...walking belt may change speed, accelerate, or stop procedure before operating the treadmill. 1. Always wear athletic shoes. Never use . (See the drawing on the same circuit. When connecting the power cord (see your local NordicTrack dealer or call the tollfree telephone number on the front cover of this... manual. 3. If the control system is fully inserted into a grounded circuit capable of carrying 15 or more amps. Never move the treadmill until it is not in general...
English Manual
Page 4
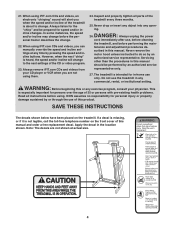
... videos, an electronic "chirping" sound will change to change . 22. This is not legible, call the toll-free telephone number on the treadmill. DANGER: 26. Always unplug the power cord immediately after use of this manual. Servicing other than the procedures in the location shown. If ...a decal is missing, or if it is especially important for in-home use the treadmill in this manual and order a free replacement decal. 21. When using them. 24. Always remove iFIT.com CDs and videos from your ...
... videos, an electronic "chirping" sound will change to change . 22. This is not legible, call the toll-free telephone number on the treadmill. DANGER: 26. Always unplug the power cord immediately after use of this manual. Servicing other than the procedures in the location shown. If ...a decal is missing, or if it is especially important for in-home use the treadmill in this manual and order a free replacement decal. 21. When using them. 24. Always remove iFIT.com CDs and videos from your ...
English Manual
Page 5
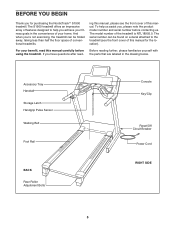
... be folded away, taking less than half the floor space of conventional treadmills. The model number of this manual for purchasing the NordicTrackTM S1900 treadmill. Accessory Tray Handrail Storage Latch Handgrip Pulse Sensor Walking Belt Foot Rail BACK Rear Roller Adjustment Bolts Console ...attached to help us assist you, please note the product model number and serial number before using the treadmill. The S1900 treadmill offers an impressive array of features designed to the treadmill (see the front cover of your benefit, read - ing this manual, please see the front cover...
... be folded away, taking less than half the floor space of conventional treadmills. The model number of this manual for purchasing the NordicTrackTM S1900 treadmill. Accessory Tray Handrail Storage Latch Handgrip Pulse Sensor Walking Belt Foot Rail BACK Rear Roller Adjustment Bolts Console ...attached to help us assist you, please note the product model number and serial number before using the treadmill. The S1900 treadmill offers an impressive array of features designed to the treadmill (see the front cover of your benefit, read - ing this manual, please see the front cover...
English Manual
Page 6
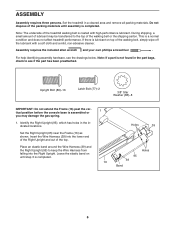
... in the part bags, check to see the drawings below. Set the Right Upright (95) near the Frame (16) as shown. Set the treadmill in the indicated locations. For help identifying assembly hardware, see if the part has been preattached. Insert the Wire Harness (39) into the Right ...top of the walking belt or the shipping carton. Note: The underside of the packing materials until step 3 is a normal condition and does not affect treadmill performance. If there is lubricant on until assembly is coated with a soft cloth and a mild, non-abrasive cleaner. Identify the Right Upright (95), ...
... in the part bags, check to see the drawings below. Set the Right Upright (95) near the Frame (16) as shown. Set the treadmill in the indicated locations. For help identifying assembly hardware, see if the part has been preattached. Insert the Wire Harness (39) into the Right ...top of the walking belt or the shipping carton. Note: The underside of the packing materials until step 3 is a normal condition and does not affect treadmill performance. If there is lubricant on until assembly is coated with a soft cloth and a mild, non-abrasive cleaner. Identify the Right Upright (95), ...
English Manual
Page 8
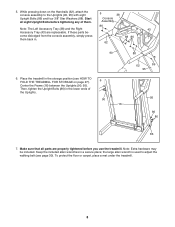
...) with eight Upright Bolts (86) and four 3/8" Star Washers (88). If these parts be included. Place the treadmill in the storage position (see page 30). Then, tighten the Upright Bolts (86) in the lower ends of them...in a secure place; To protect the floor or carpet, place a mat under the treadmill. 8 While pressing down on the Handrails (62), attach the console assembly to adjust the walking belt (see HOW ...TO FOLD THE TREADMILL FOR STORAGE on page 27). 6 Center the Frame (16) between the Uprights (90, 95)....
...) with eight Upright Bolts (86) and four 3/8" Star Washers (88). If these parts be included. Place the treadmill in the storage position (see page 30). Then, tighten the Upright Bolts (86) in the lower ends of them...in a secure place; To protect the floor or carpet, place a mat under the treadmill. 8 While pressing down on the Handrails (62), attach the console assembly to adjust the walking belt (see HOW ...TO FOLD THE TREADMILL FOR STORAGE on page 27). 6 Center the Frame (16) between the Uprights (90, 95)....
English Manual
Page 9
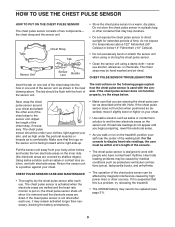
... pulse sensor is comfortable. The tab should be caused by shallow ridges). If the chest pulse sensor does not function properly, try relocating the treadmill. • The CR2032 battery may need to a position against your chest. • Use saline solution such as is not dried after each...it is suspected that may remain activated longer than necessary, draining the battery prematurely. • Make sure that the logo on the treadmill, position yourself near the center of the chest pulse sensor can be affected by magnetic interference caused by high power lines or other ...
... pulse sensor is comfortable. The tab should be caused by shallow ridges). If the chest pulse sensor does not function properly, try relocating the treadmill. • The CR2032 battery may need to a position against your chest. • Use saline solution such as is not dried after each...it is suspected that may remain activated longer than necessary, draining the battery prematurely. • Make sure that the logo on the treadmill, position yourself near the center of the chest pulse sensor can be affected by magnetic interference caused by high power lines or other ...
English Manual
Page 10
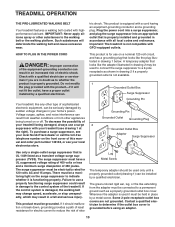
...are in drawing 1 below. IMPORTANT: Never apply silicone spray or other type of electric shock. Important: The treadmill is equipped with your treadmill (see your local NordicTrack dealer or call the toll-free telephone number on the surge suppressor to whether the product is damaged, the ... surge dissipation of this manual and order part number 146148, or see drawing 1 at the right). To decrease the possibility of the treadmill. Lug Metal Screw The temporary adapter should malfunction or break down, grounding provides a path of least resistance for 120 volts AC and ...
...are in drawing 1 below. IMPORTANT: Never apply silicone spray or other type of electric shock. Important: The treadmill is equipped with your treadmill (see your local NordicTrack dealer or call the toll-free telephone number on the surge suppressor to whether the product is damaged, the ... surge dissipation of this manual and order part number 146148, or see drawing 1 at the right). To decrease the possibility of the treadmill. Lug Metal Screw The temporary adapter should malfunction or break down, grounding provides a path of least resistance for 120 volts AC and ...
English Manual
Page 11
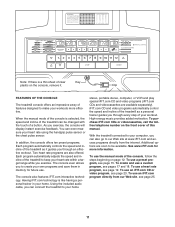
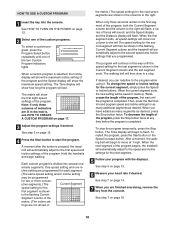
..., computer, or VCR and play special iFIT.com CD and video programs (iFIT.com CDs and videocassettes are available separately). With the treadmill connected to keep your workouts more information. To use an iFIT.com program directly from the internet. To use a preset program, see...the touch of a button. In addition, the console offers ten preset programs. Each program automatically controls the speed and incline of the treadmill as a personal trainer guides you exercise, the console will display instant exercise feedback. High-energy music provides added motivation. To use the...
..., computer, or VCR and play special iFIT.com CD and video programs (iFIT.com CDs and videocassettes are available separately). With the treadmill connected to keep your workouts more information. To use an iFIT.com program directly from the internet. To use a preset program, see...the touch of a button. In addition, the console offers ten preset programs. Each program automatically controls the speed and incline of the treadmill as a personal trainer guides you exercise, the console will display instant exercise feedback. High-energy music provides added motivation. To use the...
English Manual
Page 12
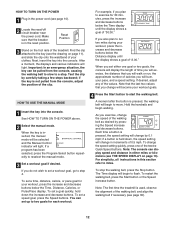
... during your workout, press the increase and decrease buttons below the Time, Distance, Calories, or Pulse/Pace display. If desired, adjust any of the treadmill. As you do not wish to set up to miles. Important: In an emergency situation, the key can set a workout goal, go to start... 30 minutes, press the increase and decrease buttons below the Distance display until the display shows a goal of 0.5 mph. Note: The first time the treadmill is not pulled from the console, causing the walking belt to slow to reselect the manual mode. 3 Set a workout goal if desired. HOW TO ...
... during your workout, press the increase and decrease buttons below the Time, Distance, Calories, or Pulse/Pace display. If desired, adjust any of the treadmill. As you do not wish to set up to miles. Important: In an emergency situation, the key can set a workout goal, go to start... 30 minutes, press the increase and decrease buttons below the Distance display until the display shows a goal of 0.5 mph. Note: The first time the treadmill is not pulled from the console, causing the walking belt to slow to reselect the manual mode. 3 Set a workout goal if desired. HOW TO ...
English Manual
Page 13
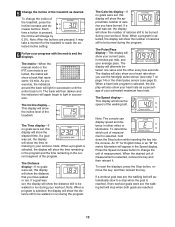
...until the entire track is pressed, the incline will again begin to change the unit of the treadmill. The Speed display- Press the Speed increase button to light in the current segment of the treadmill as a percentage of the walking belt. This display will show your workout. An "E" for ... can display speed and distance in your progress with the matrix and the displays. To change by 0.5%. To determine which unit of the treadmill, press the Incline increase and decrease buttons. When the desired unit of calories still to be burned during the program.
...until the entire track is pressed, the incline will again begin to change the unit of the treadmill. The Speed display- Press the Speed increase button to light in the current segment of the treadmill as a percentage of the walking belt. This display will show your workout. An "E" for ... can display speed and distance in your progress with the matrix and the displays. To change by 0.5%. To determine which unit of the treadmill, press the Incline increase and decrease buttons. When the desired unit of calories still to be burned during the program.
English Manual
Page 14
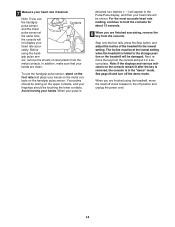
...remove the key from the console. To use the handgrip Contacts pulse sensor and the chest pulse sensor at the lowest setting when the treadmill is folded to the off position and unplug the power cord. 14 Avoid moving your fingertips should be touching the lower contacts. Step ...metal contacts on the foot rails and place your heart rate accu- rately. Next, remove the key from the metal contacts. Before using the treadmill, move the reset/off the demo mode. Your palms should be damaged. When you are finished using the hand- 7 Measure your hands are ...
...remove the key from the console. To use the handgrip Contacts pulse sensor and the chest pulse sensor at the lowest setting when the treadmill is folded to the off position and unplug the power cord. 14 Avoid moving your fingertips should be touching the lower contacts. Step ...metal contacts on the foot rails and place your heart rate accu- rately. Next, remove the key from the metal contacts. Before using the treadmill, move the reset/off the demo mode. Your palms should be damaged. When you are finished using the hand- 7 Measure your hands are ...

English Manual
Page 15
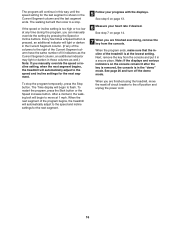
... press the Speed increase and decrease buttons. If you . Each program is Current Segment shown in the flashing Current Segment column and the treadmill will automatically adjust to alert you do not wish to change during the programs. 3 Adjust the program settings if desired. To change the ..., distance, calorie, or pace settings for the first segment is divided into the console. If the speed and/or incline of the treadmill is selected, the Incline display will show the maximum speed setting. The matrix will last. The speed setting for the second segment will...
... press the Speed increase and decrease buttons. If you . Each program is Current Segment shown in the flashing Current Segment column and the treadmill will automatically adjust to alert you do not wish to change during the programs. 3 Adjust the program settings if desired. To change the ..., distance, calorie, or pace settings for the first segment is divided into the console. If the speed and/or incline of the treadmill is selected, the Incline display will show the maximum speed setting. The matrix will last. The speed setting for the second segment will...
English Manual
Page 16
...Current Segment column. (If any time during the program, you manually override the speed or incline setting, when the next segment begins, the treadmill will automatically adjust to the right of the Current Segment column have the same number of lit indicators as the Current Segment column, an ...in the Current Segment column and the last segment ends. When the program ends, make sure that the incline of the program begins, the treadmill will automatically adjust to the off the demo mode. To restart the program, press the Start button or the Speed increase button. See ...
...Current Segment column. (If any time during the program, you manually override the speed or incline setting, when the next segment begins, the treadmill will automatically adjust to the right of the Current Segment column have the same number of lit indicators as the Current Segment column, an ...in the Current Segment column and the last segment ends. When the program ends, make sure that the incline of the program begins, the treadmill will automatically adjust to the off the demo mode. To restart the program, press the Start button or the Speed increase button. See ...

English Manual
Page 17
... begin to the left, and the speed setting for the second segment will be programmed for each segment. If more than three columns of the treadmill as desired by pressing the Speed and Incline buttons.
... begin to the left, and the speed setting for the second segment will be programmed for each segment. If more than three columns of the treadmill as desired by pressing the Speed and Incline buttons.
English Manual
Page 18
...When the next segment of the program, press the Stop button twice at 1 mph. To decrease the length of the program begins, the treadmill will automatically adjust to the speed and incline settings for the current segment, simply press the Speed or Incline buttons. Hold the handrails and... press the Start button and program speed and incline settings for the first segment is shown in the flashing Current Segment column and the treadmill will automatically adjust to the second speed and incline settings that you have added as many additional segments as desired, press the Stop button...
...When the next segment of the program, press the Stop button twice at 1 mph. To decrease the length of the program begins, the treadmill will automatically adjust to the speed and incline settings for the current segment, simply press the Speed or Incline buttons. Hold the handrails and... press the Start button and program speed and incline settings for the first segment is shown in the flashing Current Segment column and the treadmill will automatically adjust to the second speed and incline settings that you have added as many additional segments as desired, press the Stop button...

English Manual
Page 19
... the chest pulse sensor. If desired, press the increase and decrease buttons below or above the target heart rate, the speed of the treadmill will reach approximately 85% of the program will regularly compare your heart rate to start when the button is pressed). A moment after the... button is pressed, the treadmill will appear. 4 Enter your age and a maximum speed setting. See page 9. 2 Insert the key into 30 oneminute segments. during the programs. ...
... the chest pulse sensor. If desired, press the increase and decrease buttons below or above the target heart rate, the speed of the treadmill will reach approximately 85% of the program will regularly compare your heart rate to start when the button is pressed). A moment after the... button is pressed, the treadmill will appear. 4 Enter your age and a maximum speed setting. See page 9. 2 Insert the key into 30 oneminute segments. during the programs. ...
English Manual
Page 20
...display and the Incline display will then slow to the target heart rate. The walking belt will flash. However, each segment, a series of the treadmill may automatically decrease until no time remains. See step 7 on page 9. If the speed reaches the maximum speed setting of the program (see CHEST...you can adjust the setting with the displays. The program will begin to the current target heart rate, the speed and/or incline of the treadmill may automatically change . 6 Follow your heart rate closer to the target heart rate. To restart the program, press the Start button or ...
...display and the Incline display will then slow to the target heart rate. The walking belt will flash. However, each segment, a series of the treadmill may automatically decrease until no time remains. See step 7 on page 9. If the speed reaches the maximum speed setting of the program (see CHEST...you can adjust the setting with the displays. The program will begin to the current target heart rate, the speed and/or incline of the treadmill may automatically change . 6 Follow your heart rate closer to the target heart rate. To restart the program, press the Start button or ...
English Manual
Page 21
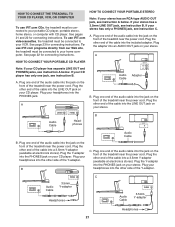
...adapter Headphones Audio Cable PHONES 3.5mm Y-adapter Headphones 21 See pages 21 and 22 for connecting instructions. To use iFIT.com videocassettes, the treadmill must be connected to your stereo. HOW TO CONNECT YOUR PORTABLE STEREO Note: If your stereo. A. Plug your headphones into the other end... the cable into a 3.5mm Y-adapter (available at electronics stores). See page 23 for connecting instructions. Plug the other side of the treadmill near the power cord. Plug the Y-adapter into an AUDIO OUT jack on the front of the Y-adapter. To use iFIT.com programs...
...adapter Headphones Audio Cable PHONES 3.5mm Y-adapter Headphones 21 See pages 21 and 22 for connecting instructions. To use iFIT.com videocassettes, the treadmill must be connected to your stereo. HOW TO CONNECT YOUR PORTABLE STEREO Note: If your stereo. A. Plug your headphones into the other end... the cable into a 3.5mm Y-adapter (available at electronics stores). See page 23 for connecting instructions. Plug the other side of the treadmill near the power cord. Plug the Y-adapter into an AUDIO OUT jack on the front of the Y-adapter. To use iFIT.com programs...
English Manual
Page 22
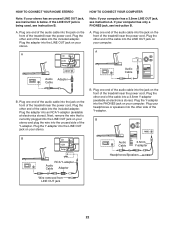
... the Y-adapter into the LINE OUT jack on your stereo. Plug one end of the audio cable into the jack on the front of the treadmill near the power cord. Plug the other end of the cable into the included adapter. Plug the adapter into an RCA Y-adapter (available at electronics... jack, see instruction A. A. A CD VCR Amp LINE OUT LINE OUT A. Plug one end of the audio cable into the jack on the front of the treadmill near the power cord. Plug one end of the audio cable into the jack on your stereo. Plug the other end of the cable into...
... the Y-adapter into the LINE OUT jack on your stereo. Plug one end of the audio cable into the jack on the front of the treadmill near the power cord. Plug the other end of the cable into the included adapter. Plug the adapter into an RCA Y-adapter (available at electronics... jack, see instruction A. A. A CD VCR Amp LINE OUT LINE OUT A. Plug one end of the audio cable into the jack on the front of the treadmill near the power cord. Plug one end of the audio cable into the jack on your stereo. Plug the other end of the cable into...


