
Uk Manual
Page 2
... not be shown at actual size. NORDICTRACK is missing or illegible, see the front cover of the warning decal(s). TABLE OF CONTENTS WARNING DECAL PLACEMENT 2 IMPORTANT PRECAUTIONS 3 BEFORE YOU BEGIN 4 ASSEMBLY 5 THE CHEST HEART RATE MONITOR 12 HOW TO USE THE EXERCISE BIKE 13 MAINTENANCE AND TROUBLESHOOTING 22 EXERCISE GUIDELINES 24 PART LIST 25 EXPLODED DRAWING 27 ORDERING REPLACEMENT PARTS Back Cover RECYCLING INFORMATION Back Cover WARNING DECAL PLACEMENT This drawing...
... not be shown at actual size. NORDICTRACK is missing or illegible, see the front cover of the warning decal(s). TABLE OF CONTENTS WARNING DECAL PLACEMENT 2 IMPORTANT PRECAUTIONS 3 BEFORE YOU BEGIN 4 ASSEMBLY 5 THE CHEST HEART RATE MONITOR 12 HOW TO USE THE EXERCISE BIKE 13 MAINTENANCE AND TROUBLESHOOTING 22 EXERCISE GUIDELINES 24 PART LIST 25 EXPLODED DRAWING 27 ORDERING REPLACEMENT PARTS Back Cover RECYCLING INFORMATION Back Cover WARNING DECAL PLACEMENT This drawing...
Uk Manual
Page 3
... kg). 4. Replace any exercise program, consult your back. 13. Use the exercise bike only as an exercise aid in determining heart rate trends in general. 12. Always keep your exercise bike. do not wear loose clothes that all users of the exercise bike are adequately informed of all times. 9. ICON assumes no responsibility for home use only. It is intended only as described in this product. 1. The heart rate monitor is...
... kg). 4. Replace any exercise program, consult your back. 13. Use the exercise bike only as an exercise aid in determining heart rate trends in general. 12. Always keep your exercise bike. do not wear loose clothes that all users of the exercise bike are adequately informed of all times. 9. ICON assumes no responsibility for home use only. It is intended only as described in this product. 1. The heart rate monitor is...
Uk Manual
Page 4
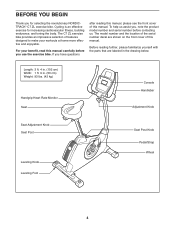
The C7 ZL exercise bike provides an impressive selection of features designed to make your benefit, read this manual carefully before contacting us. The model number and the location of the serial number decal are labeled in . (53 cm) Weight: 93 lbs. (42 kg) Handgrip Heart Rate Monitor Seat Console Handlebar Adjustment Knob Seat Adjustment Knob Seat Post Leveling Knob Leveling Foot Seat Post Knob Pedal/Strap Wheel 4 For your workouts at home more effective and enjoyable. If you have...
The C7 ZL exercise bike provides an impressive selection of features designed to make your benefit, read this manual carefully before contacting us. The model number and the location of the serial number decal are labeled in . (53 cm) Weight: 93 lbs. (42 kg) Handgrip Heart Rate Monitor Seat Console Handlebar Adjustment Knob Seat Adjustment Knob Seat Post Leveling Knob Leveling Foot Seat Post Knob Pedal/Strap Wheel 4 For your workouts at home more effective and enjoyable. If you have...
Uk Manual
Page 5
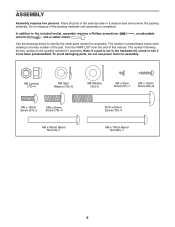
... Screw (76)-4 M6 x 70mm Barrel Nut (89)-1 5 The number in a cleared area and remove the packing materials. Place all parts of the exercise bike in parentheses below to identify the small parts needed for assembly. In addition to see if it has been preassembled. Do not dispose of this manual. The number following the key number is completed. To avoid damaging parts, do not use power...
... Screw (76)-4 M6 x 70mm Barrel Nut (89)-1 5 The number in a cleared area and remove the packing materials. Place all parts of the exercise bike in parentheses below to identify the small parts needed for assembly. In addition to see if it has been preassembled. Do not dispose of this manual. The number following the key number is completed. To avoid damaging parts, do not use power...

Uk Manual
Page 10
... wires. Adjust the strap on the Right Pedal (21) to the Wire Harness (58). Slide the Front Shield Cover (7) upward onto the Upright (4). 8 While another person holds the Upright (4) near the Frame (1), connect the Extension Wire (59) to the desired position, and press the ends of the straps onto the tabs on the Right Pedal. Attach the Upright (4) with an "R." 9 Using an adjustable wrench, firmly tighten the Right Pedal...
... wires. Adjust the strap on the Right Pedal (21) to the Wire Harness (58). Slide the Front Shield Cover (7) upward onto the Upright (4). 8 While another person holds the Upright (4) near the Frame (1), connect the Extension Wire (59) to the desired position, and press the ends of the straps onto the tabs on the Right Pedal. Attach the Upright (4) with an "R." 9 Using an adjustable wrench, firmly tighten the Right Pedal...

Uk Manual
Page 12
... is causing a problem, try relocating the fitness equipment. 12 Then, return the sensor to direct sunlight for extended periods of the heart rate monitor can be flush with a soft towel. THE CHEST HEART RATE MONITOR HOW TO PUT ON THE HEART RATE MONITOR The heart rate monitor consists of the chest strap, if neces- Wrap the heart rate monitor around your body a few inches and locate the two electrode areas, which are covered by medical...
... is causing a problem, try relocating the fitness equipment. 12 Then, return the sensor to direct sunlight for extended periods of the heart rate monitor can be flush with a soft towel. THE CHEST HEART RATE MONITOR HOW TO PUT ON THE HEART RATE MONITOR The heart rate monitor consists of the chest strap, if neces- Wrap the heart rate monitor around your body a few inches and locate the two electrode areas, which are covered by medical...
Uk Manual
Page 13
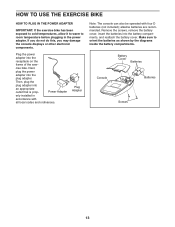
... prop- Battery Cover Batteries Console Batteries Screws 13 Next, plug the power adapter into the receptacle on the frame of the exer- If you do not do this, you may damage the console displays or other electronic components. cise bike. alkaline batteries are recommended. Plug Adapter Note: The console can also be operated with all local codes and ordinances. HOW TO USE THE EXERCISE BIKE HOW TO PLUG IN THE POWER ADAPTER IMPORTANT...
... prop- Battery Cover Batteries Console Batteries Screws 13 Next, plug the power adapter into the receptacle on the frame of the exer- If you do not do this, you may damage the console displays or other electronic components. cise bike. alkaline batteries are recommended. Plug Adapter Note: The console can also be operated with all local codes and ordinances. HOW TO USE THE EXERCISE BIKE HOW TO PLUG IN THE POWER ADAPTER IMPORTANT...
Uk Manual
Page 14
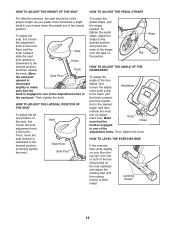
... one of the adjustment holes. To tighten the pedal staps, adjust the straps to the desired angle, and then release the knob into an adjustment hole. dlebar, first loosen the adjust- Then, tighten the knob. To adjust the seat, first loosen the adjustment knob a few turns. bar to the desired position, and press the ends of the straps onto the tabs on the rear stabilizer and adjust the leveling feet...
... one of the adjustment holes. To tighten the pedal staps, adjust the straps to the desired angle, and then release the knob into an adjustment hole. dlebar, first loosen the adjust- Then, tighten the knob. To adjust the seat, first loosen the adjustment knob a few turns. bar to the desired position, and press the ends of the straps onto the tabs on the rear stabilizer and adjust the leveling feet...
Uk Manual
Page 15
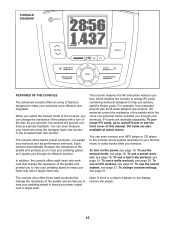
... continuous exercise feedback. To use an iFit workout, see page 21. For example, lose unwanted pounds with a turn on the display, remove the plastic. 15 To use the manual mode, see the front cover of this manual. When you select the manual mode of the console, you to vary your pedaling speed to keep your pedaling speed as it guides you achieve specific fitness goals. As you through an effective workout. To use a heart rate workout, see...
... continuous exercise feedback. To use an iFit workout, see page 21. For example, lose unwanted pounds with a turn on the display, remove the plastic. 15 To use the manual mode, see the front cover of this manual. When you select the manual mode of the console, you to vary your pedaling speed to keep your pedaling speed as it guides you achieve specific fitness goals. As you through an effective workout. To use a heart rate workout, see...
Uk Manual
Page 16
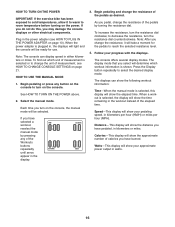
... power adapter (see HOW TO CHANGE CONSOLE SETTINGS on page 21. When the power adapter is selected, the display will show the approximate number of the pedals by pressing any button on the console. When a workout is plugged in kilometers or miles. Plug in the workout instead of the elapsed time. To find out which workout information is selected, this , you have selected a workout, reselect the manual mode by turning the resistance dial. Select the manual mode...
... power adapter (see HOW TO CHANGE CONSOLE SETTINGS on page 21. When the power adapter is selected, the display will show the approximate number of the pedals by pressing any button on the console. When a workout is plugged in kilometers or miles. Plug in the workout instead of the elapsed time. To find out which workout information is selected, this , you have selected a workout, reselect the manual mode by turning the resistance dial. Select the manual mode...

Uk Manual
Page 17
... resistance settings for a few seconds each time the resistance level changes. Profile-When a workout is selected, this display will show a profile of the pedals for the workout. To use the handgrip heart rate monitor or the included heart rate monitor (see page 12. Be careful not to squeeze the contacts tightly. Contacts sure your heart rate, hold the contacts for several seconds, a tone will sound and the console...
... resistance settings for a few seconds each time the resistance level changes. Profile-When a workout is selected, this display will show a profile of the pedals for the workout. To use the handgrip heart rate monitor or the included heart rate monitor (see page 12. Be careful not to squeeze the contacts tightly. Contacts sure your heart rate, hold the contacts for several seconds, a tone will sound and the console...
Uk Manual
Page 18
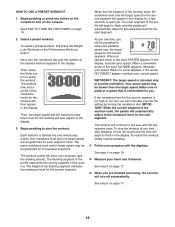
... target speed. To stop pedaling. Make sure to pedal at any button on the console. HOW TO USE A PRESET WORKOUT 1. To select a preset workout, first press the Weight Loss Workouts or the Performance Workouts button. The height of the workout. The workout time and a profile of the desired workout appears in the display for the workout will continue in the display. 3. When you can manually override the setting by turning the resistance dial. Each workout...
... target speed. To stop pedaling. Make sure to pedal at any button on the console. HOW TO USE A PRESET WORKOUT 1. To select a preset workout, first press the Weight Loss Workouts or the Performance Workouts button. The height of the workout. The workout time and a profile of the desired workout appears in the display for the workout will continue in the display. 3. When you can manually override the setting by turning the resistance dial. Each workout...
Uk Manual
Page 19
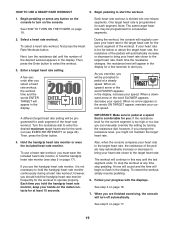
... target heart rate. Turn the resistance dial to flash in the display. Also, when the console compares your heart rate to the target heart rate, the resistance of the pedals will begin to enter the desired maximum target heart rate for consecutive segments. 2. HOW TO USE A HEART RATE WORKOUT 5. Enter a target heart rate setting. however, if you change the resistance level, you must wear the included heart rate monitor or hold the handgrip heart rate monitor, keep your speed. To use...
... target heart rate. Turn the resistance dial to flash in the display. Also, when the console compares your heart rate to the target heart rate, the resistance of the pedals will begin to enter the desired maximum target heart rate for consecutive segments. 2. HOW TO USE A HEART RATE WORKOUT 5. Enter a target heart rate setting. however, if you change the resistance level, you must wear the included heart rate monitor or hold the handgrip heart rate monitor, keep your speed. To use...
Uk Manual
Page 20
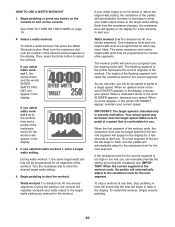
... stop pedaling. To select a watts workout, first press the Watts Workouts button. If you entered for the second segment will appear in the display. 3. Note: The same resistance level and/or target watts level may be programmed for all segments of the workout. As you exercise, you . If the resistance level for each segment. See HOW TO TURN ON THE POWER on the console to...
... stop pedaling. To select a watts workout, first press the Watts Workouts button. If you entered for the second segment will appear in the display. 3. Note: The same resistance level and/or target watts level may be programmed for all segments of the workout. As you exercise, you . If the resistance level for each segment. See HOW TO TURN ON THE POWER on the console to...
Uk Manual
Page 21
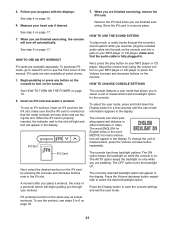
... and decrease buttons on the console. To change the unit of a personal trainer will appear in the display. To use the workout, see the front cover of measurement and a backlight option for metric kilometers will turn on the console. When the iFit card is fully plugged in the display. Remove the iFit card when you are finished exercising, the console will appear in . Begin pedaling or press any button on the console to...
... and decrease buttons on the console. To change the unit of a personal trainer will appear in the display. To use the workout, see the front cover of measurement and a backlight option for metric kilometers will turn on the console. When the iFit card is fully plugged in the display. Remove the iFit card when you are finished exercising, the console will appear in . Begin pedaling or press any button on the console to...
Uk Manual
Page 22
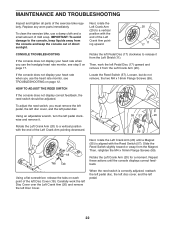
..., work the left Disc Cover over the Left Crank Arm (20) and remove the left pedal clockwise and remove it. 55 57 20 Rotate the Left Crank Arm (20) to the console, keep liquids away from the Magnet. HOW TO ADJUST THE REED SWITCH If the console does not display correct feedback, the reed switch should be adjusted. Using an adjustable wrench, turn the left Disc Cover. To clean the exercise bike, use the handgrip heart rate monitor...
..., work the left Disc Cover over the Left Crank Arm (20) and remove the left pedal clockwise and remove it. 55 57 20 Rotate the Left Crank Arm (20) to the console, keep liquids away from the Magnet. HOW TO ADJUST THE REED SWITCH If the console does not display correct feedback, the reed switch should be adjusted. Using an adjustable wrench, turn the left Disc Cover. To clean the exercise bike, use the handgrip heart rate monitor...

Uk Manual
Page 23
... cover, the rear shield cover, the front shield cover, the right disc cover, the right pedal disc, and the right shield. Remove the Adjustment Knob (27) and remove the Seat Post (6). Then, remove the Right Shield. Next, loosen the M6 x 20mm Hex Screw (85). Then, tighten the M10 x 65mm Hex Screw (86) until the Drive Belt (54) is tight, tighten the M6 x 20mm Hex Screw (85). Rotate the Right Crank Arm...
... cover, the rear shield cover, the front shield cover, the right disc cover, the right pedal disc, and the right shield. Remove the Adjustment Knob (27) and remove the Seat Post (6). Then, remove the Right Shield. Next, loosen the M6 x 20mm Hex Screw (85). Then, tighten the M10 x 65mm Hex Screw (86) until the Drive Belt (54) is tight, tighten the M6 x 20mm Hex Screw (85). Rotate the Right Crank Arm...

Uk Manual
Page 24
... exercise, adjust the intensity of your exercise until your heart rate is to make exercise a regular and enjoyable part of stretching. WORKOUT GUIDELINES Warming Up-Start with 5 to 10 minutes of your cardiovascular system, you to plan your "training zone." The lowest number is the heart rate for fat burning, the middle number is the heart rate for exercise. For maximum fat burning, exercise with pre-existing health problems. The heart rate monitor...
... exercise, adjust the intensity of your exercise until your heart rate is to make exercise a regular and enjoyable part of stretching. WORKOUT GUIDELINES Warming Up-Start with 5 to 10 minutes of your cardiovascular system, you to plan your "training zone." The lowest number is the heart rate for fat burning, the middle number is the heart rate for exercise. For maximum fat burning, exercise with pre-existing health problems. The heart rate monitor...

Uk Manual
Page 25
... 1 90 16 Description Motor Bracket Resistance Motor Resistance Disc Resistance Arm Snap Ring Resistance Arm Adjustment Nut C-magnet Drive Belt Magnet Clamp Reed Switch/Wire Wire Harness Extension Wire Power Receptacle/Wire Pulse Wire Receiver/Wire Sensor Audio Cable Power Adapter Plug Adapter Chest Strap Crank Cap Upright Pivot Bushing 5/16" Flange Screw M8 x 20mm Button Bolt M8 Locknut M8 Jam Nut M8 x 20mm Screw M8 Split Washer M10 x 95mm Screw M6 x 65mm Hex Screw M6 Locknut M4 x 12mm Screw M6 x 8mm Hex Screw M5 Washer M5 x 7mm Screw M6 x 14...
... 1 90 16 Description Motor Bracket Resistance Motor Resistance Disc Resistance Arm Snap Ring Resistance Arm Adjustment Nut C-magnet Drive Belt Magnet Clamp Reed Switch/Wire Wire Harness Extension Wire Power Receptacle/Wire Pulse Wire Receiver/Wire Sensor Audio Cable Power Adapter Plug Adapter Chest Strap Crank Cap Upright Pivot Bushing 5/16" Flange Screw M8 x 20mm Button Bolt M8 Locknut M8 Jam Nut M8 x 20mm Screw M8 Split Washer M10 x 95mm Screw M6 x 65mm Hex Screw M6 Locknut M4 x 12mm Screw M6 x 8mm Hex Screw M5 Washer M5 x 7mm Screw M6 x 14...
Uk Manual
Page 28
... help us : • the model number and serial number of the product (see the front cover of this manual) • the name of the product (see the front cover of this manual) • the key number and description of the replacement part(s) (see the front cover of environmental protection. Please use recycling facilities that are authorized to provide the following information when contacting us assist...
... help us : • the model number and serial number of the product (see the front cover of this manual) • the name of the product (see the front cover of this manual) • the key number and description of the replacement part(s) (see the front cover of environmental protection. Please use recycling facilities that are authorized to provide the following information when contacting us assist...


