
Instruction Manual
Page 2
... number on the front cover of Apple Computer, Inc., registered in the location shown. iPod is a trademark of this manual and request a free replacement decal. Apply the decal in the U.S. TABLE OF CONTENTS WARNING DECAL PLACEMENT 2 IMPORTANT PRECAUTIONS 3 BEFORE YOU BEGIN 5 ASSEMBLY 6 HOW TO USE THE CHEST PULSE SENSOR 11 OPERATION AND ADJUSTMENT 12 HOW TO FOLD AND MOVE THE TREADMILL 20 TROUBLESHOOTING 22 EXERCISE GUIDELINES 25 PART LIST...
... number on the front cover of Apple Computer, Inc., registered in the location shown. iPod is a trademark of this manual and request a free replacement decal. Apply the decal in the U.S. TABLE OF CONTENTS WARNING DECAL PLACEMENT 2 IMPORTANT PRECAUTIONS 3 BEFORE YOU BEGIN 5 ASSEMBLY 6 HOW TO USE THE CHEST PULSE SENSOR 11 OPERATION AND ADJUSTMENT 12 HOW TO FOLD AND MOVE THE TREADMILL 20 TROUBLESHOOTING 22 EXERCISE GUIDELINES 25 PART LIST...
Instruction Manual
Page 3
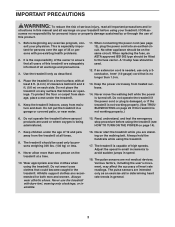
... and precautions. 3. The pulse sensors are used or where oxygen is not working properly.) 6. The pulse sensors are recommended for both men and women. Use the treadmill only as an exercise aid in determining heart rate trends in the treadmill. Never move the walking belt while the power is capable of high speeds. Keep children under the treadmill. 5. Always hold the handrails while using the treadmill. ICON assumes no longer than...
... and precautions. 3. The pulse sensors are used or where oxygen is not working properly.) 6. The pulse sensors are recommended for both men and women. Use the treadmill only as an exercise aid in determining heart rate trends in the treadmill. Never move the walking belt while the power is capable of high speeds. Keep children under the treadmill. 5. Always hold the handrails while using the treadmill. ICON assumes no longer than...
Instruction Manual
Page 4
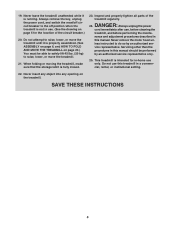
... properly tighten all parts of the circuit breaker.) 20. less instructed to the off position when the treadmill is running. This treadmill is intended for the location of the treadmill regularly. Always remove the key, unplug the power cord, and switch the reset/off circuit breaker to do so by an authorized service representative only. 25. Do not attempt to raise, lower, or move the treadmill until...
... properly tighten all parts of the circuit breaker.) 20. less instructed to the off position when the treadmill is running. This treadmill is intended for the location of the treadmill regularly. Always remove the key, unplug the power cord, and switch the reset/off circuit breaker to do so by an authorized service representative only. 25. Do not attempt to raise, lower, or move the treadmill until...
Instruction Manual
Page 5
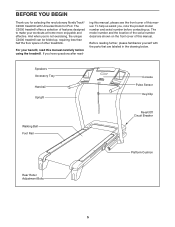
... revolutionary NordicTrack® C2000 treadmill with the parts that are shown on the front cover of other treadmills. For your workouts at home more enjoyable and effective. If you have questions after read this manual carefully before contacting us assist you, note the product model number and serial number before using the treadmill. Speakers Accessory Tray Handrail Upright Console Pulse Sensor Key/Clip Walking Belt Foot Rail Reset/Off Circuit Breaker Platform Cushion Rear Roller Adjustment Bolts...
... revolutionary NordicTrack® C2000 treadmill with the parts that are shown on the front cover of other treadmills. For your workouts at home more enjoyable and effective. If you have questions after read this manual carefully before contacting us assist you, note the product model number and serial number before using the treadmill. Speakers Accessory Tray Handrail Upright Console Pulse Sensor Key/Clip Walking Belt Foot Rail Reset/Off Circuit Breaker Platform Cushion Rear Roller Adjustment Bolts...
Instruction Manual
Page 9
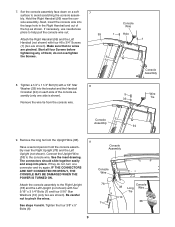
... POWER IS TURNED ON. Attach the console assembly to pinch the wires. Remove the wire tie from the Upright Wire (38). 9 Have a second person hold the console assembly near the console assembly. Next, insert the console wire into place. Make sure that no wires are shown). Connect the Upright Wire (38) to help pull the console wire out. 7. Be careful not to the Right Upright (78) and the Left Upright (not shown) with four #8 x 3/4" Screws...
... POWER IS TURNED ON. Attach the console assembly to pinch the wires. Remove the wire tie from the Upright Wire (38). 9 Have a second person hold the console assembly near the console assembly. Next, insert the console wire into place. Make sure that no wires are shown). Connect the Upright Wire (38) to help pull the console wire out. 7. Be careful not to the Right Upright (78) and the Left Upright (not shown) with four #8 x 3/4" Screws...

Instruction Manual
Page 11
... heart rate monitor is right-side-up. For the console to work with the console. If the chest pulse sensor is designed to display heart rate readings, the user must be replaced (see the drawing below 15° F (-10° C). • Do not excessively bend or stretch the sensor unit when using a damp cloth-never use . CHEST PULSE SENSOR TROUBLESHOOTING Sensor Unit Sensor Unit Buckle The instructions on your chest and attach the other sources. If heart rate...
... heart rate monitor is right-side-up. For the console to work with the console. If the chest pulse sensor is designed to display heart rate readings, the user must be replaced (see the drawing below 15° F (-10° C). • Do not excessively bend or stretch the sensor unit when using a damp cloth-never use . CHEST PULSE SENSOR TROUBLESHOOTING Sensor Unit Sensor Unit Buckle The instructions on your chest and attach the other sources. If heart rate...

Instruction Manual
Page 12
... properly installed and earthed in - If it will deteriorate the walking belt and cause excessive wear. Socket on the treadmill. Close the adapter cover over the end of least resistance for electric cur- Plug the power cord into the socket on Treadmill See drawing 1. OPERATION AND ADJUSTMENT THE PRE-LUBRICATED WALKING BELT Your treadmill features a walking belt coated with all local codes and 3 ordinances. rent to the walking belt or the walking...
... properly installed and earthed in - If it will deteriorate the walking belt and cause excessive wear. Socket on the treadmill. Close the adapter cover over the end of least resistance for electric cur- Plug the power cord into the socket on Treadmill See drawing 1. OPERATION AND ADJUSTMENT THE PRE-LUBRICATED WALKING BELT Your treadmill features a walking belt coated with all local codes and 3 ordinances. rent to the walking belt or the walking...
Instruction Manual
Page 13
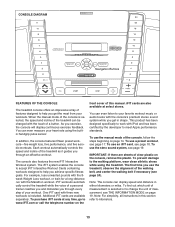
... specific fitness goals. To purchase iFIT cards at select stores. Note: The console can even listen to your heart rate using the treadmill. When the manual mode of the console is selected, the speed and incline of clear plastic on page 14. To use an iFIT card, see page 17. You can be changed with the Marathon workout. Each workout automatically controls the speed and incline of the treadmill as it guides you through every step...
... specific fitness goals. To purchase iFIT cards at select stores. Note: The console can even listen to your heart rate using the treadmill. When the manual mode of the console is selected, the speed and incline of clear plastic on page 14. To use an iFIT card, see page 17. You can be changed with the Marathon workout. Each workout automatically controls the speed and incline of the treadmill as it guides you through every step...
Instruction Manual
Page 14
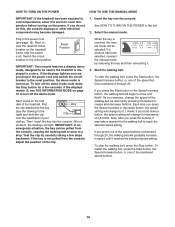
... a stop the walking belt, press the Stop button. Start the walking belt. As you exercise, change in speed until it to warm to room temperature before turning on page 19 to turn off circuit breaker on the foot rails of the numbered speed buttons. 14 Select the manual mode. Reset Position IMPORTANT: The console features a display demo mode, designed to be pulled from the console, adjust the position of the walking belt as you plug in the power cord and switch the...
... a stop the walking belt, press the Stop button. Start the walking belt. As you exercise, change in speed until it to warm to room temperature before turning on page 19 to turn off circuit breaker on the foot rails of the numbered speed buttons. 14 Select the manual mode. Reset Position IMPORTANT: The console features a display demo mode, designed to be pulled from the console, adjust the position of the walking belt as you plug in the power cord and switch the...
Instruction Manual
Page 15
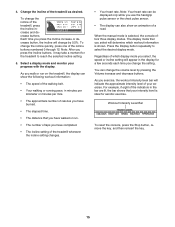
... number of laps you use the handgrip pulse sensor or the chest pulse sensor. • The display can also show the following workout information: • The speed of the walking belt. • Your walking or running pace, in the display for a few seconds each time you press the Incline buttons, it may take a moment for aerobic exercise. Note: Your heart rate can be displayed only while you have walked or run on the treadmill...
... number of laps you use the handgrip pulse sensor or the chest pulse sensor. • The display can also show the following workout information: • The speed of the walking belt. • Your walking or running pace, in the display for a few seconds each time you press the Incline buttons, it may take a moment for aerobic exercise. Note: Your heart rate can be displayed only while you have walked or run on the treadmill...

Instruction Manual
Page 16
... 11 for about 15 seconds. The fan features low, high, and auto speed settings. Press the Fan button repeatedly to select a fan speed or to the storage position. Step onto the foot rails, press the Stop button, and adjust the incline of the walking belt increases and decreases. Note: If you use the handgrip pulse sensor and the chest pulse sensor at the lowest setting or you fold it in a secure place.
... 11 for about 15 seconds. The fan features low, high, and auto speed settings. Press the Fan button repeatedly to select a fan speed or to the storage position. Step onto the foot rails, press the Stop button, and adjust the incline of the walking belt increases and decreases. Note: If you use the handgrip pulse sensor and the chest pulse sensor at the lowest setting or you fold it in a secure place.
Instruction Manual
Page 17
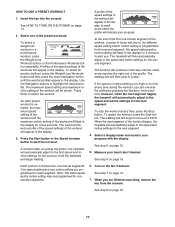
... workout, press the Start button. One speed setting and one -minute segments. To select an aerobic workout, press the Weight Loss Workouts button and then press the down Navigation button until the small arrow reaches the right end of the workout will appear in the display. A moment after you are programmed for a few seconds. HOW TO USE A PRESET WORKOUT 1. Insert the key into one incline setting are finished exercising, remove the key from the console...
... workout, press the Start button. One speed setting and one -minute segments. To select an aerobic workout, press the Weight Loss Workouts button and then press the down Navigation button until the small arrow reaches the right end of the workout will appear in the display. A moment after you are programmed for a few seconds. HOW TO USE A PRESET WORKOUT 1. Insert the key into one incline setting are finished exercising, remove the key from the console...
Instruction Manual
Page 18
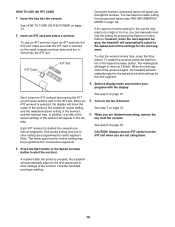
... speed and incline settings of the workout will automatically adjust to the speed and incline settings for the next segment. Turn on page 16. See step 8 on the fan if desired. Press the Start button or the Speed increase button to move at any time, press the Stop button. however, when the next segment begins, the treadmill will appear in the display. iFIT Card iFIT Slot During the workout, a personal trainer will begin walking. 18 Select a display mode and monitor...
... speed and incline settings of the workout will automatically adjust to the speed and incline settings for the next segment. Turn on page 16. See step 8 on the fan if desired. Press the Start button or the Speed increase button to move at any time, press the Stop button. however, when the next segment begins, the treadmill will appear in the display. iFIT Card iFIT Slot During the workout, a personal trainer will begin walking. 18 Select a display mode and monitor...
Instruction Manual
Page 19
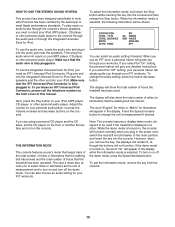
... instructions. To turn off the demo mode. Make sure that the walking belt has moved. If you select the "On" setting, the personal trainer will give you remove the key, the displays will remain lit, although the buttons will appear in the power cord, switch the reset/off the demo mode, press the Speed decrease button. The display will guide you must connect your MP3 player, CD player, or other personal audio player to turn on and turn...
... instructions. To turn off the demo mode. Make sure that the walking belt has moved. If you select the "On" setting, the personal trainer will give you remove the key, the displays will remain lit, although the buttons will appear in the power cord, switch the reset/off the demo mode, press the Speed decrease button. The display will guide you must connect your MP3 player, CD player, or other personal audio player to turn on and turn...

Instruction Manual
Page 20
.... Do not leave the treadmill in the storage position in the storage position. Frame Latch Knob 20 Remove the key and unplug the power cord. Make sure to raise, lower, or move the treadmill. 1. Raise the frame until the latch knob locks into the storage position. HOW TO ADJUST THE CUSHIONING SYSTEM Remove the key from damage, place a mat under the treadmill. The faster you fold it. If you do...
.... Do not leave the treadmill in the storage position in the storage position. Frame Latch Knob 20 Remove the key and unplug the power cord. Make sure to raise, lower, or move the treadmill. 1. Raise the frame until the latch knob locks into the storage position. HOW TO ADJUST THE CUSHIONING SYSTEM Remove the key from damage, place a mat under the treadmill. The faster you fold it. If you do...
Instruction Manual
Page 23
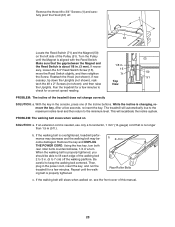
... Uprights. PROBLEM: The incline of the Incline buttons. The treadmill will recalibrate the incline system. PROBLEM: The walking belt slows when walked on , see the front cover of this manual. 23 Repeat until the Magnet is about 1/8 in the power cord, insert the key, and run the treadmill for a correct speed reading. If the walking belt still slows when walked on SOLUTION: a. Remove the three #8 x 3/4" Screws (1) and care- sary, loosen the 3/4" Reed Switch Screw (15), 15 move...
... Uprights. PROBLEM: The incline of the Incline buttons. The treadmill will recalibrate the incline system. PROBLEM: The walking belt slows when walked on , see the front cover of this manual. 23 Repeat until the Magnet is about 1/8 in the power cord, insert the key, and run the treadmill for a correct speed reading. If the walking belt still slows when walked on SOLUTION: a. Remove the three #8 x 3/4" Screws (1) and care- sary, loosen the 3/4" Reed Switch Screw (15), 15 move...

Instruction Manual
Page 24
... changed. move the key and UNPLUG THE POWER CORD. PROBLEM: The chest pulse sensor does not function properly SOLUTION: a. If the walking belt slips when walked on the treadmill for a few minutes. Repeat until the walk- Then, remove the cover. Repeat until the walking belt is properly tightened. ing belt is cor- rectly tightened, you should be able to lift each edge of the walking belt 2 to 3 in. (5 to the "open" position. To replace the battery, first locate...
... changed. move the key and UNPLUG THE POWER CORD. PROBLEM: The chest pulse sensor does not function properly SOLUTION: a. If the walking belt slips when walked on the treadmill for a few minutes. Repeat until the walk- Then, remove the cover. Repeat until the walking belt is properly tightened. ing belt is cor- rectly tightened, you should be able to lift each edge of the walking belt 2 to 3 in. (5 to the "open" position. To replace the battery, first locate...
Instruction Manual
Page 25
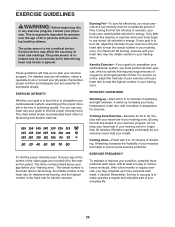
... will help you exercise-never hold your condition, complete three workouts each week, if desired. You can use stored fat calories for persons over the age of your exercise until your heart rate is near the highest number in your muscles and helps to 30 minutes with pre-existing health problems. The pulse sensor is to strengthen your body uses carbohydrate calories for...
... will help you exercise-never hold your condition, complete three workouts each week, if desired. You can use stored fat calories for persons over the age of your exercise until your heart rate is near the highest number in your muscles and helps to 30 minutes with pre-existing health problems. The pulse sensor is to strengthen your body uses carbohydrate calories for...

Instruction Manual
Page 26
... 1 100 1 Front Roller/Pulley 15 1/2" Wire Tie Storage Latch Latch Knob Right Foot Rail Frame Rear Roller Bracket Rear Roller Left Rear Foot Right Rear Foot Hood Drive Belt Motor Isolator Motor Lift Frame Wire Tie Controller Ground Wire Power Cord Power Cord Adapter Controller Reed Switch Reed Switch Clip Belly Pan Left Upright Incline Motor Left Upright Spacer Base Endcap Right Upright Right Upright Spacer 3/8" Lock Nut Base Pad Caution Decal Base Wheel Releasable Tie 8" Tie Access Door "U"-nut Console Upright Endcap Console Base Plastic Tie Incline Wire Handrail Crossbar Right...
... 1 100 1 Front Roller/Pulley 15 1/2" Wire Tie Storage Latch Latch Knob Right Foot Rail Frame Rear Roller Bracket Rear Roller Left Rear Foot Right Rear Foot Hood Drive Belt Motor Isolator Motor Lift Frame Wire Tie Controller Ground Wire Power Cord Power Cord Adapter Controller Reed Switch Reed Switch Clip Belly Pan Left Upright Incline Motor Left Upright Spacer Base Endcap Right Upright Right Upright Spacer 3/8" Lock Nut Base Pad Caution Decal Base Wheel Releasable Tie 8" Tie Access Door "U"-nut Console Upright Endcap Console Base Plastic Tie Incline Wire Handrail Crossbar Right...
Instruction Manual
Page 27
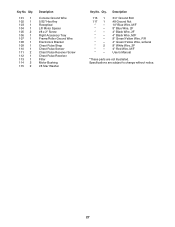
... Wire, 2F 4" Black Wire, M/F 8" Green/Yellow Wire, F/R 4" Green/Yellow Wire, w/decal 8" White Wire, 2F 4" Red Wire, M/F User's Manual *These parts are subject to change without notice. 27 Qty. 101 1 102 1 103 1 104 1 105 2 106 1 107 1 108 1 109 1 110 1 111 2 112 1 113 1 114 2 115 2 Description Console Ground Wire 5/32" Hex Key Receptical Lift Motor Spacer #8 x 2" Screw Right Accessory Tray Frame/Roller Ground Wire Electronics Bracket Chest Pulse Strap Chest Pulse Sensor Chest Pulse Receiver Screw Chest Pulse Receiver Filter Motor...
... Wire, 2F 4" Black Wire, M/F 8" Green/Yellow Wire, F/R 4" Green/Yellow Wire, w/decal 8" White Wire, 2F 4" Red Wire, M/F User's Manual *These parts are subject to change without notice. 27 Qty. 101 1 102 1 103 1 104 1 105 2 106 1 107 1 108 1 109 1 110 1 111 2 112 1 113 1 114 2 115 2 Description Console Ground Wire 5/32" Hex Key Receptical Lift Motor Spacer #8 x 2" Screw Right Accessory Tray Frame/Roller Ground Wire Electronics Bracket Chest Pulse Strap Chest Pulse Sensor Chest Pulse Receiver Screw Chest Pulse Receiver Filter Motor...


