User Manual
Page 2
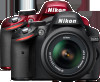
... form, is available from your camera, please be read by all who use to prevent damage to read all instructions thoroughly and keep them where they will be sure to the camera. Digitutor "Digitutor", a series of a Nikon single-lens reflex (SLR) digital camera. Symbols and Conventions To make ...it easier to other topics. Help Use the camera's on-board help feature for help on menu items and other...
... form, is available from your camera, please be read by all who use to prevent damage to read all instructions thoroughly and keep them where they will be sure to the camera. Digitutor "Digitutor", a series of a Nikon single-lens reflex (SLR) digital camera. Symbols and Conventions To make ...it easier to other topics. Help Use the camera's on-board help feature for help on menu items and other...
User Manual
Page 4
...needed? i Release Modes Can I take pictures with the self-timer or a remote control? i Image Quality and Size How do I choose how the camera focuses? i Using the Flash Can I protect photos from firing? Can I set the flash to freeze or blur motion (mode S)? Can I reduce shutter...one at large sizes? How do I choose the focus point? How do I view photographs on the mode dial? Can I use the g position on the camera? Can I make long ("time") exposures (mode M)? i Exposure Can I view photos in an automatic slide show? Taking Photographs i Shooting Modes and Framing ...
...needed? i Release Modes Can I take pictures with the self-timer or a remote control? i Image Quality and Size How do I choose how the camera focuses? i Using the Flash Can I protect photos from firing? Can I set the flash to freeze or blur motion (mode S)? Can I reduce shutter...one at large sizes? How do I choose the focus point? How do I view photographs on the mode dial? Can I use the g position on the camera? Can I make long ("time") exposures (mode M)? i Exposure Can I view photos in an automatic slide show? Taking Photographs i Shooting Modes and Framing ...

User Manual
Page 5
...lenses can I trim movie footage on my photos? Can I use ? Menus and Settings How do I focus the viewfinder? How do I clean the camera? How do I keep the displays from turning off? How do I use ? Is there any way to make JPEG copies of photos? How do ... Connections How do I format memory cards? What software is available for my camera? Can I copy photos to a computer? Can I take my camera for a menu or message? How do I create a copy of recording on the camera or save movie stills? Maintenance and Optional Accessories What memory cards can I ...
...lenses can I trim movie footage on my photos? Can I use ? Menus and Settings How do I focus the viewfinder? How do I clean the camera? How do I keep the displays from turning off? How do I use ? Is there any way to make JPEG copies of photos? How do ... Connections How do I format memory cards? What software is available for my camera? Can I copy photos to a computer? Can I take my camera for a menu or message? How do I create a copy of recording on the camera or save movie stills? Maintenance and Optional Accessories What memory cards can I ...
User Manual
Page 6
Table of Contents Q&A Index ...ii For Your Safety ...ix Notices...xi Introduction 1 Getting to Know the Camera 1 The Camera Body ...1 The Mode Dial...3 The Viewfinder...4 The Information Display...5 The Command Dial ...7 Camera Menus...9 Using Camera Menus ...10 First Steps ...12 Charge the Battery ...12 Insert the Battery ...13 Attach a Lens...14 Basic Setup...16 Insert...
Table of Contents Q&A Index ...ii For Your Safety ...ix Notices...xi Introduction 1 Getting to Know the Camera 1 The Camera Body ...1 The Mode Dial...3 The Viewfinder...4 The Information Display...5 The Command Dial ...7 Camera Menus...9 Using Camera Menus ...10 First Steps ...12 Charge the Battery ...12 Insert the Battery ...13 Attach a Lens...14 Basic Setup...16 Insert...
User Manual
Page 8
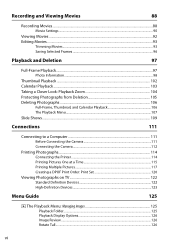
... ...106 Full-Frame, Thumbnail, and Calendar Playback 106 The Playback Menu...107 Slide Shows...109 Connections 111 Connecting to a Computer 111 Before Connecting the Camera 111 Connecting the Camera ...112 Printing Photographs...114 Connecting the Printer...114 Printing Pictures One at a Time 115 Printing Multiple Pictures 117 Creating a DPOF Print Order: Print...
... ...106 Full-Frame, Thumbnail, and Calendar Playback 106 The Playback Menu...107 Slide Shows...109 Connections 111 Connecting to a Computer 111 Before Connecting the Camera 111 Connecting the Camera ...112 Printing Photographs...114 Connecting the Printer...114 Printing Pictures One at a Time 115 Printing Multiple Pictures 117 Creating a DPOF Print Order: Print...
User Manual
Page 9
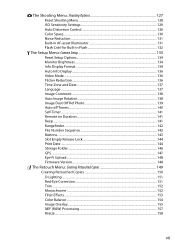
... Distortion Control 130 Color Space...130 Noise Reduction...131 Built-in AF-assist Illuminator 131 Flash Cntrl for Built-in Flash 132 B The Setup Menu: Camera Setup 133 Reset Setup Options...134 Monitor Brightness ...134 Info Display Format ...134 Auto Info Display ...136 Video Mode ...136 Flicker Reduction...136 Time Zone...
... Distortion Control 130 Color Space...130 Noise Reduction...131 Built-in AF-assist Illuminator 131 Flash Cntrl for Built-in Flash 132 B The Setup Menu: Camera Setup 133 Reset Setup Options...134 Monitor Brightness ...134 Info Display Format ...134 Auto Info Display ...136 Video Mode ...136 Flicker Reduction...136 Time Zone...

User Manual
Page 10
... Notes 167 Compatible Lenses...167 Compatible CPU Lenses ...167 Compatible Non-CPU Lenses 169 Optional Flash Units (Speedlights 172 The Nikon Creative Lighting System (CLS 173 Other Accessories...176 Approved Memory Cards 177 Attaching a Power Connector and AC Adapter 178 Caring for the... Camera...179 Storage ...179 Cleaning ...179 The Low-Pass Filter ...180 Caring for the Camera and Battery: Cautions 184 Caring for the Camera...184 Caring for the Battery...185 Available Settings...187 Memory Card Capacity ......
... Notes 167 Compatible Lenses...167 Compatible CPU Lenses ...167 Compatible Non-CPU Lenses 169 Optional Flash Units (Speedlights 172 The Nikon Creative Lighting System (CLS 173 Other Accessories...176 Approved Memory Cards 177 Attaching a Power Connector and AC Adapter 178 Caring for the... Camera...179 Storage ...179 Cleaning ...179 The Low-Pass Filter ...180 Caring for the Camera and Battery: Cautions 184 Caring for the Camera...184 Caring for the Battery...185 Available Settings...187 Memory Card Capacity ......
User Manual
Page 11
...symbol: A This icon marks warnings. A Using the viewfinder diopter adjustment control When operating the viewfinder diopter adjustment control with your eye to a Nikon-authorized service center for extended periods while the devices are indicated by a qualified technician. After removing the battery, take the product to the ... from failure to put your eye accidentally. A Do not place the strap around the neck of an infant or child Placing the camera strap around the neck of children Failure to observe this equipment. A Keep out of reach of an infant or child could result ...
...symbol: A This icon marks warnings. A Using the viewfinder diopter adjustment control When operating the viewfinder diopter adjustment control with your eye to a Nikon-authorized service center for extended periods while the devices are indicated by a qualified technician. After removing the battery, take the product to the ... from failure to put your eye accidentally. A Do not place the strap around the neck of an infant or child Placing the camera strap around the neck of children Failure to observe this equipment. A Keep out of reach of an infant or child could result ...
User Manual
Page 12
...this precaution could result in electric shock. • Do not handle the plug or charger with wet hands. Before removing the battery turn the camera off before replacing the battery. Continued use or when the product has been used on or near the charger during thunderstorms. Failure to the ...equipment. • Do not short or disassemble the battery. • Be sure the product is not in use only the cables provided or sold by Nikon for an extended period. A Use appropriate cables When connecting cables to the input and output jacks, use , attach the terminal cover and store in ...
...this precaution could result in electric shock. • Do not handle the plug or charger with wet hands. Before removing the battery turn the camera off before replacing the battery. Continued use or when the product has been used on or near the charger during thunderstorms. Failure to the ...equipment. • Do not short or disassemble the battery. • Be sure the product is not in use only the cables provided or sold by Nikon for an extended period. A Use appropriate cables When connecting cables to the input and output jacks, use , attach the terminal cover and store in ...
User Manual
Page 15
... by law. • Items prohibited by private companies (shares, bills, checks, gift certificates, etc.), commuter passes, or coupon tickets, except when a minimum of a scanner, digital camera, or other data storage devices does not completely erase the original image data. Before discarding a data storage device or transferring ownership to also replace any...
... by law. • Items prohibited by private companies (shares, bills, checks, gift certificates, etc.), commuter passes, or coupon tickets, except when a minimum of a scanner, digital camera, or other data storage devices does not completely erase the original image data. Before discarding a data storage device or transferring ownership to also replace any...

User Manual
Page 16
... apply to these sites to keep up-to-date with your Nikon digital camera are engineered and proven to operate within its operational and safety requirements. Use Only Nikon Brand Electronic Accessories Nikon cameras are particularly recommended if the camera is used with this Nikon digital camera are engineered and proven to operate within the operational and safety...
... apply to these sites to keep up-to-date with your Nikon digital camera are engineered and proven to operate within its operational and safety requirements. Use Only Nikon Brand Electronic Accessories Nikon cameras are particularly recommended if the camera is used with this Nikon digital camera are engineered and proven to operate within the operational and safety...
User Manual
Page 17
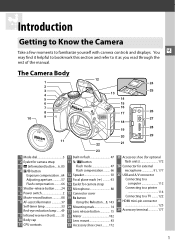
...4 5 6 7 8 10 9 12 24 25 13 14 15 16 17 26 27 18 28 19 20 29 11 22 21 23 1 Mode dial 3 2 Eyelet for camera strap 3 R (information) button.... 6, 85 4 E/N button Exposure compensation...64 Adjusting aperture 57 Flash compensation..........66 5 Shutter-release button.........24 6 Power switch 2 7 Movie-record button...47 13 M/ Y button Flash mode 47 Flash compensation ......... 66 14 Speaker 92 15 Focal plane mark (E 43 16 Eyelet for camera strap 17 Microphone 88 18 Connector cover 19 Fn button Using the Fn button....8, 143 20 Mounting mark 14 21 Lens release button 15...
...4 5 6 7 8 10 9 12 24 25 13 14 15 16 17 26 27 18 28 19 20 29 11 22 21 23 1 Mode dial 3 2 Eyelet for camera strap 3 R (information) button.... 6, 85 4 E/N button Exposure compensation...64 Adjusting aperture 57 Flash compensation..........66 5 Shutter-release button.........24 6 Power switch 2 7 Movie-record button...47 13 M/ Y button Flash mode 47 Flash compensation ......... 66 14 Speaker 92 15 Focal plane mark (E 43 16 Eyelet for camera strap 17 Microphone 88 18 Connector cover 19 Fn button Using the Fn button....8, 143 20 Mounting mark 14 21 Lens release button 15...
User Manual
Page 18
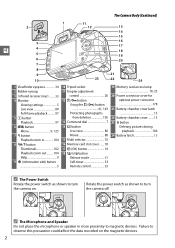
The Camera Body (Continued) 2 3 X 4 5 6 7 8 9 10 1 11 12 13 14 15 16 17 18 19 20 21 23 22 24 1 Viewfinder eyepiece 34... Playback 97 6 G button Menu 9, 125 7 X button Playback zoom in close proximity to magnetic devices. Rotate the power switch as shown to turn the camera off. A The Microphone and Speaker Do not place the microphone or speaker in 104 8 W/Q button Thumbnails 102 Playback zoom out ......... 104 Help 9 9 ... switch as shown to observe this precaution could affect the data recorded on . Failure to turn the camera on the magnetic devices. 2
The Camera Body (Continued) 2 3 X 4 5 6 7 8 9 10 1 11 12 13 14 15 16 17 18 19 20 21 23 22 24 1 Viewfinder eyepiece 34... Playback 97 6 G button Menu 9, 125 7 X button Playback zoom in close proximity to magnetic devices. Rotate the power switch as shown to turn the camera off. A The Microphone and Speaker Do not place the microphone or speaker in 104 8 W/Q button Thumbnails 102 Playback zoom out ......... 104 Help 9 9 ... switch as shown to observe this precaution could affect the data recorded on . Failure to turn the camera on the magnetic devices. 2

User Manual
Page 19
... (0 27) Take and view pictures and adjust settings with the mode dial. P, S, A, and M Modes Select these modes for full control over camera settings. • P-Programmed auto (0 54) • S-Shutter-priority auto (0 55) X • A-Aperture-priority auto (0 56) •...) Auto Modes Select these modes for simple, point-and-shoot photography. • i Auto (0 22) • j Auto (flash off) (0 22) Scene Modes The camera automatically optimizes settings to the scene being photographed. • k Portrait (0 25) • m Sports (0 26) • l Landscape (0 25) • n Close...
... (0 27) Take and view pictures and adjust settings with the mode dial. P, S, A, and M Modes Select these modes for full control over camera settings. • P-Programmed auto (0 54) • S-Shutter-priority auto (0 55) X • A-Aperture-priority auto (0 56) •...) Auto Modes Select these modes for simple, point-and-shoot photography. • i Auto (0 22) • j Auto (flash off) (0 22) Scene Modes The camera automatically optimizes settings to the scene being photographed. • k Portrait (0 25) • m Sports (0 26) • l Landscape (0 25) • n Close...

User Manual
Page 21
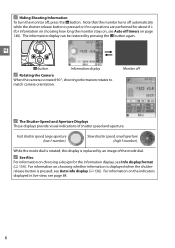
... mode 35, 81 29 AF-area mode 38, 82 30 Metering 60 5 Highlight items using the multi selector and press J to settings. The Information Display Camera settings can be viewed and adjusted in the information display.
... mode 35, 81 29 AF-area mode 38, 82 30 Metering 60 5 Highlight items using the multi selector and press J to settings. The Information Display Camera settings can be viewed and adjusted in the information display.
User Manual
Page 22
... information on choosing how long the monitor stays on, see Info display format (0 134). X R button Information display A Rotating the Camera When the camera is pressed or if no operations are performed for about 8 s (for the information display, see Auto off timers on choosing whether...136). Note that the monitor turns off automatically while the shutter-release button is rotated 90 °, shooting information rotates to match camera orientation. For information on page 140). A Hiding Shooting Information To turn the monitor off A The Shutter-Speed and Aperture Displays...
... information on choosing how long the monitor stays on, see Info display format (0 134). X R button Information display A Rotating the Camera When the camera is pressed or if no operations are performed for about 8 s (for the information display, see Auto off timers on choosing whether...136). Note that the monitor turns off automatically while the shutter-release button is rotated 90 °, shooting information rotates to match camera orientation. For information on page 140). A Hiding Shooting Information To turn the monitor off A The Shutter-Speed and Aperture Displays...

User Manual
Page 25
...(0 149) • m: Recent settings (0 166) Slider shows position in current menu. Menu options Options in current menu. G button X Tabs Choose from the camera menus. W (Q) button A Guide Mode To display the on-screen guide, rotate the mode dial to scroll through the display. d If a d icon is ...pressed. Current settings are shown by pressing the W (Q) button. Press 1 or 3 to g (0 27). 9 Camera Menus Most shooting, playback, and setup options can be displayed while the button is displayed at the bottom left corner of the currently selected option...
...(0 149) • m: Recent settings (0 166) Slider shows position in current menu. Menu options Options in current menu. G button X Tabs Choose from the camera menus. W (Q) button A Guide Mode To display the on-screen guide, rotate the mode dial to scroll through the display. d If a d icon is ...pressed. Current settings are shown by pressing the W (Q) button. Press 1 or 3 to g (0 27). 9 Camera Menus Most shooting, playback, and setup options can be displayed while the button is displayed at the bottom left corner of the currently selected option...

User Manual
Page 26
Press 4 to navigate the menus. 1 Display the menus. Move cursor up J button: select highlighted item Cancel and return to Select highlighted item or X previous menu display sub-menu Move cursor down Follow the steps below to highlight the icon for the current menu. G button 10 Using Camera Menus The multi selector and J button are used to select the desired menu. Press 1 or 3 to navigate the camera menus. Press the G button to display the menus. 2 Highlight the icon for the current menu. 3 Select a menu.
Press 4 to navigate the menus. 1 Display the menus. Move cursor up J button: select highlighted item Cancel and return to Select highlighted item or X previous menu display sub-menu Move cursor down Follow the steps below to highlight the icon for the current menu. G button 10 Using Camera Menus The multi selector and J button are used to select the desired menu. Press 1 or 3 to navigate the camera menus. Press the G button to display the menus. 2 Highlight the icon for the current menu. 3 Select a menu.

User Manual
Page 28
... recharge the battery X when no charge remains. Charging is powered by an EN-EL14 rechargeable Li-ion battery (supplied). First Steps Charge the Battery The camera is complete when the CHARGE lamp stops flashing. To maximize shooting time, charge the battery in . About 1 hour and 30 minutes are required to begin...
... recharge the battery X when no charge remains. Charging is powered by an EN-EL14 rechargeable Li-ion battery (supplied). First Steps Charge the Battery The camera is complete when the CHARGE lamp stops flashing. To maximize shooting time, charge the battery in . About 1 hour and 30 minutes are required to begin...

User Manual
Page 29
A Removing the Battery Turn the camera off and open (w) the battery-chamber cover. failure to charge a fully-charged battery. Do not attempt to observe this precaution could damage the battery or ... shown (e), using the battery to keep the orange battery latch pressed to your retailer or a Nikon-authorized service representative. Failure to observe this manual. Unplug when not in reduced battery performance. Insert the Battery 1 Turn the camera off before inserting or removing batteries. 2 Open the battery-chamber cover. A Inserting and Removing Batteries...
A Removing the Battery Turn the camera off and open (w) the battery-chamber cover. failure to charge a fully-charged battery. Do not attempt to observe this precaution could damage the battery or ... shown (e), using the battery to keep the orange battery latch pressed to your retailer or a Nikon-authorized service representative. Failure to observe this manual. Unplug when not in reduced battery performance. Insert the Battery 1 Turn the camera off before inserting or removing batteries. 2 Open the battery-chamber cover. A Inserting and Removing Batteries...


