User Manual
Page 6
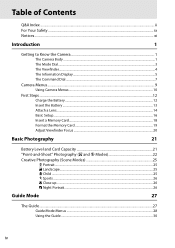
Table of Contents Q&A Index ...ii For Your Safety ...ix Notices...xi Introduction 1 Getting to Know the Camera 1 The Camera Body ...1 The Mode Dial...3 The Viewfinder...4 The Information Display...5 The Command Dial ...7 Camera Menus...9 Using Camera Menus ...10 First Steps ...12 Charge the Battery ...12 Insert ...
Table of Contents Q&A Index ...ii For Your Safety ...ix Notices...xi Introduction 1 Getting to Know the Camera 1 The Camera Body ...1 The Mode Dial...3 The Viewfinder...4 The Information Display...5 The Command Dial ...7 Camera Menus...9 Using Camera Menus ...10 First Steps ...12 Charge the Battery ...12 Insert ...
User Manual
Page 17
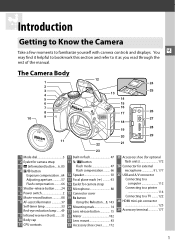
XIntroduction Getting to Know the Camera Take a few moments to a TV .........122 28 HDMI mini-pin connector 123 29 Accessory terminal 177 1 The Camera Body 1 2 3 4 5 6 7 8 10 9 12 24 25 13 14 15 16 17 26 27 18 28 19 20 29 11 22 21 23 1 Mode dial 3 2 ...Power switch 2 7 Movie-record button 88 8 AF-assist illuminator 37 Self-timer lamp 33 Red-eye reduction lamp ......49 9 Infrared receiver (front)........ 33 10 Body cap 11 CPU contacts 12 Built-in flash 47 13 M/ Y button Flash mode 47 Flash compensation ......... 66 14 Speaker 92 15 Focal plane mark (E 43...
XIntroduction Getting to Know the Camera Take a few moments to a TV .........122 28 HDMI mini-pin connector 123 29 Accessory terminal 177 1 The Camera Body 1 2 3 4 5 6 7 8 10 9 12 24 25 13 14 15 16 17 26 27 18 28 19 20 29 11 22 21 23 1 Mode dial 3 2 ...Power switch 2 7 Movie-record button 88 8 AF-assist illuminator 37 Self-timer lamp 33 Red-eye reduction lamp ......49 9 Infrared receiver (front)........ 33 10 Body cap 11 CPU contacts 12 Built-in flash 47 13 M/ Y button Flash mode 47 Flash compensation ......... 66 14 Speaker 92 15 Focal plane mark (E 43...
User Manual
Page 18
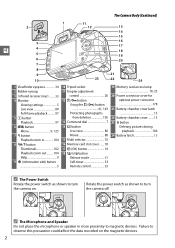
... 24 Battery latch 13 A The Power Switch Rotate the power switch as shown to observe this precaution could affect the data recorded on . The Camera Body (Continued) 2 3 X 4 5 6 7 8 9 10 1 11 12 13 14 15 16 17 18 19 20 21 23 22 24 1 Viewfinder eyepiece 34 2 Rubber eyecup 3 Infrared receiver (rear) .........33...
... 24 Battery latch 13 A The Power Switch Rotate the power switch as shown to observe this precaution could affect the data recorded on . The Camera Body (Continued) 2 3 X 4 5 6 7 8 9 10 1 11 12 13 14 15 16 17 18 19 20 21 23 22 24 1 Viewfinder eyepiece 34 2 Rubber eyecup 3 Infrared receiver (rear) .........33...
User Manual
Page 30
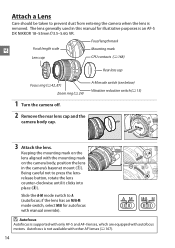
.... Autofocus is supported with only AF-S and AF-I lenses, which are equipped with other AF lenses (0 167). 14 Keeping the mounting mark on the camera body, position the lens in this manual for autofocus with the mounting mark on the lens aligned with manual override). The lens generally used in the... (0 42, 87) Zoom ring (0 24) A-M mode switch (see below) Vibration reduction switch (0 15) 1 Turn the camera off. 2 Remove the rear lens cap and the camera body cap. 3 Attach the lens.
.... Autofocus is supported with only AF-S and AF-I lenses, which are equipped with other AF lenses (0 167). 14 Keeping the mounting mark on the camera body, position the lens in this manual for autofocus with the mounting mark on the lens aligned with manual override). The lens generally used in the... (0 42, 87) Zoom ring (0 24) A-M mode switch (see below) Vibration reduction switch (0 15) 1 Turn the camera off. 2 Remove the rear lens cap and the camera body cap. 3 Attach the lens.
User Manual
Page 31
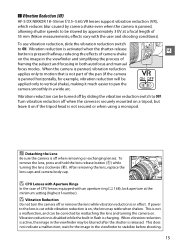
... X button is pressed halfway, reducing the effects of camera shake on the image in the viewfinder and simplifying the process of 55 mm (Nikon measurements; When the camera is panned, vibration reduction applies only to motion that is not part of CPU lenses equipped with the user and...not indicate a malfunction; To use vibration reduction, slide the vibration reduction switch to ON. After removing the lens, replace the lens caps and camera body cap. This is not a malfunction, and can be turned off or remove the lens while vibration reduction is in a wide arc. Turn vibration...
... X button is pressed halfway, reducing the effects of camera shake on the image in the viewfinder and simplifying the process of 55 mm (Nikon measurements; When the camera is panned, vibration reduction applies only to motion that is not part of CPU lenses equipped with the user and...not indicate a malfunction; To use vibration reduction, slide the vibration reduction switch to ON. After removing the lens, replace the lens caps and camera body cap. This is not a malfunction, and can be turned off or remove the lens while vibration reduction is in a wide arc. Turn vibration...
User Manual
Page 38
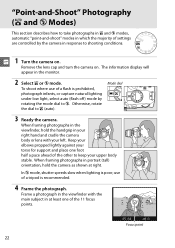
... select auto (flash off) mode by the camera in portrait (tall) orientation, hold the handgrip in your right hand and cradle the camera body or lens with the main subject in at right. When framing photographs in the viewfinder, hold the camera as shown at least one foot half... in which the majority of settings are controlled by rotating the mode dial to j. The information display will appear in the viewfinder with your upper body stable. Otherwise, rotate the dial to i (auto). In j mode, shutter speeds slow when lighting is poor; Remove the lens cap and turn ...
... select auto (flash off) mode by the camera in portrait (tall) orientation, hold the handgrip in your right hand and cradle the camera body or lens with the main subject in at right. When framing photographs in the viewfinder, hold the camera as shown at least one foot half... in which the majority of settings are controlled by rotating the mode dial to j. The information display will appear in the viewfinder with your upper body stable. Otherwise, rotate the dial to i (auto). In j mode, shutter speeds slow when lighting is poor; Remove the lens cap and turn ...

User Manual
Page 59
The distance between your subject and the camera, measure from the focal plane mark on the camera body. A Focal Plane Position To determine the distance between the lens mounting flange and the focal plane is in .). 46.5 mm Focal plane mark A The Exposure ...
The distance between your subject and the camera, measure from the focal plane mark on the camera body. A Focal Plane Position To determine the distance between the lens mounting flange and the focal plane is in .). 46.5 mm Focal plane mark A The Exposure ...
User Manual
Page 193
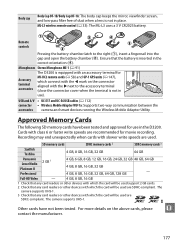
... next to the right (q), insert a fingernail into the gap and open the battery chamber (w). Microphones Stereo Microphone ME-1 (0 91) Accessory terminal accessories The D3200 is equipped with the 4 mark on the above cards, please n contact the manufacturer. 177 USB and A/V • UC-E17 and UC-E6 USB cables... supports UHS-1. 3 Check that any card readers or other devices with slower write speeds are used are SDXC-compliant. Body cap Body Cap BF-1B/Body Cap BF-1A: The body cap keeps the mirror, viewfinder screen, and low-pass filter free of dust when a lens is not in use ...
... next to the right (q), insert a fingernail into the gap and open the battery chamber (w). Microphones Stereo Microphone ME-1 (0 91) Accessory terminal accessories The D3200 is equipped with the 4 mark on the above cards, please n contact the manufacturer. 177 USB and A/V • UC-E17 and UC-E6 USB cables... supports UHS-1. 3 Check that any card readers or other devices with slower write speeds are used are SDXC-compliant. Body cap Body Cap BF-1B/Body Cap BF-1A: The body cap keeps the mirror, viewfinder screen, and low-pass filter free of dust when a lens is not in use ...

User Manual
Page 195
Remove dust and lint with the terminal cover in a cool, dry area with a blower. Nikon recommends that the n camera be inspected by the original retailer or Nikon-authorized service representative once every one to two years, and that it in place. Caring for the Camera Storage When ... sand or salt with a soft cloth or chamois leather. To remove fingerprints and other stains, Monitor wipe the surface lightly with a cloth lightly body dampened in locations that: • are poorly ventilated or subject to humidities of over 60% • are next to equipment that fees apply to...
Remove dust and lint with the terminal cover in a cool, dry area with a blower. Nikon recommends that the n camera be inspected by the original retailer or Nikon-authorized service representative once every one to two years, and that it in place. Caring for the Camera Storage When ... sand or salt with a soft cloth or chamois leather. To remove fingerprints and other stains, Monitor wipe the surface lightly with a cloth lightly body dampened in locations that: • are poorly ventilated or subject to humidities of over 60% • are next to equipment that fees apply to...
User Manual
Page 199
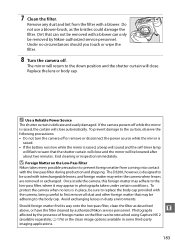
The D3200, however, is delicate and easily damaged. Avoid exchanging lenses in place, be adhering to replace the body cap provided with the low-pass filter during production and shipping. Do not use a blower-brush, as described above, or have the filter cleaned by Nikon-authorized service personnel.... The mirror will return to prevent foreign matter from the filter with a blower. Replace the lens or body cap. Should foreign matter find its way onto the low-pass filter, clean...
The D3200, however, is delicate and easily damaged. Avoid exchanging lenses in place, be adhering to replace the body cap provided with the low-pass filter during production and shipping. Do not use a blower-brush, as described above, or have the filter cleaned by Nikon-authorized service personnel.... The mirror will return to prevent foreign matter from the filter with a blower. Replace the lens or body cap. Should foreign matter find its way onto the low-pass filter, clean...

User Manual
Page 200
Cleaning: When cleaning the camera body, use or store this device in temperature, such as radio transmitters could interfere with a blower. The lens and mirror are being recorded or deleted. See "...
Cleaning: When cleaning the camera body, use or store this device in temperature, such as radio transmitters could interfere with a blower. The lens and mirror are being recorded or deleted. See "...
User Manual
Page 216
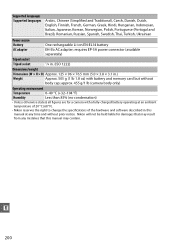
... liable for a camera with a fully-charged battery operating at an ambient temperature of 20 °C (68 °F). • Nikon reserves the right to change the specifications of the hardware and software described in .) Weight Approx. 505 g (1 lb 1.8 oz...215; 96 × 76.5 mm (5.0 × 3.8 × 3.1 in this manual at any mistakes that this manual may result from any time and without body cap; Supported languages Supported languages Arabic, Chinese (Simplified and Traditional), Czech, Danish, Dutch, English, Finnish, French, German, Greek, Hindi, Hungarian, Indonesian, Italian,...
... liable for a camera with a fully-charged battery operating at an ambient temperature of 20 °C (68 °F). • Nikon reserves the right to change the specifications of the hardware and software described in .) Weight Approx. 505 g (1 lb 1.8 oz...215; 96 × 76.5 mm (5.0 × 3.8 × 3.1 in this manual at any mistakes that this manual may result from any time and without body cap; Supported languages Supported languages Arabic, Chinese (Simplified and Traditional), Czech, Danish, Dutch, English, Finnish, French, German, Greek, Hindi, Hungarian, Indonesian, Italian,...
User Manual
Page 222
...-83 Auto-servo AF 35 Available settings 187 B Battery 12, 13 Beep 141 Bit rate 90 Black-and-white 152 Blue intensifier (Filter effects) ..153 Body cap 1, 14, 177 Border (PictBridge 116 Built-in AF-assist illuminator ..... 37, 131, 171 Built-in flash 47, 132, 170 Bulb 58 Buttons 143 C Calendar...
...-83 Auto-servo AF 35 Available settings 187 B Battery 12, 13 Beep 141 Bit rate 90 Black-and-white 152 Blue intensifier (Filter effects) ..153 Body cap 1, 14, 177 Border (PictBridge 116 Built-in AF-assist illuminator ..... 37, 131, 171 Built-in flash 47, 132, 170 Bulb 58 Buttons 143 C Calendar...


