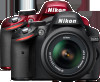
User Manual
Page 2
...from your purchase of "watch and learn" manuals in the camera monitor are used : D This icon marks cautions; A This icon marks notes; Digitutor "Digitutor", a series of a Nikon single-lens reflex (SLR) digital camera. Thank you need, the following website: http://www.nikondigitutor....com/index_eng.html A For Your Safety Before using the camera. 0 This icon marks references to other topics. information that ...
...from your purchase of "watch and learn" manuals in the camera monitor are used : D This icon marks cautions; A This icon marks notes; Digitutor "Digitutor", a series of a Nikon single-lens reflex (SLR) digital camera. Thank you need, the following website: http://www.nikondigitutor....com/index_eng.html A For Your Safety Before using the camera. 0 This icon marks references to other topics. information that ...
User Manual
Page 4
...-46 63 67-68 47-50 Viewing Photographs i Playback How do I adjust shutter speed to fire automatically when needed? Can I view more pictures on the camera? i Deletion How do I view photos on the mode dial? How do I view photographs on the memory card? How do I choose how the... camera focuses? Can I use the g position on a TV? Can I set the flash to freeze or blur motion (mode S)? How do I view photos in the monitor (live ...
...-46 63 67-68 47-50 Viewing Photographs i Playback How do I adjust shutter speed to fire automatically when needed? Can I view more pictures on the camera? i Deletion How do I view photos on the mode dial? How do I view photographs on the memory card? How do I choose how the... camera focuses? Can I use the g position on a TV? Can I set the flash to freeze or blur motion (mode S)? How do I view photos in the monitor (live ...

User Manual
Page 5
... there any way to a computer? What optional flash units (Speedlights) can I trim movie footage on my photos? How do I set the camera clock? Retouching Photographs How do I focus the viewfinder? How do I print the date of a photo that looks like a painting? Can I ...create retouched copies of RAW (NEF) photos? Can I print photos? How do I create a copy of recording on the camera or save movie stills? How do I keep the displays from turning off? Maintenance and Optional Accessories What memory cards can I use the menus? What lenses...
... there any way to a computer? What optional flash units (Speedlights) can I trim movie footage on my photos? How do I set the camera clock? Retouching Photographs How do I focus the viewfinder? How do I print the date of a photo that looks like a painting? Can I ...create retouched copies of RAW (NEF) photos? Can I print photos? How do I create a copy of recording on the camera or save movie stills? How do I keep the displays from turning off? Maintenance and Optional Accessories What memory cards can I use the menus? What lenses...
User Manual
Page 6
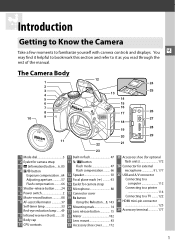
Table of Contents Q&A Index ...ii For Your Safety ...ix Notices...xi Introduction 1 Getting to Know the Camera 1 The Camera Body ...1 The Mode Dial...3 The Viewfinder...4 The Information Display...5 The Command Dial ...7 Camera Menus...9 Using Camera Menus ...10 First Steps ...12 Charge the Battery ...12 Insert the Battery ...13 Attach a Lens...14 Basic Setup...16 Insert...
Table of Contents Q&A Index ...ii For Your Safety ...ix Notices...xi Introduction 1 Getting to Know the Camera 1 The Camera Body ...1 The Mode Dial...3 The Viewfinder...4 The Information Display...5 The Command Dial ...7 Camera Menus...9 Using Camera Menus ...10 First Steps ...12 Charge the Battery ...12 Insert the Battery ...13 Attach a Lens...14 Basic Setup...16 Insert...
User Manual
Page 8
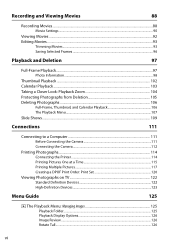
... ...106 Full-Frame, Thumbnail, and Calendar Playback 106 The Playback Menu...107 Slide Shows...109 Connections 111 Connecting to a Computer 111 Before Connecting the Camera 111 Connecting the Camera ...112 Printing Photographs...114 Connecting the Printer...114 Printing Pictures One at a Time 115 Printing Multiple Pictures 117 Creating a DPOF Print Order: Print...
... ...106 Full-Frame, Thumbnail, and Calendar Playback 106 The Playback Menu...107 Slide Shows...109 Connections 111 Connecting to a Computer 111 Before Connecting the Camera 111 Connecting the Camera ...112 Printing Photographs...114 Connecting the Printer...114 Printing Pictures One at a Time 115 Printing Multiple Pictures 117 Creating a DPOF Print Order: Print...
User Manual
Page 9
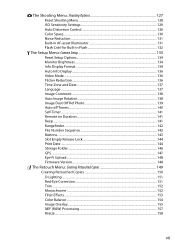
... Distortion Control 130 Color Space...130 Noise Reduction...131 Built-in AF-assist Illuminator 131 Flash Cntrl for Built-in Flash 132 B The Setup Menu: Camera Setup 133 Reset Setup Options...134 Monitor Brightness ...134 Info Display Format ...134 Auto Info Display ...136 Video Mode ...136 Flicker Reduction...136 Time Zone...
... Distortion Control 130 Color Space...130 Noise Reduction...131 Built-in AF-assist Illuminator 131 Flash Cntrl for Built-in Flash 132 B The Setup Menu: Camera Setup 133 Reset Setup Options...134 Monitor Brightness ...134 Info Display Format ...134 Auto Info Display ...136 Video Mode ...136 Flicker Reduction...136 Time Zone...

User Manual
Page 10
... Notes 167 Compatible Lenses...167 Compatible CPU Lenses ...167 Compatible Non-CPU Lenses 169 Optional Flash Units (Speedlights 172 The Nikon Creative Lighting System (CLS 173 Other Accessories...176 Approved Memory Cards 177 Attaching a Power Connector and AC Adapter 178 Caring for the... Camera...179 Storage ...179 Cleaning ...179 The Low-Pass Filter ...180 Caring for the Camera and Battery: Cautions 184 Caring for the Camera...184 Caring for the Battery...185 Available Settings...187 Memory Card Capacity ......
... Notes 167 Compatible Lenses...167 Compatible CPU Lenses ...167 Compatible Non-CPU Lenses 169 Optional Flash Units (Speedlights 172 The Nikon Creative Lighting System (CLS 173 Other Accessories...176 Approved Memory Cards 177 Attaching a Power Connector and AC Adapter 178 Caring for the... Camera...179 Storage ...179 Cleaning ...179 The Low-Pass Filter ...180 Caring for the Camera and Battery: Cautions 184 Caring for the Camera...184 Caring for the Battery...185 Available Settings...187 Memory Card Capacity ......
User Manual
Page 11
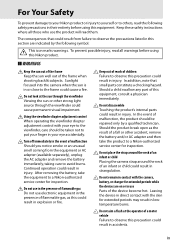
...this equipment. After removing the battery, take the product to a Nikon-authorized service center for inspection. In the event of the frame when shooting backlit subjects. Leaving the device in direct contact with the camera, battery, or charger for extended periods may result in their ...entirety before using this Nikon product. ❚❚ WARNINGS A Keep the sun out of the frame Keep the sun...
...this equipment. After removing the battery, take the product to a Nikon-authorized service center for inspection. In the event of the frame when shooting backlit subjects. Leaving the device in direct contact with the camera, battery, or charger for extended periods may result in their ...entirety before using this Nikon product. ❚❚ WARNINGS A Keep the sun out of the frame Keep the sun...
User Manual
Page 12
... precautions when handling batteries for use in this precaution could damage the product or cause overheating or fire. Before removing the battery turn the camera off before replacing the battery. Failure to observe this product: • Use only batteries approved for the purpose to convert from the monitor... liquid crystal Should the monitor break, care should you are prone to the input and output jacks, use only the cables provided or sold by Nikon for use , attach the terminal cover and store in this equipment. • Do not short or disassemble the battery. • Be sure...
... precautions when handling batteries for use in this precaution could damage the product or cause overheating or fire. Before removing the battery turn the camera off before replacing the battery. Failure to observe this product: • Use only batteries approved for the purpose to convert from the monitor... liquid crystal Should the monitor break, care should you are prone to the input and output jacks, use only the cables provided or sold by Nikon for use , attach the terminal cover and store in this equipment. • Do not short or disassemble the battery. • Be sure...
User Manual
Page 15
... BE IMPLIED FOR ANY OTHER USE. Disposing of Data Storage Devices Please note that has been digitally copied or reproduced by means of a scanner, digital camera, or other data storage devices does not completely erase the original image data. The copying or reproduction of stamps issued by the government and of...
... BE IMPLIED FOR ANY OTHER USE. Disposing of Data Storage Devices Please note that has been digitally copied or reproduced by means of a scanner, digital camera, or other data storage devices does not completely erase the original image data. The copying or reproduction of stamps issued by the government and of...

User Manual
Page 16
... Li-ion batteries not bearing the Nikon holographic seal shown at right could damage the camera and may void your Nikon warranty. D Use Only Nikon Brand Accessories Only Nikon brand accessories certified by the original retailer or a Nikon-authorized service representative once every one to...http://www.nikonusa.com/ • For users in Europe and Africa: http://www.europe-nikon.com/support/ • For users in your Nikon digital camera are particularly recommended if the camera is used with the latest product information, tips, answers to frequently-asked questions (FAQs),...
... Li-ion batteries not bearing the Nikon holographic seal shown at right could damage the camera and may void your Nikon warranty. D Use Only Nikon Brand Accessories Only Nikon brand accessories certified by the original retailer or a Nikon-authorized service representative once every one to...http://www.nikonusa.com/ • For users in Europe and Africa: http://www.europe-nikon.com/support/ • For users in your Nikon digital camera are particularly recommended if the camera is used with the latest product information, tips, answers to frequently-asked questions (FAQs),...
User Manual
Page 17
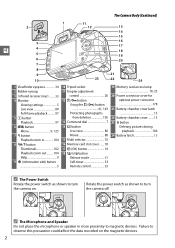
...12 Built-in flash 47 13 M/ Y button Flash mode 47 Flash compensation ......... 66 14 Speaker 92 15 Focal plane mark (E 43 16 Eyelet for camera strap 17 Microphone 88 18 Connector cover 19 Fn button Using the Fn button....8, 143 20 Mounting mark 14 21 Lens release button 15 22... 26 Connector for external microphone 91, 177 27 USB and A/V connector Connecting to a computer 112 Connecting to a printer 114 Connecting to familiarize yourself with camera controls and displays. You X may find it helpful to bookmark this section and refer to it as you read through the rest of the manual.
...12 Built-in flash 47 13 M/ Y button Flash mode 47 Flash compensation ......... 66 14 Speaker 92 15 Focal plane mark (E 43 16 Eyelet for camera strap 17 Microphone 88 18 Connector cover 19 Fn button Using the Fn button....8, 143 20 Mounting mark 14 21 Lens release button 15 22... 26 Connector for external microphone 91, 177 27 USB and A/V connector Connecting to a computer 112 Connecting to a printer 114 Connecting to familiarize yourself with camera controls and displays. You X may find it helpful to bookmark this section and refer to it as you read through the rest of the manual.
User Manual
Page 18
Failure to observe this precaution could affect the data recorded on . Rotate the power switch as shown to turn the camera off. A The Microphone and Speaker Do not place the microphone or speaker in 104 8 W/Q button Thumbnails 102 Playback zoom out ......... 104 Help 9 9 P (... 23 O button Deleting pictures during playback 106 24 Battery latch 13 A The Power Switch Rotate the power switch as shown to turn the camera on the magnetic devices. 2 The Camera Body (Continued) 2 3 X 4 5 6 7 8 9 10 1 11 12 13 14 15 16 17 18 19 20 21 23 22 24 1 Viewfinder eyepiece...
Failure to observe this precaution could affect the data recorded on . Rotate the power switch as shown to turn the camera off. A The Microphone and Speaker Do not place the microphone or speaker in 104 8 W/Q button Thumbnails 102 Playback zoom out ......... 104 Help 9 9 P (... 23 O button Deleting pictures during playback 106 24 Battery latch 13 A The Power Switch Rotate the power switch as shown to turn the camera on the magnetic devices. 2 The Camera Body (Continued) 2 3 X 4 5 6 7 8 9 10 1 11 12 13 14 15 16 17 18 19 20 21 23 22 24 1 Viewfinder eyepiece...

User Manual
Page 19
...to suit the scene selected with the help of an on-screen guide. P, S, A, and M Modes Select these modes for full control over camera settings. • P-Programmed auto (0 54) • S-Shutter-priority auto (0 55) X • A-Aperture-priority auto (0 56) ...57) Auto Modes Select these modes for simple, point-and-shoot photography. • i Auto (0 22) • j Auto (flash off) (0 22) Scene Modes The camera automatically optimizes settings to the scene being photographed. • k Portrait (0 25) • m Sports (0 26) • l Landscape (0 25) • n Close up...
...to suit the scene selected with the help of an on-screen guide. P, S, A, and M Modes Select these modes for full control over camera settings. • P-Programmed auto (0 54) • S-Shutter-priority auto (0 55) X • A-Aperture-priority auto (0 56) ...57) Auto Modes Select these modes for simple, point-and-shoot photography. • i Auto (0 22) • j Auto (flash off) (0 22) Scene Modes The camera automatically optimizes settings to the scene being photographed. • k Portrait (0 25) • m Sports (0 26) • l Landscape (0 25) • n Close up...

User Manual
Page 21
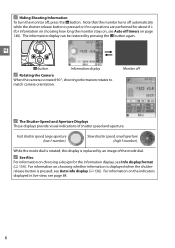
The Information Display Camera settings can be viewed and adjusted in the information display. Highlight items using the multi selector and press J to settings. Press the P button once to ...
The Information Display Camera settings can be viewed and adjusted in the information display. Highlight items using the multi selector and press J to settings. Press the P button once to ...
User Manual
Page 22
... replaced by pressing the R button again. While the mode dial is rotated, this display is rotated 90 °, shooting information rotates to match camera orientation. For information on page 140). The information display can be restored by an image of shutter speed and aperture. Fast shutter speed, large aperture (...
... replaced by pressing the R button again. While the mode dial is rotated, this display is rotated 90 °, shooting information rotates to match camera orientation. For information on page 140). The information display can be restored by an image of shutter speed and aperture. Fast shutter speed, large aperture (...

User Manual
Page 25
... (0 125) • C: Shooting (0 127) • B: Setup (0 133) • N: Retouch (0 149) • m: Recent settings (0 166) Slider shows position in current menu. G button X Tabs Choose from the camera menus. Current settings are shown by pressing the W (Q) button. Press 1 or 3 to g (0 27). 9 To view the menus, press the G button. W (Q) button A Guide Mode To display...
... (0 125) • C: Shooting (0 127) • B: Setup (0 133) • N: Retouch (0 149) • m: Recent settings (0 166) Slider shows position in current menu. G button X Tabs Choose from the camera menus. Current settings are shown by pressing the W (Q) button. Press 1 or 3 to g (0 27). 9 To view the menus, press the G button. W (Q) button A Guide Mode To display...

User Manual
Page 26
Move cursor up J button: select highlighted item Cancel and return to Select highlighted item or X previous menu display sub-menu Move cursor down Follow the steps below to highlight the icon for the current menu. Press 4 to navigate the menus. 1 Display the menus. Using Camera Menus The multi selector and J button are used to display the menus. 2 Highlight the icon for the current menu. 3 Select a menu. Press the G button to navigate the camera menus. G button 10 Press 1 or 3 to select the desired menu.
Move cursor up J button: select highlighted item Cancel and return to Select highlighted item or X previous menu display sub-menu Move cursor down Follow the steps below to highlight the icon for the current menu. Press 4 to navigate the menus. 1 Display the menus. Using Camera Menus The multi selector and J button are used to display the menus. 2 Highlight the icon for the current menu. 3 Select a menu. Press the G button to navigate the camera menus. G button 10 Press 1 or 3 to select the desired menu.

User Manual
Page 28
... charger and remove the battery. 12 Attempting to observe this precaution could damage the product. 1 Remove the terminal cover. First Steps Charge the Battery The camera is supplied, raise the wall plug and connect the plug adapter as shown in the supplied MH-24 battery charger before use. About 1 hour and...
... charger and remove the battery. 12 Attempting to observe this precaution could damage the product. 1 Remove the terminal cover. First Steps Charge the Battery The camera is supplied, raise the wall plug and connect the plug adapter as shown in the supplied MH-24 battery charger before use. About 1 hour and...

User Manual
Page 29
...59°F and from 45°C/113°F to your retailer or a Nikon-authorized service representative. failure to e one side. Use the charger with compatible batteries only. A Inserting and Removing Batteries Always turn the camera off . X w q 3 Insert the battery. Unplug when not in the...the battery and then remove the battery by hand. Insert the Battery 1 Turn the camera off before inserting or removing batteries. 2 Open the battery-chamber cover. A Removing the Battery Turn the camera off and open (w) the battery-chamber cover. If the problem persists, cease use ...
...59°F and from 45°C/113°F to your retailer or a Nikon-authorized service representative. failure to e one side. Use the charger with compatible batteries only. A Inserting and Removing Batteries Always turn the camera off . X w q 3 Insert the battery. Unplug when not in the...the battery and then remove the battery by hand. Insert the Battery 1 Turn the camera off before inserting or removing batteries. 2 Open the battery-chamber cover. A Removing the Battery Turn the camera off and open (w) the battery-chamber cover. If the problem persists, cease use ...


