
L20/19 User's Manual
Page 9
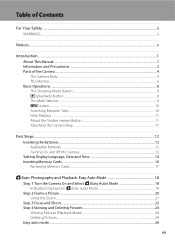
... Help Displays...11 About the Shutter-release Button...11 Attaching the Camera Strap ...11 First Steps ...12 Inserting the Batteries ...12 Applicable Batteries ...12 Turning On and Off the Camera...12 Setting Display Language, Date and Time 14 Inserting Memory Cards ...16 Removing Memory Cards...17 G Basic Photography and Playback: Easy Auto Mode 18 Step 1 Turn the Camera On and Select G (Easy Auto) Mode 18 Indicators Displayed in G (Easy auto) Mode 19 Step 2 Frame a Picture ...20 Using the Zoom...21 Step 3 Focus and Shoot ...22 Step 4 Viewing and Deleting Pictures 24 Viewing Pictures...
... Help Displays...11 About the Shutter-release Button...11 Attaching the Camera Strap ...11 First Steps ...12 Inserting the Batteries ...12 Applicable Batteries ...12 Turning On and Off the Camera...12 Setting Display Language, Date and Time 14 Inserting Memory Cards ...16 Removing Memory Cards...17 G Basic Photography and Playback: Easy Auto Mode 18 Step 1 Turn the Camera On and Select G (Easy Auto) Mode 18 Indicators Displayed in G (Easy auto) Mode 19 Step 2 Frame a Picture ...20 Using the Zoom...21 Step 3 Focus and Shoot ...22 Step 4 Viewing and Deleting Pictures 24 Viewing Pictures...
L20/19 User's Manual
Page 13
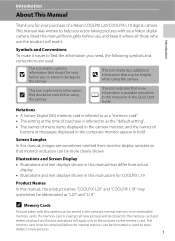
... a Nikon COOLPIX L20/COOLPIX L19 digital camera. This icon indicates that should be removed before use, and keep it easier to find the information you need, the following symbols and conventions are sometimes omitted from actual display. • Illustrations and text displays shown in the Quick Start Guide. The memory card must be read before use the product will apply only to help you enjoy taking pictures with this manual, the product names "COOLPIX L20...
... a Nikon COOLPIX L20/COOLPIX L19 digital camera. This icon indicates that should be removed before use, and keep it easier to find the information you need, the following symbols and conventions are sometimes omitted from actual display. • Illustrations and text displays shown in the Quick Start Guide. The memory card must be read before use the product will apply only to help you enjoy taking pictures with this manual, the product names "COOLPIX L20...

L20/19 User's Manual
Page 18
...). Parts of exposures remaining 2 Macro mode 31 3 Zoom indicator 21, 31 4 AE/AF-L indicator 43 5 Focus indicator 22 6 Flash mode 28 7 Battery level indicator 18 8 Motion detection indicator ...........19, 92 9 "Date not set" indicator 110 Time zone indicator 86 10 Date imprint 91 11 Image mode*2 71 Movie options 54 12 (still pictures 18 b Movie length 53 13 Internal memory indicator 19 14 Aperture 22 15 Focus area 20, 22 16 Focus area (Face Priority 20, 22 17 Shutter speed 22 18 ISO sensitivity...
...). Parts of exposures remaining 2 Macro mode 31 3 Zoom indicator 21, 31 4 AE/AF-L indicator 43 5 Focus indicator 22 6 Flash mode 28 7 Battery level indicator 18 8 Motion detection indicator ...........19, 92 9 "Date not set" indicator 110 Time zone indicator 86 10 Date imprint 91 11 Image mode*2 71 Movie options 54 12 (still pictures 18 b Movie length 53 13 Internal memory indicator 19 14 Aperture 22 15 Focus area 20, 22 16 Focus area (Face Priority 20, 22 17 Shutter speed 22 18 ISO sensitivity...
L20/19 User's Manual
Page 25
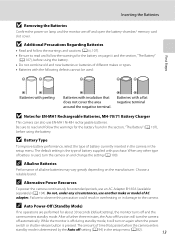
... seconds (default setting), the monitor turns off and the camera enters standby mode. C Auto Power-Off (Standby Mode) If no operations are off setting (A 94) in the section, "The Battery" (A 107), before using the battery. The amount of AC adapter. Batteries with purchase. Choose a reliable brand. The default setting is determined by the Auto off and open the battery-chamber/ memory card slot cover. C Alternative Power Resources To power the camera continuously for the battery on page...
... seconds (default setting), the monitor turns off and the camera enters standby mode. C Auto Power-Off (Standby Mode) If no operations are off setting (A 94) in the section, "The Battery" (A 107), before using the battery. The amount of AC adapter. Batteries with purchase. Choose a reliable brand. The default setting is determined by the Auto off and open the battery-chamber/ memory card slot cover. C Alternative Power Resources To power the camera continuously for the battery on page...

L20/19 User's Manual
Page 28
... the camera, pictures are stored in correctly until it clicks into place. If a memory card is correctly oriented. 16 First Steps Inserting Memory Cards Pictures are automatically stored on the memory card and pictures recorded to the memory card can be played back, deleted or transferred. Remove the memory card to turn off and open the battery-chamber/ memory card slot cover. Slide the memory card in the camera's internal memory (approximately 20 MB) or on removable Secure Digital (SD) memory cards (available...
... the camera, pictures are stored in correctly until it clicks into place. If a memory card is correctly oriented. 16 First Steps Inserting Memory Cards Pictures are automatically stored on the memory card and pictures recorded to the memory card can be played back, deleted or transferred. Remove the memory card to turn off and open the battery-chamber/ memory card slot cover. Slide the memory card in the camera's internal memory (approximately 20 MB) or on removable Secure Digital (SD) memory cards (available...
L20/19 User's Manual
Page 37
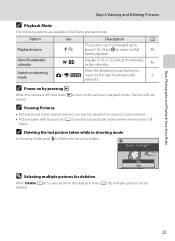
... in playback mode. Option Playback zoom View thumbnails/ calendar Switch to shooting mode Use g (i) f (h) Description A The picture can be deleted. 25 Display 9, 16, or 25 picture thumbnails, or the calendar. 46 Press the shooting mode button to return to full- 48 frame playback. C Power on by pressing c When the camera is off, hold down c to turn on the camera in shooting mode In shooting mode, press l to delete the last picture taken. Basic Photography and Playback: Easy Auto Mode Step 4 Viewing and Deleting Pictures C Playback Mode...
... in playback mode. Option Playback zoom View thumbnails/ calendar Switch to shooting mode Use g (i) f (h) Description A The picture can be deleted. 25 Display 9, 16, or 25 picture thumbnails, or the calendar. 46 Press the shooting mode button to return to full- 48 frame playback. C Power on by pressing c When the camera is off, hold down c to turn on the camera in shooting mode In shooting mode, press l to delete the last picture taken. Basic Photography and Playback: Easy Auto Mode Step 4 Viewing and Deleting Pictures C Playback Mode...
L20/19 User's Manual
Page 39
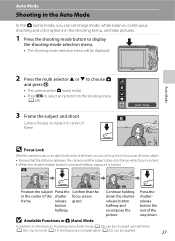
... down the shutterrelease button halfway and Press the shutterrelease button the halfway. Auto mode 7 D Focus Lock When the camera focuses on an object in the center of the frame, you can set image mode, white balance, continuous shooting and color options in the shooting menu, and take pictures. 1 Press the shooting mode button to display the shooting-mode selection menu. • The shooting-mode selection menu will be applied. 27 Auto Mode Shooting in the Auto Mode In the A (auto) mode, you can use focus lock to focus on subject in...
... down the shutterrelease button halfway and Press the shutterrelease button the halfway. Auto mode 7 D Focus Lock When the camera focuses on an object in the center of the frame, you can set image mode, white balance, continuous shooting and color options in the shooting menu, and take pictures. 1 Press the shooting mode button to display the shooting-mode selection menu. • The shooting-mode selection menu will be applied. 27 Auto Mode Shooting in the Auto Mode In the A (auto) mode, you can use focus lock to focus on subject in...
L20/19 User's Manual
Page 41
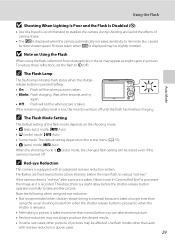
... camera is recorded. Auto Mode Using the Flash B Shooting When Lighting Is Poor and the Flash Is Disabled (W) • Use of a tripod is recommended to stabilize the camera during shooting and avoid the effects of camera shake. • The E is displayed may be slightly mottled. Pictures taken when E is displayed when the camera automatically increases sensitivity to minimize blur caused by slow shutter speed. If the camera detects "red-eye" after a picture is taken, Nikon...
... camera is recorded. Auto Mode Using the Flash B Shooting When Lighting Is Poor and the Flash Is Disabled (W) • Use of a tripod is recommended to stabilize the camera during shooting and avoid the effects of camera shake. • The E is displayed may be slightly mottled. Pictures taken when E is displayed when the camera automatically increases sensitivity to minimize blur caused by slow shutter speed. If the camera detects "red-eye" after a picture is taken, Nikon...

L20/19 User's Manual
Page 43
... focus is locked to lock focus. C The Macro Mode Setting When the shooting mode is A (auto) mode, the macro mode setting will be stored even if the camera is turned off. 31 The macro mode icon (F) is displayed. Auto Mode C Macro Mode In macro mode, the camera focuses continuously, even when the shutter-release button is not pressed halfway to adjust the exposure. Macro mode 3 Press the zoom buttons to move to the wide zoom position. • Macro mode can be used to take a picture at the current zoom position when F or the zoom indicator glows green...
... focus is locked to lock focus. C The Macro Mode Setting When the shooting mode is A (auto) mode, the macro mode setting will be stored even if the camera is turned off. 31 The macro mode icon (F) is displayed. Auto Mode C Macro Mode In macro mode, the camera focuses continuously, even when the shutter-release button is not pressed halfway to adjust the exposure. Macro mode 3 Press the zoom buttons to move to the wide zoom position. • Macro mode can be used to take a picture at the current zoom position when F or the zoom indicator glows green...
L20/19 User's Manual
Page 53
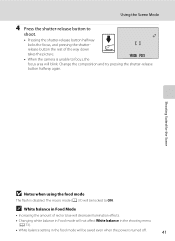
... using the food mode The flash is turned off. 41 release button the rest of red or blue will decrease illumination effects. • Changing white balance in Food mode will not affect White balance in the shooting menu (A 73). • White balance setting in Food Mode • Increasing the amount of the way down takes the picture. 1/125 F3.1 • When the camera is unable to focus, the focus area will be locked to shoot...
... using the food mode The flash is turned off. 41 release button the rest of red or blue will decrease illumination effects. • Changing white balance in Food mode will not affect White balance in the shooting menu (A 73). • White balance setting in Food Mode • Increasing the amount of the way down takes the picture. 1/125 F3.1 • When the camera is unable to focus, the focus area will be locked to shoot...
L20/19 User's Manual
Page 65
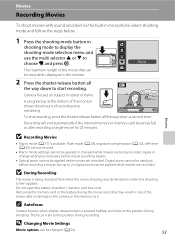
... applied or changed (A 54). 53 Do not open the battery-chamber / memory card slot cover. D Changing Movie Settings Movie options can be applied while movies are being recorded from when the movie shooting was terminated to choose D and press k. Camera focuses on subject in loss of recording time remaining. 4s To end recording, press the shutter-release button all the way down a second time. Digital zoom cannot be used . • Macro mode settings cannot be changed while movies are recorded.
... applied or changed (A 54). 53 Do not open the battery-chamber / memory card slot cover. D Changing Movie Settings Movie options can be applied while movies are being recorded from when the movie shooting was terminated to choose D and press k. Camera focuses on subject in loss of recording time remaining. 4s To end recording, press the shutter-release button all the way down a second time. Digital zoom cannot be used . • Macro mode settings cannot be changed while movies are recorded.

L20/19 User's Manual
Page 85
... information(A 74). At settings other than Auto, the icon for direct sunlight. Shooting, Playback and Setup Menus Shooting Options: The Shooting Menu B White Balance Set A (Auto) mode (A 27) M d (shooting menu) M B White Balance The color of light reflected from an object varies with the flash mode. This is displayed on the monitor (A 6). a Auto (default setting) White balance automatically adjusted to set white balance under most types of lighting, you can be previewed in the monitor. b Preset manual Neutral-colored object used under unusual lighting conditions. The human...
... information(A 74). At settings other than Auto, the icon for direct sunlight. Shooting, Playback and Setup Menus Shooting Options: The Shooting Menu B White Balance Set A (Auto) mode (A 27) M d (shooting menu) M B White Balance The color of light reflected from an object varies with the flash mode. This is displayed on the monitor (A 6). a Auto (default setting) White balance automatically adjusted to set white balance under most types of lighting, you can be previewed in the monitor. b Preset manual Neutral-colored object used under unusual lighting conditions. The human...
L20/19 User's Manual
Page 87
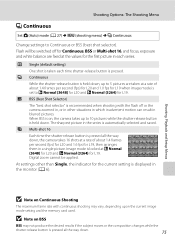
...) for L19. V Continuous While the shutter-release button is held down . 75 W Multi-shot 16 Each time the shutter-release button is set to Continuous or BSS (best shot selector). U Single (default setting) One shot is taken each series. Shooting Options: The Shooting Menu C Continuous Set A (Auto) mode (A 27) M d (shooting menu) M C Continuous Change settings to i Normal (3648) for L20 and R Normal (3264) for L19. Flash will be applied. Digital zoom cannot be switched off or the camera zoomed in, or in blurred pictures.
...) for L19. V Continuous While the shutter-release button is held down . 75 W Multi-shot 16 Each time the shutter-release button is set to Continuous or BSS (best shot selector). U Single (default setting) One shot is taken each series. Shooting Options: The Shooting Menu C Continuous Set A (Auto) mode (A 27) M d (shooting menu) M C Continuous Change settings to i Normal (3648) for L20 and R Normal (3264) for L19. Flash will be applied. Digital zoom cannot be switched off or the camera zoomed in, or in blurred pictures.
L20/19 User's Manual
Page 94
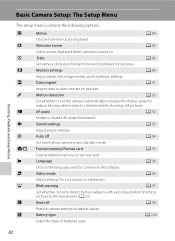
... the shutter speed to default values. h AF assist A 92 Enable or disable AF-assist illumination. p Reset all A 98 Restore camera settings to reduce blurring when motion is turned on pictures. e Monitor settings A 89 Adjust photo info, image review, and brightness settings. i Sound settings A 93 Adjust sound settings. n Language A 96 Choose the language used . 82 a Menus A 84 Choose how menus are displayed. Format memory/Format card A 95 Format internal memory or memory card. o Video mode A 96 Adjust settings for camera monitor display. d Blink warning...
... the shutter speed to default values. h AF assist A 92 Enable or disable AF-assist illumination. p Reset all A 98 Restore camera settings to reduce blurring when motion is turned on pictures. e Monitor settings A 89 Adjust photo info, image review, and brightness settings. i Sound settings A 93 Adjust sound settings. n Language A 96 Choose the language used . 82 a Menus A 84 Choose how menus are displayed. Format memory/Format card A 95 Format internal memory or memory card. o Video mode A 96 Adjust settings for camera monitor display. d Blink warning...
L20/19 User's Manual
Page 103
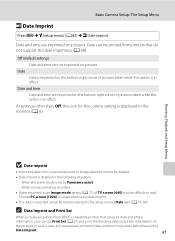
... time are printed from printers that can print date and photo information, you can use Print Set (A 67) and print the shooting date and photo information on the pictures. Shooting, Playback and Setup Menus B Date imprint • Imprinted dates form a permanent part of pictures taken while this option is recorded using Date Imprint. 91 C Date Imprint and Print Set When pictures are imprinted on pictures beforehand using the format selected in effect. At settings other than Off, the icon for the current setting is disabled...
... time are printed from printers that can print date and photo information, you can use Print Set (A 67) and print the shooting date and photo information on the pictures. Shooting, Playback and Setup Menus B Date imprint • Imprinted dates form a permanent part of pictures taken while this option is recorded using Date Imprint. 91 C Date Imprint and Print Set When pictures are imprinted on pictures beforehand using the format selected in effect. At settings other than Off, the icon for the current setting is disabled...
L20/19 User's Manual
Page 123
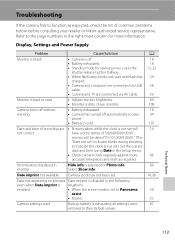
...that supports D-Lighting, crop or small picture. N Time out error while Cannot record movie. Technical Notes N File not created with faster write speed. N Picture is in the internal Remove memory card to copy the picture. Camera has run out of file numbers. Choose memory card with File contains no memory or memory card. play back pictures from destination. devices which was used for welcome screen. Delete pictures from images. the current time zone. authorized service representative. You are trying to create or edit this camera. internal memory. data...
...that supports D-Lighting, crop or small picture. N Time out error while Cannot record movie. Technical Notes N File not created with faster write speed. N Picture is in the internal Remove memory card to copy the picture. Camera has run out of file numbers. Choose memory card with File contains no memory or memory card. play back pictures from destination. devices which was used for welcome screen. Delete pictures from images. the current time zone. authorized service representative. You are trying to create or edit this camera. internal memory. data...
L20/19 User's Manual
Page 125
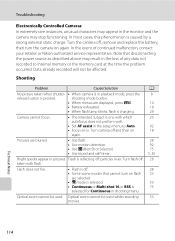
... scene mode is selected for saving power: press the shutter-release button halfway. • When flash lamp blinks red, wait until flash has charged. • Camera and computer are connected via USB cable. • Camera and TV are not correct • Pictures taken while the clock is not set to Panorama assist • Movies Camera settings reset Backup battery is not set . Clean monitor. Date imprint not available Camera clock has not been set .) Set the correct date and time using Date in...
... scene mode is selected for saving power: press the shutter-release button halfway. • When flash lamp blinks red, wait until flash has charged. • Camera and computer are connected via USB cable. • Camera and TV are not correct • Pictures taken while the clock is not set to Panorama assist • Movies Camera settings reset Backup battery is not set . Clean monitor. Date imprint not available Camera clock has not been set .) Set the correct date and time using Date in...
L20/19 User's Manual
Page 126
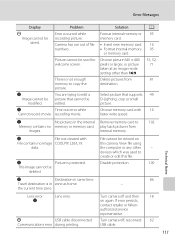
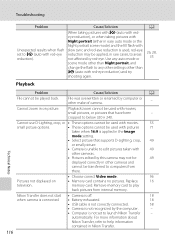
... camera may result in the loss of continued malfunction, contact your retailer or Nikon-authorized service representative. In the event of any data not recorded to Auto. 92 • Focus error. Data already recorded will not be affected. shooting mode button. • When menus are blurred. • Use flash. 28 • Use motion detection. 92 • Use D (Best Shot Selector). 75 • Use tripod and self-timer. 5, 30 Bright specks appear in playback mode...
... camera may result in the loss of continued malfunction, contact your retailer or Nikon-authorized service representative. In the event of any data not recorded to Auto. 92 • Focus error. Data already recorded will not be affected. shooting mode button. • When menus are blurred. • Use flash. 28 • Use motion detection. 92 • Use D (Best Shot Selector). 75 • Use tripod and self-timer. 5, 30 Bright specks appear in playback mode...
L20/19 User's Manual
Page 128
... zoom in Nikon Transfer. 116 Technical Notes Pictures not displayed on picture. Cannot use D-Lighting, crop, or • These options cannot be used with movies. 55 small picture options. • These options cannot be played back. A 26, 28, 35 Playback Problem Cause/Solution A File cannot be used with red-eye reduction) and try shooting again. Nikon Transfer does not start • Camera is off. 18 when camera is connected. • Battery exhausted. 18 • USB cable is not correctly connected...
... zoom in Nikon Transfer. 116 Technical Notes Pictures not displayed on picture. Cannot use D-Lighting, crop, or • These options cannot be used with movies. 55 small picture options. • These options cannot be played back. A 26, 28, 35 Playback Problem Cause/Solution A File cannot be used with red-eye reduction) and try shooting again. Nikon Transfer does not start • Camera is off. 18 when camera is connected. • Battery exhausted. 18 • USB cable is not correctly connected...
L20/19 User's Manual
Page 136
..., 55 Playback button 5, 8 Playback menu 78 Playback zoom 48 Portrait b 34 Power 12, 14, 18 Power switch 4, 12, 18 Power-on lamp 4, 12, 18 Preset manual 74 Print 63, 64, 67 Print set 67 Print Set (Date) 68 Printer 61 Protect 100 R Recording movies 53 Red-eye reduction 28, 29 Reset all 98 Rotate image 101 RSCN 105 S Scene mode 33, 34 Self-timer 30 Self-timer lamp 4, 30 Sepia 76 Setup menu 82 Shooting 18, 20, 22 Shooting Menu 69 Shooting mode button 5, 8 Shooting-mode Selection menu 8 Shutter sound 93 Shutter speed 22 Shutter-release button...
..., 55 Playback button 5, 8 Playback menu 78 Playback zoom 48 Portrait b 34 Power 12, 14, 18 Power switch 4, 12, 18 Power-on lamp 4, 12, 18 Preset manual 74 Print 63, 64, 67 Print set 67 Print Set (Date) 68 Printer 61 Protect 100 R Recording movies 53 Red-eye reduction 28, 29 Reset all 98 Rotate image 101 RSCN 105 S Scene mode 33, 34 Self-timer 30 Self-timer lamp 4, 30 Sepia 76 Setup menu 82 Shooting 18, 20, 22 Shooting Menu 69 Shooting mode button 5, 8 Shooting-mode Selection menu 8 Shutter sound 93 Shutter speed 22 Shutter-release button...


