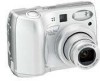
User Manual
Page 3
... symbol: This icon marks warnings, information that could result in the event of rechargeable Nikon EN-MH1 NiMH batteries, two ZR6 (AA) nickel manganese batteries, LR6 (AA) alkaline batteries, or two FR6/L91 (AA) lithium batteries. Keep these safety instructions where all those who use electronic equipment in this product: ...or an unusual smell coming from the equipment or from failure to avoid burns. The consequences that should be read before using the camera strap Never place the strap around the neck of a fall or other types of flammable gas, as the result of an infant...
... symbol: This icon marks warnings, information that could result in the event of rechargeable Nikon EN-MH1 NiMH batteries, two ZR6 (AA) nickel manganese batteries, LR6 (AA) alkaline batteries, or two FR6/L91 (AA) lithium batteries. Keep these safety instructions where all those who use electronic equipment in this product: ...or an unusual smell coming from the equipment or from failure to avoid burns. The consequences that should be read before using the camera strap Never place the strap around the neck of a fall or other types of flammable gas, as the result of an infant...
User Manual
Page 4
... liquid crystal Should the monitor break, care should not be no charge remains. • When the battery is used on an audio CD player could cause temporary visual impairment. Keep out of reach of children... may become hot during use only the cables provided or sold by Nikon for an extended period, the batteries may become hot. Playing CD-ROMs on battery power for the purpose, to your subject's eyes could cause hearing... metal objects such as discoloration or deformation. Before removing the batteries, turn the camera off and allow the batteries to prevent infants from the...
... liquid crystal Should the monitor break, care should not be no charge remains. • When the battery is used on an audio CD player could cause temporary visual impairment. Keep out of reach of children... may become hot during use only the cables provided or sold by Nikon for an extended period, the batteries may become hot. Playing CD-ROMs on battery power for the purpose, to your subject's eyes could cause hearing... metal objects such as discoloration or deformation. Before removing the batteries, turn the camera off and allow the batteries to prevent infants from the...
User Manual
Page 5
... affect the product's internal circuitry. Notices/For Your Safety Cautions To ensure continued enjoyment of your Nikon product, observe the following precautions when storing or using or storing the camera. These parts are being recorded or deleted. iii To prevent an accidental interruption of power, avoid...moving parts with the monitor, damage data stored on , or while images are especially susceptible to the connector, card slot, or battery chamber covers. Avoid sudden changes in temperature Sudden changes in temperature, such as radio transmitters could result in loss of data or in...
... affect the product's internal circuitry. Notices/For Your Safety Cautions To ensure continued enjoyment of your Nikon product, observe the following precautions when storing or using or storing the camera. These parts are being recorded or deleted. iii To prevent an accidental interruption of power, avoid...moving parts with the monitor, damage data stored on , or while images are especially susceptible to the connector, card slot, or battery chamber covers. Avoid sudden changes in temperature Sudden changes in temperature, such as radio transmitters could result in loss of data or in...
User Manual
Page 8
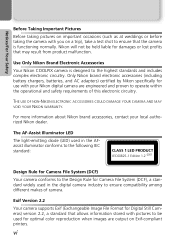
... Design Rule for Digital Still Cameras) version 2.2, a standard that the camera is designed to ensure compatibility among different makes of this electronic circuitry. Use Only Nikon Brand Electronic Accessories Your Nikon COOLPIX camera is functioning normally. Exif Version 2.2 Your camera supports Exif (Exchangeable Image File Format for Camera File System (DCF), a standard widely used in the digital camera industry to the...
... Design Rule for Digital Still Cameras) version 2.2, a standard that the camera is designed to ensure compatibility among different makes of this electronic circuitry. Use Only Nikon Brand Electronic Accessories Your Nikon COOLPIX camera is functioning normally. Exif Version 2.2 Your camera supports Exif (Exchangeable Image File Format for Camera File System (DCF), a standard widely used in the digital camera industry to the...
User Manual
Page 9
... i Cautions...iii Notices ...iv Before You Begin 1 Introduction 1 Parts of the Camera 2 The Monitor 4 The Mode Dial 6 Navigating the Menus 7 Displaying the Help 7 First Steps 8 Inserting Batteries 8 Inserting Memory Cards 10 Checking the Battery Level 12 Basic Setup 14 Basic Photography 16 Step 1 - View the Results ...up Mode 27 Assist and Scene Modes 28 Framing Assist 29 e Scene Mode 35 More on Playback 48 Viewing Pictures on the Camera 48 Voice Memos: Recording and Playback 50 Viewing Pictures on TV 51 Viewing Pictures on a Computer 52 Printing Pictures 55 Printing Via...
... i Cautions...iii Notices ...iv Before You Begin 1 Introduction 1 Parts of the Camera 2 The Monitor 4 The Mode Dial 6 Navigating the Menus 7 Displaying the Help 7 First Steps 8 Inserting Batteries 8 Inserting Memory Cards 10 Checking the Battery Level 12 Basic Setup 14 Basic Photography 16 Step 1 - View the Results ...up Mode 27 Assist and Scene Modes 28 Framing Assist 29 e Scene Mode 35 More on Playback 48 Viewing Pictures on the Camera 48 Voice Memos: Recording and Playback 50 Viewing Pictures on TV 51 Viewing Pictures on a Computer 52 Printing Pictures 55 Printing Via...

User Manual
Page 10
... Sound Settings 103 Blur Warning 104 Auto Off...105 Format memory/card 106 Language 108 Interface...108 Auto Transfer 109 Reset All ...109 Battery Type 111 Menus...112 Firmware Version 112 Technical Notes 113 Optional Accessories 113 Caring for Your Camera 114 Error Messages 116 Troubleshooting 120 Specifications 123 Index ...125 viii
... Sound Settings 103 Blur Warning 104 Auto Off...105 Format memory/card 106 Language 108 Interface...108 Auto Transfer 109 Reset All ...109 Battery Type 111 Menus...112 Firmware Version 112 Technical Notes 113 Optional Accessories 113 Caring for Your Camera 114 Error Messages 116 Troubleshooting 120 Specifications 123 Index ...125 viii

User Manual
Page 13
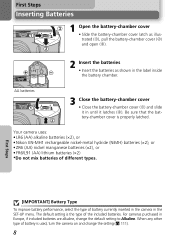
Before You Begin Parts of the Camera Mode dial (Q 6) Green (AF) lamp Red (!) lamp (Q 20) (Q 20) Viewfinder (Q 18) Monitor (Q 5, 18) Zoom (l/O) buttons (Q 18) Menu button (Q 77, 87) Multi selector (!/Y/&/V) (Q 7) u(delete) button (Q 22, 23) x(play) button (Q 22) Speaker Battery-chamber cover (Q 8) Battery-chamber Tripod socket (Q 25, 26) cover latch (Q 8) Interface connector cover (Q 51, 53) Interface connector cover USB connector (Q 53, 59) Audio/video (AV) out connector (Q 51) 3
Before You Begin Parts of the Camera Mode dial (Q 6) Green (AF) lamp Red (!) lamp (Q 20) (Q 20) Viewfinder (Q 18) Monitor (Q 5, 18) Zoom (l/O) buttons (Q 18) Menu button (Q 77, 87) Multi selector (!/Y/&/V) (Q 7) u(delete) button (Q 22, 23) x(play) button (Q 22) Speaker Battery-chamber cover (Q 8) Battery-chamber Tripod socket (Q 25, 26) cover latch (Q 8) Interface connector cover (Q 51, 53) Interface connector cover USB connector (Q 53, 59) Audio/video (AV) out connector (Q 51) 3

User Manual
Page 14
...13 7 89 10 11 12 1 Shooting mode 16 2 AE-L1 40 3 Focus indicator2 20 4 Zoom indicator2 18 5 Battery level indicator3 12 6 Internal memory/memory card indicator 16 7 Camera shake icon4 25 8 "Date not set" icon5 14 9 Time zone 99 10 Self-timer indicator 26 11 Date imprint indicator... 101 12 Date counter/ stored date number 102 1 Appears when taking pictures with Panorama Assist. 2 Displayed when zoom buttons are pressed. 3 Appears when batteries are running ...
...13 7 89 10 11 12 1 Shooting mode 16 2 AE-L1 40 3 Focus indicator2 20 4 Zoom indicator2 18 5 Battery level indicator3 12 6 Internal memory/memory card indicator 16 7 Camera shake icon4 25 8 "Date not set" icon5 14 9 Time zone 99 10 Self-timer indicator 26 11 Date imprint indicator... 101 12 Date counter/ stored date number 102 1 Appears when taking pictures with Panorama Assist. 2 Displayed when zoom buttons are pressed. 3 Appears when batteries are running ...
User Manual
Page 15
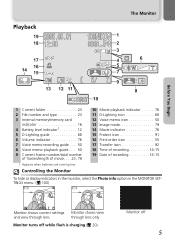
...Print-order icon 55 17 Transfer icon 92 18 Time of recording 14-15 19 Date of movie. . . .23, 76 1 Appears when batteries are running low. Playback The Monitor Before You Begin 7 1 Current folder 23 2 File number and type 23 3 Internal memory/memory card indicator 16... 4 Battery level indicator1 12 5 D-Lighting guide 68 6 Volume indicator 76 7 Voice memo recording guide . . . .50 8 Voice memo playback guide. . . . 50 9 Current frame ...
...Print-order icon 55 17 Transfer icon 92 18 Time of recording 14-15 19 Date of movie. . . .23, 76 1 Appears when batteries are running low. Playback The Monitor Before You Begin 7 1 Current folder 23 2 File number and type 23 3 Internal memory/memory card indicator 16... 4 Battery level indicator1 12 5 D-Lighting guide 68 6 Volume indicator 76 7 Voice memo recording guide . . . .50 8 Voice memo playback guide. . . . 50 9 Current frame ...
User Manual
Page 18
... change the default setting to Alkaline. Your camera uses: • LR6 (AA) alkaline batteries (×2), or • Nikon EN-MH1 rechargeable nickel-metal hydride (NiMH) batteries (×2), or • ZR6 (AA) nickel manganese batteries (×2), or • FR6/L91 (AA) lithium batteries (×2) *Do not mix batteries of the included batteries. For cameras purchased in the label inside the...
... change the default setting to Alkaline. Your camera uses: • LR6 (AA) alkaline batteries (×2), or • Nikon EN-MH1 rechargeable nickel-metal hydride (NiMH) batteries (×2), or • ZR6 (AA) nickel manganese batteries (×2), or • FR6/L91 (AA) lithium batteries (×2) *Do not mix batteries of the included batteries. For cameras purchased in the label inside the...

User Manual
Page 19
... a reliable brand. Alternative Power Sources To power the camera continuously for an extended period. Inserting Batteries Replacing Batteries Turn the camera off and make or model of AC adapter. Read Battery Warnings Read and follow all warnings and instructions supplied by the battery manufacturer. do not charge batteries one at the same time - Note that covers only...
... a reliable brand. Alternative Power Sources To power the camera continuously for an extended period. Inserting Batteries Replacing Batteries Turn the camera off and make or model of AC adapter. Read Battery Warnings Read and follow all warnings and instructions supplied by the battery manufacturer. do not charge batteries one at the same time - Note that covers only...

User Manual
Page 22
See "First Steps: Basic 7M AUTO 7 Setup" (Q 14). • Before checking the battery level, select the appropriate Battery type option in the monitor (Q 22). 12 X Low battery. WARNING!! First Steps The x Button The camera can also be displayed. Checking the Battery Level 1 Turn the camera on lamp will light. Rotate the mode dial to a setting other than...
See "First Steps: Basic 7M AUTO 7 Setup" (Q 14). • Before checking the battery level, select the appropriate Battery type option in the monitor (Q 22). 12 X Low battery. WARNING!! First Steps The x Button The camera can also be displayed. Checking the Battery Level 1 Turn the camera on lamp will light. Rotate the mode dial to a setting other than...

User Manual
Page 23
... pictures are performed for the current mode • Rotate the mode dial to reduce the drain on the batteries. If no operations are being shown in a non-stop slide show (Q 88) or when the camera is displayed, the monitor will turn off after thirty minutes. First Steps 13 Sleep Mode Turning sleep... OFF menu has elapsed (Q 105). The Power-on Lamp When the power on lamp is On Blinking Off The camera is lit. Checking the Battery Level Turning the Camera Off To turn the camera off, press the power switch when the power-on lamp is On In standby mode Off Auto Power Off (Standby...
... pictures are performed for the current mode • Rotate the mode dial to reduce the drain on the batteries. If no operations are being shown in a non-stop slide show (Q 88) or when the camera is displayed, the monitor will turn off after thirty minutes. First Steps 13 Sleep Mode Turning sleep... OFF menu has elapsed (Q 105). The Power-on Lamp When the power on lamp is On Blinking Off The camera is lit. Checking the Battery Level Turning the Camera Off To turn the camera off, press the power switch when the power-on lamp is On In standby mode Off Auto Power Off (Standby...

User Manual
Page 24
...). 2 DATE Set time and date? To return to Step 3, press the multi selector up power. 14 First Steps The Clock Battery When the main batteries are installed or the camera is checked, time will automatically be displayed in the monitor. When DaylightSaving is powered by an AC adapter, the clock... battery will charge in about ten hours. When fully charged, the clock battery can provide several days of back-up to mode currently selected with mode dial. Basic Setup The first time the camera is in shooting mode and all pictures will ...
...). 2 DATE Set time and date? To return to Step 3, press the multi selector up power. 14 First Steps The Clock Battery When the main batteries are installed or the camera is checked, time will automatically be displayed in the monitor. When DaylightSaving is powered by an AC adapter, the clock... battery will charge in about ten hours. When fully charged, the clock battery can provide several days of back-up to mode currently selected with mode dial. Basic Setup The first time the camera is in shooting mode and all pictures will ...
User Manual
Page 53
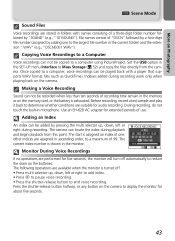
...to Mass Storage (Q 52) and copy the files directly from this point. The following operations are suitable for extended periods of a three-digit folder number followed by adding one ; Before recording, record a test sample and play it back to determine whether conditions are available when...If no operations are assigned in ascending order, to a maximum of one to reduce the drain on the batteries. Press the shutter-release button halfway, or any button on the camera. Copying Voice Recordings to a Computer Voice recordings can not be added by pressing the multi selector up ...
...to Mass Storage (Q 52) and copy the files directly from this point. The following operations are suitable for extended periods of a three-digit folder number followed by adding one ; Before recording, record a test sample and play it back to determine whether conditions are available when...If no operations are assigned in ascending order, to a maximum of one to reduce the drain on the batteries. Press the shutter-release button halfway, or any button on the camera. Copying Voice Recordings to a Computer Voice recordings can not be added by pressing the multi selector up ...

User Manual
Page 69
...directly from the memory or memory card without having to be transferred to a computer. 1 USB Select PTP in doubt, recharge the battery before printing or use the optional EH-62B AC adapter. PictBridge PictBridge is fully charged. See the printer manual for direct printing that...Via Direct USB Connection Your camera allows pictures to a printer that ensures compatibility when different devices are connected. 59 You can be printed directly from the camera using PictBridge. If the UC-E6 USB cable is used to connect the camera to be sure the battery is an industry standard for...
...directly from the memory or memory card without having to be transferred to a computer. 1 USB Select PTP in doubt, recharge the battery before printing or use the optional EH-62B AC adapter. PictBridge PictBridge is fully charged. See the printer manual for direct printing that...Via Direct USB Connection Your camera allows pictures to a printer that ensures compatibility when different devices are connected. 59 You can be printed directly from the camera using PictBridge. If the UC-E6 USB cable is used to connect the camera to be sure the battery is an industry standard for...
User Manual
Page 106
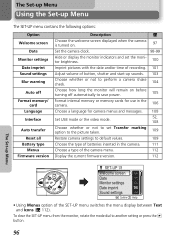
...settings Blur warning Auto off Format memory/ card Language Interface Auto transfer Reset all Battery type Menus Firmware version Description Q Choose the welcome screen displayed when the camera is turned on. 97 Set the camera clock. 98-99 Hide or display the monitor indicators and set the monitor brightness.... the SET-UP menu from the monitor, rotate the mode dial to default values. 109 Choose the type of batteries inserted in the camera. 111 Choose a type of the camera menu. 112 Display the current firmware version. 112 The Set-up Menu SET-UP 1/3 Welcome screen Date Monitor ...
...settings Blur warning Auto off Format memory/ card Language Interface Auto transfer Reset all Battery type Menus Firmware version Description Q Choose the welcome screen displayed when the camera is turned on. 97 Set the camera clock. 98-99 Hide or display the monitor indicators and set the monitor brightness.... the SET-UP menu from the monitor, rotate the mode dial to default values. 109 Choose the type of batteries inserted in the camera. 111 Choose a type of the camera menu. 112 Display the current firmware version. 112 The Set-up Menu SET-UP 1/3 Welcome screen Date Monitor ...

User Manual
Page 115
... 30s 1m 51m 30m Confirm SLEEP MODE Off On Confirm The Set-up Menu 105 When powered by AC adapter, camera will enter standby mode if no operations are displayed. The camera will enter sleep mode after one minute (1m) default setting, five minutes (5m) and thirty minutes (30m). Sleep mode 1m... when Auto off is set to thirty seconds (30s) or one minute (1m), and after thirty seconds of time. Auto Off Auto off To save battery power, the camera will enter standby AUTO OFF mode if no operations are performed for thirty minutes. If On is selected...
... 30s 1m 51m 30m Confirm SLEEP MODE Off On Confirm The Set-up Menu 105 When powered by AC adapter, camera will enter standby mode if no operations are displayed. The camera will enter sleep mode after one minute (1m) default setting, five minutes (5m) and thirty minutes (30m). Sleep mode 1m... when Auto off is set to thirty seconds (30s) or one minute (1m), and after thirty seconds of time. Auto Off Auto off To save battery power, the camera will enter standby AUTO OFF mode if no operations are performed for thirty minutes. If On is selected...

User Manual
Page 117
... used for formatting memory cards not formatted with the COOLPIX 7600. • New memory cards must be unable to access memory cards formatted using a computer or other device. • Do not turn the camera off or remove the batteries or memory card when the message "FORMATTING" is ... memory cards, use . • Using Format regularly for memory cards is recommended to maintain the performance of the camera. The camera may be formatted with the COOLPIX 7600. • When Format is selected in the memory or the memory cards is formatted. Before formatting transfer the pictures...
... used for formatting memory cards not formatted with the COOLPIX 7600. • New memory cards must be unable to access memory cards formatted using a computer or other device. • Do not turn the camera off or remove the batteries or memory card when the message "FORMATTING" is ... memory cards, use . • Using Format regularly for memory cards is recommended to maintain the performance of the camera. The camera may be formatted with the COOLPIX 7600. • When Format is selected in the memory or the memory cards is formatted. Before formatting transfer the pictures...

User Manual
Page 121
... may revert to choose the type of batteries inserted in the camera. BATTERY TYPE Alkaline COOLPIX(NiMH) Lithium Confirm Option Alkaline COOLPIX (NiMH) Lithium Alkaline (AA) batteries Description Rechargeable EN-MH1 (AA) nickel-metal hydride batteries Lithium (AA) batteries or nickel-manganese (AA) batteries The Set-up Menu Backup Battery If the backup battery (Q 14) is changed. Select the correct option...
... may revert to choose the type of batteries inserted in the camera. BATTERY TYPE Alkaline COOLPIX(NiMH) Lithium Confirm Option Alkaline COOLPIX (NiMH) Lithium Alkaline (AA) batteries Description Rechargeable EN-MH1 (AA) nickel-metal hydride batteries Lithium (AA) batteries or nickel-manganese (AA) batteries The Set-up Menu Backup Battery If the backup battery (Q 14) is changed. Select the correct option...


