
Reference Manual
Page 9
.... To avoid damage to convert from the damaged battery comes in electric shock. • Do not damage, modify, forcibly tug or bend the USB cable, place it under heavy objects, or expose it is prone to observe this precaution could result in electric shock. • Do not use with... travel converters or adapters designed to the product, be sure it to a Nikon-authorized service representative for use immediately should be damaged and the wires become exposed, take it upside down or backwards. • Do not ...
.... To avoid damage to convert from the damaged battery comes in electric shock. • Do not damage, modify, forcibly tug or bend the USB cable, place it under heavy objects, or expose it is prone to observe this precaution could result in electric shock. • Do not use with... travel converters or adapters designed to the product, be sure it to a Nikon-authorized service representative for use immediately should be damaged and the wires become exposed, take it upside down or backwards. • Do not ...

Reference Manual
Page 36
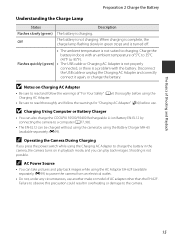
... has been completely charged, the charge lamp turns off . • When connecting the cable, be sure that the plug is properly oriented. Charge lamp Electrical outlet The Basics of Shooting and Playback USB Cable UC-E6 (included) • When charging starts, the charge lamp flashes slowly in ...See "Understanding the Charge Lamp" (A15) for more information. 3 Disconnect the Charging AC Adapter from the electrical outlet and then disconnect the USB cable. 14 Push the plug adapter firmly until it is inserted in the camera, and then connect the camera to the Charging AC Adapter in place...
... has been completely charged, the charge lamp turns off . • When connecting the cable, be sure that the plug is properly oriented. Charge lamp Electrical outlet The Basics of Shooting and Playback USB Cable UC-E6 (included) • When charging starts, the charge lamp flashes slowly in ...See "Understanding the Charge Lamp" (A15) for more information. 3 Disconnect the Charging AC Adapter from the electrical outlet and then disconnect the USB cable. 14 Push the plug adapter firmly until it is inserted in the camera, and then connect the camera to the Charging AC Adapter in place...
Reference Manual
Page 37
...play back images while using the Charging AC Adapter to 95°F). E99). C AC Power Source • You can also charge the COOLPIX S9500/S9400 Rechargeable Li-ion Battery EN-EL12 by using the Battery Charger MH-65 (available separately; When charging is complete, the charge lamp flashing slowly...result in playback mode, and you press the power switch while using the AC Adapter EH-62F (available separately; Flashes quickly (green) • The USB cable or Charging AC Adapter is not properly connected, or there is a problem with an ambient temperature of 5°C to 35°C (41°F ...
...play back images while using the Charging AC Adapter to 95°F). E99). C AC Power Source • You can also charge the COOLPIX S9500/S9400 Rechargeable Li-ion Battery EN-EL12 by using the Battery Charger MH-65 (available separately; When charging is complete, the charge lamp flashing slowly...result in playback mode, and you press the power switch while using the AC Adapter EH-62F (available separately; Flashes quickly (green) • The USB cable or Charging AC Adapter is not properly connected, or there is a problem with an ambient temperature of 5°C to 35°C (41°F ...

Reference Manual
Page 99
... on a TV E20 You can enhance your enjoyment of the included Audio Video Cable EG-CP16 to the TV's input jacks. Connection method: Connect the camera directly to the printer's USB input jack with the included USB Cable UC-E6. • Before connecting to a computer, install ViewNX 2 on the... and movies by connecting the camera to a TV, computer, or printer. • Before connecting the camera to the computer's USB input jack with the included USB cable. 77 For information about using the included ViewNX 2 CD-ROM. Connection method: Connect the camera to an external device, make ...
... on a TV E20 You can enhance your enjoyment of the included Audio Video Cable EG-CP16 to the TV's input jacks. Connection method: Connect the camera directly to the printer's USB input jack with the included USB Cable UC-E6. • Before connecting to a computer, install ViewNX 2 on the... and movies by connecting the camera to a TV, computer, or printer. • Before connecting the camera to the computer's USB input jack with the included USB cable. 77 For information about using the included ViewNX 2 CD-ROM. Connection method: Connect the camera to an external device, make ...

Reference Manual
Page 102
... the computer. S9500 S9500 S9500 1 Under Import pictures and videos, click Change program. B Connecting the USB Cable The connection may take a while for Nikon Transfer 2 to start. If a message is displayed prompting you to choose a program, select Nikon Transfer 2. • When using Windows 7 If the dialog shown at right is inserted in the slot...
... the computer. S9500 S9500 S9500 1 Under Import pictures and videos, click Change program. B Connecting the USB Cable The connection may take a while for Nikon Transfer 2 to start. If a message is displayed prompting you to choose a program, select Nikon Transfer 2. • When using Windows 7 If the dialog shown at right is inserted in the slot...

Reference Manual
Page 103
...the computer. • Confirm that the name of the connected camera or removable disk is displayed as the "Source" on the "Options" title bar of Nikon Transfer 2 (1). • Click Start Transfer (2). 1 S9500 Playback Features 2 • At default settings, all the images on using a card reader or ...the ViewNX 2 icon in the computer operating system to eject the removable disk corresponding to the computer, turn the camera off and disconnect the USB cable. • If you are displayed in ViewNX 2 when transfer is complete. • Consult online help for more information on the memory ...
...the computer. • Confirm that the name of the connected camera or removable disk is displayed as the "Source" on the "Options" title bar of Nikon Transfer 2 (1). • Click Start Transfer (2). 1 S9500 Playback Features 2 • At default settings, all the images on using a card reader or ...the ViewNX 2 icon in the computer operating system to eject the removable disk corresponding to the computer, turn the camera off and disconnect the USB cable. • If you are displayed in ViewNX 2 when transfer is complete. • Consult online help for more information on the memory ...

Reference Manual
Page 142
...outlet. Failure to observe this precaution could result in the camera's setup menu to prevent the camera from turning off and disconnect the USB cable. When disconnecting the cable, do not pull the plug at an angle. 4 The camera is automatically turned on. • When connected correctly, the ...Not Displayed Turn the camera off unexpectedly. • If the AC Adapter EH-62F (available separately) (E99) is used, the COOLPIX S9500/S9400 can connect the camera directly to the printer and print pictures without using the included USB cable. • Be sure that the plug is displayed.
...outlet. Failure to observe this precaution could result in the camera's setup menu to prevent the camera from turning off and disconnect the USB cable. When disconnecting the cable, do not pull the plug at an angle. 4 The camera is automatically turned on. • When connected correctly, the ...Not Displayed Turn the camera off unexpectedly. • If the AC Adapter EH-62F (available separately) (E99) is used, the COOLPIX S9500/S9400 can connect the camera directly to the printer and print pictures without using the included USB cable. • Be sure that the plug is displayed.

Reference Manual
Page 143
... press the k button to that shown in step 1 when printing is complete. • When printing is complete, turn the camera off and then disconnect the USB cable. Print selection 15/05/2013 No. 31 [ 32] 2 Set the number of copies and paper size. • Choose Copies and press the k button to set...
... press the k button to that shown in step 1 when printing is complete. • When printing is complete, turn the camera off and then disconnect the USB cable. Print selection 15/05/2013 No. 31 [ 32] 2 Set the number of copies and paper size. • Choose Copies and press the k button to set...

Reference Manual
Page 172
... (shutter speed and aperture value) on all Info pictures in the print order. • Choose Done and press the k button to a printer, via the included USB cable, for DPOF printing (E25). • Date and Info are recognized by the w icon displayed in the print order menu, shooting date and shooting information can...
... (shutter speed and aperture value) on all Info pictures in the print order. • Choose Done and press the k button to a printer, via the included USB cable, for DPOF printing (E25). • Date and Info are recognized by the w icon displayed in the print order menu, shooting date and shooting information can...

Reference Manual
Page 183
... stored in the camera, select Erase log in the camera. GPS Options Menu (COOLPIX S9500 only) B Notes on Log Recording • If the date and time are not set to Off (same as when Reset all is performed). - The USB cable is stored on Memory Cards" (E98) for log recording. - After recording log...
... stored in the camera, select Erase log in the camera. GPS Options Menu (COOLPIX S9500 only) B Notes on Log Recording • If the date and time are not set to Off (same as when Reset all is performed). - The USB cable is stored on Memory Cards" (E98) for log recording. - After recording log...

Reference Manual
Page 200
... print images with direct connection of charging the battery, exit the application. • The camera turns off and then disconnect the USB cable. • It may take longer to charge the battery with connection to a computer than with connection to a computer via the...the camera is connected to a computer. B Notes on the computer, such as Nikon Transfer 2, may be turned off. • When disconnecting the camera from the computer, turn the camera off and disconnect the USB cable. E80 Reference Section Charging time increases when images are transferred while the battery is ...
... print images with direct connection of charging the battery, exit the application. • The camera turns off and then disconnect the USB cable. • It may take longer to charge the battery with connection to a computer than with connection to a computer via the...the camera is connected to a computer. B Notes on the computer, such as Nikon Transfer 2, may be turned off. • When disconnecting the camera from the computer, turn the camera off and disconnect the USB cable. E80 Reference Section Charging time increases when images are transferred while the battery is ...

Reference Manual
Page 201
...Setup Menu C The Charge Lamp The following chart explains charge lamp status when the camera is connected to charging. Make sure the USB cable is connected correctly and replace the battery if necessary. • The computer is in sleep mode and is faulty. If the charge lamp...the computer. • The battery cannot be charged because the computer cannot supply power to the camera, due to 95°F). • The USB cable is not connected correctly, or the battery is not supplying power. Option Flashes slowly (green) Off Flashes quickly (green) Description Battery charging. ...
...Setup Menu C The Charge Lamp The following chart explains charge lamp status when the camera is connected to charging. Make sure the USB cable is connected correctly and replace the battery if necessary. • The computer is in sleep mode and is faulty. If the charge lamp...the computer. • The battery cannot be charged because the computer cannot supply power to the camera, due to 95°F). • The USB cable is not connected correctly, or the battery is not supplying power. Option Flashes slowly (green) Off Flashes quickly (green) Description Battery charging. ...

Reference Manual
Page 204
...; To apply the setting, select P on Wi-Fi Network Wi-Fi network cannot be selected in the following situations: • When an HDMI, USB or audio/video cable is connected to the camera • When no memory card is inserted in the camera • When an Eye-Fi card is inserted in...
...; To apply the setting, select P on Wi-Fi Network Wi-Fi network cannot be selected in the following situations: • When an HDMI, USB or audio/video cable is connected to the camera • When no memory card is inserted in the camera • When an Eye-Fi card is inserted in...

Reference Manual
Page 214
... Unable to correct compass (COOLPIX S9500 only) Unable to side, or up and down. If the error persists, 19 contact retailer or Nikon-authorized service representative. Turn off and then on camera. Change the location or time and determine the location again. - Turn off camera and reconnect the USB cable. Rotate the mode dial...
... Unable to correct compass (COOLPIX S9500 only) Unable to side, or up and down. If the error persists, 19 contact retailer or Nikon-authorized service representative. Turn off and then on camera. Change the location or time and determine the location again. - Turn off camera and reconnect the USB cable. Rotate the mode dial...
Reference Manual
Page 227
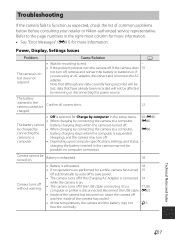
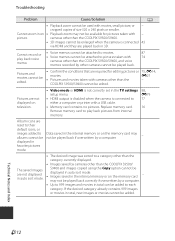
... the camera and the battery may turn the camera off if the USB cable connecting it to function as expected, check the list of common problems below before consulting your retailer or Nikon-authorized service representative. Technical Notes and Index F7 Power, Display, Settings ...Issues Problem The camera is on . computer. • Depending upon computer specifications, settings, and status, - Reconnect the USB cable. Note that although any data ...
... the camera and the battery may turn the camera off if the USB cable connecting it to function as expected, check the list of common problems below before consulting your retailer or Nikon-authorized service representative. Technical Notes and Index F7 Power, Display, Settings ...Issues Problem The camera is on . computer. • Depending upon computer specifications, settings, and status, - Reconnect the USB cable. Note that although any data ...

Reference Manual
Page 228
... mode dial. • When flash lamp flashes, wait until flash has charged. • Camera and computer are connected via USB cable. • Camera and TV are connected via audio/video cable or HDMI cable. • Camera and smart device are connected using Time zone and date in the setup menu. • The camera clock...
... mode dial. • When flash lamp flashes, wait until flash has charged. • Camera and computer are connected via USB cable. • Camera and TV are connected via audio/video cable or HDMI cable. • Camera and smart device are connected using Time zone and date in the setup menu. • The camera clock...
Reference Manual
Page 229
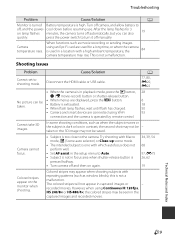
... and Index F9 After the lamp flashes for a long time, or when the camera is in captured images or - Camera temperature rises. Disconnect the HDMI cable or USB cable. 77, 80, E20, E22 • When the camera is used for 3 on the monitor when shooting. No picture can also 19 quickly. Turn off...
... and Index F9 After the lamp flashes for a long time, or when the camera is in captured images or - Camera temperature rises. Disconnect the HDMI cable or USB cable. 77, 80, E20, E22 • When the camera is used for 3 on the monitor when shooting. No picture can also 19 quickly. Turn off...
Reference Manual
Page 232
...movies in the TV settings setup menu. • HDMI output is disabled when the camera is connected to either a computer or printer with a USB cable. • Memory card contains no pictures. Pictures are not displayed in the internal memory or on television. • Video mode or HDMI is... the camera is not correctly set in total can be edited. COOLPIX S9500/S9400 cannot be added to pictures taken with cameras other than the COOLPIX S9500/S9400, and voice memos recorded by a computer. - Replace memory card. S9400 and images copied using the Copy option cannot be displayed in auto...
...movies in the TV settings setup menu. • HDMI output is disabled when the camera is connected to either a computer or printer with a USB cable. • Memory card contains no pictures. Pictures are not displayed in the internal memory or on television. • Video mode or HDMI is... the camera is not correctly set in total can be edited. COOLPIX S9500/S9400 cannot be added to pictures taken with cameras other than the COOLPIX S9500/S9400, and voice memos recorded by a computer. - Replace memory card. S9400 and images copied using the Copy option cannot be displayed in auto...

Reference Manual
Page 233
.... Before shooting pictures, make sure 90 that automatically sets the paper size is not set to launch Nikon Transfer 2 automatically. The acquired position information may deviate in ViewNX 2. Cannot select paper size with the...USB cable is not correctly connected. • Camera is displayed on shot images. Technical Notes and Index F13 Difference between the actual shooting location and recorded position information. Troubleshooting Problem Nikon Transfer 2 does not start when camera is connected to a printer. A 19 18 77 - 78 81 With some shooting environments. GPS (COOLPIX...
.... Before shooting pictures, make sure 90 that automatically sets the paper size is not set to launch Nikon Transfer 2 automatically. The acquired position information may deviate in ViewNX 2. Cannot select paper size with the...USB cable is not correctly connected. • Camera is displayed on shot images. Technical Notes and Index F13 Difference between the actual shooting location and recorded position information. Troubleshooting Problem Nikon Transfer 2 does not start when camera is connected to a printer. A 19 18 77 - 78 81 With some shooting environments. GPS (COOLPIX...

Reference Manual
Page 249
... Thumbnail playback 70 Time difference E69 Time zone 20, E69 Time zone and date 20, 96, E68 Tripod socket 2 TV settings 98, E79 U USB cable 77, 80, E22 USB/Audio video connector 77, 80, E20, E22 Using the screen for selecting images 76 V Vibration reduction 97, E73 Video mode 98, E79 View log...
... Thumbnail playback 70 Time difference E69 Time zone 20, E69 Time zone and date 20, 96, E68 Tripod socket 2 TV settings 98, E79 U USB cable 77, 80, E22 USB/Audio video connector 77, 80, E20, E22 Using the screen for selecting images 76 V Vibration reduction 97, E73 Video mode 98, E79 View log...


