Reference Manual
Page 5
... "Reference Section," F: "Technical Notes and Index." • SD, SDHC and SDXC memory cards are referred to as "memory cards" in this manual. • The setting at the time of purchase is used in the monitor screen, and the names of buttons or messages displayed on the names and... in this manual. Introduction Read This First About This Manual If you need, the following symbols and conventions are used for both the COOLPIX S9500 and the COOLPIX S9400 are provided when necessary. See "Parts of Shooting and Playback" (A 12). Illustrations for the illustrations and monitor contents...
... "Reference Section," F: "Technical Notes and Index." • SD, SDHC and SDXC memory cards are referred to as "memory cards" in this manual. • The setting at the time of purchase is used in the monitor screen, and the names of buttons or messages displayed on the names and... in this manual. Introduction Read This First About This Manual If you need, the following symbols and conventions are used for both the COOLPIX S9500 and the COOLPIX S9400 are provided when necessary. See "Parts of Shooting and Playback" (A 12). Illustrations for the illustrations and monitor contents...
Reference Manual
Page 7
... data storage devices. • For the COOLPIX S9500, the log data saved on the memory card is governed by law is obtained but not stored on the memory card, select Create log ➝ End log ➝ Erase log. • For the COOLPIX S9500, you can sometimes be punishable by ...government, licenses issued by a company. Deleted files can clear the Wi-Fi options (A98) setting using Reset all data using commercially available software, potentially resulting in the malicious use this product for the Select an image option in a foreign country is prohibited. Care should be provided...
... data storage devices. • For the COOLPIX S9500, the log data saved on the memory card is governed by law is obtained but not stored on the memory card, select Create log ➝ End log ➝ Erase log. • For the COOLPIX S9500, you can sometimes be punishable by ...government, licenses issued by a company. Deleted files can clear the Wi-Fi options (A98) setting using Reset all data using commercially available software, potentially resulting in the malicious use this product for the Select an image option in a foreign country is prohibited. Care should be provided...

Reference Manual
Page 18
...COOLPIX S9500 only xiii Parts of the Camera and Main Functions 1 The Camera Body ...1 Principle Functions of the Controls ...3 Attaching the Camera Strap ...5 Basic Menu Operations ...6 Monitor Screen ...8 The Basics of Shooting and Playback 12 Preparation 1 Insert the Battery...12 Preparation 2 Charge the Battery 14 Preparation 3 Insert a Memory Card 16 Internal Memory and Memory Cards...Back Images ...28 Step 6 Delete Unwanted Images 29 Shooting Features...31 A (Auto) Mode ...31 Using Quick Effects ...32 Scene Mode (Shooting Suited to Scenes 33 Viewing a Description (Help Information) of...
...COOLPIX S9500 only xiii Parts of the Camera and Main Functions 1 The Camera Body ...1 Principle Functions of the Controls ...3 Attaching the Camera Strap ...5 Basic Menu Operations ...6 Monitor Screen ...8 The Basics of Shooting and Playback 12 Preparation 1 Insert the Battery...12 Preparation 2 Charge the Battery 14 Preparation 3 Insert a Memory Card 16 Internal Memory and Memory Cards...Back Images ...28 Step 6 Delete Unwanted Images 29 Shooting Features...31 A (Auto) Mode ...31 Using Quick Effects ...32 Scene Mode (Shooting Suited to Scenes 33 Viewing a Description (Help Information) of...

Reference Manual
Page 34
... correctly, the battery latch will lock the battery in the correct orientation. 3 Close the battery-chamber/memory card slot cover. • Charge the battery before the first use or when the battery is in place. BInserting the Battery Correctly Inserting the battery upside down or backwards... and Playback The Basics of Shooting and Playback Preparation 1 Insert the Battery 1 Open the battery-chamber/memory card slot cover. 2 Insert the included battery (Rechargeable Li-ion Battery EN-EL12). Battery latch • Use the battery to check that the battery is running low (A18). 12
... correctly, the battery latch will lock the battery in the correct orientation. 3 Close the battery-chamber/memory card slot cover. • Charge the battery before the first use or when the battery is in place. BInserting the Battery Correctly Inserting the battery upside down or backwards... and Playback The Basics of Shooting and Playback Preparation 1 Insert the Battery 1 Open the battery-chamber/memory card slot cover. 2 Insert the included battery (Rechargeable Li-ion Battery EN-EL12). Battery latch • Use the battery to check that the battery is running low (A18). 12

Reference Manual
Page 35
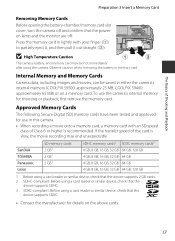
..., open the battery-chamber/ memory card slot cover and push the orange battery latch in the direction shown (1). Observe caution when removing the battery or memory card. B Notes on lamp and the monitor have turned off (A19) and be hot immediately after using the camera. B High Temperature... Caution The camera, battery, and memory card may be sure that the power-on Battery •...
..., open the battery-chamber/ memory card slot cover and push the orange battery latch in the direction shown (1). Observe caution when removing the battery or memory card. B Notes on lamp and the monitor have turned off (A19) and be hot immediately after using the camera. B High Temperature... Caution The camera, battery, and memory card may be sure that the power-on Battery •...
Reference Manual
Page 38
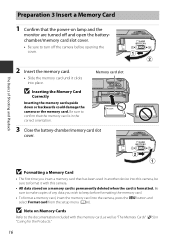
... a memory card that has been used in the correct orientation. Memory card slot 3 Close the battery-chamber/memory card slot cover. B Note on lamp and the monitor are turned off and open the batterychamber/memory card slot cover. • Be sure to turn off the camera before formatting the memory card. • To format a memory card, insert the memory card into place. Preparation 3 Insert a Memory Card 1 Confirm...
... a memory card that has been used in the correct orientation. Memory card slot 3 Close the battery-chamber/memory card slot cover. B Note on lamp and the monitor are turned off and open the batterychamber/memory card slot cover. • Be sure to turn off the camera before formatting the memory card. • To format a memory card, insert the memory card into place. Preparation 3 Insert a Memory Card 1 Confirm...
Reference Manual
Page 39
... in either the camera's internal memory (COOLPIX S9500: approximately 23 MB, COOLPIX S9400: approximately 65 MB) or on the above cards. 17 Press the memory card in this camera. • When recording a movie onto a memory card, a memory card with your finger (1) to partially eject it, and then pull it out straight (2). To use the camera's internal memory for use in lightly with an SD...
... in either the camera's internal memory (COOLPIX S9500: approximately 23 MB, COOLPIX S9400: approximately 65 MB) or on the above cards. 17 Press the memory card in this camera. • When recording a movie onto a memory card, a memory card with your finger (1) to partially eject it, and then pull it out straight (2). To use the camera's internal memory for use in lightly with an SD...

Reference Manual
Page 50
... 0004.JPG 4 132 Current image number/ Total number of images C Viewing Pictures • When the orientation of Shooting and Playback 2 Use the multi selector to the orientation of the face. • The orientation of images shot continuously as a separate file with the effects ... during playback, the displayed images are rotated automatically. • Pictures taken in the internal memory, remove the memory card. When you press the k button, the quick effects selection menu is changed using face detection (A67) or pet detection (A42) will be rotated automatically when displayed in ...
... 0004.JPG 4 132 Current image number/ Total number of images C Viewing Pictures • When the orientation of Shooting and Playback 2 Use the multi selector to the orientation of the face. • The orientation of images shot continuously as a separate file with the effects ... during playback, the displayed images are rotated automatically. • Pictures taken in the internal memory, remove the memory card. When you press the k button, the quick effects selection menu is changed using face detection (A67) or pet detection (A42) will be rotated automatically when displayed in ...

Reference Manual
Page 60
Set Vibration reduction to Off in the setup menu (A96) when shooting using a tripod to r 4896×3672). • The camera focuses on the subject at the center of the camera focusing. • Focus, exposure, and hue are .... • As images are easily affected by camera shake, hold the camera steadily. You may become slow depending upon the current image mode setting, the memory card used, or shooting condition. y M c Landscape • When the shutter-release button is not pressed halfway. y M d Sports • The camera focuses at the center area of the...
Set Vibration reduction to Off in the setup menu (A96) when shooting using a tripod to r 4896×3672). • The camera focuses on the subject at the center of the camera focusing. • Focus, exposure, and hue are .... • As images are easily affected by camera shake, hold the camera steadily. You may become slow depending upon the current image mode setting, the memory card used, or shooting condition. y M c Landscape • When the shutter-release button is not pressed halfway. y M d Sports • The camera focuses at the center area of the...

Reference Manual
Page 64
...rotating the zoom control toward g (i), the image is enlarged at a dog or cat, it detects and focuses on its face. B Viewing Pictures Taken Using Pet Detection When zooming in on an image displayed in which the pets are detected, the camera focuses on Pet Portrait • The digital zoom...dog or cat (up to 5), the largest face displayed on the monitor is full To continue shooting with continuous shooting). 42 When the internal memory or the memory card is framed by a double border (focus area) and the others by a yellow double border (focus area). When the camera has focused on...
...rotating the zoom control toward g (i), the image is enlarged at a dog or cat, it detects and focuses on its face. B Viewing Pictures Taken Using Pet Detection When zooming in on an image displayed in which the pets are detected, the camera focuses on Pet Portrait • The digital zoom...dog or cat (up to 5), the largest face displayed on the monitor is full To continue shooting with continuous shooting). 42 When the internal memory or the memory card is framed by a double border (focus area) and the others by a yellow double border (focus area). When the camera has focused on...
Reference Manual
Page 96
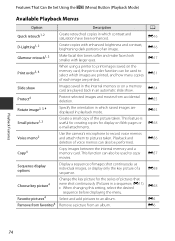
...accidental deletion. E17 Print order3, 4 When using a printer to print images saved on the memory card, the print order function can also be performed. This feature is useful for creating copies for the series of voice memos can also be used to copy movies. Select and add pictures ...E56 Copy4 Copy images between the internal memory and a memory card. E16 D-Lighting1, 2 Create copies with larger eyes. E51 Slide show Images saved in the internal memory or on Web pages or E18 email attachments. This function can be used to select which images are printed, and...
...accidental deletion. E17 Print order3, 4 When using a printer to print images saved on the memory card, the print order function can also be performed. This feature is useful for creating copies for the series of voice memos can also be used to copy movies. Select and add pictures ...E56 Copy4 Copy images between the internal memory and a memory card. E16 D-Lighting1, 2 Create copies with larger eyes. E51 Slide show Images saved in the internal memory or on Web pages or E18 email attachments. This function can be used to select which images are printed, and...

Reference Manual
Page 99
...• Before connecting to a PictBridge-compatible printer, you can print images without using a computer E22 If you connect the camera to a computer, install ViewNX 2 on a TV. Printing images without using a computer. Connection method: Connect the video and audio plugs of images and movies... movies on the computer using the included ViewNX 2 CD-ROM and transferring images to a computer. • If any USB devices that draw the power from the computer are connected, disconnect them from the computer, which could damage the camera or memory card. Alternatively, connect a...
...• Before connecting to a PictBridge-compatible printer, you can print images without using a computer E22 If you connect the camera to a computer, install ViewNX 2 on a TV. Printing images without using a computer. Connection method: Connect the video and audio plugs of images and movies... movies on the computer using the included ViewNX 2 CD-ROM and transferring images to a computer. • If any USB devices that draw the power from the computer are connected, disconnect them from the computer, which could damage the camera or memory card. Alternatively, connect a...

Reference Manual
Page 102
... that the memory card is connected to the computer via a USB hub. 80 If a message is displayed prompting you to choose a program, select Nikon Transfer 2. • When using Windows 7 If the dialog shown at right is equipped with an SD card slot, the card can be inserted directly in the slot. • SD card reader: Connect a card reader...
... that the memory card is connected to the computer via a USB hub. 80 If a message is displayed prompting you to choose a program, select Nikon Transfer 2. • When using Windows 7 If the dialog shown at right is equipped with an SD card slot, the card can be inserted directly in the slot. • SD card reader: Connect a card reader...

Reference Manual
Page 103
...system to eject the removable disk corresponding to the memory card and then remove the card from the card reader or card slot. Viewing Images Start ViewNX 2. • Images are using ViewNX 2. Using ViewNX 2 2 Transfer images to the computer. ...• Confirm that the name of the connected camera or removable disk is displayed as the "Source" on the "Options" title bar of Nikon Transfer 2 (1). • Click Start Transfer (2). 1 S9500 Playback Features 2 • At default settings, all the images on the memory card...
...system to eject the removable disk corresponding to the memory card and then remove the card from the card reader or card slot. Viewing Images Start ViewNX 2. • Images are using ViewNX 2. Using ViewNX 2 2 Transfer images to the computer. ...• Confirm that the name of the connected camera or removable disk is displayed as the "Source" on the "Options" title bar of Nikon Transfer 2 (1). • Click Start Transfer (2). 1 S9500 Playback Features 2 • At default settings, all the images on the memory card...
Reference Manual
Page 106
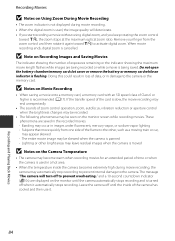
...overheating." The entire movie image may be seen on Movie Recording • When saving a movie onto a memory card, a memory card with an SD speed class of the camera has cooled and then use it again toward g(i), the zoom stops at the maximum optical zoom ratio. and a 10-second countdown .... • If you start recording a movie without using digital zoom, and you keep rotating the zoom control toward g(i) to the camera or the memory card. Do not open the battery-chamber/memory card slot cover or remove the battery or memory card while an indicator is panned - When movie recording ends...
...overheating." The entire movie image may be seen on Movie Recording • When saving a movie onto a memory card, a memory card with an SD speed class of the camera has cooled and then use it again toward g(i), the zoom stops at the maximum optical zoom ratio. and a 10-second countdown .... • If you start recording a movie without using digital zoom, and you keep rotating the zoom control toward g(i) to the camera or the memory card. Do not open the battery-chamber/memory card slot cover or remove the battery or memory card while an indicator is panned - When movie recording ends...

Reference Manual
Page 113
... taken, the location name information for the POI (points of the location name information. Features That Can Be Set Using the d (Menu) Button (GPS Options Menu) Using GPS/Electronic Compass (COOLPIX S9500 only) Press the d button Mz (GPS options) menu icon (A7) From the menu screen, select the... setting is displayed on the shooting screen or playback screen. Display POI: When set to update the A- Update A-GPS file: A memory card is displayed on the pictures to On, the location name information is Off. Using the latest A-GPS file can change the following settings.
... taken, the location name information for the POI (points of the location name information. Features That Can Be Set Using the d (Menu) Button (GPS Options Menu) Using GPS/Electronic Compass (COOLPIX S9500 only) Press the d button Mz (GPS options) menu icon (A7) From the menu screen, select the... setting is displayed on the shooting screen or playback screen. Display POI: When set to update the A- Update A-GPS file: A memory card is displayed on the pictures to On, the location name information is Off. Using the latest A-GPS file can change the following settings.

Reference Manual
Page 114
... the camera to draw a figure eight in the air while turning your wrist to face the camera forward and backward, side to a memory card using Start log is reached (only when Record GPS data in GPS options of the GPS options menu is Off. E62 You can delete log... compass indicator switches to a circle compass with a red arrow that was recorded to side, or up and down. Using GPS/Electronic Compass (COOLPIX S9500 only) Features That Can Be Set Using the d (Menu) Button (GPS Options Menu) Option Create log View log Synchronize Electronic compass Description A The measured position...
... the camera to draw a figure eight in the air while turning your wrist to face the camera forward and backward, side to a memory card using Start log is reached (only when Record GPS data in GPS options of the GPS options menu is Off. E62 You can delete log... compass indicator switches to a circle compass with a red arrow that was recorded to side, or up and down. Using GPS/Electronic Compass (COOLPIX S9500 only) Features That Can Be Set Using the d (Menu) Button (GPS Options Menu) Option Create log View log Synchronize Electronic compass Description A The measured position...

Reference Manual
Page 184
... memory card is erased. View log 2013/05/26 [2] 2013/05/26 [1] 2013/05/20 2013/05/18 2013/05/15 To Erase Log Data Press the l button to the time zone set the time if it is not accurate in any NMEA format-compliant camera is not guaranteed. GPS Options Menu (COOLPIX... S9500 only) View Log Press the d button M z (GPS options) menu icon (A6) M View log Check or erase the log data stored on the memory card using Synchronize is not as accurate as radio clocks. B Notes on...
... memory card is erased. View log 2013/05/26 [2] 2013/05/26 [1] 2013/05/20 2013/05/18 2013/05/15 To Erase Log Data Press the l button to the time zone set the time if it is not accurate in any NMEA format-compliant camera is not guaranteed. GPS Options Menu (COOLPIX... S9500 only) View Log Press the d button M z (GPS options) menu icon (A6) M View log Check or erase the log data stored on the memory card using Synchronize is not as accurate as radio clocks. B Notes on...
Reference Manual
Page 211
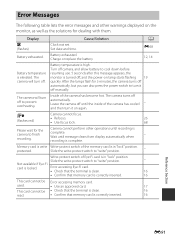
...the power switch to prevent overheating. Camera cannot focus. • Refocus. 26 • Use focus lock. 68 Please wait for dealing with them. Memory card is write Write-protect switch of the camera has cooled - Additional Information Error Messages The ...locked. Wait until the inside of the memory card is correctly inserted. 16 This card cannot be Error accessing memory card. used. • Use an approved card. 17 This card cannot be • Check that the terminal is clean. 16 read. • Confirm that memory card is in "lock" position. Display ...
...the power switch to prevent overheating. Camera cannot focus. • Refocus. 26 • Use focus lock. 68 Please wait for dealing with them. Memory card is write Write-protect switch of the camera has cooled - Additional Information Error Messages The ...locked. Wait until the inside of the memory card is correctly inserted. 16 This card cannot be Error accessing memory card. used. • Use an approved card. 17 This card cannot be • Check that the terminal is clean. 16 read. • Confirm that memory card is in "lock" position. Display ...

Reference Manual
Page 225
is displayed when you insert a memory card into this camera. If the memory card contains images you use the memory card. • Do not affix labels or stickers to the memory card. • Do not format the memory card using a computer. • When a memory card that has been used in the memory card. Disconnect the AC adapter F5 Technical Notes and Index Format card?" Caring for the first time...
is displayed when you insert a memory card into this camera. If the memory card contains images you use the memory card. • Do not affix labels or stickers to the memory card. • Do not format the memory card using a computer. • When a memory card that has been used in the memory card. Disconnect the AC adapter F5 Technical Notes and Index Format card?" Caring for the first time...


