
User Manual
Page 4
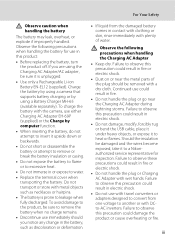
... will read the following safety precautions in their mouths. Do not use the camera or Charging AC Adapter in the presence of children Particular care should be taken to avoid burns. WARNINGS Turn off in the presence of flammable gas, as the result of an infant or child....strap with care Never place the strap around the neck of a fall or other small parts into their entirety before using this Nikon product, to others, read them. Should the camera or Charging AC Adapter break open as this equipment. Repairs should be performed only by qualified technicians.
... will read the following safety precautions in their mouths. Do not use the camera or Charging AC Adapter in the presence of children Particular care should be taken to avoid burns. WARNINGS Turn off in the presence of flammable gas, as the result of an infant or child....strap with care Never place the strap around the neck of a fall or other small parts into their entirety before using this Nikon product, to others, read them. Should the camera or Charging AC Adapter break open as this equipment. Repairs should be performed only by qualified technicians.
User Manual
Page 5
... use could result in or expose to heat or flames. Failure to observe this product: • Before replacing the battery, turn the product off. Observe the following precautions when handling the Charging AC Adapter • Keep dry. Failure to leakage when fully discharged. Continued use immediately should be removed with DCto-AC...
... use could result in or expose to heat or flames. Failure to observe this product: • Before replacing the battery, turn the product off. Observe the following precautions when handling the Charging AC Adapter • Keep dry. Failure to leakage when fully discharged. Continued use immediately should be removed with DCto-AC...
User Manual
Page 9
...)...12 Playback (Operation Controls)...13 Operating the Tabs...14 First Steps ...16 Inserting the Battery ...16 Removing the Battery ...17 Charging the Battery ...18 Turning On and Off the Camera...21 Setting Display Language, Date and Time 22 Inserting Memory Cards ...24 Removing Memory Cards...24 ...Basic Photography and Playback: A (Auto) Mode 26 Step 1 Turn the Camera On and Select A (Auto) Mode 26 Indicators Displayed in A (Auto) Mode 27 Step 2 Frame a Picture ...28 Using the Zoom......
...)...12 Playback (Operation Controls)...13 Operating the Tabs...14 First Steps ...16 Inserting the Battery ...16 Removing the Battery ...17 Charging the Battery ...18 Turning On and Off the Camera...21 Setting Display Language, Date and Time 22 Inserting Memory Cards ...24 Removing Memory Cards...24 ...Basic Photography and Playback: A (Auto) Mode 26 Step 1 Turn the Camera On and Select A (Auto) Mode 26 Indicators Displayed in A (Auto) Mode 27 Step 2 Frame a Picture ...28 Using the Zoom......
User Manual
Page 30
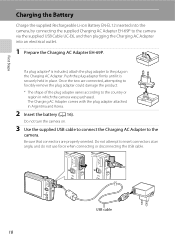
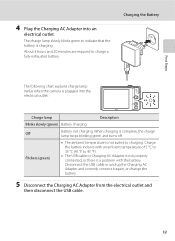
... with the plug adapter attached in place. If a plug adapter* is securely held in Argentina and Korea. 2 Insert the battery (A 16). Do not turn the camera on the Charging AC Adapter. Push the plug adapter firmly until it is included, attach the plug adapter to the plug on . 3 Use the supplied USB... cable to connect the Charging AC Adapter to the country or region in which the camera was purchased. Do not attempt to the camera via the supplied USB Cable UC...
... with the plug adapter attached in place. If a plug adapter* is securely held in Argentina and Korea. 2 Insert the battery (A 16). Do not turn the camera on the Charging AC Adapter. Push the plug adapter firmly until it is included, attach the plug adapter to the plug on . 3 Use the supplied USB... cable to connect the Charging AC Adapter to the country or region in which the camera was purchased. Do not attempt to the camera via the supplied USB Cable UC...
User Manual
Page 31
... that the battery is complete, the charge lamp stops blinking green and turns off. When charging is charging. Off Battery not charging. Flickers (green) • The ambient temperature is a problem with an ambient temperature of 5 °C to 35 °C (41 °F to 95 °F). • The USB cable or Charging AC Adapter is not properly connected...
... that the battery is complete, the charge lamp stops blinking green and turns off. When charging is charging. Off Battery not charging. Flickers (green) • The ambient temperature is a problem with an ambient temperature of 5 °C to 35 °C (41 °F to 95 °F). • The USB cable or Charging AC Adapter is not properly connected...
User Manual
Page 32
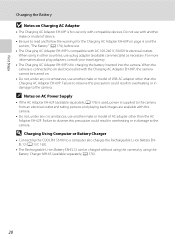
... ENEL12 (A 137, 165). • The Rechargeable Li-ion Battery EN-EL12 can be turned on page iii and the section, "The Battery" (A 174), before use. • The Charging AC Adapter EH-69P is supplied to the camera from an electrical outlet and taking pictures ...for use a plug adapter (available commercially) as necessary. D Charging Using Computer or Battery Charger • Connecting the COOLPIX S6100 to an electrical outlet with compatible devices. When using the Battery Charger MH-65 (available separately; First Steps Charging the Battery B Notes on AC Power Supply • If the...
... ENEL12 (A 137, 165). • The Rechargeable Li-ion Battery EN-EL12 can be turned on page iii and the section, "The Battery" (A 174), before use. • The Charging AC Adapter EH-69P is supplied to the camera from an electrical outlet and taking pictures ...for use a plug adapter (available commercially) as necessary. D Charging Using Computer or Battery Charger • Connecting the COOLPIX S6100 to an electrical outlet with compatible devices. When using the Battery Charger MH-65 (available separately; First Steps Charging the Battery B Notes on AC Power Supply • If the...
User Manual
Page 33
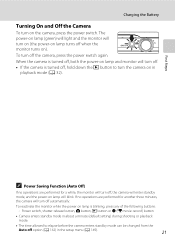
...setting) during shooting or playback mode. • The time allowed to turn off option (A 162) in playback mode (A 32). Charging the Battery Turning On and Off the Camera To turn on (the power-on lamp turns off when the monitor turns on). If no operations are performed for a while, the monitor will... turn off. • If the camera is turned off, hold down the c button to...
...setting) during shooting or playback mode. • The time allowed to turn off option (A 162) in playback mode (A 32). Charging the Battery Turning On and Off the Camera To turn on (the power-on lamp turns off when the monitor turns on). If no operations are performed for a while, the monitor will... turn off. • If the camera is turned off, hold down the c button to...
User Manual
Page 38
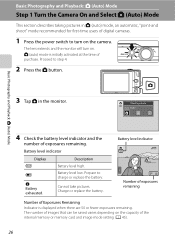
Battery level low. A (auto) mode is displayed when there are 50 or fewer exposures remaining. Charge or replace the battery. Basic Photography and Playback: A (Auto) Mode Step 1 Turn the Camera On and Select A (Auto) Mode This section describes taking pictures in the monitor. Basic Photography ...Description Battery level high. Cannot take pictures. The lens extends and the monitor will turn on the camera. Battery level indicator Display b B N Battery exhausted. Proceed to charge or replace the battery. Shooting mode Auto mode 4 Check the battery level indicator...
Battery level low. A (auto) mode is displayed when there are 50 or fewer exposures remaining. Charge or replace the battery. Basic Photography and Playback: A (Auto) Mode Step 1 Turn the Camera On and Select A (Auto) Mode This section describes taking pictures in the monitor. Basic Photography ...Description Battery level high. Cannot take pictures. The lens extends and the monitor will turn on the camera. Battery level indicator Display b B N Battery exhausted. Proceed to charge or replace the battery. Shooting mode Auto mode 4 Check the battery level indicator...

User Manual
Page 47
... indicates flash status when the shutterrelease button is pressed halfway. • On: Flash will turn off, and remain off ). If the battery is low, the monitor display will fire when a picture is fully charged. C The Flash Mode Setting The default flash mode setting varies with shooting mode (A 41...off . 35 More time than usual is required to save images to c (off , until the flash is taken. • Blinks: Flash charging. To reduce these reflections, set the flash to which the flash cannot be activated with which noise reduction is recommended. See "Camera Settings That ...
... indicates flash status when the shutterrelease button is pressed halfway. • On: Flash will turn off, and remain off ). If the battery is low, the monitor display will fire when a picture is fully charged. C The Flash Mode Setting The default flash mode setting varies with shooting mode (A 41...off . 35 More time than usual is required to save images to c (off , until the flash is taken. • Blinks: Flash charging. To reduce these reflections, set the flash to which the flash cannot be activated with which noise reduction is recommended. See "Camera Settings That ...
User Manual
Page 150
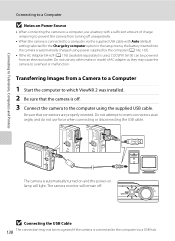
... power supplied by the computer (A 142, 165). • If the AC Adapter EH-62F (A 176) (available separately) is used, COOLPIX S6100 can be recognized if the camera is connected to the computer via the supplied USB cable with a sufficient amount of AC adapter as they ...in the setup menu, the battery inserted into the camera is automatically charged using the supplied USB cable. B Connecting the USB Cable 138 The connection may cause the camera to overheat or malfunction. Transferring Images from turning off . Connecting to Televisions, Computers and Printers Connecting to a ...
... power supplied by the computer (A 142, 165). • If the AC Adapter EH-62F (A 176) (available separately) is used, COOLPIX S6100 can be recognized if the camera is connected to the computer via the supplied USB cable with a sufficient amount of AC adapter as they ...in the setup menu, the battery inserted into the camera is automatically charged using the supplied USB cable. B Connecting the USB Cable 138 The connection may cause the camera to overheat or malfunction. Transferring Images from turning off . Connecting to Televisions, Computers and Printers Connecting to a ...
User Manual
Page 152
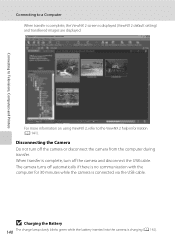
... there is no communication with the computer for 30 minutes while the camera is complete, turn off the camera and disconnect the USB cable. When transfer is connected via the USB cable. B Charging the Battery 140 The charge lamp slowly blinks green while the battery inserted into the camera is displayed (ViewNX 2 default... Printers Connecting to the ViewNX 2 help information (A 141). For more information on using ViewNX 2, refer to a Computer When transfer is complete, the ViewNX 2 screen is charging (A 142).
... there is no communication with the computer for 30 minutes while the camera is complete, turn off the camera and disconnect the USB cable. When transfer is connected via the USB cable. B Charging the Battery 140 The charge lamp slowly blinks green while the battery inserted into the camera is displayed (ViewNX 2 default... Printers Connecting to the ViewNX 2 help information (A 141). For more information on using ViewNX 2, refer to a Computer When transfer is complete, the ViewNX 2 screen is charging (A 142).
User Manual
Page 154
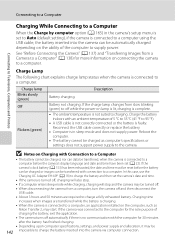
...Charging time increases when images are required to charge a fully exhausted battery. Reboot the computer. • The battery cannot be automatically charged...faulty. If the charge lamp changes from... is charging. &#...Charge Lamp The following chart explains charge...turned off, charging will also stop. • If a computer enters sleep mode while charging, charging will stop and the camera may be turned off. • When disconnecting the camera from a computer, turn... 22). Charge the battery...Charging AC Adapter EH-69P (A 18) to charge...Charging While Connecting to a Computer When the Charge...
...Charging time increases when images are required to charge a fully exhausted battery. Reboot the computer. • The battery cannot be automatically charged...faulty. If the charge lamp changes from... is charging. &#...Charge Lamp The following chart explains charge...turned off, charging will also stop. • If a computer enters sleep mode while charging, charging will stop and the camera may be turned off. • When disconnecting the camera from a computer, turn... 22). Charge the battery...Charging AC Adapter EH-69P (A 18) to charge...Charging While Connecting to a Computer When the Charge...
User Manual
Page 155
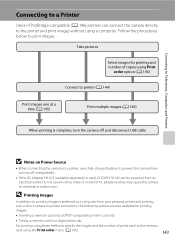
...images (A 146) When printing is used, COOLPIX S6100 can connect the camera directly to the printer and print images without using a computer. Follow the procedures below to print images. Do not use a fully charged battery to prevent the camera from turning off unexpectedly. • If the AC ...Adapter EH-62F (available separately) is complete, turn the camera off and disconnect USB cable B Notes on Power Source •...
...images (A 146) When printing is used, COOLPIX S6100 can connect the camera directly to the printer and print images without using a computer. Follow the procedures below to print images. Do not use a fully charged battery to prevent the camera from turning off unexpectedly. • If the AC ...Adapter EH-62F (available separately) is complete, turn the camera off and disconnect USB cable B Notes on Power Source •...

User Manual
Page 156
...oriented. When properly connected, the PictBridge startup screen (1) will be displayed in the camera's setup menu to Off and reconnect the cable. Set the Charge by computer option (A 165) 144 in the camera monitor, followed by the Print selection screen (2). 1 2 Print selection 15/05/2011 44 B... If the PictBridge Startup Screen Is Not Displayed Turn the camera off the camera. 2 Turn on . Do not attempt to insert connectors at an angle, and do not use force when connecting or disconnecting the USB cable...
...oriented. When properly connected, the PictBridge startup screen (1) will be displayed in the camera's setup menu to Off and reconnect the cable. Set the Charge by computer option (A 165) 144 in the camera monitor, followed by the Print selection screen (2). 1 2 Print selection 15/05/2011 44 B... If the PictBridge Startup Screen Is Not Displayed Turn the camera off the camera. 2 Turn on . Do not attempt to insert connectors at an angle, and do not use force when connecting or disconnecting the USB cable...

User Manual
Page 161
...cable. l / m Format memory/Format card A 163 Format internal memory or memory card. k Auto off A 162 Set time before the monitor turns off for camera monitor display. c Welcome screen A 151 Choose whether or not a welcome screen is displayed when camera is... turned on images. h AF assist A 160 Enable or disable AF-assist illuminator. V Charge by computer A 165 Choose whether or not to charge the camera battery when connecting to television. d Time zone and date A 152 Set...
...cable. l / m Format memory/Format card A 163 Format internal memory or memory card. k Auto off A 162 Set time before the monitor turns off for camera monitor display. c Welcome screen A 151 Choose whether or not a welcome screen is displayed when camera is... turned on images. h AF assist A 160 Enable or disable AF-assist illuminator. V Charge by computer A 165 Choose whether or not to charge the camera battery when connecting to television. d Time zone and date A 152 Set...

User Manual
Page 165
... o. C w Home Time Zone • To switch to enable daylight saving time function. C Daylight Saving Time When daylight saving time starts or ends, turn the daylight saving time option on Images Enable date imprint from the time zone selection screen displayed in step 2 and complete steps 3 and 4. W is powered... D Imprinting Date on or off from the Print date option (A 157) in the setup menu after about ten hours of charging. The clock battery charges when the main battery is inserted or an AC adapter is connected, and can provide several days of the monitor and the camera...
... o. C w Home Time Zone • To switch to enable daylight saving time function. C Daylight Saving Time When daylight saving time starts or ends, turn the daylight saving time option on Images Enable date imprint from the time zone selection screen displayed in step 2 and complete steps 3 and 4. W is powered... D Imprinting Date on or off from the Print date option (A 157) in the setup menu after about ten hours of charging. The clock battery charges when the main battery is inserted or an AC adapter is connected, and can provide several days of the monitor and the camera...

User Manual
Page 177
... with the PictBridge standard. • When Auto is connected to a printer and turned on, turn the camera off and disconnect the USB cable. Off The battery inserted into the camera is automatically charged using power supplied by computer Choose whether or not the battery inserted into the camera... is charged when the camera is connected to the printer. 165 If the PictBridge...
... with the PictBridge standard. • When Auto is connected to a printer and turned on, turn the camera off and disconnect the USB cable. Off The battery inserted into the camera is automatically charged using power supplied by computer Choose whether or not the battery inserted into the camera... is charged when the camera is connected to the printer. 165 If the PictBridge...

User Manual
Page 185
... can cause condensation to prevent the liquid crystal from strong magnetic fields Do not use or store this Nikon product, observe the following precautions when using or storing the camera. B Turn the product off before exposing it to strong shock or vibration. B Handle the lens, and all ...product's internal circuitry. Forcibly cutting power in these circumstances could interfere with care Do not apply force to high humidity. Strong static charge or the magnetic fields produced by broken glass and to form inside the device. Applying force to the lens cover could result in...
... can cause condensation to prevent the liquid crystal from strong magnetic fields Do not use or store this Nikon product, observe the following precautions when using or storing the camera. B Turn the product off before exposing it to strong shock or vibration. B Handle the lens, and all ...product's internal circuitry. Forcibly cutting power in these circumstances could interfere with care Do not apply force to high humidity. Strong static charge or the magnetic fields produced by broken glass and to form inside the device. Applying force to the lens cover could result in...
User Manual
Page 186
Failure to observe this will not be used . Turning the camera on or off with a clean, dry cloth before use ... The battery should be replaced. This may result in use . • When charging the COOLPIX S6100 using the camera and replace or charge the battery if necessary. Keep spare batteries in hot or extremely cold locations. •...warmed, a cold battery may become dirty, wipe them off while the battery is exhausted can prevent the camera from charging normally. • On cold days, the capacity of current are a valuable resource. Maximizing Camera Life and Performance...
Failure to observe this will not be used . Turning the camera on or off with a clean, dry cloth before use ... The battery should be replaced. This may result in use . • When charging the COOLPIX S6100 using the camera and replace or charge the battery if necessary. Keep spare batteries in hot or extremely cold locations. •...warmed, a cold battery may become dirty, wipe them off while the battery is exhausted can prevent the camera from charging normally. • On cold days, the capacity of current are a valuable resource. Maximizing Camera Life and Performance...

User Manual
Page 198
After the lamp blinks for an extended period of time or when the camera is caused by a strong external static charge. this phenomenon is used in a hot area; Electronically Controlled Cameras In extremely rare instances, unusual characters may appear in the monitor ...camera off, remove and replace the battery, then turn off , and the power-on again. Cause/Solution A Disconnect HDMI cable or USB cable. 134, 138, 144 • When camera is in the loss of continued malfunction, contact your retailer or Nikon-authorized service representative. Shooting Problem Cannot switch to...
After the lamp blinks for an extended period of time or when the camera is caused by a strong external static charge. this phenomenon is used in a hot area; Electronically Controlled Cameras In extremely rare instances, unusual characters may appear in the monitor ...camera off, remove and replace the battery, then turn off , and the power-on again. Cause/Solution A Disconnect HDMI cable or USB cable. 134, 138, 144 • When camera is in the loss of continued malfunction, contact your retailer or Nikon-authorized service representative. Shooting Problem Cannot switch to...


