User Manual
Page 9
... ...16 Removing the Battery ...17 Charging the Battery ...18 Turning On and Off the Camera...21 Setting Display Language, Date and Time 22 Inserting Memory Cards ...24 Removing Memory Cards...24 Basic Photography and Playback: A (Auto) Mode 26 Step 1 Turn the Camera On and Select A (Auto) Mode 26 Indicators Displayed in A (Auto) Mode 27...
... ...16 Removing the Battery ...17 Charging the Battery ...18 Turning On and Off the Camera...21 Setting Display Language, Date and Time 22 Inserting Memory Cards ...24 Removing Memory Cards...24 Basic Photography and Playback: A (Auto) Mode 26 Step 1 Turn the Camera On and Select A (Auto) Mode 26 Indicators Displayed in A (Auto) Mode 27...

User Manual
Page 12
......159 h AF Assist...160 u Digital Zoom ...160 i Sound Settings...161 k Auto Off ...162 l/m Format Memory/Format Card 163 n Language...164 H TV Settings ...164 V Charge by Computer ...165 d Blink Warning...166 p Reset All ...168 h Copy (Copy Between Internal Memory and Memory Card 171 r Firmware Version ...172 Caring for the Camera...173 Maximizing Camera Life and Performance...
......159 h AF Assist...160 u Digital Zoom ...160 i Sound Settings...161 k Auto Off ...162 l/m Format Memory/Format Card 163 n Language...164 H TV Settings ...164 V Charge by Computer ...165 d Blink Warning...166 p Reset All ...168 h Copy (Copy Between Internal Memory and Memory Card 171 r Firmware Version ...172 Caring for the Camera...173 Maximizing Camera Life and Performance...
User Manual
Page 13
... display. Symbols and Conventions To make it . Notations • Secure Digital (SD) memory card, SDHC memory card, and SDXC memory card are referred to as the "default setting." • The names of menu items displayed in the camera monitor, and the names of a Nikon COOLPIX S6100 digital camera. This icon indicates that should be read before using the camera...
... display. Symbols and Conventions To make it . Notations • Secure Digital (SD) memory card, SDHC memory card, and SDXC memory card are referred to as the "default setting." • The names of menu items displayed in the camera monitor, and the names of a Nikon COOLPIX S6100 digital camera. This icon indicates that should be read before using the camera...
User Manual
Page 15
... is governed by a company. Be sure to be punishable by law. • Items prohibited by public agencies and private groups, ID cards and tickets, such as memory cards or builtin camera memory does not completely erase the original image data. The copying or reproduction of paper money, coins, or securities which are to also...
... is governed by a company. Be sure to be punishable by law. • Items prohibited by public agencies and private groups, ID cards and tickets, such as memory cards or builtin camera memory does not completely erase the original image data. The copying or reproduction of paper money, coins, or securities which are to also...

User Manual
Page 17
Introduction Parts of the Camera 11 1 10 2 3 4 9 5 1 b (e movie-record) button....... 6, 128 2 Charge lamp 19, 165 Flash lamp 35 3 A (shooting mode) button 6, 41 4 c (playback) button 6, 32, 87 5 Battery-chamber/ memory card slot cover 16, 24 8 76 6 Battery latch 16, 17 7 Battery chamber 16 8 Memory card slot 24 9 Tripod socket 10 Monitor/touch panel 10 11 Speaker 112, 133 5
Introduction Parts of the Camera 11 1 10 2 3 4 9 5 1 b (e movie-record) button....... 6, 128 2 Charge lamp 19, 165 Flash lamp 35 3 A (shooting mode) button 6, 41 4 c (playback) button 6, 32, 87 5 Battery-chamber/ memory card slot cover 16, 24 8 76 6 Battery latch 16, 17 7 Battery chamber 16 8 Memory card slot 24 9 Tripod socket 10 Monitor/touch panel 10 11 Speaker 112, 133 5

User Manual
Page 28
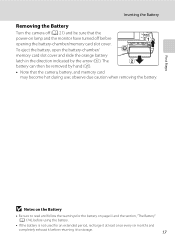
... battery upside down or backwards could damage the camera. Use the battery to check that the battery is running low (A 18). 1 Open the battery-chamber/memory card slot cover. 2 Insert the battery. When the battery is fully inserted, the battery latch will lock it in the direction indicated by the arrow (1) and... (supplied) into the camera. • Charge the battery before the first use or when the battery is in the correct orientation. 3 Close the battery-chamber/memory card slot cover. 16 Be sure to push up the orange battery latch in place.
... battery upside down or backwards could damage the camera. Use the battery to check that the battery is running low (A 18). 1 Open the battery-chamber/memory card slot cover. 2 Insert the battery. When the battery is fully inserted, the battery latch will lock it in the direction indicated by the arrow (1) and... (supplied) into the camera. • Charge the battery before the first use or when the battery is in the correct orientation. 3 Close the battery-chamber/memory card slot cover. 16 Be sure to push up the orange battery latch in place.
User Manual
Page 29
... cover and slide the orange battery latch in the direction indicated by hand (2). • Note that the camera, battery, and memory card may become hot during use; The battery can then be sure that the power-on page iii and the section, "The Battery" (A 174), before using ... (A 21) and be removed by the arrow (1). Inserting the Battery Removing the Battery Turn the camera off before returning it before opening the battery-chamber/memory card slot cover.
... cover and slide the orange battery latch in the direction indicated by hand (2). • Note that the camera, battery, and memory card may become hot during use; The battery can then be sure that the power-on page iii and the section, "The Battery" (A 174), before using ... (A 21) and be removed by the arrow (1). Inserting the Battery Removing the Battery Turn the camera off before returning it before opening the battery-chamber/memory card slot cover.
User Manual
Page 36
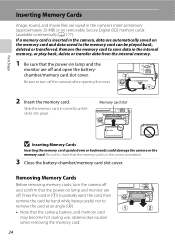
.... 3 Close the battery-chamber/memory card slot cover. Removing Memory Cards Before removing memory cards, turn off . Slide the memory card in the camera's internal memory (approximately 20 MB) or on removable Secure Digital (SD) memory cards (available commercially; Be sure to check that the camera, battery, and memory card may become hot during use; If a memory card is in the internal memory, or play back...
.... 3 Close the battery-chamber/memory card slot cover. Removing Memory Cards Before removing memory cards, turn off . Slide the memory card in the camera's internal memory (approximately 20 MB) or on removable Secure Digital (SD) memory cards (available commercially; Be sure to check that the camera, battery, and memory card may become hot during use; If a memory card is in the internal memory, or play back...
User Manual
Page 37
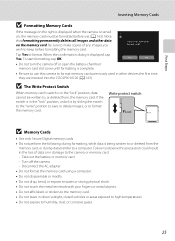
...this camera to format memory cards previously used in damage to the camera or memory card: - Format card? Ye s No • Do not turn the camera off the camera - Note that formatting permanently deletes all images and other devices the first time they are inserted into the COOLPIX S6100 (A 163). Be sure... to make copies of data or in other data on , the memory card must be written to, or deleted from the memory card, or during data transfer to a computer. Tap Yes to format. ...
...this camera to format memory cards previously used in damage to the camera or memory card: - Format card? Ye s No • Do not turn the camera off the camera - Note that formatting permanently deletes all images and other devices the first time they are inserted into the COOLPIX S6100 (A 163). Be sure... to make copies of data or in other data on , the memory card must be written to, or deleted from the memory card, or during data transfer to a computer. Tap Yes to format. ...
User Manual
Page 38
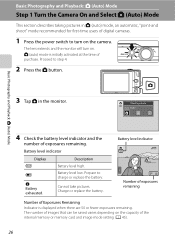
... taking pictures in the monitor. Charge or replace the battery. Shooting mode Auto mode 4 Check the battery level indicator and the number of the internal memory or memory card and image mode setting (A 45). 26 Battery level low. A (auto) mode is displayed when there are 50 or fewer exposures remaining. Cannot take pictures...
... taking pictures in the monitor. Charge or replace the battery. Shooting mode Auto mode 4 Check the battery level indicator and the number of the internal memory or memory card and image mode setting (A 45). 26 Battery level low. A (auto) mode is displayed when there are 50 or fewer exposures remaining. Cannot take pictures...

User Manual
Page 39
... it back on it, activates (A 30). • Shooting settings (A 44) can be changed by simply tapping a subject in the camera's internal memory (approximately 20 MB). Shooting mode A displayed in the setup menu (A 149) for more information. 27 D Vibration Reduction and Motion Detection See Vibration ...; When the camera is inserted in the camera, C does not appear and images will be saved in the monitor (A 47). When a memory card is pointed at a human face, the face detection function, with which the camera automatically detects that you do not release the shutter accidently. ...
... it back on it, activates (A 30). • Shooting settings (A 44) can be changed by simply tapping a subject in the camera's internal memory (approximately 20 MB). Shooting mode A displayed in the setup menu (A 149) for more information. 27 D Vibration Reduction and Motion Detection See Vibration ...; When the camera is inserted in the camera, C does not appear and images will be saved in the monitor (A 47). When a memory card is pointed at a human face, the face detection function, with which the camera automatically detects that you do not release the shutter accidently. ...

User Manual
Page 40
... the camera to 12 faces can be displayed. Up to a tripod, be framed by the camera will be careful not to open the battery-chamber/memory card slot cover and tighten the tripod screw. • Set Vibration reduction (A 158) to Off when using a tripod to the camera will not be detected. Frame...
... the camera to 12 faces can be displayed. Up to a tripod, be framed by the camera will be careful not to open the battery-chamber/memory card slot cover and tighten the tripod screw. • Set Vibration reduction (A 158) to Off when using a tripod to the camera will not be detected. Frame...
User Manual
Page 42
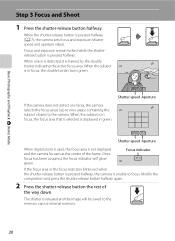
... aperture value). When a face is detected, it is unable to the camera. Once focus has been acquired, the focus indicator will be saved to the memory card or internal memory. 30 Basic Photography and Playback: A (Auto) Mode Step 3 Focus and Shoot 1 Press the shutter-release button halfway.
... aperture value). When a face is detected, it is unable to the camera. Once focus has been acquired, the focus indicator will be saved to the memory card or internal memory. 30 Basic Photography and Playback: A (Auto) Mode Step 3 Focus and Shoot 1 Press the shutter-release button halfway.
User Manual
Page 43
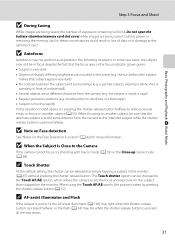
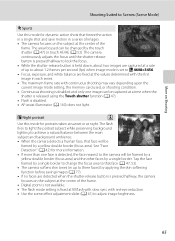
... be released by pressing the shutter-release button (A 52). Cutting power or removing the memory card in these circumstances could result in front of exposures remaining will blink. Do not open the battery-chamber/memory card slot cover while images are included in a skyscraper) • Subject is moving rapidly ...B When the Subject Is Close to the Camera If the camera cannot focus, try pressing the shutter-release button halfway to the camera or card. When using the Touch AF/AE option, the picture is very dark • Objects of data or in the monitor (A 47) without ...
... be released by pressing the shutter-release button (A 52). Cutting power or removing the memory card in these circumstances could result in front of exposures remaining will blink. Do not open the battery-chamber/memory card slot cover while images are included in a skyscraper) • Subject is moving rapidly ...B When the Subject Is Close to the Camera If the camera cannot focus, try pressing the shutter-release button halfway to the camera or card. When using the Touch AF/AE option, the picture is very dark • Objects of data or in the monitor (A 47) without ...

User Manual
Page 44
...monitor back on Playback" (A 82) or "Editing Images" (A 113) for more to stop at low resolution while being read from the memory card or internal memory. Tap the monitor to skip past . JPG 33 Images may be rotated and displayed automatically according to the orientation of the monitor or ...more information. C When the Monitor Has Turned Off to turn the camera on the memory card are played back. Display the previous image Display the next image 15/05/2011 15 : 30 0003. Press the A button, b (e movie-...
...monitor back on Playback" (A 82) or "Editing Images" (A 113) for more to stop at low resolution while being read from the memory card or internal memory. Tap the monitor to skip past . JPG 33 Images may be rotated and displayed automatically according to the orientation of the monitor or ...more information. C When the Monitor Has Turned Off to turn the camera on the memory card are played back. Display the previous image Display the next image 15/05/2011 15 : 30 0003. Press the A button, b (e movie-...

User Manual
Page 57
... cannot be enabled. The compression ratio is approximately 1:4. 4608 × 3456 Best choice in which images will be used and the capacity of the internal memory or memory card. More on Shooting Adjusting the A (Auto) Mode setting A Image Mode (Changing Image Quality/Image Size) A (auto) M Tap the bottom tab M Image mode Image mode...
... cannot be enabled. The compression ratio is approximately 1:4. 4608 × 3456 Best choice in which images will be used and the capacity of the internal memory or memory card. More on Shooting Adjusting the A (Auto) Mode setting A Image Mode (Changing Image Quality/Image Size) A (auto) M Tap the bottom tab M Image mode Image mode...
User Manual
Page 58
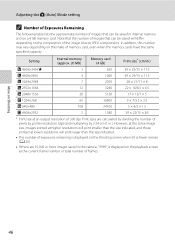
... 2048×1536 N 1024×768 O 640×480 l 4608×2592 Internal memory (approx. 20 MB) 1 3 7 12 20 65 108 5 Memory card (4 GB) 620 1060 2050 3240 5120 16400 24100 1380 Print size* (cm/in internal memory and on the make of the image (due to JPEG compression). However, at the same... of pixels by printer resolution (dpi) and multiplying by dividing the number of frames. In addition, this number may vary depending on a 4 GB memory card. Note that the number of images that can be saved will print larger than the size indicated, and those printed at an output resolution of...
... 2048×1536 N 1024×768 O 640×480 l 4608×2592 Internal memory (approx. 20 MB) 1 3 7 12 20 65 108 5 Memory card (4 GB) 620 1060 2050 3240 5120 16400 24100 1380 Print size* (cm/in internal memory and on the make of the image (due to JPEG compression). However, at the same... of pixels by printer resolution (dpi) and multiplying by dividing the number of frames. In addition, this number may vary depending on a 4 GB memory card. Note that the number of images that can be saved will print larger than the size indicated, and those printed at an output resolution of...
User Manual
Page 68
... an image mode setting of about 30 fps and arranges them in a single image. BSS may vary depending upon the current image mode setting, the memory card used, or shooting condition. • There are captured at a rate of up to about two images are functions with the flash off or the camera...
... an image mode setting of about 30 fps and arranges them in a single image. BSS may vary depending upon the current image mode setting, the memory card used, or shooting condition. • There are captured at a rate of up to about two images are functions with the flash off or the camera...
User Manual
Page 77
...). • If no faces are captured at fill flash with slow sync with continuous shooting may vary depending upon the current image mode setting, the memory card used, or shooting condition. • Continuous shooting is disabled and only one face is detected, the face nearest to the camera will be framed by...
...). • If no faces are captured at fill flash with slow sync with continuous shooting may vary depending upon the current image mode setting, the memory card used, or shooting condition. • Continuous shooting is disabled and only one face is detected, the face nearest to the camera will be framed by...

User Manual
Page 103
... favorite pictures mode deletes not only the image from the album, but also deletes the original image from favorites? Remove this picture from the internal memory or memory card permanently (A 94). 91
... favorite pictures mode deletes not only the image from the album, but also deletes the original image from favorites? Remove this picture from the internal memory or memory card permanently (A 94). 91


