

User Manual
Page 3
Introduction First Steps Basic Photography and Playback: A (Auto) Mode More on Shooting More on Playback Editing Images Movie Recording and Playback Connecting to Televisions, Computers and Printers Basic Camera Setup Caring for the Camera Technical Notes and Index i
Introduction First Steps Basic Photography and Playback: A (Auto) Mode More on Shooting More on Playback Editing Images Movie Recording and Playback Connecting to Televisions, Computers and Printers Basic Camera Setup Caring for the Camera Technical Notes and Index i

User Manual
Page 4
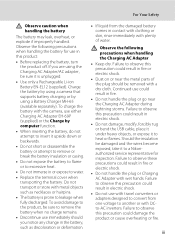
... a fall or other small parts into their entirety before using this Nikon product, to a Nikonauthorized service representative for inspection, after unplugging the product and/or removing the battery. Should the camera or Charging AC Adapter break open as this could result in the ...icon marks warnings, information that should be taken to prevent infants from the camera or Charging AC Adapter, unplug the Charging AC Adapter and remove the battery immediately, taking care to a Nikon-authorized service representative for inspection. WARNINGS Turn off in the presence of an...
... a fall or other small parts into their entirety before using this Nikon product, to a Nikonauthorized service representative for inspection, after unplugging the product and/or removing the battery. Should the camera or Charging AC Adapter break open as this could result in the ...icon marks warnings, information that should be taken to prevent infants from the camera or Charging AC Adapter, unplug the Charging AC Adapter and remove the battery immediately, taking care to a Nikon-authorized service representative for inspection. WARNINGS Turn off in the presence of an...
User Manual
Page 5
...; The battery is unplugged. • Use only a Rechargeable Li-ion Battery EN-EL12 (supplied). Do not transport or store with the camera, use with travel converters or adapters designed to another or with wet hands. Failure to water. • Replace the terminal cover when transporting...rinse immediately with plenty of the plug should you are using a Battery Charger MH-65 (available separately). Charge the battery by using a camera that supports battery charging or by computer function. • When inserting the battery, do not attempt to insert it to a Nikonauthorized service ...
...; The battery is unplugged. • Use only a Rechargeable Li-ion Battery EN-EL12 (supplied). Do not transport or store with the camera, use with travel converters or adapters designed to another or with wet hands. Failure to water. • Replace the terminal cover when transporting...rinse immediately with plenty of the plug should you are using a Battery Charger MH-65 (available separately). Charge the battery by using a camera that supports battery charging or by computer function. • When inserting the battery, do not attempt to insert it to a Nikonauthorized service ...

User Manual
Page 6
...pinched by broken glass and to prevent liquid crystal from the subject. Follow the instructions of the hospital. The electromagnetic waves given out by Nikon for the purpose, to maintain compliance with this device should not be played back on an audio CD player could cause hearing loss or ... For Your Safety Use appropriate cables When connecting cables to the input and output jacks, use only the cables provided or sold by this camera may disrupt the electronic systems of the airplane or the instruments of the hospital when using inside an airplane or the hospital Turn the power...
...pinched by broken glass and to prevent liquid crystal from the subject. Follow the instructions of the hospital. The electromagnetic waves given out by Nikon for the purpose, to maintain compliance with this device should not be played back on an audio CD player could cause hearing loss or ... For Your Safety Use appropriate cables When connecting cables to the input and output jacks, use only the cables provided or sold by this camera may disrupt the electronic systems of the airplane or the instruments of the hospital when using inside an airplane or the hospital Turn the power...
User Manual
Page 9
...Operating the Tabs...14 First Steps ...16 Inserting the Battery ...16 Removing the Battery ...17 Charging the Battery ...18 Turning On and Off the Camera...21 Setting Display Language, Date and Time 22 Inserting Memory Cards ...24 Removing Memory Cards...24 Basic Photography and Playback: A (Auto) Mode... 26 Step 1 Turn the Camera On and Select A (Auto) Mode 26 Indicators Displayed in A (Auto) Mode 27 Step 2 Frame a Picture ...28 Using the Zoom...29 Step 3 ...
...Operating the Tabs...14 First Steps ...16 Inserting the Battery ...16 Removing the Battery ...17 Charging the Battery ...18 Turning On and Off the Camera...21 Setting Display Language, Date and Time 22 Inserting Memory Cards ...24 Removing Memory Cards...24 Basic Photography and Playback: A (Auto) Mode... 26 Step 1 Turn the Camera On and Select A (Auto) Mode 26 Indicators Displayed in A (Auto) Mode 27 Step 2 Frame a Picture ...28 Using the Zoom...29 Step 3 ...
User Manual
Page 10
...Balance (Adjusting Hue) ...57 Shooting Suited to Scenes (Scene Mode 59 Selecting a Scene Mode...59 Shooting in the Scene Mode Selected by the Camera (Scene Auto Selector)...62 Selecting a Scene Mode to Take Pictures (Features 64 Using the Draw Option...72 Shooting for a Panorama...74 Shooting ...Smiling Faces (Smart Portrait Mode 76 Changing the Smart Portrait Mode Settings 78 Camera Settings That Cannot Be Applied Simultaneously 80 More on Playback...82 Operations in Full-frame Playback Mode 82 Viewing Multiple Images: Thumbnail ...
...Balance (Adjusting Hue) ...57 Shooting Suited to Scenes (Scene Mode 59 Selecting a Scene Mode...59 Shooting in the Scene Mode Selected by the Camera (Scene Auto Selector)...62 Selecting a Scene Mode to Take Pictures (Features 64 Using the Draw Option...72 Shooting for a Panorama...74 Shooting ...Smiling Faces (Smart Portrait Mode 76 Changing the Smart Portrait Mode Settings 78 Camera Settings That Cannot Be Applied Simultaneously 80 More on Playback...82 Operations in Full-frame Playback Mode 82 Viewing Multiple Images: Thumbnail ...

User Manual
Page 11
... Y Wind Noise Reduction...132 Movie Playback ...133 Connecting to Televisions, Computers and Printers 134 Connecting to a TV ...134 Connecting to a Computer...137 Before Connecting the Camera...137 Transferring Images from a Camera to a Computer 138 Charging While Connecting to a Computer 142 ix
... Y Wind Noise Reduction...132 Movie Playback ...133 Connecting to Televisions, Computers and Printers 134 Connecting to a TV ...134 Connecting to a Computer...137 Before Connecting the Camera...137 Transferring Images from a Camera to a Computer 138 Charging While Connecting to a Computer 142 ix

User Manual
Page 12
... a Printer...144 Printing Images One at a Time...145 Printing Multiple Images...146 Basic Camera Setup ...149 Setup Menu...149 c Welcome Screen...151 d Time Zone and Date...152 e Monitor Settings ...155 f Print Date (Imprinting Date and Time 157 g ... ...165 d Blink Warning...166 p Reset All ...168 h Copy (Copy Between Internal Memory and Memory Card 171 r Firmware Version ...172 Caring for the Camera...173 Maximizing Camera Life and Performance 173 Cleaning ...175 Storage ...175 Technical Notes and Index...176 Optional Accessories ...176 Approved Memory Cards ...177 File and Folder Names...
... a Printer...144 Printing Images One at a Time...145 Printing Multiple Images...146 Basic Camera Setup ...149 Setup Menu...149 c Welcome Screen...151 d Time Zone and Date...152 e Monitor Settings ...155 f Print Date (Imprinting Date and Time 157 g ... ...165 d Blink Warning...166 p Reset All ...168 h Copy (Copy Between Internal Memory and Memory Card 171 r Firmware Version ...172 Caring for the Camera...173 Maximizing Camera Life and Performance 173 Cleaning ...175 Storage ...175 Technical Notes and Index...176 Optional Accessories ...176 Approved Memory Cards ...177 File and Folder Names...
User Manual
Page 13
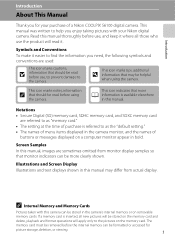
... C that more clearly shown. Illustrations and Screen Display Illustrations and text displays shown in the camera's internal memory or on removable memory cards. If a memory card is available elsewhere in the camera monitor, and the names of a Nikon COOLPIX S6100 digital camera. Symbols and Conventions To make it . This manual was written to find the information...
... C that more clearly shown. Illustrations and Screen Display Illustrations and text displays shown in the camera's internal memory or on removable memory cards. If a memory card is available elsewhere in the camera monitor, and the names of a Nikon COOLPIX S6100 digital camera. Symbols and Conventions To make it . This manual was written to find the information...
User Manual
Page 14
... complex electronic circuitry. THE USE OF NON-NIKON ELECTRONIC ACCESSORIES COULD DAMAGE THE CAMERA AND MAY VOID YOUR NIKON WARRANTY. Before Taking Important Pictures Before taking the camera on digital imaging and photography. Nikon will not be available from the use of... separately). 2 Holographic seal: Identifies this product may be held liable for contact information: http://imaging.nikon.com/ Use Only Nikon Brand Electronic Accessories Nikon COOLPIX cameras are engineered and proven to operate within the operational and safety requirements of this product. • ...
... complex electronic circuitry. THE USE OF NON-NIKON ELECTRONIC ACCESSORIES COULD DAMAGE THE CAMERA AND MAY VOID YOUR NIKON WARRANTY. Before Taking Important Pictures Before taking the camera on digital imaging and photography. Nikon will not be available from the use of... separately). 2 Holographic seal: Identifies this product may be held liable for contact information: http://imaging.nikon.com/ Use Only Nikon Brand Electronic Accessories Nikon COOLPIX cameras are engineered and proven to operate within the operational and safety requirements of this product. • ...
User Manual
Page 15
... and then completely refill it with copyright notices The copying or reproduction of copyrighted creative works such as memory cards or builtin camera memory does not completely erase the original image data. Ensuring the privacy of empty sky). Care should be recovered from being...a foreign country is prohibited. Disposing of Data Storage Devices Please note that was obtained, the copying or reproduction of a scanner, digital camera or other device may be provided for the welcome screen (A 151). Before discarding a data storage device or transferring ownership to property when...
... and then completely refill it with copyright notices The copying or reproduction of copyrighted creative works such as memory cards or builtin camera memory does not completely erase the original image data. Ensuring the privacy of empty sky). Care should be recovered from being...a foreign country is prohibited. Disposing of Data Storage Devices Please note that was obtained, the copying or reproduction of a scanner, digital camera or other device may be provided for the welcome screen (A 151). Before discarding a data storage device or transferring ownership to property when...
User Manual
Page 16
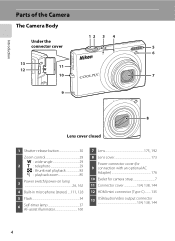
Introduction Parts of the Camera The Camera Body Under the 12 3 4 connector cover 5 6 13 11 12 10 7 9 8 Lens cover closed 1 Shutter-release button 30 Zoom control 29 f : wide-angle 29 2 g : telephoto 29 h : ... 37 AF-assist illuminator 160 7 Lens 175, 192 8 Lens cover 173 Power connector cover (for 9 connection with an optional AC Adapter 176 10 Eyelet for camera strap 7 11 Connector cover 134, 138, 144 12 HDMI mini connector (Type C) ......... 135 13 USB/audio/video output connector 134, 138, 144 4
Introduction Parts of the Camera The Camera Body Under the 12 3 4 connector cover 5 6 13 11 12 10 7 9 8 Lens cover closed 1 Shutter-release button 30 Zoom control 29 f : wide-angle 29 2 g : telephoto 29 h : ... 37 AF-assist illuminator 160 7 Lens 175, 192 8 Lens cover 173 Power connector cover (for 9 connection with an optional AC Adapter 176 10 Eyelet for camera strap 7 11 Connector cover 134, 138, 144 12 HDMI mini connector (Type C) ......... 135 13 USB/audio/video output connector 134, 138, 144 4

User Manual
Page 17
Introduction Parts of the Camera 11 1 10 2 3 4 9 5 1 b (e movie-record) button....... 6, 128 2 Charge lamp 19, 165 Flash lamp 35 3 A (shooting mode) button 6, 41 4 c (playback) button 6, 32, 87 5 Battery-chamber/ memory card slot cover 16, 24 8 76 6 Battery latch 16, 17 7 Battery chamber 16 8 Memory card slot 24 9 Tripod socket 10 Monitor/touch panel 10 11 Speaker 112, 133 5
Introduction Parts of the Camera 11 1 10 2 3 4 9 5 1 b (e movie-record) button....... 6, 128 2 Charge lamp 19, 165 Flash lamp 35 3 A (shooting mode) button 6, 41 4 c (playback) button 6, 32, 87 5 Battery-chamber/ memory card slot cover 16, 24 8 76 6 Battery latch 16, 17 7 Battery chamber 16 8 Memory card slot 24 9 Tripod socket 10 Monitor/touch panel 10 11 Speaker 112, 133 5
User Manual
Page 18
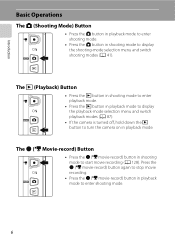
...The A (Shooting Mode) Button • Press the A button in playback mode to enter shooting mode. • Press the A button in shooting mode to turn the camera on in playback mode. The c (Playback) Button • Press the c button in shooting mode to enter playback mode. • Press the c button in playback mode... to display the playback-mode selection menu and switch playback modes (A 87). • If the camera is turned off, hold down the c button to display the shooting-mode selection menu and switch shooting modes (A 41).
...The A (Shooting Mode) Button • Press the A button in playback mode to enter shooting mode. • Press the A button in shooting mode to turn the camera on in playback mode. The c (Playback) Button • Press the c button in shooting mode to enter playback mode. • Press the c button in playback mode... to display the playback-mode selection menu and switch playback modes (A 87). • If the camera is turned off, hold down the c button to display the shooting-mode selection menu and switch shooting modes (A 41).
User Manual
Page 19
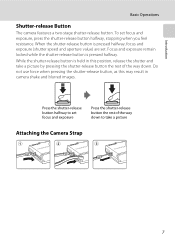
... set. Do not use force when pressing the shutter-release button, as this position, release the shutter and take a picture Attaching the Camera Strap 7 When the shutter-release button is pressed halfway. Press the shutter-release button halfway to take a picture by pressing the shutter-... rest of the way down. While the shutter-release button is held in this may result in camera shake and blurred images. Introduction Basic Operations Shutter-release Button The camera features a two-stage shutter-release button. To set focus and exposure Press the shutter-release button...
... set. Do not use force when pressing the shutter-release button, as this position, release the shutter and take a picture Attaching the Camera Strap 7 When the shutter-release button is pressed halfway. Press the shutter-release button halfway to take a picture by pressing the shutter-... rest of the way down. While the shutter-release button is held in this may result in camera shake and blurred images. Introduction Basic Operations Shutter-release Button The camera features a two-stage shutter-release button. To set focus and exposure Press the shutter-release button...

User Manual
Page 21
...touch panel. Stroke the display too lightly - B Notes on Tapping/Dragging • When tapping, the camera may not respond if your finger too quickly • When tapping the touch panel, the camera may fall. 9 Operating the Touch Panel Introduction B Notes on the Touch Panel • Do not ...Bounce your finger over too short a distance - Drag your finger off the strap and the camera may not respond properly if something else is left in one place too long. • When dragging, the camera may slip off the display - Move your finger is touching another area of the following:...
...touch panel. Stroke the display too lightly - B Notes on Tapping/Dragging • When tapping, the camera may not respond if your finger too quickly • When tapping the touch panel, the camera may fall. 9 Operating the Touch Panel Introduction B Notes on the Touch Panel • Do not ...Bounce your finger over too short a distance - Drag your finger off the strap and the camera may not respond properly if something else is left in one place too long. • When dragging, the camera may slip off the display - Move your finger is touching another area of the following:...
User Manual
Page 22
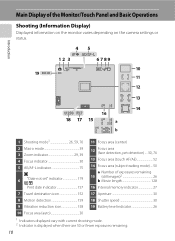
... (subject tracking mode)....50 a Number of the Monitor/Touch Panel and Basic Operations Shooting (Information Display) Displayed information on the monitor varies depending on the camera settings or status.
... (subject tracking mode)....50 a Number of the Monitor/Touch Panel and Basic Operations Shooting (Information Display) Displayed information on the monitor varies depending on the camera settings or status.

User Manual
Page 23
Introduction Main Display of the Monitor/Touch Panel and Basic Operations Shooting (Operation Controls) Tap the following controls to change settings. • Tap the tab to display the setting controls and shooting settings can be changed (A 14). • The controls available and indicators displayed vary with shooting mode and the current camera settings. 1 2 4 3 1 Tab 14 2 Scene effect adjustment slider 61 3 Setting controls 15 4 Touch AF/AE cancellation 52 11
Introduction Main Display of the Monitor/Touch Panel and Basic Operations Shooting (Operation Controls) Tap the following controls to change settings. • Tap the tab to display the setting controls and shooting settings can be changed (A 14). • The controls available and indicators displayed vary with shooting mode and the current camera settings. 1 2 4 3 1 Tab 14 2 Scene effect adjustment slider 61 3 Setting controls 15 4 Touch AF/AE cancellation 52 11

User Manual
Page 24
.... • The displayed information varies depending on the image played back and the current camera status. • Indicators below are displayed when turning on the camera or operating the camera, and turn off after a few seconds elapse (A 155). 12 3 4567 15/05/2011 15 : 30 12 0003. JPG 8 9 33 3/ 3 9999 /9999 a 11 10...
.... • The displayed information varies depending on the image played back and the current camera status. • Indicators below are displayed when turning on the camera or operating the camera, and turn off after a few seconds elapse (A 155). 12 3 4567 15/05/2011 15 : 30 12 0003. JPG 8 9 33 3/ 3 9999 /9999 a 11 10...

User Manual
Page 25
Introduction Main Display of the Monitor/Touch Panel and Basic Operations Playback (Operation Controls) Tap the following controls to change settings. • Tap the tab to display the setting controls and delete or edit images (A 14). • The controls available and indicators displayed vary with the image played back and the current camera settings. 1 2 3 1 Movie playback 133 2 Tab 14 3 Setting controls 15 13
Introduction Main Display of the Monitor/Touch Panel and Basic Operations Playback (Operation Controls) Tap the following controls to change settings. • Tap the tab to display the setting controls and delete or edit images (A 14). • The controls available and indicators displayed vary with the image played back and the current camera settings. 1 2 3 1 Movie playback 133 2 Tab 14 3 Setting controls 15 13


