

User Manual
Page 4
... strap with care Never place the strap around the neck of children Particular care should be read before using this equipment. WARNINGS Turn off in the event of malfunction Should you notice smoke or an unusual smell coming from putting the battery or other accident, take...internal parts of a fall or other small parts into their entirety before using this Nikon product, to prevent possible injury. After removing or disconnecting the power source, take the product to a Nikon-authorized service representative for inspection. Do not use the camera or Charging AC Adapter in...
... strap with care Never place the strap around the neck of children Particular care should be read before using this equipment. WARNINGS Turn off in the event of malfunction Should you notice smoke or an unusual smell coming from putting the battery or other accident, take...internal parts of a fall or other small parts into their entirety before using this Nikon product, to prevent possible injury. After removing or disconnecting the power source, take the product to a Nikon-authorized service representative for inspection. Do not use the camera or Charging AC Adapter in...
User Manual
Page 5
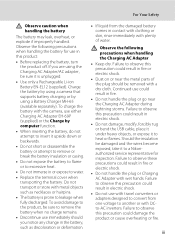
... change in this precaution could damage the product or cause overheating or fire. To avoid damage to observe this product: • Before replacing the battery, turn the product off.
... change in this precaution could damage the product or cause overheating or fire. To avoid damage to observe this product: • Before replacing the battery, turn the product off.

User Manual
Page 6
...the hospital. For Your Safety Use appropriate cables When connecting cables to the input and output jacks, use only the cables provided or sold by Nikon for the purpose, to prevent liquid crystal from the subject. CD-ROMs The CD-ROMs supplied with this device should not be played back on... observe this camera may disrupt the electronic systems of the airplane or the instruments of the hospital when using inside an airplane or the hospital Turn the power off while inside the airplane during take off or landing. Playing CDROMs on audio CD equipment. iv Avoid contact with liquid crystal ...
...the hospital. For Your Safety Use appropriate cables When connecting cables to the input and output jacks, use only the cables provided or sold by Nikon for the purpose, to prevent liquid crystal from the subject. CD-ROMs The CD-ROMs supplied with this device should not be played back on... observe this camera may disrupt the electronic systems of the airplane or the instruments of the hospital when using inside an airplane or the hospital Turn the power off while inside the airplane during take off or landing. Playing CDROMs on audio CD equipment. iv Avoid contact with liquid crystal ...
User Manual
Page 7
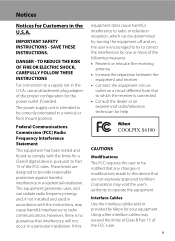
... CAREFULLY FOLLOW THESE INSTRUCTIONS For connection to a supply not in a residential installation. However, there is intended to be determined by turning the equipment off and on, the user is encouraged to try to Part 15 of the FCC rules. CAUTIONS Modifications The FCC ... This equipment generates, uses, and can be correctly orientated in a particular installation. Interface Cables Use the interface cables sold or provided by Nikon Corporation may void the user's authority to which can radiate radio frequency energy and, if not installed and used in the U.S.A. SAVE THESE...
... CAREFULLY FOLLOW THESE INSTRUCTIONS For connection to a supply not in a residential installation. However, there is intended to be determined by turning the equipment off and on, the user is encouraged to try to Part 15 of the FCC rules. CAUTIONS Modifications The FCC ... This equipment generates, uses, and can be correctly orientated in a particular installation. Interface Cables Use the interface cables sold or provided by Nikon Corporation may void the user's authority to which can radiate radio frequency energy and, if not installed and used in the U.S.A. SAVE THESE...
User Manual
Page 9
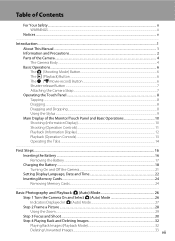
...Operation Controls)...13 Operating the Tabs...14 First Steps ...16 Inserting the Battery ...16 Removing the Battery ...17 Charging the Battery ...18 Turning On and Off the Camera...21 Setting Display Language, Date and Time 22 Inserting Memory Cards ...24 Removing Memory Cards...24 Basic Photography ...and Playback: A (Auto) Mode 26 Step 1 Turn the Camera On and Select A (Auto) Mode 26 Indicators Displayed in A (Auto) Mode 27 Step 2 Frame a Picture ...28 Using the Zoom...29...
...Operation Controls)...13 Operating the Tabs...14 First Steps ...16 Inserting the Battery ...16 Removing the Battery ...17 Charging the Battery ...18 Turning On and Off the Camera...21 Setting Display Language, Date and Time 22 Inserting Memory Cards ...24 Removing Memory Cards...24 Basic Photography ...and Playback: A (Auto) Mode 26 Step 1 Turn the Camera On and Select A (Auto) Mode 26 Indicators Displayed in A (Auto) Mode 27 Step 2 Frame a Picture ...28 Using the Zoom...29...
User Manual
Page 18
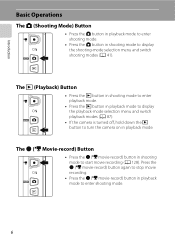
... the c button in playback mode to display the playback-mode selection menu and switch playback modes (A 87). • If the camera is turned off, hold down the c button to turn the camera on in playback mode to enter shooting mode. 6 The b (e Movie-record) Button • Press the b (e movie-record) button in shooting...
... the c button in playback mode to display the playback-mode selection menu and switch playback modes (A 87). • If the camera is turned off, hold down the c button to turn the camera on in playback mode to enter shooting mode. 6 The b (e Movie-record) Button • Press the b (e movie-record) button in shooting...

User Manual
Page 24
... and camera status. • The displayed information varies depending on the image played back and the current camera status. • Indicators below are displayed when turning on the setting for shooting. 3 The icon for the selected album or category in auto sort mode currently selected in playback mode is displayed. 12... 101 12 Battery level indicator 26 1 Indicators displayed vary with current playback mode. 2 Indicators displayed vary depending on the camera or operating the camera, and turn off after a few seconds elapse (A 155). 12 3 4567 15/05/2011 15 : 30 12 0003.
... and camera status. • The displayed information varies depending on the image played back and the current camera status. • Indicators below are displayed when turning on the setting for shooting. 3 The icon for the selected album or category in auto sort mode currently selected in playback mode is displayed. 12... 101 12 Battery level indicator 26 1 Indicators displayed vary with current playback mode. 2 Indicators displayed vary depending on the camera or operating the camera, and turn off after a few seconds elapse (A 155). 12 3 4567 15/05/2011 15 : 30 12 0003.
User Manual
Page 29
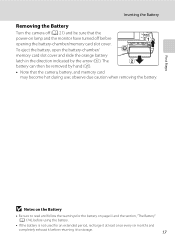
... six months and completely exhaust it to read and follow the warnings for the battery on lamp and the monitor have turned off (A 21) and be removed by the arrow (1). Inserting the Battery Removing the Battery Turn the camera off before returning it before opening the battery-chamber/memory card slot cover.
... six months and completely exhaust it to read and follow the warnings for the battery on lamp and the monitor have turned off (A 21) and be removed by the arrow (1). Inserting the Battery Removing the Battery Turn the camera off before returning it before opening the battery-chamber/memory card slot cover.
User Manual
Page 30
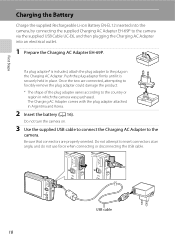
... supplied Rechargeable Li-ion Battery EN-EL12 inserted into the camera, by connecting the supplied Charging AC Adapter EH-69P to the camera. Do not turn the camera on the Charging AC Adapter. Once the two are properly oriented. Push the plug adapter firmly until it is included, attach the plug...
... supplied Rechargeable Li-ion Battery EN-EL12 inserted into the camera, by connecting the supplied Charging AC Adapter EH-69P to the camera. Do not turn the camera on the Charging AC Adapter. Once the two are properly oriented. Push the plug adapter firmly until it is included, attach the plug...
User Manual
Page 31
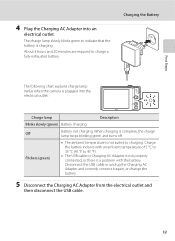
... an electrical outlet. Charging the Battery The following chart explains charge lamp status when the camera is complete, the charge lamp stops blinking green and turns off. Off Battery not charging. About 3 hours and 20 minutes are required to charging. The charge lamp slowly blinks green to 95 °F). • The...
... an electrical outlet. Charging the Battery The following chart explains charge lamp status when the camera is complete, the charge lamp stops blinking green and turns off. Off Battery not charging. About 3 hours and 20 minutes are required to charging. The charge lamp slowly blinks green to 95 °F). • The...
User Manual
Page 32
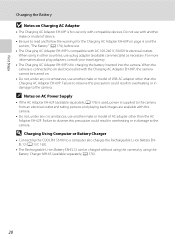
... damage to a computer also charges the Rechargeable Li-ion Battery ENEL12 (A 137, 165). • The Rechargeable Li-ion Battery EN-EL12 can be turned on AC Power Supply • If the AC Adapter EH-62F (available separately; A 176) is used, power is supplied to the camera from...The Charging AC Adapter EH-69P is for charging the battery inserted into the camera. D Charging Using Computer or Battery Charger • Connecting the COOLPIX S6100 to the camera. For more information about plug adapters, consult your travel agency. • The Charging AC Adapter EH-69P is for use only...
... damage to a computer also charges the Rechargeable Li-ion Battery ENEL12 (A 137, 165). • The Rechargeable Li-ion Battery EN-EL12 can be turned on AC Power Supply • If the AC Adapter EH-62F (available separately; A 176) is used, power is supplied to the camera from...The Charging AC Adapter EH-69P is for charging the battery inserted into the camera. D Charging Using Computer or Battery Charger • Connecting the COOLPIX S6100 to the camera. For more information about plug adapters, consult your travel agency. • The Charging AC Adapter EH-69P is for use only...
User Manual
Page 33
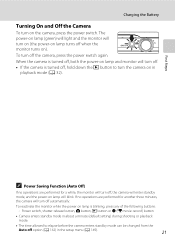
.... • If the camera is blinking, press any of the following buttons: - Charging the Battery Turning On and Off the Camera To turn on (the power-on lamp turns off when the monitor turns on). First Steps C Power Saving Function (Auto Off) If no operations are performed for another three ...minutes, the camera will turn off, the camera will turn off automatically. To turn the camera on lamp will turn off the camera, press the power switch again. When the camera is turned off, both the power-on lamp is turned off, hold down the c button to ...
.... • If the camera is blinking, press any of the following buttons: - Charging the Battery Turning On and Off the Camera To turn on (the power-on lamp turns off when the monitor turns on). First Steps C Power Saving Function (Auto Off) If no operations are performed for another three ...minutes, the camera will turn off, the camera will turn off automatically. To turn the camera on lamp will turn off the camera, press the power switch again. When the camera is turned off, both the power-on lamp is turned off, hold down the c button to ...

User Manual
Page 34
... or C to view other language options. First Steps Setting Display Language, Date and Time A language-selection dialog is displayed the first time the camera is turned on. 1 Press the power switch to select your home time zone (A 154) and tap I. Language Čeština Dansk Deutsch Español Fran... time is in effect, tap p in the time zone selection screen displayed in step 4 to the previous screen. Tap J to return to turn on lamp turns off the daylight saving time option, tap p again. 22 Home time zone London Casablanca To cancel setting the time zone and date, tap No...
... or C to view other language options. First Steps Setting Display Language, Date and Time A language-selection dialog is displayed the first time the camera is turned on. 1 Press the power switch to select your home time zone (A 154) and tap I. Language Čeština Dansk Deutsch Español Fran... time is in effect, tap p in the time zone selection screen displayed in step 4 to the previous screen. Tap J to return to turn on lamp turns off the daylight saving time option, tap p again. 22 Home time zone London Casablanca To cancel setting the time zone and date, tap No...
User Manual
Page 36
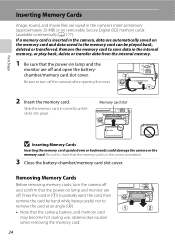
... batterychamber/memory card slot cover. Slide the memory card in correctly until it clicks into place. Removing Memory Cards Before removing memory cards, turn off . Be sure to turn the camera off and confirm that the power-on lamp and monitor are off the camera before opening the cover. 2 Insert the memory...
... batterychamber/memory card slot cover. Slide the memory card in correctly until it clicks into place. Removing Memory Cards Before removing memory cards, turn off . Be sure to turn the camera off and confirm that the power-on lamp and monitor are off the camera before opening the cover. 2 Insert the memory...
User Manual
Page 37
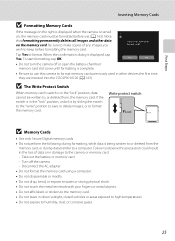
... Cards B Formatting Memory Cards If the message on the right is displayed when the camera is not formatted. Ye s No • Do not turn the camera off the camera - Write protect switch B Memory Cards • Use only Secure Digital memory cards. • Do not perform the ...Turn off or open the battery-chamber/ memory card slot cover until formatting is being written to or deleted from , the memory card. Tap Yes to humidity, dust, or corrosive gases. 25 Note that formatting permanently deletes all images and other devices the first time they are inserted into the COOLPIX S6100...
... Cards B Formatting Memory Cards If the message on the right is displayed when the camera is not formatted. Ye s No • Do not turn the camera off the camera - Write protect switch B Memory Cards • Use only Secure Digital memory cards. • Do not perform the ...Turn off or open the battery-chamber/ memory card slot cover until formatting is being written to or deleted from , the memory card. Tap Yes to humidity, dust, or corrosive gases. 25 Note that formatting permanently deletes all images and other devices the first time they are inserted into the COOLPIX S6100...
User Manual
Page 38
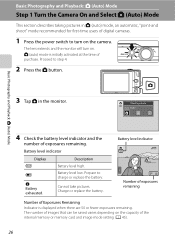
... of exposures remaining Number of Exposures Remaining Indicator is initially activated at the time of digital cameras. 1 Press the power switch to turn on the capacity of the internal memory or memory card and image mode setting (A 45). 26 Proceed to charge or replace the battery...step 4. 2 Press the A button. The number of exposures remaining. Charge or replace the battery. Basic Photography and Playback: A (Auto) Mode Step 1 Turn the Camera On and Select A (Auto) Mode This section describes taking pictures in the monitor. A (auto) mode is displayed when there are 50 or...
... of exposures remaining Number of Exposures Remaining Indicator is initially activated at the time of digital cameras. 1 Press the power switch to turn on the capacity of the internal memory or memory card and image mode setting (A 45). 26 Proceed to charge or replace the battery...step 4. 2 Press the A button. The number of exposures remaining. Charge or replace the battery. Basic Photography and Playback: A (Auto) Mode Step 1 Turn the Camera On and Select A (Auto) Mode This section describes taking pictures in the monitor. A (auto) mode is displayed when there are 50 or...

User Manual
Page 39
..., the face detection function, with which the camera automatically detects that face and focuses on . - Basic Photography and Playback: A (Auto) Mode Step 1 Turn the Camera On and Select A (Auto) Mode Indicators Displayed in A (Auto) Mode Motion detection icon The effects of camera shake are reduced. Take care ...that you do not release the shutter accidently. When the monitor has turned off in standby mode to turn it back on it, activates (A 30). • Shooting settings (A 44) can be released by tapping the left or bottom...
..., the face detection function, with which the camera automatically detects that face and focuses on . - Basic Photography and Playback: A (Auto) Mode Step 1 Turn the Camera On and Select A (Auto) Mode Indicators Displayed in A (Auto) Mode Motion detection icon The effects of camera shake are reduced. Take care ...that you do not release the shutter accidently. When the monitor has turned off in standby mode to turn it back on it, activates (A 30). • Shooting settings (A 44) can be released by tapping the left or bottom...

User Manual
Page 40
... screw. • Set Vibration reduction (A 158) to Off when using a tripod to a tripod, be framed by a single border. 3 When taking pictures in portrait ("tall") orientation, turn the camera so that the intended subject is detected, the face closest to 12 faces can be displayed. If more than people, or framing a subject...
... screw. • Set Vibration reduction (A 158) to Off when using a tripod to a tripod, be framed by a single border. 3 When taking pictures in portrait ("tall") orientation, turn the camera so that the intended subject is detected, the face closest to 12 faces can be displayed. If more than people, or framing a subject...
User Manual
Page 41
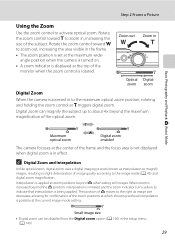
... g to zoom out, increasing the area visible in , increasing the size of the monitor when the zoom control is initiated and the zoom indicator turns yellow to activate optical zoom. Step 2 Frame a Picture Using the Zoom Use the zoom control to indicate that interpolation is being applied. Rotate the... zoom control toward f to zoom in the frame. • The zoom position is set at the maximum wideangle position when the camera is turned on. • A zoom indicator is displayed at the top of the subject. Small image size • Digital zoom can magnify the subject up ...
... g to zoom out, increasing the area visible in , increasing the size of the monitor when the zoom control is initiated and the zoom indicator turns yellow to activate optical zoom. Step 2 Frame a Picture Using the Zoom Use the zoom control to indicate that interpolation is being applied. Rotate the... zoom control toward f to zoom in the frame. • The zoom position is set at the maximum wideangle position when the camera is turned on. • A zoom indicator is displayed at the top of the subject. Small image size • Digital zoom can magnify the subject up ...
User Manual
Page 42
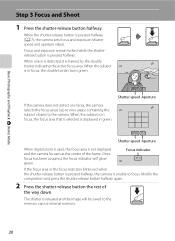
... and the image will glow green. When the subject is in focus, the focus area that is selected is displayed in focus, the double border turns green. 1/ 250 F3.7 Shutter speed Aperture If the camera does not detect any faces, the camera selects the focus areas (up to nine areas) containing...
... and the image will glow green. When the subject is in focus, the focus area that is selected is displayed in focus, the double border turns green. 1/ 250 F3.7 Shutter speed Aperture If the camera does not detect any faces, the camera selects the focus areas (up to nine areas) containing...


