
User Manual
Page 11
... 115 I D-Lighting: Enhancing Brightness and Contrast 116 P Stretch: Stretching Pictures...117 O Perspective Control: Adjusting a Sense of Perspective 118 i Filter Effects (Digital Filter) ...119 j Glamour Retouch...121 g Small Picture: Making Smaller Pictures 123 o Crop: Creating a Cropped Copy...124 Movie Recording and Playback 126 Recording... Connecting to Televisions, Computers and Printers 132 Connecting to a TV...132 Connecting to a Computer...134 Before Connecting the Camera...134 Transferring Images from a Camera to a Computer 135 Charging While Connecting to a Computer 139 ix
... 115 I D-Lighting: Enhancing Brightness and Contrast 116 P Stretch: Stretching Pictures...117 O Perspective Control: Adjusting a Sense of Perspective 118 i Filter Effects (Digital Filter) ...119 j Glamour Retouch...121 g Small Picture: Making Smaller Pictures 123 o Crop: Creating a Cropped Copy...124 Movie Recording and Playback 126 Recording... Connecting to Televisions, Computers and Printers 132 Connecting to a TV...132 Connecting to a Computer...134 Before Connecting the Camera...134 Transferring Images from a Camera to a Computer 135 Charging While Connecting to a Computer 139 ix
User Manual
Page 12
... a Time ...142 Printing Multiple Pictures ...143 Basic Camera Setup ...146 Setup Menu...146 Operating the Setup Menu ...147 c Welcome Screen...148 d Time Zone and Date...149 e Monitor Settings ...152 f Print Date (Imprinting Date and Time 153 w Electronic VR...154 U Motion Detection ...155 h AF Assist ...156 u Digital Zoom ...156 i Sound Settings ...157 k Auto...
... a Time ...142 Printing Multiple Pictures ...143 Basic Camera Setup ...146 Setup Menu...146 Operating the Setup Menu ...147 c Welcome Screen...148 d Time Zone and Date...149 e Monitor Settings ...152 f Print Date (Imprinting Date and Time 153 w Electronic VR...154 U Motion Detection ...155 h AF Assist ...156 u Digital Zoom ...156 i Sound Settings ...157 k Auto...
User Manual
Page 13
... removed before the internal memory can be more A information is referred to as "memory card." • The setting at the time of a Nikon COOLPIX S4100 digital camera. This icon marks notes, information C that more clearly shown. Screen Samples In this manual, images are used: This icon marks cautions, B ...or on the memory card. This icon marks tips, additional D information that monitor indicators can be formatted or accessed for your Nikon digital camera. If a memory card is inserted, all those who use the product will apply only to the pictures on removable memory ...
... removed before the internal memory can be more A information is referred to as "memory card." • The setting at the time of a Nikon COOLPIX S4100 digital camera. This icon marks notes, information C that more clearly shown. Screen Samples In this manual, images are used: This icon marks cautions, B ...or on the memory card. This icon marks tips, additional D information that monitor indicators can be formatted or accessed for your Nikon digital camera. If a memory card is inserted, all those who use the product will apply only to the pictures on removable memory ...
User Manual
Page 14
...NIKON ELECTRONIC ACCESSORIES COULD DAMAGE THE CAMERA AND MAY VOID YOUR NIKON WARRANTY. For more information about Nikon brand accessories, contact a local authorized Nikon dealer. Before Taking Important Pictures Before taking the camera on digital imaging and photography. Additional information may result from product malfunction. Holographic seal: Identifies this Nikon digital camera... the site below for contact information: http://imaging.nikon.com/ Use Only Nikon Brand Electronic Accessories Nikon COOLPIX cameras are engineered and proven to ongoing product support and...
...NIKON ELECTRONIC ACCESSORIES COULD DAMAGE THE CAMERA AND MAY VOID YOUR NIKON WARRANTY. For more information about Nikon brand accessories, contact a local authorized Nikon dealer. Before Taking Important Pictures Before taking the camera on digital imaging and photography. Additional information may result from product malfunction. Holographic seal: Identifies this Nikon digital camera... the site below for contact information: http://imaging.nikon.com/ Use Only Nikon Brand Electronic Accessories Nikon COOLPIX cameras are engineered and proven to ongoing product support and...
User Manual
Page 15
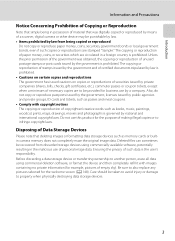
...certain copies and reproductions The government has issued cautions on copies or reproductions of securities issued by means of a scanner, digital camera or other device may be recovered from discarded storage devices using commercially available software, potentially resulting in a foreign country is... Before discarding a data storage device or transferring ownership to infringe copyright laws. Unless the prior permission of the government was digitally copied or reproduced by private companies (shares, bills, checks, gift certificates, etc.), commuter passes or coupon tickets, except ...
...certain copies and reproductions The government has issued cautions on copies or reproductions of securities issued by means of a scanner, digital camera or other device may be recovered from discarded storage devices using commercially available software, potentially resulting in a foreign country is... Before discarding a data storage device or transferring ownership to infringe copyright laws. Unless the prior permission of the government was digitally copied or reproduced by private companies (shares, bills, checks, gift certificates, etc.), commuter passes or coupon tickets, except ...

User Manual
Page 36
... card and data recorded to the memory card can be sure that the power-on lamp and the monitor are automatically stored on removable Secure Digital (SD) memory cards (available commercially; A 173). First Steps 2 Insert the memory card. Slide the memory card in the correct orientation. Removing Memory...or memory card. 24 Be sure to remove the card at an angle (2). • Note that the memory card is inserted in the camera, data are off and open the batterychamber/memory card slot cover. B Inserting Memory Cards Inserting the memory card upside down or backwards could damage...
... card and data recorded to the memory card can be sure that the power-on lamp and the monitor are automatically stored on removable Secure Digital (SD) memory cards (available commercially; A 173). First Steps 2 Insert the memory card. Slide the memory card in the correct orientation. Removing Memory...or memory card. 24 Be sure to remove the card at an angle (2). • Note that the memory card is inserted in the camera, data are off and open the batterychamber/memory card slot cover. B Inserting Memory Cards Inserting the memory card upside down or backwards could damage...
User Manual
Page 37
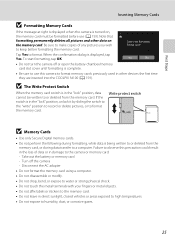
...When the confirmation dialog is not formatted. To start formatting, tap OK. Write protect switch B Memory Cards • Use only Secure Digital memory cards. • Do not perform the following during formatting, while data is being written to or deleted from the memory card. ...pictures and other devices the first time they are inserted into the COOLPIX S4100 (A 159). Card is displayed, tap Yes. First Steps Inserting Memory Cards B Formatting Memory Cards If the message at right is displayed when the camera is turned on the memory card. B The Write Protect Switch ...
...When the confirmation dialog is not formatted. To start formatting, tap OK. Write protect switch B Memory Cards • Use only Secure Digital memory cards. • Do not perform the following during formatting, while data is being written to or deleted from the memory card. ...pictures and other devices the first time they are inserted into the COOLPIX S4100 (A 159). Card is displayed, tap Yes. First Steps Inserting Memory Cards B Formatting Memory Cards If the message at right is displayed when the camera is turned on the memory card. B The Write Protect Switch ...
User Manual
Page 38
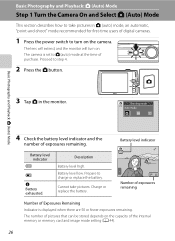
...(A 44). 26 Battery level low. The lens will extend, and the monitor will turn on the camera. Cannot take pictures in the monitor. The number of exposures remaining. The camera is displayed when there are 50 or fewer exposures remaining. Shooting mode Auto mode 4 Check the battery... and Playback: A (Auto) Mode 3 Tap A in A (auto) mode, an automatic, "point-and-shoot" mode recommended for first-time users of digital cameras. 1 Press the power switch to turn on the capacity of Exposures Remaining Indicator is set to charge or replace the battery. Proceed to step 4. 2 Press...
...(A 44). 26 Battery level low. The lens will extend, and the monitor will turn on the camera. Cannot take pictures in the monitor. The number of exposures remaining. The camera is displayed when there are 50 or fewer exposures remaining. Shooting mode Auto mode 4 Check the battery... and Playback: A (Auto) Mode 3 Tap A in A (auto) mode, an automatic, "point-and-shoot" mode recommended for first-time users of digital cameras. 1 Press the power switch to turn on the capacity of Exposures Remaining Indicator is set to charge or replace the battery. Proceed to step 4. 2 Press...

User Manual
Page 41
.... Basic Photography and Playback: A (Auto) Mode Maximum optical zoom Digital zoom enabled • The camera focuses at the current image mode setting. C Digital Zoom and Interpolation Unlike optical zoom, digital zoom uses a digital imaging process known as image size decreases, allowing for confirmation of the...Interpolation is being applied. To zoom in so that the area visible in effect. Zoom out Zoom in Optical zoom Digital zoom Digital Zoom When the camera is zoomed in the setup menu (A 146). 29 Step 2 Frame a Picture Using the Zoom Rotate the zoom control...
.... Basic Photography and Playback: A (Auto) Mode Maximum optical zoom Digital zoom enabled • The camera focuses at the current image mode setting. C Digital Zoom and Interpolation Unlike optical zoom, digital zoom uses a digital imaging process known as image size decreases, allowing for confirmation of the...Interpolation is being applied. To zoom in so that the area visible in effect. Zoom out Zoom in Optical zoom Digital zoom Digital Zoom When the camera is zoomed in the setup menu (A 146). 29 Step 2 Frame a Picture Using the Zoom Rotate the zoom control...
User Manual
Page 42
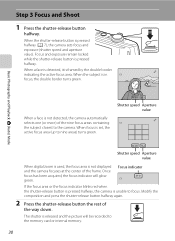
...has been acquired, the focus indicator will be recorded to the camera. When focus is set, the active focus area (up to nine areas) turns green. 1/ 250 F3.2 Shutter speed Aperture value 1/ 250 F3.2 Shutter speed Aperture value When digital zoom is used, the focus area is unable to focus. ...Focus indicator If the focus area or the focus indicator blinks red when the shutter-release button is pressed halfway, the camera is not displayed and the camera focuses at the center of the ...
...has been acquired, the focus indicator will be recorded to the camera. When focus is set, the active focus area (up to nine areas) turns green. 1/ 250 F3.2 Shutter speed Aperture value 1/ 250 F3.2 Shutter speed Aperture value When digital zoom is used, the focus area is unable to focus. ...Focus indicator If the focus area or the focus indicator blinks red when the shutter-release button is pressed halfway, the camera is not displayed and the camera focuses at the center of the ...
User Manual
Page 52
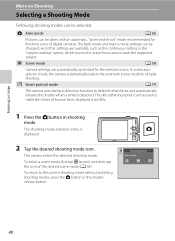
...smile is displayed. 2 Tap the desired shooting mode icon. Shooting mode Auto mode 40 The shooting-mode selection menu is detected. The camera enters the selected shooting mode. To return to the current shooting mode without switching shooting modes, press the A button or the shutterrelease ... The flash mode and macro mode settings can be taken with an automatic, "point-and-shoot" mode recommended for first-time users of digital cameras. A Auto mode A 26 Pictures can be changed, and other settings are automatically optimized for simpler shooting. More on Shooting More on ...
...smile is displayed. 2 Tap the desired shooting mode icon. Shooting mode Auto mode 40 The shooting-mode selection menu is detected. The camera enters the selected shooting mode. To return to the current shooting mode without switching shooting modes, press the A button or the shutterrelease ... The flash mode and macro mode settings can be taken with an automatic, "point-and-shoot" mode recommended for first-time users of digital cameras. A Auto mode A 26 Pictures can be changed, and other settings are automatically optimized for simpler shooting. More on Shooting More on ...

User Manual
Page 57
... 2. 1 Tap the bottom tab, tap q/s/r (touch shooting) (A 42), then tap q (touch shutter). Proceed to take a picture. Tap an area within X or a border displayed when the camera detects a face. 3 3 45 The shutter-release button can be taken by simply tapping the monitor. • Touch shutter is set by default. AUTO AUTO OFF... Monitor to Release the Shutter) A (auto) M Tap the bottom tab M q/s/r Touch shooting Pictures can also be used when the touch shutter option is selected. When digital zoom is tapped, the shutter cannot be released.
... 2. 1 Tap the bottom tab, tap q/s/r (touch shooting) (A 42), then tap q (touch shutter). Proceed to take a picture. Tap an area within X or a border displayed when the camera detects a face. 3 3 45 The shutter-release button can be taken by simply tapping the monitor. • Touch shutter is set by default. AUTO AUTO OFF... Monitor to Release the Shutter) A (auto) M Tap the bottom tab M q/s/r Touch shooting Pictures can also be used when the touch shutter option is selected. When digital zoom is tapped, the shutter cannot be released.

User Manual
Page 61
.... 1/ 250 F3.2 If the shutter-release button is pressed halfway while the focus area is not displayed, the camera focuses on Subject Tracking Mode • Digital zoom is working. • Adjust zoom position and apply shooting settings (A 42) before registering the subject. Press ...the shutter-release button halfway again to focus, the focus area will be enabled. See "Camera Settings that the focus area glows...
.... 1/ 250 F3.2 If the shutter-release button is pressed halfway while the focus area is not displayed, the camera focuses on Subject Tracking Mode • Digital zoom is working. • Adjust zoom position and apply shooting settings (A 42) before registering the subject. Press ...the shutter-release button halfway again to focus, the focus area will be enabled. See "Camera Settings that the focus area glows...

User Manual
Page 62
When digital zoom is tapped, X will be changed from Touch shutter (default setting) to Touch AF/AE. ... will be selected. AUTO AUTO OFF Touch shooting Touch AF/AE More on Shooting 2 Tap the subject at which the camera focuses. Press the shutter-release button halfway to lock focus and exposure for the area tapped, and press the shutter-release... button the rest of the way down to select the area at which the camera focuses. To cancel the focus area selection, tap a displayed at left 3 in the monitor to take the picture. 1...
When digital zoom is tapped, X will be changed from Touch shutter (default setting) to Touch AF/AE. ... will be selected. AUTO AUTO OFF Touch shooting Touch AF/AE More on Shooting 2 Tap the subject at which the camera focuses. Press the shutter-release button halfway to lock focus and exposure for the area tapped, and press the shutter-release... button the rest of the way down to select the area at which the camera focuses. To cancel the focus area selection, tap a displayed at left 3 in the monitor to take the picture. 1...
User Manual
Page 67
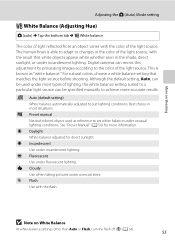
... matches the light source before shooting. More on White Balance At white-balance settings other than Auto or Flash, turn the flash off (c) (A 34). 55 Digital cameras can be specified manually to changes in most types of lighting, the white balance setting suited to a particular light source can mimic this adjustment by...
... matches the light source before shooting. More on White Balance At white-balance settings other than Auto or Flash, turn the flash off (c) (A 34). 55 Digital cameras can be specified manually to changes in most types of lighting, the white balance setting suited to a particular light source can mimic this adjustment by...
User Manual
Page 121
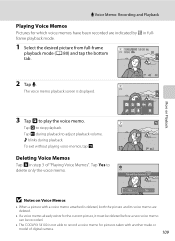
Tap Yes to delete only the voice memo. 6s File will be recorded. • The COOLPIX S4100 is not able to adjust playback volume. OK? JPG 44 2 Tap E. Tap X during playback. Deleting Voice Memos Tap E in fullframe playback mode. 1 Select the desired ... Playback 3 Tap R to stop playback. The voice memo playback screen is deleted, both the picture and its voice memo are indicated by p in step 3 of digital camera. 109
Tap Yes to delete only the voice memo. 6s File will be recorded. • The COOLPIX S4100 is not able to adjust playback volume. OK? JPG 44 2 Tap E. Tap X during playback. Deleting Voice Memos Tap E in fullframe playback mode. 1 Select the desired ... Playback 3 Tap R to stop playback. The voice memo playback screen is deleted, both the picture and its voice memo are indicated by p in step 3 of digital camera. 109
User Manual
Page 122
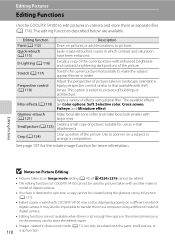
...model of buildings or architecture. It may not be edited with larger eyes. Editing Pictures Editing Functions Use the COOLPIX S4100 to edit pictures in-camera and store them to a computer using digital filter. Perspective control (A 118) Adjust the perspective of pictures suitable for use as separate files (A 174)....Soft, Selective color, Cross screen, Fisheye, and Miniature effect. This option is suited to that available with another make or model of digital cameras. • If no face is not enough free space in the internal memory or on the memory card to store the edited copies...
...model of buildings or architecture. It may not be edited with larger eyes. Editing Pictures Editing Functions Use the COOLPIX S4100 to edit pictures in-camera and store them to a computer using digital filter. Perspective control (A 118) Adjust the perspective of pictures suitable for use as separate files (A 174)....Soft, Selective color, Cross screen, Fisheye, and Miniature effect. This option is suited to that available with another make or model of digital cameras. • If no face is not enough free space in the internal memory or on the memory card to store the edited copies...
User Manual
Page 197
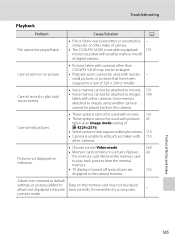
... to images using another make of digital camera. Remove the memory card to images 109 taken with movies, - small pictures, or pictures that support editing functions. 110 • Camera is unable to edit pictures taken with 110 other than COOLPIX S4100 may not be enlarged. •...with movies. 131 • These options cannot be used with other make or model of camera. • The COOLPIX S4100 is turned off and pictures are 133 displayed in the camera monitor. Replace 24 the memory card. Technical Notes and Index 185 Troubleshooting Playback Problem Cause/...
... to images using another make of digital camera. Remove the memory card to images 109 taken with movies, - small pictures, or pictures that support editing functions. 110 • Camera is unable to edit pictures taken with 110 other than COOLPIX S4100 may not be enlarged. •...with movies. 131 • These options cannot be used with other make or model of camera. • The COOLPIX S4100 is turned off and pictures are 133 displayed in the camera monitor. Replace 24 the memory card. Technical Notes and Index 185 Troubleshooting Playback Problem Cause/...
User Manual
Page 199
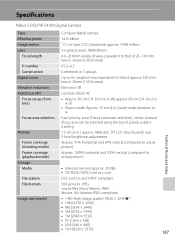
Specifications Nikon COOLPIX S4100 Digital Camera Type Effective pixels Image sensor Lens Focal length f/-number Construction Digital zoom Vibration reduction Autofocus (AF) Focus range (from lens) Focus-area selection Monitor Frame coverage (shooting mode) Frame coverage (playback mode) Storage Media File system File formats Image size (pixels) Compact digital camera 14.0 million 1/2.3-in .), approx. 460k-dot, TFT LCD (touch...
Specifications Nikon COOLPIX S4100 Digital Camera Type Effective pixels Image sensor Lens Focal length f/-number Construction Digital zoom Vibration reduction Autofocus (AF) Focus range (from lens) Focus-area selection Monitor Frame coverage (shooting mode) Frame coverage (playback mode) Storage Media File system File formats Image size (pixels) Compact digital camera 14.0 million 1/2.3-in .), approx. 460k-dot, TFT LCD (touch...

User Manual
Page 202
Specifications Supported Standards • DCF: Design Rule for Camera File System is a standard widely used in the digital camera industry to ensure compatibility among different makes of camera. • DPOF: Digital Print Order Format is an industry-wide standard that allows pictures to be printed from print orders stored on memory card. • Exif version 2.3: This...
Specifications Supported Standards • DCF: Design Rule for Camera File System is a standard widely used in the digital camera industry to ensure compatibility among different makes of camera. • DPOF: Digital Print Order Format is an industry-wide standard that allows pictures to be printed from print orders stored on memory card. • Exif version 2.3: This...


