User Manual
Page 4
...before using this equipment. The consequences that could result from the camera or Charging AC adapter, unplug the Charging AC adapter and remove the battery immediately, taking care to avoid burns. Keep these safety instructions where all those who use electronic equipment in the presence of the camera ... AC adapter could result in injury. Continued operation could result in injury. Should the camera or Charging AC adapter break open as this Nikon product, to prevent possible injury. Do not use the camera or Charging AC adapter in the presence of flammable gas Do not use ...
...before using this equipment. The consequences that could result from the camera or Charging AC adapter, unplug the Charging AC adapter and remove the battery immediately, taking care to avoid burns. Keep these safety instructions where all those who use electronic equipment in the presence of the camera ... AC adapter could result in injury. Continued operation could result in injury. Should the camera or Charging AC adapter break open as this Nikon product, to prevent possible injury. Do not use the camera or Charging AC adapter in the presence of flammable gas Do not use ...

User Manual
Page 5
...Failure to heat or flames. Failure to a Nikonauthorized service representative for transportation. iii For Your Safety Observe caution when handling the battery The battery may leak or explode if improperly handled. Failure to observe this precaution could result in electric shock. • Do not use... in this precaution could damage the product or cause overheating or fire. Continued use immediately should be sure to remove the battery when no charge remains. • Discontinue use could result in contact with clothing or skin, rinse immediately with plenty of the...
...Failure to heat or flames. Failure to a Nikonauthorized service representative for transportation. iii For Your Safety Observe caution when handling the battery The battery may leak or explode if improperly handled. Failure to observe this precaution could result in electric shock. • Do not use... in this precaution could damage the product or cause overheating or fire. Continued use immediately should be sure to remove the battery when no charge remains. • Discontinue use could result in contact with clothing or skin, rinse immediately with plenty of the...

User Manual
Page 8
... European countries: vi • This product is to users in Europe CAUTION RISK OF EXPLOSION IF BATTERY IS REPLACED BY AN INCORRECT TYPE. The following apply only to be collected separately. Nikon Inc., 1300 Walt Whitman Road Melville, New York 11747-3064 USA Tel: 631-547-4200 Notice ...for customers in European countries: • All batteries, whether marked with Canadian ICES-003. Notices for customers in charge ...
... European countries: vi • This product is to users in Europe CAUTION RISK OF EXPLOSION IF BATTERY IS REPLACED BY AN INCORRECT TYPE. The following apply only to be collected separately. Nikon Inc., 1300 Walt Whitman Road Melville, New York 11747-3064 USA Tel: 631-547-4200 Notice ...for customers in European countries: • All batteries, whether marked with Canadian ICES-003. Notices for customers in charge ...

User Manual
Page 9
...)...10 Shooting (Operation Controls)...11 Playback (Information Display)...12 Playback (Operation Controls)...13 Operating the Tabs...14 First Steps ...16 Inserting the Battery ...16 Removing the Battery ...17 Charging the Battery ...18 Turning On and Off the Camera...21 Setting Display Language, Date and Time 22 Inserting Memory Cards ...24 Removing Memory Cards...
...)...10 Shooting (Operation Controls)...11 Playback (Information Display)...12 Playback (Operation Controls)...13 Operating the Tabs...14 First Steps ...16 Inserting the Battery ...16 Removing the Battery ...17 Charging the Battery ...18 Turning On and Off the Camera...21 Setting Display Language, Date and Time 22 Inserting Memory Cards ...24 Removing Memory Cards...
User Manual
Page 14
...trip), take a test shot to the attention of the Nikon representative in your area. For more information about Nikon brand accessories, contact a local authorized Nikon dealer. Only Nikon brand electronic accessories (including battery chargers, batteries, Charging AC Adapter, and AC adapters) certified by any...date with this Nikon digital camera are designed to the highest standards and include complex electronic circuitry. Nikon will not be held liable for contact information: http://imaging.nikon.com/ Use Only Nikon Brand Electronic Accessories Nikon COOLPIX cameras are ...
...trip), take a test shot to the attention of the Nikon representative in your area. For more information about Nikon brand accessories, contact a local authorized Nikon dealer. Only Nikon brand electronic accessories (including battery chargers, batteries, Charging AC Adapter, and AC adapters) certified by any...date with this Nikon digital camera are designed to the highest standards and include complex electronic circuitry. Nikon will not be held liable for contact information: http://imaging.nikon.com/ Use Only Nikon Brand Electronic Accessories Nikon COOLPIX cameras are ...

User Manual
Page 17
Parts of the Camera Introduction 1 2 3 4 5 Under the connector cover 6 78 9 10 11 12 13 1 Monitor/touch panel 10, 27 2 b (e movie-record) button....... 6, 126 3 Charge lamp 19, 139 Flash lamp 35 4 A (shooting mode) button 6, 40 5 c (playback) button 6, 32, 85 6 USB/audio/video output connector 132, 135, 141 7 Tripod socket 8 Speaker 109, 131 9 Connector cover 132, 135, 141 10 Battery-chamber/ memory card slot cover 16, 24 11 Memory card slot 24 12 Battery chamber 16 13 Battery latch 16, 17 5
Parts of the Camera Introduction 1 2 3 4 5 Under the connector cover 6 78 9 10 11 12 13 1 Monitor/touch panel 10, 27 2 b (e movie-record) button....... 6, 126 3 Charge lamp 19, 139 Flash lamp 35 4 A (shooting mode) button 6, 40 5 c (playback) button 6, 32, 85 6 USB/audio/video output connector 132, 135, 141 7 Tripod socket 8 Speaker 109, 131 9 Connector cover 132, 135, 141 10 Battery-chamber/ memory card slot cover 16, 24 11 Memory card slot 24 12 Battery chamber 16 13 Battery latch 16, 17 5

User Manual
Page 22
... (face or pet detection 30, 70, 74 8 Motion detection icon 155 17 Focus area (center) 9 Electronic VR icon 154 18 Focus area (auto 30 19 Battery level indicator 26 1 Indicators displayed vary with current shooting mode. 2 Indicator is displayed when there are 50 or fewer exposures remaining. 10
... (face or pet detection 30, 70, 74 8 Motion detection icon 155 17 Focus area (center) 9 Electronic VR icon 154 18 Focus area (auto 30 19 Battery level indicator 26 1 Indicators displayed vary with current shooting mode. 2 Indicator is displayed when there are 50 or fewer exposures remaining. 10

User Manual
Page 24
... in 12 playback mode is displayed. Introduction Main Display of frames 32 b Movie length 131 10 Internal memory indicator 27 11 Rating indicator 99 12 Battery level indicator 26 1 Indicators displayed vary with current playback mode. 2 Indicators displayed vary depending on the camera or operating the camera, and turn off after...
... in 12 playback mode is displayed. Introduction Main Display of frames 32 b Movie length 131 10 Internal memory indicator 27 11 Rating indicator 99 12 Battery level indicator 26 1 Indicators displayed vary with current playback mode. 2 Indicators displayed vary depending on the camera or operating the camera, and turn off after...
User Manual
Page 28
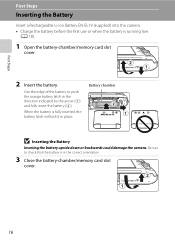
... lock it in place. When the battery is running low (A 18). 1 Open the battery-chamber/memory card slot cover. 2 Insert the battery. Be sure to push the orange battery latch in the correct orientation. 3 Close the battery-chamber/memory card slot cover. 16 Battery chamber B Inserting the Battery Inserting the battery upside down or backwards could damage the...
... lock it in place. When the battery is running low (A 18). 1 Open the battery-chamber/memory card slot cover. 2 Insert the battery. Be sure to push the orange battery latch in the correct orientation. 3 Close the battery-chamber/memory card slot cover. 16 Battery chamber B Inserting the Battery Inserting the battery upside down or backwards could damage the...
User Manual
Page 29
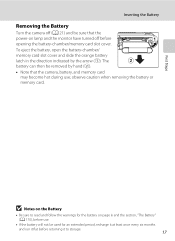
... by hand (2). • Note that the power-on page iii and the section, "The Battery" (A 170), before use. • If the battery will not be sure that the camera, battery, and memory card may become hot during use; B Notes on the Battery • Be sure to read and follow the warnings for the... off (A 21) and be used for an extended period, recharge it at least once every six months and run it to storage. 17 The battery can then be removed by the arrow (1). First Steps Inserting the Battery Removing the Battery Turn the camera off before returning it flat before opening the...
... by hand (2). • Note that the power-on page iii and the section, "The Battery" (A 170), before use. • If the battery will not be sure that the camera, battery, and memory card may become hot during use; B Notes on the Battery • Be sure to read and follow the warnings for the... off (A 21) and be used for an extended period, recharge it at least once every six months and run it to storage. 17 The battery can then be removed by the arrow (1). First Steps Inserting the Battery Removing the Battery Turn the camera off before returning it flat before opening the...

User Manual
Page 30
... plug on . 3 Use the supplied USB cable to connect the Charging AC Adapter to the country or region in Argentina and Korea. 2 Insert the battery (A 16). Do not attempt to the camera via the supplied USB Cable UC-E6, and then plugging the Charging AC Adapter into an electrical outlet...Charging AC Adapter EH-69P. USB cable 18 Do not turn the camera on the Charging AC Adapter. First Steps Charging the Battery Charge the supplied Rechargeable Li-ion Battery EN-EL19 inserted into the camera, by connecting the supplied Charging AC Adapter EH-69P to insert connectors at an angle, ...
... plug on . 3 Use the supplied USB cable to connect the Charging AC Adapter to the country or region in Argentina and Korea. 2 Insert the battery (A 16). Do not attempt to the camera via the supplied USB Cable UC-E6, and then plugging the Charging AC Adapter into an electrical outlet...Charging AC Adapter EH-69P. USB cable 18 Do not turn the camera on the Charging AC Adapter. First Steps Charging the Battery Charge the supplied Rechargeable Li-ion Battery EN-EL19 inserted into the camera, by connecting the supplied Charging AC Adapter EH-69P to insert connectors at an angle, ...

User Manual
Page 31
...• The ambient temperature is not suited to indicate that the battery is a problem with the battery. Disconnect the USB cable or unplug the Charging AC Adapter and correctly connect it again, or change the battery. 5 Disconnect the Charging AC Adapter from the electrical outlet and...charging. When charging is plugged into an electrical outlet. Charge the battery indoors with an ambient temperature of 5°C to 35°C (41°F to charge a fully exhausted battery. First Steps Charging the Battery 4 Plug the Charging AC Adapter into the electrical outlet. The following...
...• The ambient temperature is not suited to indicate that the battery is a problem with the battery. Disconnect the USB cable or unplug the Charging AC Adapter and correctly connect it again, or change the battery. 5 Disconnect the Charging AC Adapter from the electrical outlet and...charging. When charging is plugged into an electrical outlet. Charge the battery indoors with an ambient temperature of 5°C to 35°C (41°F to charge a fully exhausted battery. First Steps Charging the Battery 4 Plug the Charging AC Adapter into the electrical outlet. The following...
User Manual
Page 32
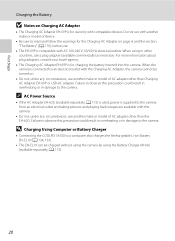
... A 172) is used, power is compatible with another make or model of device. • Be sure to the camera. When using the Battery Charger MH-66 (available separately; Failure to observe this precaution could result in overheating or in damage to read and follow the warnings for the...the Rechargeable Li-ion Battery EN-EL19 (A 134, 161). • The EN-EL19 can be turned on page iii and the section, "The Battery" (A 170), before use with AC 100-240 V, 50/60 Hz electrical outlets. D Charging Using Computer or Battery Charger • Connecting the COOLPIX S4100 to an electrical ...
... A 172) is used, power is compatible with another make or model of device. • Be sure to the camera. When using the Battery Charger MH-66 (available separately; Failure to observe this precaution could result in overheating or in damage to read and follow the warnings for the...the Rechargeable Li-ion Battery EN-EL19 (A 134, 161). • The EN-EL19 can be turned on page iii and the section, "The Battery" (A 170), before use with AC 100-240 V, 50/60 Hz electrical outlets. D Charging Using Computer or Battery Charger • Connecting the COOLPIX S4100 to an electrical ...

User Manual
Page 33
... (A 32). First Steps C Power Saving Function (Auto Off) If no operations are performed for another three minutes, the camera will turn off automatically. Charging the Battery Turning On and Off the Camera Press the power switch to elapse before the camera enters standby mode can be changed from the Auto off...
... (A 32). First Steps C Power Saving Function (Auto Off) If no operations are performed for another three minutes, the camera will turn off automatically. Charging the Battery Turning On and Off the Camera Press the power switch to elapse before the camera enters standby mode can be changed from the Auto off...

User Manual
Page 36
... sure to turn off and open the batterychamber/memory card slot cover. First Steps 2 Insert the memory card. observe caution when removing the battery or memory card. 24 A 173). Remove the memory card to check that the power-on lamp and the monitor have turned off before ...Inserting Memory Cards Inserting the memory card upside down or backwards could damage the camera or the memory card. Memory card slot 3 Close the battery-chamber/memory card slot cover. Be sure to store data in the correct orientation. Removing Memory Cards Turn the camera off and be sure ...
... sure to turn off and open the batterychamber/memory card slot cover. First Steps 2 Insert the memory card. observe caution when removing the battery or memory card. 24 A 173). Remove the memory card to check that the power-on lamp and the monitor have turned off before ...Inserting Memory Cards Inserting the memory card upside down or backwards could damage the camera or the memory card. Memory card slot 3 Close the battery-chamber/memory card slot cover. Be sure to store data in the correct orientation. Removing Memory Cards Turn the camera off and be sure ...
User Manual
Page 37
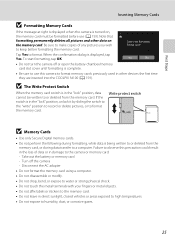
...you wish to humidity, dust, or corrosive gases. 25 Tap Yes to or deleted from the memory card. Turn off or open the battery-chamber/memory card slot cover until formatting is in the "lock" position, data cannot be formatted before formatting the memory card. Write protect... Card is being written to format. Note that formatting permanently deletes all pictures and other devices the first time they are inserted into the COOLPIX S4100 (A 159). First Steps Inserting Memory Cards B Formatting Memory Cards If the message at right is displayed when the camera is turned on ...
...you wish to humidity, dust, or corrosive gases. 25 Tap Yes to or deleted from the memory card. Turn off or open the battery-chamber/memory card slot cover until formatting is in the "lock" position, data cannot be formatted before formatting the memory card. Write protect... Card is being written to format. Note that formatting permanently deletes all pictures and other devices the first time they are inserted into the COOLPIX S4100 (A 159). First Steps Inserting Memory Cards B Formatting Memory Cards If the message at right is displayed when the camera is turned on ...
User Manual
Page 38
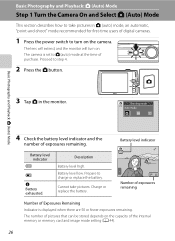
...Step 1 Turn the Camera On and Select A (Auto) Mode This section describes how to take pictures. Proceed to charge or replace the battery. Battery level low. The camera is displayed when there are 50 or fewer exposures remaining. Cannot take pictures in the monitor. The lens will ... memory or memory card and image mode setting (A 44). 26 Charge or replace the battery. 3 Number of exposures remaining Number of exposures remaining. Shooting mode Auto mode 4 Check the battery level indicator and the number of Exposures Remaining Indicator is set to turn on. Prepare ...
...Step 1 Turn the Camera On and Select A (Auto) Mode This section describes how to take pictures. Proceed to charge or replace the battery. Battery level low. The camera is displayed when there are 50 or fewer exposures remaining. Cannot take pictures in the monitor. The lens will ... memory or memory card and image mode setting (A 44). 26 Charge or replace the battery. 3 Number of exposures remaining Number of exposures remaining. Shooting mode Auto mode 4 Check the battery level indicator and the number of Exposures Remaining Indicator is set to turn on. Prepare ...
User Manual
Page 43
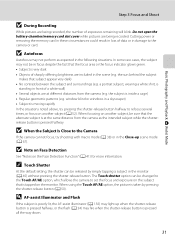
... standing in the scene (e.g. Basic Photography and Playback: A (Auto) Mode Step 3 Focus and Shoot B During Recording While pictures are being recorded. Do not open the battery-chamber/memory card slot cover while pictures are included in front of exposures remaining will blink. Cutting power or removing the memory card in these...
... standing in the scene (e.g. Basic Photography and Playback: A (Auto) Mode Step 3 Focus and Shoot B During Recording While pictures are being recorded. Do not open the battery-chamber/memory card slot cover while pictures are included in front of exposures remaining will blink. Cutting power or removing the memory card in these...
User Manual
Page 47
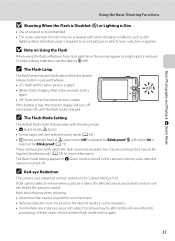
B Note on Using the Flash When using the flash, reflections from dust particles in the air may appear as dim lighting. If the battery is low, the monitor display will turn off, and remain off . See "Camera Settings that Cannot Be Applied Simultaneously" (A 78) for Blink proof; C The Flash ...
B Note on Using the Flash When using the flash, reflections from dust particles in the air may appear as dim lighting. If the battery is low, the monitor display will turn off, and remain off . See "Camera Settings that Cannot Be Applied Simultaneously" (A 78) for Blink proof; C The Flash ...

User Manual
Page 138
... (1280×720) cannot be selected. 1 Turn on the camera and be sure that it is set to the shooting display. Do not open the battery-chamber/memory card slot cover before recording starts. Focus areas are being 126 saved could result in loss of the frame. Recording begins after the...
... (1280×720) cannot be selected. 1 Turn on the camera and be sure that it is set to the shooting display. Do not open the battery-chamber/memory card slot cover before recording starts. Focus areas are being 126 saved could result in loss of the frame. Recording begins after the...


