Product Manual
Page 2
... first time, read before use the product. Menu items, options, and messages displayed in the camera monitor are shown in "For Your Safety" (0 xi-xiv). A This icon marks notes; Camera Settings The explanations in this manual. A For Your Safety Before using the camera. 0 This icon marks references to find the information you need, the following symbols and conventions are used : D This icon marks cautions; information that default settings are used . Symbols...
... first time, read before use the product. Menu items, options, and messages displayed in the camera monitor are shown in "For Your Safety" (0 xi-xiv). A This icon marks notes; Camera Settings The explanations in this manual. A For Your Safety Before using the camera. 0 This icon marks references to find the information you need, the following symbols and conventions are used : D This icon marks cautions; information that default settings are used . Symbols...

Product Manual
Page 161
... white balance or copy white balance from existing photo (0 142). 1 Display white balance options. P button Information display P, S, A, and M Modes 137 White Balance White balance ensures that colors are unaffected by direct sunlight. Use under overcast skies. Press the P button, then highlight the current white balance setting in daylight with subjects lit by the color of source: Option v Auto J Incandescent I Fluorescent H Direct sunlight N Flash G Cloudy M Shade L Preset manual Description Automatic white balance adjustment. Recommended in daylight under incandescent lighting...
... white balance or copy white balance from existing photo (0 142). 1 Display white balance options. P button Information display P, S, A, and M Modes 137 White Balance White balance ensures that colors are unaffected by direct sunlight. Use under overcast skies. Press the P button, then highlight the current white balance setting in daylight with subjects lit by the color of source: Option v Auto J Incandescent I Fluorescent H Direct sunlight N Flash G Cloudy M Shade L Preset manual Description Automatic white balance adjustment. Recommended in daylight under incandescent lighting...

Product Manual
Page 280
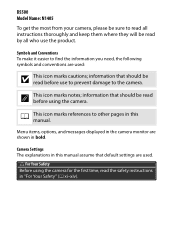
... the number of days between the date of shooting and a selected date (see below). d4: Date Stamp G button ➜ A Custom Settings menu Choose the date information imprinted on photographs as they are retouched (0 286). d3: Viewfinder Grid Display G button ➜ A Custom Settings menu Choose On to or removed from existing photos. a Date The date or date and time are imprinted on 15 . 10 . 2014 b Date and time photographs taken while this option is recorded in...
... the number of days between the date of shooting and a selected date (see below). d4: Date Stamp G button ➜ A Custom Settings menu Choose the date information imprinted on photographs as they are retouched (0 286). d3: Viewfinder Grid Display G button ➜ A Custom Settings menu Choose On to or removed from existing photos. a Date The date or date and time are imprinted on 15 . 10 . 2014 b Date and time photographs taken while this option is recorded in...

Product Manual
Page 364
... when inspecting or cleaning the image sensor. Turn the camera on and highlight Lock mirror up for cleaning in the setup menu and press 2 (note that the sensor be raised and the shutter curtain will be cleaned only by Nikon-authorized service personnel. 1 Charge the battery. Note, however, that the sensor is fully charged before proceeding. 2 Remove the lens. The message shown at battery levels of H or below . Press the shutter-release button all the way...
... when inspecting or cleaning the image sensor. Turn the camera on and highlight Lock mirror up for cleaning in the setup menu and press 2 (note that the sensor be raised and the shutter curtain will be cleaned only by Nikon-authorized service personnel. 1 Charge the battery. Note, however, that the sensor is fully charged before proceeding. 2 Remove the lens. The message shown at battery levels of H or below . Press the shutter-release button all the way...

Product Manual
Page 379
... be used: Camera is not played back: Photo was taken with Off selected for Auto image rotation (0 235). • Photo is selected for Playback folder (0 234). Playback NEF (RAW) image is in image review (0 234). • Camera was pointed up or down when photo was not created with other artifacts) appears in effect (0 127). Can not delete picture: • Picture is protected: remove protection (0 202). • Memory card is in long time-exposures: Enable long exposure noise reduction (0 243). Metering can...
... be used: Camera is not played back: Photo was taken with Off selected for Auto image rotation (0 235). • Photo is selected for Playback folder (0 234). Playback NEF (RAW) image is in image review (0 234). • Camera was pointed up or down when photo was not created with other artifacts) appears in effect (0 127). Can not delete picture: • Picture is protected: remove protection (0 202). • Memory card is in long time-exposures: Enable long exposure noise reduction (0 243). Metering can...
Product Manual
Page 383
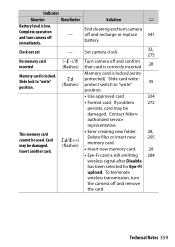
... Complete operation and turn camera - End cleaning and turn camera off and confirm that card is correctly inserted. 28 Memory card is still emitting 284 wireless signal after Disable has been selected for Eye-Fi upload. Indicator Monitor Viewfinder Solution 0 Battery level is locked (write protected). If problem 272 persists, card may be damaged. (/k (flashes) • Error creating new folder. authorized service representative. Slide lock to "write" position. 35 • Use approved card. 334 • Format card. Card may be used.
... Complete operation and turn camera - End cleaning and turn camera off and confirm that card is correctly inserted. 28 Memory card is still emitting 284 wireless signal after Disable has been selected for Eye-Fi upload. Indicator Monitor Viewfinder Solution 0 Battery level is locked (write protected). If problem 272 persists, card may be damaged. (/k (flashes) • Error creating new folder. authorized service representative. Slide lock to "write" position. 35 • Use approved card. 334 • Format card. Card may be used.
Product Manual
Page 395
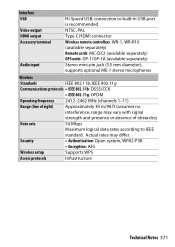
... NTSC, PAL Type C HDMI connector Wireless remote controllers: WR-1, WR-R10 (available separately) Remote cords: MC-DC2 (available separately) GPS units: GP-1/GP-1A (available separately) Stereo mini-pin jack (3.5 mm diameter); Security • Authentication: Open system, WPA2-PSK • Encryption: AES Wireless setup Supports WPS Access protocols Infrastructure Technical Notes 371 Interface USB Video output HDMI output Accessory terminal Audio input Hi-Speed USB;
... NTSC, PAL Type C HDMI connector Wireless remote controllers: WR-1, WR-R10 (available separately) Remote cords: MC-DC2 (available separately) GPS units: GP-1/GP-1A (available separately) Stereo mini-pin jack (3.5 mm diameter); Security • Authentication: Open system, WPA2-PSK • Encryption: AES Wireless setup Supports WPS Access protocols Infrastructure Technical Notes 371 Interface USB Video output HDMI output Accessory terminal Audio input Hi-Speed USB;

Product Manual
Page 419
... Aperture-priority auto 118 Assign AE-L/AF-L button 267 Assign Fn button 265 Assign touch Fn 268 Auto (White balance 137 Auto bracketing 148, 264 Auto distortion control 245 Auto flash 94 Auto image rotation 235 Auto info display 278 Auto ISO sensitivity control ..........241 Auto off timers 253 Auto-area AF (AF-area mode) ........ 83 Autoexposure lock 127 Autofocus 78-87, 164-167 Auto-servo AF 78 Available settings 348 B Battery 27, 330, 373 Beep options 276 Black...
... Aperture-priority auto 118 Assign AE-L/AF-L button 267 Assign Fn button 265 Assign touch Fn 268 Auto (White balance 137 Auto bracketing 148, 264 Auto distortion control 245 Auto flash 94 Auto image rotation 235 Auto info display 278 Auto ISO sensitivity control ..........241 Auto off timers 253 Auto-area AF (AF-area mode) ........ 83 Autoexposure lock 127 Autofocus 78-87, 164-167 Auto-servo AF 78 Available settings 348 B Battery 27, 330, 373 Beep options 276 Black...

Reference Manual
Page 12
... Multiple Images ...91 Transferring Images to a Computer (ViewNX-i 93 Installing ViewNX-i...93 Transferring Images to a Computer ...93 Using the Menu...96 Menu Operations...97 The Image Selection Screen...99 Menu Lists ...100 The Shooting Menu...100 The Movie Menu...101 The Playback Menu...101 The Network Menu ...102 The Setup Menu ...103 The Shooting Menu (Common Across Shooting Modes 104 Image Mode (Image Size and Quality)...104 The Shooting Menu (for A (Auto) Mode 106 White Balance (Adjusting Hue)...106 Continuous Shooting ...108 ISO Sensitivity ...110 AF Area Mode...111 Autofocus Mode...
... Multiple Images ...91 Transferring Images to a Computer (ViewNX-i 93 Installing ViewNX-i...93 Transferring Images to a Computer ...93 Using the Menu...96 Menu Operations...97 The Image Selection Screen...99 Menu Lists ...100 The Shooting Menu...100 The Movie Menu...101 The Playback Menu...101 The Network Menu ...102 The Setup Menu ...103 The Shooting Menu (Common Across Shooting Modes 104 Image Mode (Image Size and Quality)...104 The Shooting Menu (for A (Auto) Mode 106 White Balance (Adjusting Hue)...106 Continuous Shooting ...108 ISO Sensitivity ...110 AF Area Mode...111 Autofocus Mode...
Reference Manual
Page 46
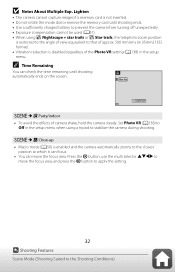
.... • Do not rotate the mode dial or remove the memory card until shooting automatically ends on the screen. 10m 0s End recording y M f Party/indoor • To avoid the effects of view equivalent to stabilize the camera during shooting. Press the k button, use the multi selector HIJK to move the focus area. Set Photo VR (A138) to Off in the setup menu when using W Nightscape + star trails or S Star...
.... • Do not rotate the mode dial or remove the memory card until shooting automatically ends on the screen. 10m 0s End recording y M f Party/indoor • To avoid the effects of view equivalent to stabilize the camera during shooting. Press the k button, use the multi selector HIJK to move the focus area. Set Photo VR (A138) to Off in the setup menu when using W Nightscape + star trails or S Star...

Reference Manual
Page 170
... memory card to a printer. The camera cannot be impossible to print images when Auto is connected to play back images in the setup menu. The PictBridge screen is not displayed when the camera is selected for shooting 173 operations. • The w1/w2 buttons on the remote control 173 cannot be printed are not displayed on the remote control to remote.2/ • Set the following situations, even when printing from a PictBridge-compatible printer. Problem...
... memory card to a printer. The camera cannot be impossible to print images when Auto is connected to play back images in the setup menu. The PictBridge screen is not displayed when the camera is selected for shooting 173 operations. • The w1/w2 buttons on the remote control 173 cannot be printed are not displayed on the remote control to remote.2/ • Set the following situations, even when printing from a PictBridge-compatible printer. Problem...
Reference Manual
Page 172
... file using a computer or the device used to resume printing.* - create or edit this image. deleted. Raise the flash before shooting in Night portrait or 29, 47 Backlighting (when HDR is lowered. If you turn the camera on again, lens operation will return to Off) scene mode. An error occurred while communicating with other cameras cannot be viewed on again, contact your retailer or Nikon-authorized service representative. Turn...
... file using a computer or the device used to resume printing.* - create or edit this image. deleted. Raise the flash before shooting in Night portrait or 29, 47 Backlighting (when HDR is lowered. If you turn the camera on again, lens operation will return to Off) scene mode. An error occurred while communicating with other cameras cannot be viewed on again, contact your retailer or Nikon-authorized service representative. Turn...

Reference Manual
Page 142
Silent Photography To enable the electronic shutter and eliminate the noise and vibration caused by operation of the mechanical shutter, select [On] for [Silent photography] in the photo shooting menu. • An icon is displayed while silent photography is in the setup menu, no limit to the number of photos that can be used regardless of the option selected for Custom Setting d2 [Max. the flash, - long exposure noise reduction, - flicker reduction, and - high...
Silent Photography To enable the electronic shutter and eliminate the noise and vibration caused by operation of the mechanical shutter, select [On] for [Silent photography] in the photo shooting menu. • An icon is displayed while silent photography is in the setup menu, no limit to the number of photos that can be used regardless of the option selected for Custom Setting d2 [Max. the flash, - long exposure noise reduction, - flicker reduction, and - high...
Reference Manual
Page 195
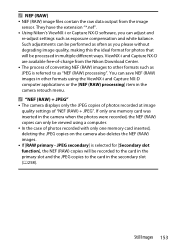
... exposure compensation and white balance. Still Images 153 If only one memory card was inserted in multiple different ways. They have the extension "*.nef". • Using Nikon's ViewNX-i or Capture NX-D software, you please without degrading image quality, making this the ideal format for [Secondary slot function], the NEF (RAW) copies will be processed in the camera when the photos were recorded, the NEF (RAW) copies can adjust and re-adjust settings...
... exposure compensation and white balance. Still Images 153 If only one memory card was inserted in multiple different ways. They have the extension "*.nef". • Using Nikon's ViewNX-i or Capture NX-D software, you please without degrading image quality, making this the ideal format for [Secondary slot function], the NEF (RAW) copies will be processed in the camera when the photos were recorded, the NEF (RAW) copies can adjust and re-adjust settings...
Reference Manual
Page 224
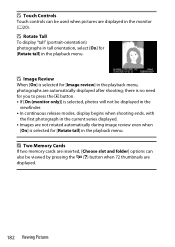
... K button. • If [On (monitor only)] is selected, photos will not be used when pictures are automatically displayed after shooting; there is no need for [Rotate tall] in the monitor (0 20). D Image Review When [On] is selected for [Image review] in the playback menu. A Two Memory Cards If two memory cards are inserted, [Choose slot and folder] options can be displayed in the viewfinder. • In continuous release modes, display begins...
... K button. • If [On (monitor only)] is selected, photos will not be used when pictures are automatically displayed after shooting; there is no need for [Rotate tall] in the monitor (0 20). D Image Review When [On] is selected for [Image review] in the playback menu. A Two Memory Cards If two memory cards are inserted, [Choose slot and folder] options can be displayed in the viewfinder. • In continuous release modes, display begins...
Reference Manual
Page 404
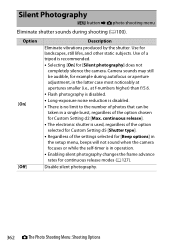
... the setup menu, beeps will not sound when the camera focuses or while the self-timer is in a single burst, regardless of the option chosen for Custom Setting d2 [Max. Use for [Silent photography] does not completely silence the camera. Silent Photography G button U C photo shooting menu Eliminate shutter sounds during autofocus or aperture adjustment, in the latter case most noticeably at apertures smaller (i.e., at f-numbers higher) than f/5.6. • Flash photography is disabled. • Long-exposure noise reduction is disabled...
... the setup menu, beeps will not sound when the camera focuses or while the self-timer is in a single burst, regardless of the option chosen for Custom Setting d2 [Max. Use for [Silent photography] does not completely silence the camera. Silent Photography G button U C photo shooting menu Eliminate shutter sounds during autofocus or aperture adjustment, in the latter case most noticeably at apertures smaller (i.e., at f-numbers higher) than f/5.6. • Flash photography is disabled. • Long-exposure noise reduction is disabled...
Reference Manual
Page 704
... the AC adapter. - Choose a different monitor mode using the M button. • Have you limited the choice of focus: • Rotate the diopter adjustment control to adjust viewfinder focus. • If adjusting viewfinder focus does not correct the problem, set the focus mode to AF-S and the AF-area mode to single-point AF. Any data currently being recorded will be lost. - Clean the eye sensor with a blower. ˔ The viewfinder is on but does not...
... the AC adapter. - Choose a different monitor mode using the M button. • Have you limited the choice of focus: • Rotate the diopter adjustment control to adjust viewfinder focus. • If adjusting viewfinder focus does not correct the problem, set the focus mode to AF-S and the AF-area mode to single-point AF. Any data currently being recorded will be lost. - Clean the eye sensor with a blower. ˔ The viewfinder is on but does not...

Reference Manual
Page 728
... connection indicator (0 158) 3 Long exposure noise reduction indicator (0285) 4 Shutter type (0398) Silent photography (0100) 5 Exposure delay mode (0397) 6 Interval timer indicator (0 326) t icon (055) 7 Flash control mode (0616) 8 "Beep" indicator (0476) 9 Battery indicator (044, 727) 10 USB power delivery (0492) 14 15 16 11 Wi-Fi connection (0158) 12 Release mode (0125, 160) 13 AF-area mode (077) 14 Focus mode (074) 15 Vibration reduction indicator (0 161) 16 View memory card info (0 159) 17 Metering (0157) 18 Image size (0154) 19 White balance (094, 145, 267) 20 Set Picture Control...
... connection indicator (0 158) 3 Long exposure noise reduction indicator (0285) 4 Shutter type (0398) Silent photography (0100) 5 Exposure delay mode (0397) 6 Interval timer indicator (0 326) t icon (055) 7 Flash control mode (0616) 8 "Beep" indicator (0476) 9 Battery indicator (044, 727) 10 USB power delivery (0492) 14 15 16 11 Wi-Fi connection (0158) 12 Release mode (0125, 160) 13 AF-area mode (077) 14 Focus mode (074) 15 Vibration reduction indicator (0 161) 16 View memory card info (0 159) 17 Metering (0157) 18 Image size (0154) 19 White balance (094, 145, 267) 20 Set Picture Control...

Reference Manual
Page 846
... (Set Picture Control). 143 Built-in AF-assist illuminator.......... 390 Built-in microphone 64 Bulb 112 C Camera-mounted flash units ....... 611 Center-weighted area 393 Center-weighted metering 157 Charger 38 Charging AC adapter 40 Choose color temperature (White balance 97 Choose image area 175, 260 Choose start/end point 199 CL mode shooting speed 396 Clarity (Set Picture Control 143 Clean image sensor 467, 739 Cloudy (White balance 96 Color space 282 Color temperature 99, 147, 270 Command dial 16 Conformity marking 490 Connect to...
... (Set Picture Control). 143 Built-in AF-assist illuminator.......... 390 Built-in microphone 64 Bulb 112 C Camera-mounted flash units ....... 611 Center-weighted area 393 Center-weighted metering 157 Charger 38 Charging AC adapter 40 Choose color temperature (White balance 97 Choose image area 175, 260 Choose start/end point 199 CL mode shooting speed 396 Clarity (Set Picture Control 143 Clean image sensor 467, 739 Cloudy (White balance 96 Color space 282 Color temperature 99, 147, 270 Command dial 16 Conformity marking 490 Connect to...
Reference Manual
Page 848
continuous release 396 Memory buffer 129 Memory card 45, 770 Memory card capacity 773 Metering 157 MF (Manual focus 75 Microphone sensitivity........... 174, 372 Mid-range sharpening (Set Picture Control 143 Mode dial 15, 57, 106 Modeling flash 407 Monitor brightness 457 Monitor color balance 458 Monochrome 522 Monochrome (Set Picture Control) .. 139 Movie file type 365 Movie quality 168, 365 Movie shooting menu 363 Movie-record button 64 Multiple exposure 309 My Menu 533 N Natural light auto (White balance)96 NEF (RAW) processing 506 NEF (RAW) recording 264 806 Index...
continuous release 396 Memory buffer 129 Memory card 45, 770 Memory card capacity 773 Metering 157 MF (Manual focus 75 Microphone sensitivity........... 174, 372 Mid-range sharpening (Set Picture Control 143 Mode dial 15, 57, 106 Modeling flash 407 Monitor brightness 457 Monitor color balance 458 Monochrome 522 Monochrome (Set Picture Control) .. 139 Movie file type 365 Movie quality 168, 365 Movie shooting menu 363 Movie-record button 64 Multiple exposure 309 My Menu 533 N Natural light auto (White balance)96 NEF (RAW) processing 506 NEF (RAW) recording 264 806 Index...


