
Product Manual
Page 1
DIGITAL CAMERA Reference Manual Nikon Manual Viewer 2 Install the Nikon Manual Viewer 2 app on your smartphone or tablet to view Nikon digital camera manuals, anytime, anywhere. Nikon Manual Viewer 2 can be downloaded free of charge from the App Store and Google Play. En
DIGITAL CAMERA Reference Manual Nikon Manual Viewer 2 Install the Nikon Manual Viewer 2 app on your smartphone or tablet to view Nikon digital camera manuals, anytime, anywhere. Nikon Manual Viewer 2 can be downloaded free of charge from the App Store and Google Play. En
Product Manual
Page 2
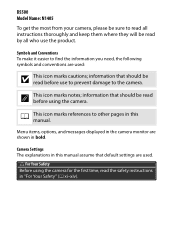
A For Your Safety Before using the camera. 0 This icon marks references to other pages in bold. Camera Settings The explanations in this manual assume that default settings are shown in this manual. Menu items, options, and messages displayed in "For Your Safety" (0 xi-xiv). information that should be read before use the product...
A For Your Safety Before using the camera. 0 This icon marks references to other pages in bold. Camera Settings The explanations in this manual assume that default settings are shown in this manual. Menu items, options, and messages displayed in "For Your Safety" (0 xi-xiv). information that should be read before use the product...

Product Manual
Page 5
... How the Camera Focuses: Focus Mode 78 Choosing How the Focus Point Is Selected: AF-Area Mode 82 Focus Point Selection 85 Focus Lock 86 Manual Focus 88 Image Quality and Size 90 Image Quality 90 Image Size 92 Using the Built-in Flash 93 Auto Pop-up Modes 93... Manual Pop-up Modes 95 ISO Sensitivity 99 Interval Timer Photography 101 Remote Control Photography 107 Using an Optional ML-L3 Remote Control 107 Restoring Default ...
... How the Camera Focuses: Focus Mode 78 Choosing How the Focus Point Is Selected: AF-Area Mode 82 Focus Point Selection 85 Focus Lock 86 Manual Focus 88 Image Quality and Size 90 Image Quality 90 Image Size 92 Using the Built-in Flash 93 Auto Pop-up Modes 93... Manual Pop-up Modes 95 ISO Sensitivity 99 Interval Timer Photography 101 Remote Control Photography 107 Using an Optional ML-L3 Remote Control 107 Restoring Default ...
Product Manual
Page 6
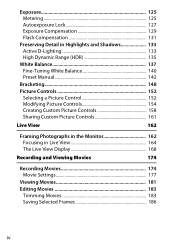
... 131 Preserving Detail in Highlights and Shadows 133 Active D-Lighting 133 High Dynamic Range (HDR 135 White Balance 137 Fine-Tuning White Balance 140 Preset Manual 142 Bracketing 148 Picture Controls 152 Selecting a Picture Control 152 Modifying Picture Controls 154 Creating Custom Picture Controls 158 Sharing Custom Picture Controls 161 Live...
... 131 Preserving Detail in Highlights and Shadows 133 Active D-Lighting 133 High Dynamic Range (HDR 135 White Balance 137 Fine-Tuning White Balance 140 Preset Manual 142 Bracketing 148 Picture Controls 152 Selecting a Picture Control 152 Modifying Picture Controls 154 Creating Custom Picture Controls 158 Sharing Custom Picture Controls 161 Live...

Product Manual
Page 17
...ensure that the battery is to be collected separately. manuals at an appropriate collection point. bring any errors or omissions to the • Nikon reserves the right to permission. Notices • No part of the manuals included • Nikon will not be held liable for any with •...; This product is designated for this symbol or not, are designated separate collection at an for separate collection at any time and without Nikon's prior written we would appreciate...
...ensure that the battery is to be collected separately. manuals at an appropriate collection point. bring any errors or omissions to the • Nikon reserves the right to permission. Notices • No part of the manuals included • Nikon will not be held liable for any with •...; This product is designated for this symbol or not, are designated separate collection at an for separate collection at any time and without Nikon's prior written we would appreciate...

Product Manual
Page 20
... from discarded storage devices using commercial deletion software, or format the device and then completely refill it with images containing no private information (for preset manual (0 146). AVC Patent Portfolio License THIS PRODUCT IS LICENSED UNDER THE AVC PATENT PORTFOLIO LICENSE FOR THE PERSONAL AND NON-COMMERCIAL USE OF A CONSUMER TO...
... from discarded storage devices using commercial deletion software, or format the device and then completely refill it with images containing no private information (for preset manual (0 146). AVC Patent Portfolio License THIS PRODUCT IS LICENSED UNDER THE AVC PATENT PORTFOLIO LICENSE FOR THE PERSONAL AND NON-COMMERCIAL USE OF A CONSUMER TO...
Product Manual
Page 25
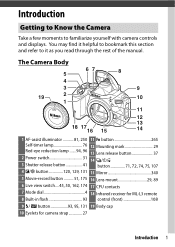
Introduction Getting to Know the Camera Take a few moments to it as you read through the rest of the manual. You may find it helpful to bookmark this section and refer to familiarize yourself with camera controls and displays. The Camera Body 67 5 8 4 3 9 19 2 10 1 ...
Introduction Getting to Know the Camera Take a few moments to it as you read through the rest of the manual. You may find it helpful to bookmark this section and refer to familiarize yourself with camera controls and displays. The Camera Body 67 5 8 4 3 9 19 2 10 1 ...

Product Manual
Page 28
The Mode Dial The camera offers a choice of the following shooting modes. P, S, A, and M Modes: • P-Programmed auto (0 115) • S-Shutter-priority auto (0 117) • A-Aperture-priority auto (0 118) • M-Manual (0 119) Scene Modes (0 54) Special Effects Modes (0 61) Auto Modes: • i Auto (0 38) • j Auto (flash off) (0 38) 4 Introduction
The Mode Dial The camera offers a choice of the following shooting modes. P, S, A, and M Modes: • P-Programmed auto (0 115) • S-Shutter-priority auto (0 117) • A-Aperture-priority auto (0 118) • M-Manual (0 119) Scene Modes (0 54) Special Effects Modes (0 61) Auto Modes: • i Auto (0 38) • j Auto (flash off) (0 38) 4 Introduction

Product Manual
Page 36
The Multi Selector In this manual, operations using the multi selector are represented by 1, 3, 4, and 2 icons. 1: Press the multi selector up J button 4: Press the multi selector left 2: Press the multi selector right 3: Press the multi selector down 12 Introduction
The Multi Selector In this manual, operations using the multi selector are represented by 1, 3, 4, and 2 icons. 1: Press the multi selector up J button 4: Press the multi selector left 2: Press the multi selector right 3: Press the multi selector down 12 Introduction

Product Manual
Page 45
... to position the focus point and focus (autofocus only; ❚❚ Live View Photography The touch screen can not be used to focus when MF-manual 3 (touch shutter on) focus-is selected for focus mode as described on the monitor.
... to position the focus point and focus (autofocus only; ❚❚ Live View Photography The touch screen can not be used to focus when MF-manual 3 (touch shutter on) focus-is selected for focus mode as described on the monitor.

Product Manual
Page 51
... minutes. Battery charging Charging complete A The Battery and Charger Read and follow the warnings and cautions on pages xi-xiv and 343-347 of this manual. If a plug adapter is fully inserted. Repeat for use. 1 Attach the strap. Introduction 27 First Steps Follow the eight steps below at left, making sure...
... minutes. Battery charging Charging complete A The Battery and Charger Read and follow the warnings and cautions on pages xi-xiv and 343-347 of this manual. If a plug adapter is fully inserted. Repeat for use. 1 Attach the strap. Introduction 27 First Steps Follow the eight steps below at left, making sure...

Product Manual
Page 85
... be used when taking photographs and shooting movies. The built-in flash and AFassist illuminator turn off. Special Effects 61 Autofocus is unable to focus. manual focus can be affected by rotating the mode dial to q and rotating the command dial until the desired option appears in the monitor. + Mode dial...
... be used when taking photographs and shooting movies. The built-in flash and AFassist illuminator turn off. Special Effects 61 Autofocus is unable to focus. manual focus can be affected by rotating the mode dial to q and rotating the command dial until the desired option appears in the monitor. + Mode dial...

Product Manual
Page 101
More on choosing the duration of the self-timer and the number of shots taken, see Custom Setting c3 (Self-timer; 0 254). A Using the Built-in Flash Before taking a photograph with the flash in the viewfinder (0 44). Shooting will be displayed in modes that require the flash to be raised manually, press the M (Y) button to raise the flash and wait for the M indicator to be interrupted if the flash is raised after the self-timer has started. A Custom Setting c3 (Self-Timer) For information on Photography 77
More on choosing the duration of the self-timer and the number of shots taken, see Custom Setting c3 (Self-timer; 0 254). A Using the Built-in Flash Before taking a photograph with the flash in the viewfinder (0 44). Shooting will be displayed in modes that require the flash to be raised manually, press the M (Y) button to raise the flash and wait for the M indicator to be interrupted if the flash is raised after the self-timer has started. A Custom Setting c3 (Self-Timer) For information on Photography 77

Product Manual
Page 102
... . Shutter can only be released if camera is able to be adjusted automatically or manually (see "Choosing How the Camera Focuses: Focus Mode," below). For stationary subjects. MF Manual focus Focus manually (0 88). 78 More on Photography Shutter can be changed to allow the shutter to...describes the focus options available when photographs are available only in the viewfinder. Focus can also select the focus point for automatic or manual focus (0 85) or use focus lock to focus to focus. Camera focuses continuously while shutter-release button is able to recompose ...
... . Shutter can only be released if camera is able to be adjusted automatically or manually (see "Choosing How the Camera Focuses: Focus Mode," below). For stationary subjects. MF Manual focus Focus manually (0 88). 78 More on Photography Shutter can be changed to allow the shutter to...describes the focus options available when photographs are available only in the viewfinder. Focus can also select the focus point for automatic or manual focus (0 85) or use focus lock to focus to focus. Camera focuses continuously while shutter-release button is able to recompose ...

Product Manual
Page 104
... subject is half in the shade. Example: Subject is inside a cage. A Getting Good Results with Autofocus Autofocus does not perform well under these cases, focus manually (0 88) or use focus lock (0 86) to focus on Photography Background objects appear larger than the subject.
... subject is half in the shade. Example: Subject is inside a cage. A Getting Good Results with Autofocus Autofocus does not perform well under these cases, focus manually (0 88) or use focus lock (0 86) to focus on Photography Background objects appear larger than the subject.

Product Manual
Page 106
...-area AF (39 points) photographing subjects that are moving quickly and are not available when AF-S is selected for autofocus is selected c Single-point AF manually; For non-stationary subjects. In AF-A and AF-C J Dynamic-area AF (9 points) focus modes, user selects focus point using multi selector (0 85), but camera will...
...-area AF (39 points) photographing subjects that are moving quickly and are not available when AF-S is selected for autofocus is selected c Single-point AF manually; For non-stationary subjects. In AF-A and AF-C J Dynamic-area AF (9 points) focus modes, user selects focus point using multi selector (0 85), but camera will...

Product Manual
Page 109
... Use the multi selector to the shooting display. 3 Select the focus point. Focus point More on . Press J to the shooting display. Focus Point Selection In manual focus mode or when autofocus is on Photography 85
... Use the multi selector to the shooting display. 3 Select the focus point. Focus point More on . Press J to the shooting display. Focus Point Selection In manual focus mode or when autofocus is on Photography 85

Product Manual
Page 112
Photographs can be taken at any time, even when the image is not in focus. Manual Focus Manual focus can be used when autofocus is not available or does not produce the desired results (0 80). 1 Set the lens focus-mode switch. To focus manually, adjust the lens focus ring until the image displayed on the clear matte field in the viewfinder is equipped with an A-M, M/A-M, or A/M-M mode switch, slide the switch to M. A-M mode switch M/A-M mode switch 2 Focus. If the lens is in focus. 88 More on Photography
Photographs can be taken at any time, even when the image is not in focus. Manual Focus Manual focus can be used when autofocus is not available or does not produce the desired results (0 80). 1 Set the lens focus-mode switch. To focus manually, adjust the lens focus ring until the image displayed on the clear matte field in the viewfinder is equipped with an A-M, M/A-M, or A/M-M mode switch, slide the switch to M. A-M mode switch M/A-M mode switch 2 Focus. If the lens is in focus. 88 More on Photography
Product Manual
Page 113
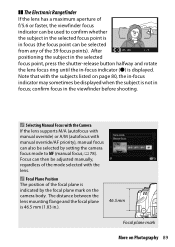
❚❚ The Electronic Rangefinder If the lens has a maximum aperture of f/5.6 or faster, the viewfinder focus indicator can be used to MF (manual focus; 0 78). A Focal Plane Position The position of the 39 focus points). After positioning the subject in the selected focus point, press the ...selected from any of the focal plane is indicated by the focal plane mark on page 80, the in-focus indicator may sometimes be adjusted manually, regardless of the mode selected with the subjects listed on the camera body. The distance between the lens mounting flange and the focal plane...
❚❚ The Electronic Rangefinder If the lens has a maximum aperture of f/5.6 or faster, the viewfinder focus indicator can be used to MF (manual focus; 0 78). A Focal Plane Position The position of the 39 focus points). After positioning the subject in the selected focus point, press the ...selected from any of the focal plane is indicated by the focal plane mark on page 80, the in-focus indicator may sometimes be adjusted manually, regardless of the mode selected with the subjects listed on the camera body. The distance between the lens mounting flange and the focal plane...

Product Manual
Page 119
More on Photography 95 Press the M (Y) button to raise the flash. Keeping the M (Y) button pressed, rotate the command dial until the desired flash mode appears in the information display. + M (Y) button Command dial Information display 3 Take pictures. M (Y) button 2 Choose a flash mode (P, S, A, and M modes only). The flash will not fire if it is taken. Manual Pop-up Modes In P, S, A, M, and 0 modes, the flash must be raised manually. The flash will fire whenever a picture is not raised. 1 Raise the flash.
More on Photography 95 Press the M (Y) button to raise the flash. Keeping the M (Y) button pressed, rotate the command dial until the desired flash mode appears in the information display. + M (Y) button Command dial Information display 3 Take pictures. M (Y) button 2 Choose a flash mode (P, S, A, and M modes only). The flash will not fire if it is taken. Manual Pop-up Modes In P, S, A, M, and 0 modes, the flash must be raised manually. The flash will fire whenever a picture is not raised. 1 Raise the flash.


