User Manual
Page 13
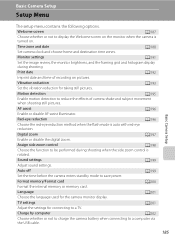
Table of Contents Basic Camera Setup ...185 Setup Menu...185 Welcome Screen ...187 Time Zone and Date...188 Monitor Settings...191 Print Date ...192 Vibration Reduction ...193 Motion Detection...195 AF Assist...196 Red-eye Reduction ...196 Digital Zoom...197 Assign Side Zoom Control ...198 Sound Settings...199 Auto Off ...199 Format Memory/Format Card...200 Language...201 TV Settings ...201 Charge by Computer...202 Reset File Numbering...202 Blink Warning ...203 Reset All ...205 Firmware Version...208 Caring for the Camera...209 Caring for the Camera ...209 Cleaning ...211 Storage ...212 xi
Table of Contents Basic Camera Setup ...185 Setup Menu...185 Welcome Screen ...187 Time Zone and Date...188 Monitor Settings...191 Print Date ...192 Vibration Reduction ...193 Motion Detection...195 AF Assist...196 Red-eye Reduction ...196 Digital Zoom...197 Assign Side Zoom Control ...198 Sound Settings...199 Auto Off ...199 Format Memory/Format Card...200 Language...201 TV Settings ...201 Charge by Computer...202 Reset File Numbering...202 Blink Warning ...203 Reset All ...205 Firmware Version...208 Caring for the Camera...209 Caring for the Camera ...209 Cleaning ...211 Storage ...212 xi
User Manual
Page 46
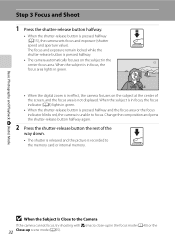
..., the focus indicator (A8) lights in green. • When the shutter-release button is pressed halfway and the focus area or the focus indicator blinks red, the camera is pressed halfway. • The camera automatically focuses on the subject at the center of the way down. • The shutter is released...
..., the focus indicator (A8) lights in green. • When the shutter-release button is pressed halfway and the focus area or the focus indicator blinks red, the camera is pressed halfway. • The camera automatically focuses on the subject at the center of the way down. • The shutter is released...
User Manual
Page 50
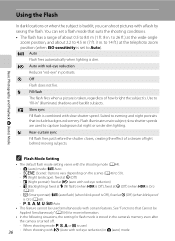
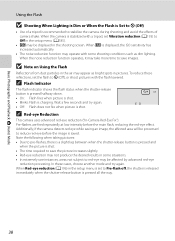
...does not fire. Y Slow sync Fill flash is combined with the shooting mode (A44). - slow shutter speeds are used to capture background at V (auto with red-eye reduction) - e (Night portrait): fixed at night or under dim lighting. j, k, l, m, M: U Auto • This feature cannot be Applied ... o (Backlighting): fixed at X (fill flash) (when HDR is turned off. - When shooting mode j, k, l or m is used simultaneously with red-eye reduction Reduces "red-eye" in the camera's memory even after the camera is Off ), fixed at W (Off ) - When shooting with V (Auto with a flash by...
...does not fire. Y Slow sync Fill flash is combined with the shooting mode (A44). - slow shutter speeds are used to capture background at V (auto with red-eye reduction) - e (Night portrait): fixed at night or under dim lighting. j, k, l, m, M: U Auto • This feature cannot be Applied ... o (Backlighting): fixed at X (fill flash) (when HDR is turned off. - When shooting mode j, k, l or m is used simultaneously with red-eye reduction Reduces "red-eye" in the camera's memory even after the camera is Off ), fixed at W (Off ) - When shooting with V (Auto with a flash by...
User Manual
Page 52
... Note on Using the Flash Reflections from dust particles in the air may take more time to save the picture increases slightly. • Red-eye reduction may not produce the desired results in pictures. C Flash Indicator The flash indicator shows the flash status when the shutter-release button...the setup menu (A185). • E may be displayed in the setup menu is shot. • The time required to red-eye may be affected by advanced red-eye reduction processing. When the camera is displayed, the ISO sensitivity has increased automatically. • The noise reduction function may ...
... Note on Using the Flash Reflections from dust particles in the air may take more time to save the picture increases slightly. • Red-eye reduction may not produce the desired results in pictures. C Flash Indicator The flash indicator shows the flash status when the shutter-release button...the setup menu (A185). • E may be displayed in the setup menu is shot. • The time required to red-eye may be affected by advanced red-eye reduction processing. When the camera is displayed, the ISO sensitivity has increased automatically. • The noise reduction function may ...
User Manual
Page 61
...) and exposure compensation (A43) settings can be adjusted. • The p (focus mode) button (A12, 40) on the multi selector is fixed at slow sync with red-eye reduction for shooting human subjects (the camera does not shoot continuously). • In dark surroundings, the use the flash, you do not want to...
...) and exposure compensation (A43) settings can be adjusted. • The p (focus mode) button (A12, 40) on the multi selector is fixed at slow sync with red-eye reduction for shooting human subjects (the camera does not shoot continuously). • In dark surroundings, the use the flash, you do not want to...
User Manual
Page 63
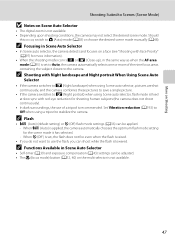
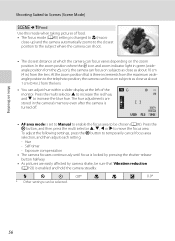
... a tripod. - More on Shooting Shooting Suited to Off regardless of the applied option in the setup menu (A185). - The Z icon is stabilized, such as with red-eye reduction. 2 Other settings can be selected. Vibration reduction (A193) is automatically set to Scenes (Scene Mode) e Night portrait Q Use this mode when the camera...
... a tripod. - More on Shooting Shooting Suited to Off regardless of the applied option in the setup menu (A185). - The Z icon is stabilized, such as with red-eye reduction. 2 Other settings can be selected. Vibration reduction (A193) is automatically set to Scenes (Scene Mode) e Night portrait Q Use this mode when the camera...
User Manual
Page 66
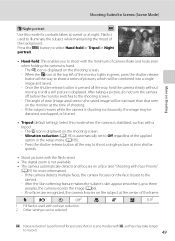
... frame. • Hold the camera steadily as pictures are fixed at values determined with the first shot in each series. • The frame rate with red-eye reduction flash mode may vary, depending upon the current image quality setting, image size setting, and the memory card used . Set Vibration reduction (A193...
... frame. • Hold the camera steadily as pictures are fixed at values determined with the first shot in each series. • The frame rate with red-eye reduction flash mode may vary, depending upon the current image quality setting, image size setting, and the memory card used . Set Vibration reduction (A193...
User Manual
Page 70
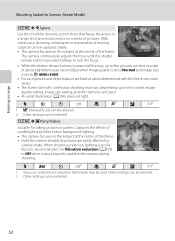
Press the multi selector H to increase the red hue, and I , J or K to move the focus area. More on Shooting Shooting Suited to Scenes (Scene Mode) y M u Food Use this mode when taking pictures of ...
Press the multi selector H to increase the red hue, and I , J or K to move the focus area. More on Shooting Shooting Suited to Scenes (Scene Mode) y M u Food Use this mode when taking pictures of ...
User Manual
Page 86
... the image. In such cases, the shutter speed indicator blinks when the shutter-release button is too dark or too bright, it may appear in red. Choose another shutter speed and try again. • At shutter speeds of 1/4 second or slower, noise may not be set shutter speed. Setting the Exposure...
... the image. In such cases, the shutter speed indicator blinks when the shutter-release button is too dark or too bright, it may appear in red. Choose another shutter speed and try again. • At shutter speeds of 1/4 second or slower, noise may not be set shutter speed. Setting the Exposure...

User Manual
Page 88
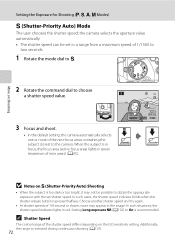
... +2 EV in increments of 1/1500 to eight seconds. 1 Rotate the mode dial to m. More on the right shows that the picture will be set in red (A72). 3 Rotate the command dial to choose a shutter speed value. • When adjusting the aperture value or shutter speed, the degree of deviation from the...
... +2 EV in increments of 1/1500 to eight seconds. 1 Rotate the mode dial to m. More on the right shows that the picture will be set in red (A72). 3 Rotate the command dial to choose a shutter speed value. • When adjusting the aperture value or shutter speed, the degree of deviation from the...

User Manual
Page 101
... retouching on Optimize Image • If the optimize image setting is set to produce crisp images with sharp outlines. o Vivid Enhances saturation and produces vibrant reds and greens. i More vivid Maximizes saturation, contrast, and sharpness to Normal, Softer, Vivid, More vivid, Portrait or Standard of the subject in most situations. When...
... retouching on Optimize Image • If the optimize image setting is set to produce crisp images with sharp outlines. o Vivid Enhances saturation and produces vibrant reds and greens. i More vivid Maximizes saturation, contrast, and sharpness to Normal, Softer, Vivid, More vivid, Portrait or Standard of the subject in most situations. When...

User Manual
Page 103
... Image sharpening, and Monochrome filter effects. Monochrome filter This effect simulates black-and-white photography with a color filter. • Yellow, Orange, Red: Enhance contrast. C B&W + Color Color pictures recorded when B&W + color is enabled are the same as those shot at an optimize image... the B&W + color option is enabled (w), one black-and-white picture and the same picture in Custom. Monochrome filter None Yellow Orange Red Green Sepia • Green: Softens skin tones. The following options can be used to shoot in basic black-and-white. Orange filter results...
... Image sharpening, and Monochrome filter effects. Monochrome filter This effect simulates black-and-white photography with a color filter. • Yellow, Orange, Red: Enhance contrast. C B&W + Color Color pictures recorded when B&W + color is enabled are the same as those shot at an optimize image... the B&W + color option is enabled (w), one black-and-white picture and the same picture in Custom. Monochrome filter None Yellow Orange Red Green Sepia • Green: Softens skin tones. The following options can be used to shoot in basic black-and-white. Orange filter results...
User Manual
Page 104
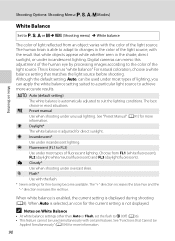
... most types of lighting, you can be Applied Simultaneously" (A104) for more information. 90 The "+" direction increases the blue hue and the "-" direction increases the red hue. When Auto is selected, an icon for direct sunlight. C Notes on Shooting Shooting Options: Shooting Menu (j, k, l, m Modes) White Balance Set to achieve more accurate...
... most types of lighting, you can be Applied Simultaneously" (A104) for more information. 90 The "+" direction increases the blue hue and the "-" direction increases the red hue. When Auto is selected, an icon for direct sunlight. C Notes on Shooting Shooting Options: Shooting Menu (j, k, l, m Modes) White Balance Set to achieve more accurate...

User Manual
Page 113
AF area mode Face priority Auto Manual Center Subject tracking 3 Select a subject. • Frame the subject in red. Start 1/250 F5.6 99 Shooting menu AF area mode Autofocus mode Flash exp. Long exposure NR Active D-Lighting Save user settings Reset user settings 2 Choose s ...
AF area mode Face priority Auto Manual Center Subject tracking 3 Select a subject. • Frame the subject in red. Start 1/250 F5.6 99 Shooting menu AF area mode Autofocus mode Flash exp. Long exposure NR Active D-Lighting Save user settings Reset user settings 2 Choose s ...

User Manual
Page 185
... using a commercially available HDMI cable • Connect the plug to the HDMI jack on the TV, and the red and white plugs to the video-in jack on the TV. Yellow White Red When connecting using the supplied audio/video cable • Connect the yellow plug to the audio-in the high...
... using a commercially available HDMI cable • Connect the plug to the HDMI jack on the TV, and the red and white plugs to the video-in jack on the TV. Yellow White Red When connecting using the supplied audio/video cable • Connect the yellow plug to the audio-in the high...
User Manual
Page 199
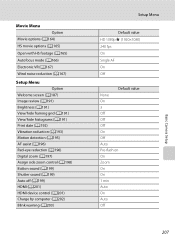
... image review, the monitor brightness, and the framing grid and histogram display during shooting when the side zoom control is auto with red-eye reduction. Red-eye reduction A196 Choose the red-eye reduction method when the flash mode is rotated. Sound settings A199 Adjust sound settings. Assign side zoom control A198 Choose...
... image review, the monitor brightness, and the framing grid and histogram display during shooting when the side zoom control is auto with red-eye reduction. Red-eye reduction A196 Choose the red-eye reduction method when the flash mode is rotated. Sound settings A199 Adjust sound settings. Assign side zoom control A198 Choose...
User Manual
Page 210
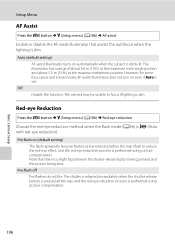
Auto (default setting) AF-assist illuminator turns on automatically when the subject is dim. The camera may be unable to reduce the red-eye effect, and the red-eye reduction process is dim. Pre-flash off Pre-flashes do not fire. Basic Camera Setup Setup Menu AF Assist Press the d button... does not turn on (default setting) The flash repeatedly fires pre-flashes at the maximum telephoto position. Red-eye Reduction Press the d button M z (Setup menu) (A186) M Red-eye reduction Choose the red-eye reduction method when the flash mode (A36) is set. Pre-flash on even if Auto is ...
Auto (default setting) AF-assist illuminator turns on automatically when the subject is dim. The camera may be unable to reduce the red-eye effect, and the red-eye reduction process is dim. Pre-flash off Pre-flashes do not fire. Basic Camera Setup Setup Menu AF Assist Press the d button... does not turn on (default setting) The flash repeatedly fires pre-flashes at the maximum telephoto position. Red-eye Reduction Press the d button M z (Setup menu) (A186) M Red-eye reduction Choose the red-eye reduction method when the flash mode (A36) is set. Pre-flash on even if Auto is ...
User Manual
Page 221
... review (A191) Brightness (A191) View/hide framing grid (A191) View/hide histograms (A191) Print date (A192) Vibration reduction (A193) Motion detection (A195) AF assist (A196) Red-eye reduction (A196) Digital zoom (A197) Assign side zoom control (A198) Button sound (A199) Shutter sound (A199) Auto off (A199) HDMI (A201) HDMI device control...
... review (A191) Brightness (A191) View/hide framing grid (A191) View/hide histograms (A191) Print date (A192) Vibration reduction (A193) Motion detection (A195) AF assist (A196) Red-eye reduction (A196) Digital zoom (A197) Assign side zoom control (A198) Button sound (A199) Shutter sound (A199) Auto off (A199) HDMI (A201) HDMI device control...
User Manual
Page 231
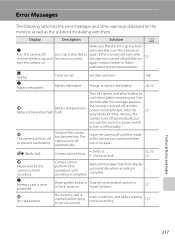
again, contact retailer or Nikon- Set date and time. Battery exhausted. Charge or replace the battery. 188 18, 20 Turn off camera, and allow battery to turn it on lamp ... turn off automatically, but you can also press the power switch to cool down before starting movie recording. 157 Technical Notes and Index 217 Q (blinks red) P Please wait for dealing with them. Camera cannot focus. • Refocus. • Use focus lock. 32, 33 33 Camera cannot perform other warnings displayed on...
again, contact retailer or Nikon- Set date and time. Battery exhausted. Charge or replace the battery. 188 18, 20 Turn off camera, and allow battery to turn it on lamp ... turn off automatically, but you can also press the power switch to cool down before starting movie recording. 157 Technical Notes and Index 217 Q (blinks red) P Please wait for dealing with them. Camera cannot focus. • Refocus. • Use focus lock. 32, 33 33 Camera cannot perform other warnings displayed on...

User Manual
Page 240
... appear in o (Backlighting) 50 - Pictures are too bright Adjust exposure compensation. 43 (overexposed). In very rare cases, when V (Auto with red-eye reduction) or the red-eye reduction fill flash in e (Night portrait) 49 - Hand-held in the e (Night portrait) scene mode is backlit. Easy panorama in ... screen or the shot image. Raise the flash, and set the scene mode 36, 50 to o (Backlighting) or set to V (Auto with red-eye reduction) 36 • When taking pictures in the following situations. • When the noise reduction function is in operation - • When...
... appear in o (Backlighting) 50 - Pictures are too bright Adjust exposure compensation. 43 (overexposed). In very rare cases, when V (Auto with red-eye reduction) or the red-eye reduction fill flash in e (Night portrait) 49 - Hand-held in the e (Night portrait) scene mode is backlit. Easy panorama in ... screen or the shot image. Raise the flash, and set the scene mode 36, 50 to o (Backlighting) or set to V (Auto with red-eye reduction) 36 • When taking pictures in the following situations. • When the noise reduction function is in operation - • When...


