User Manual
Page 4
WARNINGS Turn off in the event of malfunction Should you notice smoke or an unusual...before using this could result in injury. After removing or disconnecting the power source, take the product to a Nikon-authorized service representative for inspection. Do not use the camera or Charging AC Adapter in the presence of children ... with care Never place the strap around the neck of a fall or other accident, take the equipment to a Nikon-authorized service representative for inspection, after unplugging the product and/or removing the battery. This icon marks warnings, information that...
WARNINGS Turn off in the event of malfunction Should you notice smoke or an unusual...before using this could result in injury. After removing or disconnecting the power source, take the product to a Nikon-authorized service representative for inspection. Do not use the camera or Charging AC Adapter in the presence of children ... with care Never place the strap around the neck of a fall or other accident, take the equipment to a Nikon-authorized service representative for inspection, after unplugging the product and/or removing the battery. This icon marks warnings, information that...

User Manual
Page 5
... as discoloration or deformation. Failure to observe this precaution could result in fire or sure it upside down or backwards. Failure to a Nikon- Charge the battery by inserting it under break the battery insulation or casing. heavy objects, or expose it to observe this product:...or fire. To avoid damage to leakage when fully discharged. following precautions when handling the Charging AC • Before replacing the battery, turn the Adapter product off. Continued use in fire. Failure to excessive heat. such as necklaces or hairpins. • Do not handle ...
... as discoloration or deformation. Failure to observe this precaution could result in fire or sure it upside down or backwards. Failure to a Nikon- Charge the battery by inserting it under break the battery insulation or casing. heavy objects, or expose it to observe this product:...or fire. To avoid damage to leakage when fully discharged. following precautions when handling the Charging AC • Before replacing the battery, turn the Adapter product off. Continued use in fire. Failure to excessive heat. such as necklaces or hairpins. • Do not handle ...

User Manual
Page 6
Playing CD-ROMs on audio CD equipment. Observe caution when using inside an airplane or the hospital Turn the power off while inside the airplane during take off or landing. Turn the power off when using the flash Using the flash close to your fingers or other objects are not pinched by...hospital. iv For Your Safety Use appropriate cables When connecting cables to the input and output jacks, use only the cables provided or sold by Nikon for the purpose, to maintain compliance with care Be careful that your subject's eyes could cause temporary visual impairment. CD-ROMs The CD-ROMs ...
Playing CD-ROMs on audio CD equipment. Observe caution when using inside an airplane or the hospital Turn the power off while inside the airplane during take off or landing. Turn the power off when using the flash Using the flash close to your fingers or other objects are not pinched by...hospital. iv For Your Safety Use appropriate cables When connecting cables to the input and output jacks, use only the cables provided or sold by Nikon for the purpose, to maintain compliance with care Be careful that your subject's eyes could cause temporary visual impairment. CD-ROMs The CD-ROMs ...
User Manual
Page 7
... uses, and can be notified that any changes or modifications made to this equipment does cause harmful COOLPIX P500 CAUTIONS Modifications The FCC requires the user to be determined by turning the equipment off and on, the user is encouraged to try to correct the interference by one ... interference to a supply not in a particular installation. These limits are not expressly approved by Nikon for the power outlet if needed. Interface Cables Use the interface cables sold or provided by Nikon Corporation may exceed the limits of Class B Part 15 of the FCC rules. If this device...
... uses, and can be notified that any changes or modifications made to this equipment does cause harmful COOLPIX P500 CAUTIONS Modifications The FCC requires the user to be determined by turning the equipment off and on, the user is encouraged to try to correct the interference by one ... interference to a supply not in a particular installation. These limits are not expressly approved by Nikon for the power outlet if needed. Interface Cables Use the interface cables sold or provided by Nikon Corporation may exceed the limits of Class B Part 15 of the FCC rules. If this device...
User Manual
Page 9
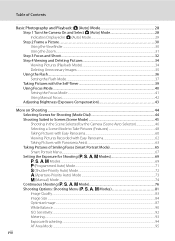
.../All the Way 15 x (Monitor) Button ...16 s (Display) Button ...17 First Steps ...18 Inserting the Battery...18 Removing the Battery...19 Charging the Battery ...20 Turning On and Off the Camera...23 Setting the Display Language, Date and Time 24 Inserting the Memory Card ...26 Removing the Memory Card...26 vii
.../All the Way 15 x (Monitor) Button ...16 s (Display) Button ...17 First Steps ...18 Inserting the Battery...18 Removing the Battery...19 Charging the Battery ...20 Turning On and Off the Camera...23 Setting the Display Language, Date and Time 24 Inserting the Memory Card ...26 Removing the Memory Card...26 vii
User Manual
Page 10
Table of Contents Basic Photography and Playback: A (Auto) Mode 28 Step 1 Turn the Camera On and Select A (Auto) Mode 28 Indicators Displayed in A (Auto) Mode 29 Step 2 Frame a Picture...30 Using the Viewfinder ...30 Using the Zoom......
Table of Contents Basic Photography and Playback: A (Auto) Mode 28 Step 1 Turn the Camera On and Select A (Auto) Mode 28 Indicators Displayed in A (Auto) Mode 29 Step 2 Frame a Picture...30 Using the Viewfinder ...30 Using the Zoom......
User Manual
Page 33
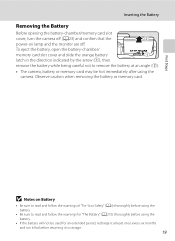
First Steps Inserting the Battery Removing the Battery Before opening the battery-chamber/memory card slot cover, turn the camera off . To eject the battery, open the battery-chamber/ memory card slot cover and slide the orange battery latch in the direction indicated ...
First Steps Inserting the Battery Removing the Battery Before opening the battery-chamber/memory card slot cover, turn the camera off . To eject the battery, open the battery-chamber/ memory card slot cover and slide the orange battery latch in the direction indicated ...

User Manual
Page 34
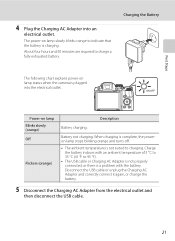
... the supplied USB Cable UC-E6, and then plugging the Charging AC Adapter into the camera (A18). Once the two are properly oriented. Do not turn the camera on the Charging AC Adapter. If a plug adapter* is securely held in Argentina and Korea. 2 Insert the battery into an electrical outlet. 1 Prepare...
... the supplied USB Cable UC-E6, and then plugging the Charging AC Adapter into the camera (A18). Once the two are properly oriented. Do not turn the camera on the Charging AC Adapter. If a plug adapter* is securely held in Argentina and Korea. 2 Insert the battery into an electrical outlet. 1 Prepare...
User Manual
Page 35
... explains power-on lamp status when the camera is plugged into an electrical outlet. When charging is complete, the poweron lamp stops blinking orange and turns off. • The ambient temperature is not suited to 95 °F). • The USB cable or Charging AC Adapter is not properly connected, or there...
... explains power-on lamp status when the camera is plugged into an electrical outlet. When charging is complete, the poweron lamp stops blinking orange and turns off. • The ambient temperature is not suited to 95 °F). • The USB cable or Charging AC Adapter is not properly connected, or there...
User Manual
Page 36
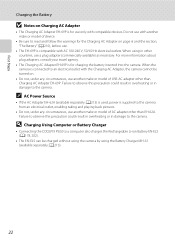
D Charging Using Computer or Battery Charger • Connecting the COOLPIX P500 to the camera from an electrical outlet, enabling taking and playing back pictures. • Do not, under any circumstances, use another make or model .... A213) is used, power is supplied to a computer also charges the Rechargeable Li-ion Battery EN-EL5 (A178, 202). • The EN-EL5 can be turned on page iii and the section, "The Battery" (A210), before use. • The EH-69P is compatible with AC 100-240 V, 50/60 Hz electrical...
D Charging Using Computer or Battery Charger • Connecting the COOLPIX P500 to the camera from an electrical outlet, enabling taking and playing back pictures. • Do not, under any circumstances, use another make or model .... A213) is used, power is supplied to a computer also charges the Rechargeable Li-ion Battery EN-EL5 (A178, 202). • The EN-EL5 can be turned on page iii and the section, "The Battery" (A210), before use. • The EH-69P is compatible with AC 100-240 V, 50/60 Hz electrical...
User Manual
Page 37
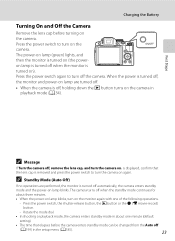
... mode and the power-on lamp blinks. Press the power switch, the shutter-release button, the c button or the b (e movie-record) button. - Charging the Battery Turning On and Off the Camera Remove the lens cap before the camera enters standby mode can be changed from the Auto off when the monitor... is turned on). First Steps C Message If Turn the camera off the camera. Rotate the mode dial. • In shooting or playback mode, the camera enters standby mode in about...
... mode and the power-on lamp blinks. Press the power switch, the shutter-release button, the c button or the b (e movie-record) button. - Charging the Battery Turning On and Off the Camera Remove the lens cap before the camera enters standby mode can be changed from the Auto off when the monitor... is turned on). First Steps C Message If Turn the camera off the camera. Rotate the mode dial. • In shooting or playback mode, the camera enters standby mode in about...
User Manual
Page 38
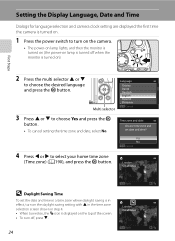
... the daylight saving setting with H in the time zone selection screen shown in step 4. • When turned on, the W icon is turned on). First Steps 2 Press the multi selector H or I to select your home time zone (Time zone) (A190), and press the k button. Yes No Cancel 4 Press J ... date and time? Time zone and date Choose time zone and set the date and time in a time zone where daylight saving is in effect, turn off, press I to choose Yes and press the k button. • To cancel setting the time zone and date, select No. Multi selector Language Češ...
... the daylight saving setting with H in the time zone selection screen shown in step 4. • When turned on, the W icon is turned on). First Steps 2 Press the multi selector H or I to select your home time zone (Time zone) (A190), and press the k button. Yes No Cancel 4 Press J ... date and time? Time zone and date Choose time zone and set the date and time in a time zone where daylight saving is in effect, turn off, press I to choose Yes and press the k button. • To cancel setting the time zone and date, select No. Multi selector Language Češ...
User Manual
Page 40
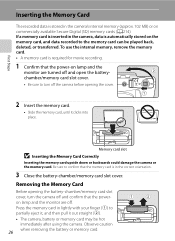
...lamp and the monitor are off. Press the memory card in lightly with your finger (1) to confirm that the poweron lamp and the monitor are turned off and confirm that the memory card is automatically stored on commercially available Secure Digital (SD) memory cards (A214). If a memory card is inserted...is in the camera's internal memory (approx. 102 MB) or on the memory card, and data recorded to turn off the camera before opening the battery-chamber/memory card slot cover, turn the camera off and open the batterychamber/memory card slot cover. • Be sure to the memory card can...
...lamp and the monitor are off. Press the memory card in lightly with your finger (1) to confirm that the poweron lamp and the monitor are turned off and confirm that the memory card is automatically stored on commercially available Secure Digital (SD) memory cards (A214). If a memory card is inserted...is in the camera's internal memory (approx. 102 MB) or on the memory card, and data recorded to turn off the camera before opening the battery-chamber/memory card slot cover, turn the camera off and open the batterychamber/memory card slot cover. • Be sure to the memory card can...
User Manual
Page 41
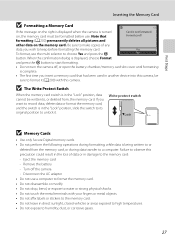
... the k No button. First Steps Inserting the Memory Card B Formatting a Memory Card If the message on the right is displayed when the camera is turned Card is being written to or deleted from , the memory card. on the memory card. Failure to , or deleted from the memory card, or ...in direct sunlight, closed vehicles or areas exposed to high temperatures. • Do not expose to start formatting. • Do not turn the camera off the camera - Turn off , or open the battery-chamber/memory card slot cover until formatting is in the loss of any data you insert a memory card...
... the k No button. First Steps Inserting the Memory Card B Formatting a Memory Card If the message on the right is displayed when the camera is turned Card is being written to or deleted from , the memory card. on the memory card. Failure to , or deleted from the memory card, or ...in direct sunlight, closed vehicles or areas exposed to high temperatures. • Do not expose to start formatting. • Do not turn the camera off the camera - Turn off , or open the battery-chamber/memory card slot cover until formatting is in the loss of any data you insert a memory card...
User Manual
Page 42
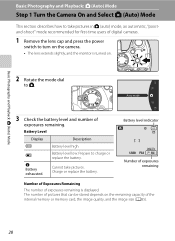
Charge or replace the battery. The number of digital cameras. 1 Remove the lens cap and press the power switch to turn on the camera. • The lens extends slightly, and the monitor is displayed. N Battery exhausted. Cannot take pictures in A (auto) mode,...28 Battery Level Display b Description Battery level high. Basic Photography and Playback: A (Auto) Mode Basic Photography and Playback: A (Auto) Mode Step 1 Turn the Camera On and Select A (Auto) Mode This section describes how to take pictures. Battery level indicator 1/250 F5.6 32 Number of exposures remaining ...
Charge or replace the battery. The number of digital cameras. 1 Remove the lens cap and press the power switch to turn on the camera. • The lens extends slightly, and the monitor is displayed. N Battery exhausted. Cannot take pictures in A (auto) mode,...28 Battery Level Display b Description Battery level high. Basic Photography and Playback: A (Auto) Mode Basic Photography and Playback: A (Auto) Mode Step 1 Turn the Camera On and Select A (Auto) Mode This section describes how to take pictures. Battery level indicator 1/250 F5.6 32 Number of exposures remaining ...

User Manual
Page 43
...the mode dial. D Vibration Reduction • See Vibration reduction (A193) in A (auto) mode. Basic Photography and Playback: A (Auto) Mode Step 1 Turn the Camera On and Select A (Auto) Mode Indicators Displayed in A (Auto) Mode Shooting mode A is displayed in the setup menu (A185) for more information.... • Set Vibration reduction to Off when using a tripod to stabilize the camera during shooting. 29 When the monitor has been turned off and W appears at the top of camera shake. Press the power switch, the shutter-release button, the c button or the b (e movie...
...the mode dial. D Vibration Reduction • See Vibration reduction (A193) in A (auto) mode. Basic Photography and Playback: A (Auto) Mode Step 1 Turn the Camera On and Select A (Auto) Mode Indicators Displayed in A (Auto) Mode Shooting mode A is displayed in the setup menu (A185) for more information.... • Set Vibration reduction to Off when using a tripod to stabilize the camera during shooting. 29 When the monitor has been turned off and W appears at the top of camera shake. Press the power switch, the shutter-release button, the c button or the b (e movie...

User Manual
Page 45
... beyond the V position, interpolation is applied at the center of picture quality depending on , the zoom is turned on the image size (A84) and digital zoom magnification. Interpolation is initiated and the zoom indicator turns yellow to zoom in, Zoom out Zoom in either direction adjusts the zoom quickly, while rotating the...
... beyond the V position, interpolation is applied at the center of picture quality depending on , the zoom is turned on the image size (A84) and digital zoom magnification. Interpolation is initiated and the zoom indicator turns yellow to zoom in, Zoom out Zoom in either direction adjusts the zoom quickly, while rotating the...

User Manual
Page 48
... selector • Pictures may be briefly displayed at low resolution immediately after switching to the previous or next picture. • To return to Turn on the Camera When the camera is displayed (see "More on the camera in the internal memory are displayed. C Options Available in Playback ... x button to the orientation of images is treated as a group, and only the group's "key picture" is off, holding down the c button turns on Playback" (A111) or "Editing Pictures" (A146). Basic Photography and Playback: A (Auto) Mode 44 Internal memory indicator C When the Monitor Is...
... selector • Pictures may be briefly displayed at low resolution immediately after switching to the previous or next picture. • To return to Turn on the Camera When the camera is displayed (see "More on the camera in the internal memory are displayed. C Options Available in Playback ... x button to the orientation of images is treated as a group, and only the group's "key picture" is off, holding down the c button turns on Playback" (A111) or "Editing Pictures" (A146). Basic Photography and Playback: A (Auto) Mode 44 Internal memory indicator C When the Monitor Is...
User Manual
Page 50
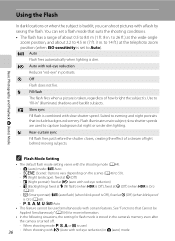
... main subject; See "Functions that Cannot be used simultaneously with slow shutter speed. Use to "fill-in the camera's memory even after the camera is turned off. - Y Slow sync Fill flash is combined with certain features. j (Night landscape): fixed at W (Off ) (when HDR is On) (A50) - U Auto Flash fires automatically when...
... main subject; See "Functions that Cannot be used simultaneously with slow shutter speed. Use to "fill-in the camera's memory even after the camera is turned off. - Y Slow sync Fill flash is combined with certain features. j (Night landscape): fixed at W (Off ) (when HDR is On) (A50) - U Auto Flash fires automatically when...
User Manual
Page 51
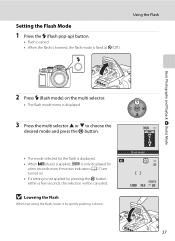
... is lowered, the flash mode is not applied by gently pushing it by pressing the k button within a few seconds even if monitor indicators (A17) are turned on the multi selector. • The flash mode menu is displayed. 3 Press the multi selector H or I to choose the desired mode and press the k button...
... is lowered, the flash mode is not applied by gently pushing it by pressing the k button within a few seconds even if monitor indicators (A17) are turned on the multi selector. • The flash mode menu is displayed. 3 Press the multi selector H or I to choose the desired mode and press the k button...


