
User Manual
Page 6
... should be no less than 1 m (3 ft. 4 in burns or fire. iv The electromagnetic waves given out by this precaution could result in .) from the monitor touching the skin or entering the eyes or mouth. Avoid contact with the flash window touching a person or object Failure to observe this camera may... a hospital. For Your Safety Use appropriate cables When connecting cables to the input and output jacks, use only the cables provided or sold by Nikon for the purpose, to maintain compliance with care Be careful that your subject's eyes could cause temporary visual impairment.
... should be no less than 1 m (3 ft. 4 in burns or fire. iv The electromagnetic waves given out by this precaution could result in .) from the monitor touching the skin or entering the eyes or mouth. Avoid contact with the flash window touching a person or object Failure to observe this camera may... a hospital. For Your Safety Use appropriate cables When connecting cables to the input and output jacks, use only the cables provided or sold by Nikon for the purpose, to maintain compliance with care Be careful that your subject's eyes could cause temporary visual impairment.
User Manual
Page 9
...Manual ...1 Information and Precautions ...2 Parts of the Camera ...4 Camera Body ...4 Changing the Angle of the Monitor ...6 Raising and Lowering the Flash...7 Attaching the Camera Strap and Lens Cap 7 Monitor ...8 Basic Operations...11 Command Dial ...11 Multi Selector ...12 d (Menu) Button...13 Switching Between Tabs... in the Menu Screen 13 Using Camera Menus...14 Pressing the Shutter-Release Button Halfway/All the Way 15 x (Monitor) Button ...16 s (Display) Button ...17 First Steps ...18 Inserting the Battery...18 Removing the Battery...19 Charging the Battery ......
...Manual ...1 Information and Precautions ...2 Parts of the Camera ...4 Camera Body ...4 Changing the Angle of the Monitor ...6 Raising and Lowering the Flash...7 Attaching the Camera Strap and Lens Cap 7 Monitor ...8 Basic Operations...11 Command Dial ...11 Multi Selector ...12 d (Menu) Button...13 Switching Between Tabs... in the Menu Screen 13 Using Camera Menus...14 Pressing the Shutter-Release Button Halfway/All the Way 15 x (Monitor) Button ...16 s (Display) Button ...17 First Steps ...18 Inserting the Battery...18 Removing the Battery...19 Charging the Battery ......
User Manual
Page 13
Table of Contents Basic Camera Setup ...185 Setup Menu...185 Welcome Screen ...187 Time Zone and Date...188 Monitor Settings...191 Print Date ...192 Vibration Reduction ...193 Motion Detection...195 AF Assist...196 Red-eye Reduction ...196 Digital Zoom...197 Assign Side Zoom Control ...198 Sound Settings...199 Auto Off ...199 Format Memory/Format Card...200 Language...201 TV Settings ...201 Charge by Computer...202 Reset File Numbering...202 Blink Warning ...203 Reset All ...205 Firmware Version...208 Caring for the Camera...209 Caring for the Camera ...209 Cleaning ...211 Storage ...212 xi
Table of Contents Basic Camera Setup ...185 Setup Menu...185 Welcome Screen ...187 Time Zone and Date...188 Monitor Settings...191 Print Date ...192 Vibration Reduction ...193 Motion Detection...195 AF Assist...196 Red-eye Reduction ...196 Digital Zoom...197 Assign Side Zoom Control ...198 Sound Settings...199 Auto Off ...199 Format Memory/Format Card...200 Language...201 TV Settings ...201 Charge by Computer...202 Reset File Numbering...202 Blink Warning ...203 Reset All ...205 Firmware Version...208 Caring for the Camera...209 Caring for the Camera ...209 Cleaning ...211 Storage ...212 xi
User Manual
Page 15
...Display Illustrations and text displays shown in the camera's internal memory or on removable memory cards. This icon marks tips, additional D information that monitor indicators can be stored on the memory card. This icon indicates that should be read before use, and keep it . Read this manual ... the names of buttons or messages displayed on a computer monitor appear in this manual may be read it where all those who use , to prevent damage to as "memory card." • The setting at the time of Nikon COOLPIX P500 digital camera. If a memory card is referred to the ...
...Display Illustrations and text displays shown in the camera's internal memory or on removable memory cards. This icon marks tips, additional D information that monitor indicators can be stored on the memory card. This icon indicates that should be read before use, and keep it . Read this manual ... the names of buttons or messages displayed on a computer monitor appear in this manual may be read it where all those who use , to prevent damage to as "memory card." • The setting at the time of Nikon COOLPIX P500 digital camera. If a memory card is referred to the ...

User Manual
Page 19
... 1 2 3 4 5 6 78 9 19 20 21 10 11 12 13 14 15 16 17 18 22 23 24 1 Side zoom control 31 2 Speaker 143, 168 3 x (monitor) button 16 4 Diopter adjustment control 30 5 Electronic viewfinder 16, 30 6 s (display) button 17 7 b (e movie-record) button 157 8 Movie mode switch 157 9 Command dial 11... 10 USB/Audio video connector 171, 174, 180 11 HDMI Mini Connector 171 12 Connector cover 171, 174, 180 13 Monitor 8, 17, 29 14 c (playback) button 34 15 Multi selector 12 16 k (apply selection) button 12 17 d button......13, 45, 82, 135, 163, 186...
... 1 2 3 4 5 6 78 9 19 20 21 10 11 12 13 14 15 16 17 18 22 23 24 1 Side zoom control 31 2 Speaker 143, 168 3 x (monitor) button 16 4 Diopter adjustment control 30 5 Electronic viewfinder 16, 30 6 s (display) button 17 7 b (e movie-record) button 157 8 Movie mode switch 157 9 Command dial 11... 10 USB/Audio video connector 171, 174, 180 11 HDMI Mini Connector 171 12 Connector cover 171, 174, 180 13 Monitor 8, 17, 29 14 c (playback) button 34 15 Multi selector 12 16 k (apply selection) button 12 17 d button......13, 45, 82, 135, 163, 186...

User Manual
Page 20
Introduction Parts of the Camera Changing the Angle of the Monitor The angle of the monitor. • The monitor cannot be lowered down to 82° or raised upward to 90°. B Notes on Monitor • Do not apply excessive force when changing the angle of the monitor can be moved horizontally. 6 • Put the monitor back in the original position when using in normal situations. This is convenient when taking pictures with the camera held at high or low positions.
Introduction Parts of the Camera Changing the Angle of the Monitor The angle of the monitor. • The monitor cannot be lowered down to 82° or raised upward to 90°. B Notes on Monitor • Do not apply excessive force when changing the angle of the monitor can be moved horizontally. 6 • Put the monitor back in the original position when using in normal situations. This is convenient when taking pictures with the camera held at high or low positions.

User Manual
Page 22
See page 17 for how to switch the monitor display. Shooting 48 47 46 45 44 43 42 41 40 45 2 6 13 8 7 9 12 13 10 11 14 15 38, 39 37 35 1/250 F5.6 999 32 27 26 17 18 19 16 20 21 34 33 25 36 999 9999 1m00s 31 30 29 28 a b 22 23 24 49 50 1/250 F5.6 1342 8 Introduction Parts of the Camera Monitor The following indicators may appear in the monitor during shooting and playback (actual display varies with current camera settings).
See page 17 for how to switch the monitor display. Shooting 48 47 46 45 44 43 42 41 40 45 2 6 13 8 7 9 12 13 10 11 14 15 38, 39 37 35 1/250 F5.6 999 32 27 26 17 18 19 16 20 21 34 33 25 36 999 9999 1m00s 31 30 29 28 a b 22 23 24 49 50 1/250 F5.6 1342 8 Introduction Parts of the Camera Monitor The following indicators may appear in the monitor during shooting and playback (actual display varies with current camera settings).

User Manual
Page 27
... (during playback mode) Tab for the menu items. • Use the multi selector to highlight the tab. Set up Welcome screen Time zone and date Monitor settings Print date Vibration reduction Motion detection AF assist The corresponding menu is pressed, choose the left end tab to switch to choose another tab...
... (during playback mode) Tab for the menu items. • Use the multi selector to highlight the tab. Set up Welcome screen Time zone and date Monitor settings Print date Vibration reduction Motion detection AF assist The corresponding menu is pressed, choose the left end tab to switch to choose another tab...

User Manual
Page 30
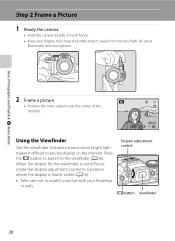
...your eye with the diopter adjustment control. While looking into the viewfinder, rotate the diopter adjustment control until the display is difficult to see the monitor. Monitor Viewfinder 1/250 F5.6 1342 1/250 F5.6 1342 B Diopter Adjustment of Viewfinder When the diopter for the viewfinder is out of focus and the... display is difficult to see , adjust the diopter with your fingertips or nails. Introduction Basic Operations x (Monitor) Button Press the x (monitor) button to the one that suits the shooting conditions. Switch to switch between the...
...your eye with the diopter adjustment control. While looking into the viewfinder, rotate the diopter adjustment control until the display is difficult to see the monitor. Monitor Viewfinder 1/250 F5.6 1342 1/250 F5.6 1342 B Diopter Adjustment of Viewfinder When the diopter for the viewfinder is out of focus and the... display is difficult to see , adjust the diopter with your fingertips or nails. Introduction Basic Operations x (Monitor) Button Press the x (monitor) button to the one that suits the shooting conditions. Switch to switch between the...

User Manual
Page 31
.... +1.0 ISO 200 4 132 Display shooting information (except for movies) Display highlight1, histogram2 and shooting information3. s (Display) Button To switch between the information displayed on the monitor during shooting and playback, press the s (display) button. For Playback 1/250 F5.6 1342 Movie frame Display the range of a movie in the picture.
.... +1.0 ISO 200 4 132 Display shooting information (except for movies) Display highlight1, histogram2 and shooting information3. s (Display) Button To switch between the information displayed on the monitor during shooting and playback, press the s (display) button. For Playback 1/250 F5.6 1342 Movie frame Display the range of a movie in the picture.
User Manual
Page 33
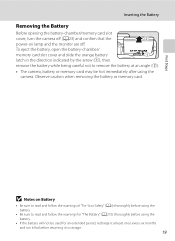
...) thoroughly before returning it to read and follow the warnings of "For Your Safety" (Aii) thoroughly before using the camera. B Notes on lamp and the monitor are off. Observe caution when removing the battery or memory card. First Steps Inserting the Battery Removing the Battery Before opening the battery-chamber/memory...
...) thoroughly before returning it to read and follow the warnings of "For Your Safety" (Aii) thoroughly before using the camera. B Notes on lamp and the monitor are off. Observe caution when removing the battery or memory card. First Steps Inserting the Battery Removing the Battery Before opening the battery-chamber/memory...
User Manual
Page 37
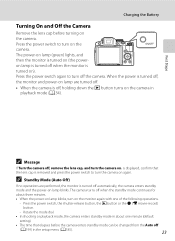
... button. - Press the power switch again to turn the camera on the camera. When the power is turned off, the monitor and power-on lamp are performed, the monitor is turned off automatically, the camera enters standby mode and the power-on the camera in playback mode (A34). Rotate the ...• In shooting or playback mode, the camera enters standby mode in about three minutes. • When the power-on lamp blinks, turn on the monitor again with one minute (default setting). • The time that the lens cap is off, holding down the c button turns on lamp blinks. Charging ...
... button. - Press the power switch again to turn the camera on the camera. When the power is turned off, the monitor and power-on lamp are performed, the monitor is turned off automatically, the camera enters standby mode and the power-on the camera in playback mode (A34). Rotate the ...• In shooting or playback mode, the camera enters standby mode in about three minutes. • When the power-on lamp blinks, turn on the monitor again with one minute (default setting). • The time that the lens cap is off, holding down the c button turns on lamp blinks. Charging ...
User Manual
Page 38
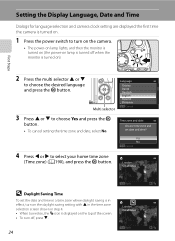
... zone and date Choose time zone and set the date and time in a time zone where daylight saving is in effect, turn off when the monitor is turned on the top of the screen. • To turn on the daylight saving setting with H in the time zone selection screen shown in... first time the camera is turned on. 1 Press the power switch to turn on the camera. • The power-on lamp lights, and then the monitor is turned on (the power-on lamp is displayed on ). First Steps 2 Press the multi selector H or I to select your home time zone (Time zone...
... zone and date Choose time zone and set the date and time in a time zone where daylight saving is in effect, turn off when the monitor is turned on the top of the screen. • To turn on the daylight saving setting with H in the time zone selection screen shown in... first time the camera is turned on. 1 Press the power switch to turn on the camera. • The power-on lamp lights, and then the monitor is turned on (the power-on lamp is displayed on ). First Steps 2 Press the multi selector H or I to select your home time zone (Time zone...
User Manual
Page 40
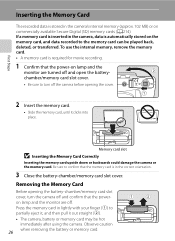
... the memory card in the correct orientation. 3 Close the battery-chamber/memory card slot cover. Be sure to confirm that the poweron lamp and the monitor are turned off and open the batterychamber/memory card slot cover. • Be sure to turn the camera off and confirm that the memory card...) memory cards (A214). First Steps Inserting the Memory Card The recorded data is stored in the camera, data is automatically stored on lamp and the monitor are off.
... the memory card in the correct orientation. 3 Close the battery-chamber/memory card slot cover. Be sure to confirm that the poweron lamp and the monitor are turned off and open the batterychamber/memory card slot cover. • Be sure to turn the camera off and confirm that the memory card...) memory cards (A214). First Steps Inserting the Memory Card The recorded data is stored in the camera, data is automatically stored on lamp and the monitor are off.
User Manual
Page 42
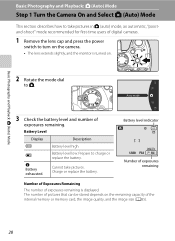
... number of digital cameras. 1 Remove the lens cap and press the power switch to turn on the camera. • The lens extends slightly, and the monitor is displayed. Cannot take pictures in A (auto) mode, an automatic, "pointand-shoot" mode recommended for first-time users of exposures remaining is turned on the...
... number of digital cameras. 1 Remove the lens cap and press the power switch to turn on the camera. • The lens extends slightly, and the monitor is displayed. Cannot take pictures in A (auto) mode, an automatic, "pointand-shoot" mode recommended for first-time users of exposures remaining is turned on the...

User Manual
Page 43
...). C Functions Available in standby mode to raise the flash (A37). When a memory card is inserted, C is needed, such as in A (auto) mode. When the monitor has been turned off in A (Auto) Mode • The flash mode (A36) can be adjusted, self-timer (A39), focus mode (A40) and exposure compensation (A43...) (A199), turn on the Flash When the flash is lowered, the flash setting is fixed at off and W appears at the top of the monitor. Rotate the mode dial. In situations where a flash is not displayed and pictures are recorded to stabilize the camera during shooting. 29 C Note on...
...). C Functions Available in standby mode to raise the flash (A37). When a memory card is inserted, C is needed, such as in A (auto) mode. When the monitor has been turned off in A (Auto) Mode • The flash mode (A36) can be adjusted, self-timer (A39), focus mode (A40) and exposure compensation (A43...) (A199), turn on the Flash When the flash is lowered, the flash setting is fixed at off and W appears at the top of the monitor. Rotate the mode dial. In situations where a flash is not displayed and pictures are recorded to stabilize the camera during shooting. 29 C Note on...
User Manual
Page 44
...hair, strap and other objects away from the lens, flash, AF-assist illuminator and microphone. When the diopter for the viewfinder is out of the monitor. 1/250 F5.6 32 Using the Viewfinder Use the viewfinder to frame pictures when bright light makes it difficult to see the display on the... monitor. Basic Photography and Playback: A (Auto) Mode 2 Frame a picture. • Position the main subject near the center of focus, rotate the diopter adjustment control to a...
...hair, strap and other objects away from the lens, flash, AF-assist illuminator and microphone. When the diopter for the viewfinder is out of the monitor. 1/250 F5.6 32 Using the Viewfinder Use the viewfinder to frame pictures when bright light makes it difficult to see the display on the... monitor. Basic Photography and Playback: A (Auto) Mode 2 Frame a picture. • Position the main subject near the center of focus, rotate the diopter adjustment control to a...

User Manual
Page 45
... zoom is possible at which shooting without interpolation is in the setup menu (A185). Interpolation is at zoom positions beyond the maximum magnification of the monitor when the zoom control is being applied. When the image size is small • Using Digital zoom (A197) in either direction adjusts the zoom quickly...
... zoom is possible at which shooting without interpolation is in the setup menu (A185). Interpolation is at zoom positions beyond the maximum magnification of the monitor when the zoom control is being applied. When the image size is small • Using Digital zoom (A197) in either direction adjusts the zoom quickly...

User Manual
Page 48
...J or K to shooting mode, press the c button again or press the shutter-release button or b (e movie-record) button. • C is displayed on the monitor again (A199). The lens does not extend. Pictures can also be briefly displayed at low resolution immediately after switching to the previous or next picture... Turned Off to Save Power When the power-on lamp blinks, press the c button to turn on the monitor (A17). • Pictures that were shot using the monitor and viewfinder display (A16). • Press the s button to the orientation of images is treated as a group, and only the...
...J or K to shooting mode, press the c button again or press the shutter-release button or b (e movie-record) button. • C is displayed on the monitor again (A199). The lens does not extend. Pictures can also be briefly displayed at low resolution immediately after switching to the previous or next picture... Turned Off to Save Power When the power-on lamp blinks, press the c button to turn on the monitor (A17). • Pictures that were shot using the monitor and viewfinder display (A16). • Press the s button to the orientation of images is treated as a group, and only the...

User Manual
Page 49
...zoom control (A4) toward g (i) to switch back to full-frame playback or f (h) to display thumbnails. Follow the instructions displayed on the monitor. B Notes on Deletion • Deleted images cannot be deleted (A139). • Deleting images captured with the continuous shooting feature ➝ "... Pictures Basic Photography and Playback: A (Auto) Mode Deleting Unnecessary Images 1 Press the l button to delete the image currently displayed on the monitor. • To exit without deleting, press the d button. 2 Press the multi selector H or I to choose the desired deletion method ...
...zoom control (A4) toward g (i) to switch back to full-frame playback or f (h) to display thumbnails. Follow the instructions displayed on the monitor. B Notes on Deletion • Deleted images cannot be deleted (A139). • Deleting images captured with the continuous shooting feature ➝ "... Pictures Basic Photography and Playback: A (Auto) Mode Deleting Unnecessary Images 1 Press the l button to delete the image currently displayed on the monitor. • To exit without deleting, press the d button. 2 Press the multi selector H or I to choose the desired deletion method ...


