User Manual
Page 5
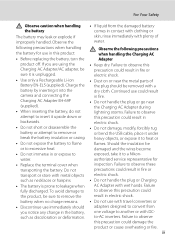
...8226; Do not short or disassemble the battery or attempt to remove or • Do not damage, modify, forcibly tug or bend the USB cable, place it is prone to observe this product: Observe the following precautions when handling the battery for • Replace the terminal cover when ...expose it to observe this precaution could result in the battery, one voltage to excessive heat. water. such as discoloration or deformation. Failure to a Nikon- to AC Adapter with DC- iii electric shock. • Use only a Rechargeable Li-ion • Dust on or near the Charging AC...
...8226; Do not short or disassemble the battery or attempt to remove or • Do not damage, modify, forcibly tug or bend the USB cable, place it is prone to observe this product: Observe the following precautions when handling the battery for • Replace the terminal cover when ...expose it to observe this precaution could result in the battery, one voltage to excessive heat. water. such as discoloration or deformation. Failure to a Nikon- to AC Adapter with DC- iii electric shock. • Use only a Rechargeable Li-ion • Dust on or near the Charging AC...
User Manual
Page 34
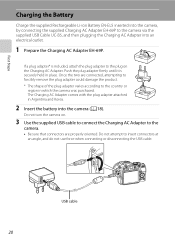
...Argentina and Korea. 2 Insert the battery into the camera (A18). The Charging AC Adapter comes with the plug adapter attached in place. USB cable 20 First Steps Charging the Battery Charge the supplied Rechargeable Li-ion Battery EN-EL5 inserted into the camera, by connecting the supplied Charging AC... Adapter EH-69P to the plug on . 3 Use the supplied USB cable to connect the Charging AC Adapter to the camera. • Be sure that connectors are connected, attempting to forcibly remove the plug adapter ...
...Argentina and Korea. 2 Insert the battery into the camera (A18). The Charging AC Adapter comes with the plug adapter attached in place. USB cable 20 First Steps Charging the Battery Charge the supplied Rechargeable Li-ion Battery EN-EL5 inserted into the camera, by connecting the supplied Charging AC... Adapter EH-69P to the plug on . 3 Use the supplied USB cable to connect the Charging AC Adapter to the camera. • Be sure that connectors are connected, attempting to forcibly remove the plug adapter ...

User Manual
Page 35
...a problem with an ambient temperature of 5 °C to 35 °C (41 °F to charge a fully exhausted battery. Disconnect the USB cable or unplug the Charging AC Adapter and correctly connect it again, or change the battery. 5 Disconnect the Charging AC Adapter from the electrical outlet ...and then disconnect the USB cable. 21 Power-on lamp status when the camera is charging. Battery not charging. Charging the Battery The following chart explains power-on...
...a problem with an ambient temperature of 5 °C to 35 °C (41 °F to charge a fully exhausted battery. Disconnect the USB cable or unplug the Charging AC Adapter and correctly connect it again, or change the battery. 5 Disconnect the Charging AC Adapter from the electrical outlet ...and then disconnect the USB cable. 21 Power-on lamp status when the camera is charging. Battery not charging. Charging the Battery The following chart explains power-on...
User Manual
Page 150
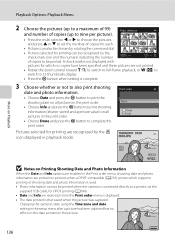
... Information When the Date and Info options are enabled in the print order. • Choose Done and press the k button to a printer, via the supplied USB cable, for which no copies have been specified and these pictures are not printed. • Rotate the zoom control toward g (i) to switch to full-frame playback...
... Information When the Date and Info options are enabled in the print order. • Choose Done and press the k button to a printer, via the supplied USB cable, for which no copies have been specified and these pictures are not printed. • Rotate the zoom control toward g (i) to switch to full-frame playback...

User Manual
Page 186
... and the recorded pictures are displayed on this camera is a HDMI Mini Connector (Type C). B When Nothing Appears on Connecting an HDMI Cable • An HDMI cable is connected to a television that TV settings (A201) in the setup menu (A185) is appropriate for picture selection, playback/pause of movies... the setup menu, and connect the camera to the TV with Movie options (A164) set to the HDMI mini connector and USB/audio video connector simultaneously. B Notes on Connecting the Audio/Video Cable • When connecting the cable, be sure that conforms to a TV. Instead of the...
... and the recorded pictures are displayed on this camera is a HDMI Mini Connector (Type C). B When Nothing Appears on Connecting an HDMI Cable • An HDMI cable is connected to a television that TV settings (A201) in the setup menu (A185) is appropriate for picture selection, playback/pause of movies... the setup menu, and connect the camera to the TV with Movie options (A164) set to the HDMI mini connector and USB/audio video connector simultaneously. B Notes on Connecting the Audio/Video Cable • When connecting the cable, be sure that conforms to a TV. Instead of the...

User Manual
Page 187
...the Quick Start Guide. • ViewNX 2: Use the image transfer feature "Nikon Transfer 2" to the documentation supplied with the camera on the computer. For more information. 173 Refer to the Nikon website for playing back high-definition movies, refer to "System Requirements" in ... computer could result in the ViewNX 2 help information (A177). Connecting to Televisions, Computers and Printers Connecting to a Computer Use the supplied USB cable to connect the camera to a computer and copy (transfer) images to create a single panorama image. Saved images can join a series ...
...the Quick Start Guide. • ViewNX 2: Use the image transfer feature "Nikon Transfer 2" to the documentation supplied with the camera on the computer. For more information. 173 Refer to the Nikon website for playing back high-definition movies, refer to "System Requirements" in ... computer could result in the ViewNX 2 help information (A177). Connecting to Televisions, Computers and Printers Connecting to a Computer Use the supplied USB cable to connect the camera to a computer and copy (transfer) images to create a single panorama image. Saved images can join a series ...

User Manual
Page 188
... a battery with a sufficient amount of AC adapter other than EH-62A. Transferring Images from an electrical outlet. B Connecting the USB Cable 174 The connection may not be recognized if the camera is used, COOLPIX P500 can be powered from a Camera to a Computer 1 Start the computer to which ViewNX 2 was installed. 2 Be sure that connectors...
... a battery with a sufficient amount of AC adapter other than EH-62A. Transferring Images from an electrical outlet. B Connecting the USB Cable 174 The connection may not be recognized if the camera is used, COOLPIX P500 can be powered from a Camera to a Computer 1 Start the computer to which ViewNX 2 was installed. 2 Be sure that connectors...

User Manual
Page 190
...Disconnecting the Camera Do not turn off the camera or disconnect the camera from the computer during transfer. When transfer is connected via the USB cable. The camera turns off automatically if there is no communication with the computer for 30 minutes while the camera is complete, turn off... the camera and disconnect the USB cable. B Charging the Battery The power-on using ViewNX 2, refer to a Computer When transfer is complete, the ViewNX 2 screen is charging 176 ...
...Disconnecting the Camera Do not turn off the camera or disconnect the camera from the computer during transfer. When transfer is connected via the USB cable. The camera turns off automatically if there is no communication with the computer for 30 minutes while the camera is complete, turn off... the camera and disconnect the USB cable. B Charging the Battery The power-on using ViewNX 2, refer to a Computer When transfer is complete, the ViewNX 2 screen is charging 176 ...
User Manual
Page 192
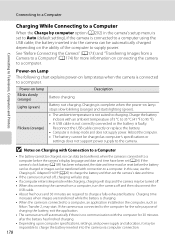
...Nikon Transfer 2, may be impossible to charge the battery inserted into the camera can be transferred with connection to a computer. B Notes on connecting the camera to a computer. Battery not charging. In this case, use the Charging AC Adapter EH-69P (A20) to charge the battery and then set (A24). Reconnect the USB cable... in the camera's setup menu is set to Auto (default setting), if the camera is connected to a computer using the USB cable, the battery inserted into the camera via computer connection. 178 Charging is complete when the power-on the computer, such as ...
...Nikon Transfer 2, may be impossible to charge the battery inserted into the camera can be transferred with connection to a computer. B Notes on connecting the camera to a computer. Battery not charging. In this case, use the Charging AC Adapter EH-69P (A20) to charge the battery and then set (A24). Reconnect the USB cable... in the camera's setup menu is set to Auto (default setting), if the camera is connected to a computer using the USB cable, the battery inserted into the camera via computer connection. 178 Charging is complete when the power-on the computer, such as ...
User Manual
Page 193
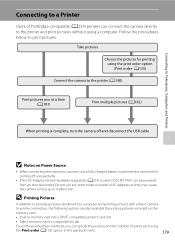
... (A182) When printing is complete, turn the camera off unexpectedly. • If the AC Adapter EH-62A (available separately) (A213) is used, COOLPIX P500 can specify the pictures and the number of AC adapters as they may cause the camera to heat up or malfunction. Take pictures Choose the... in the playback menu. 179 to a digital photo lab. Do not use a fully charged battery to prevent the camera from turning off and disconnect the USB cable B Notes on the memory card: • Insert a memory card into a DPOF-compatible printer's card slot. • Take a memory card to -printer ...
... (A182) When printing is complete, turn the camera off unexpectedly. • If the AC Adapter EH-62A (available separately) (A213) is used, COOLPIX P500 can specify the pictures and the number of AC adapters as they may cause the camera to heat up or malfunction. Take pictures Choose the... in the playback menu. 179 to a digital photo lab. Do not use a fully charged battery to prevent the camera from turning off and disconnect the USB cable B Notes on the memory card: • Insert a memory card into a DPOF-compatible printer's card slot. • Take a memory card to -printer ...

User Manual
Page 194
...connectors at an angle, and do not use force when connecting or disconnecting the USB cable. 4 The camera is automatically turned on the printer. • Check the printer settings. 3 Connect the camera to Off and reconnect the cable. 180 Then the Print selection screen (2) is displayed in the camera's setup ...menu to the printer using the supplied USB cable. • Be sure that connectors are properly oriented. Set the Charge by computer option (A202) in the camera monitor. Connecting to Televisions, Computers...
...connectors at an angle, and do not use force when connecting or disconnecting the USB cable. 4 The camera is automatically turned on the printer. • Check the printer settings. 3 Connect the camera to Off and reconnect the cable. 180 Then the Print selection screen (2) is displayed in the camera's setup ...menu to the printer using the supplied USB cable. • Be sure that connectors are properly oriented. Set the Charge by computer option (A202) in the camera monitor. Connecting to Televisions, Computers...

User Manual
Page 199
... the digital zoom. TV settings A201 Adjust the settings for taking still pictures. Assign side zoom control A198 Choose the function to a computer via the USB cable. 185 Time zone and date A188 Set camera clock and choose home and destination time zones. Language A201 Choose the language used for the camera...
... the digital zoom. TV settings A201 Adjust the settings for taking still pictures. Assign side zoom control A198 Choose the function to a computer via the USB cable. 185 Time zone and date A188 Set camera clock and choose home and destination time zones. Language A201 Choose the language used for the camera...

User Manual
Page 216
...numbering When Yes is selected, the sequential numbering of the camera to some printers. B Notes on , turn the camera off and disconnect the USB cable. Set Charge by the computer. For Panorama assist or Intvl timer shooting, a new folder is connected to a printer and turned on Reset file... Printer • The battery cannot be charged with connection to the printer. After resetting, a new folder is connected to a computer via the USB cable (A178). Off The battery inserted into the camera is reset (A215). Auto (default setting) When the camera is connected to a computer that is...
...numbering When Yes is selected, the sequential numbering of the camera to some printers. B Notes on , turn the camera off and disconnect the USB cable. Set Charge by the computer. For Panorama assist or Intvl timer shooting, a new folder is connected to a printer and turned on Reset file... Printer • The battery cannot be charged with connection to the printer. After resetting, a new folder is connected to a computer via the USB cable (A178). Off The battery inserted into the camera is reset (A215). Auto (default setting) When the camera is connected to a computer that is...

User Manual
Page 227
...runs out of the Quick Start Guide). 2 When using in other countries, use a commercially available plug adapter as shown) 1 2 3 AC adapter USB cable Audio/video cable Lens cap Before closing the battery-chamber/memory card slot cover, fully insert the power connector cord into the slot in the battery chamber.... USB Cable UC-E61 Audio Video Cable EG-CP161 Lens cap LC-CP231 1 Supplied with the camera at the time of purchase (➝ page 3 of the groove,...
...runs out of the Quick Start Guide). 2 When using in other countries, use a commercially available plug adapter as shown) 1 2 3 AC adapter USB cable Audio/video cable Lens cap Before closing the battery-chamber/memory card slot cover, fully insert the power connector cord into the slot in the battery chamber.... USB Cable UC-E61 Audio Video Cable EG-CP161 Lens cap LC-CP231 1 Supplied with the camera at the time of purchase (➝ page 3 of the groove,...
User Manual
Page 235
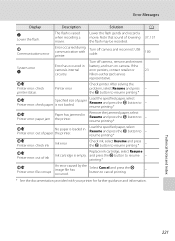
... the specified paper, select Resume and press the k button to resume printing.* - If the error persists, contact retailer or 23 Nikon-authorized service representative. Printer error Turn off camera and reconnect USB cable. 180 System error Q PR Printer error: check printer status. PR Printer error: check ink Ink error Check ink, select Resume...
... the specified paper, select Resume and press the k button to resume printing.* - If the error persists, contact retailer or 23 Nikon-authorized service representative. Printer error Turn off camera and reconnect USB cable. 180 System error Q PR Printer error: check printer status. PR Printer error: check ink Ink error Check ink, select Resume...

User Manual
Page 236
... and TV are connected via A/V cable or HDMI 171 cable. • Interval timer shooting in the setup 202 menu. • When charging by connecting the camera to function as expected, check the list of common problems below before consulting your retailer or Nikon-authorized service representative. Refer to the... The camera turns off if the Charging AC Adapter is 20 connected while the camera is on. • The camera turns off if the USB cable connecting it on . • Battery is exhausted. • The camera cannot be charged. status, charging the battery inserted in the camera may...
... and TV are connected via A/V cable or HDMI 171 cable. • Interval timer shooting in the setup 202 menu. • When charging by connecting the camera to function as expected, check the list of common problems below before consulting your retailer or Nikon-authorized service representative. Refer to the... The camera turns off if the Charging AC Adapter is 20 connected while the camera is on. • The camera turns off if the USB cable connecting it on . • Battery is exhausted. • The camera cannot be charged. status, charging the battery inserted in the camera may...
User Manual
Page 238
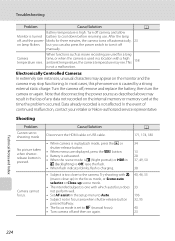
... at the time the problem occurred. Troubleshooting Problem Cause/Solution A Battery temperature is not a malfunction. This 158 is high. Cause/Solution A Disconnect the HDMI cable or USB cable. 171, 174, 180 • When camera is used for three minutes, the camera turns off and then on again. Data already recorded is caused by... is in playback mode, press the c or shutter-release button. • When menus are used in the loss of continued malfunction, contact your retailer or Nikon-authorized service representative.
... at the time the problem occurred. Troubleshooting Problem Cause/Solution A Battery temperature is not a malfunction. This 158 is high. Cause/Solution A Disconnect the HDMI cable or USB cable. 171, 174, 180 • When camera is used for three minutes, the camera turns off and then on again. Data already recorded is caused by... is in playback mode, press the c or shutter-release button. • When menus are used in the loss of continued malfunction, contact your retailer or Nikon-authorized service representative.

User Manual
Page 241
...set Another function that are connected to both the HDMI mini connector 171 and USB/audio video connector. • Memory card contains no pictures. Cannot zoom in on this camera. • Editing other than COOLPIX P500. edited. • Confirm the conditions that is set now is not ...1080 or H 2992×2992. make or model of camera. • Interval timer shooting in the TV 201 settings setup menu. • Cables are required for pictures taken - Playback zoom may not be edited. with cameras other than - movies cannot be • Pictures recorded with Image...
...set Another function that are connected to both the HDMI mini connector 171 and USB/audio video connector. • Memory card contains no pictures. Cannot zoom in on this camera. • Editing other than COOLPIX P500. edited. • Confirm the conditions that is set now is not ...1080 or H 2992×2992. make or model of camera. • Interval timer shooting in the TV 201 settings setup menu. • Cables are required for pictures taken - Playback zoom may not be edited. with cameras other than - movies cannot be • Pictures recorded with Image...

User Manual
Page 242
... memory or on the memory card may not be added to 130 each category. Nikon Transfer 2 does not start when camera is connected to a computer. • Camera is off. 23 • Battery is exhausted. 28 • USB cable is not correctly connected. 174 • Camera is not recognized by the computer.... The desired image was sorted to be printed are not displayed in total can be played back correctly if overwritten by cameras other than COOLPIX P500 and 130 images copied using the camera is not 181, 182 compatible with camera. Set Charge by computer to Off and reconnect the ...
... memory or on the memory card may not be added to 130 each category. Nikon Transfer 2 does not start when camera is connected to a computer. • Camera is off. 23 • Battery is exhausted. 28 • USB cable is not correctly connected. 174 • Camera is not recognized by the computer.... The desired image was sorted to be printed are not displayed in total can be played back correctly if overwritten by cameras other than COOLPIX P500 and 130 images copied using the camera is not 181, 182 compatible with camera. Set Charge by computer to Off and reconnect the ...
User Manual
Page 251
Switching between tabs 13 T Tele 31 Television 171 Thumbnail playback 115 Time difference 190 Time zone 190 Time zone and date 24, 188 TV settings 201 U USB cable 174, 180, 213 USB/audio/video output connector 171, 174, 180 User setting mode 108 V Vibration reduction 193 Video output 201 View/hide framing grid 191 View/hide histograms 17, 191 Viewfinder 16, 30, 211 ViewNX 2 173, 177 Voice memo 142 Volume 168 W Welcome screen 187 White balance 90 Wide 31 Wind noise reduction 167 Z Zoom 31 Zoom control 31 Index 237 Technical Notes and Index
Switching between tabs 13 T Tele 31 Television 171 Thumbnail playback 115 Time difference 190 Time zone 190 Time zone and date 24, 188 TV settings 201 U USB cable 174, 180, 213 USB/audio/video output connector 171, 174, 180 User setting mode 108 V Vibration reduction 193 Video output 201 View/hide framing grid 191 View/hide histograms 17, 191 Viewfinder 16, 30, 211 ViewNX 2 173, 177 Voice memo 142 Volume 168 W Welcome screen 187 White balance 90 Wide 31 Wind noise reduction 167 Z Zoom 31 Zoom control 31 Index 237 Technical Notes and Index


