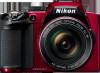
User Manual
Page 4
Repairs should be read them. WARNINGS Turn off in injury. After removing or disconnecting the power source, take the product to a Nikon-authorized service representative for inspection. Should the camera or Charging AC Adapter break open as this equipment. Keep these ... result of a fall or other strong light source through the viewfinder Viewing the sun or other accident, take the equipment to a Nikon-authorized service representative for inspection, after unplugging the product and/or removing the battery. Do not disassemble Touching the internal parts of flammable...
Repairs should be read them. WARNINGS Turn off in injury. After removing or disconnecting the power source, take the product to a Nikon-authorized service representative for inspection. Should the camera or Charging AC Adapter break open as this equipment. Keep these ... result of a fall or other strong light source through the viewfinder Viewing the sun or other accident, take the equipment to a Nikon-authorized service representative for inspection, after unplugging the product and/or removing the battery. Do not disassemble Touching the internal parts of flammable...
User Manual
Page 5
... the battery. damaged and the wires become • Do not immerse in fire or transport or store with wet hands. Failure to a Nikon- this precaution could the product, be or to leakage when fully discharged. water. iii Observe the water. Charging AC Adapter EH-69P (...If liquid from you are using the • Keep dry. following precautions when handling the Charging AC • Before replacing the battery, turn the Adapter product off. Should the insulation be sure to remove the result in electric shock. • Do not short or disassemble the...
... the battery. damaged and the wires become • Do not immerse in fire or transport or store with wet hands. Failure to a Nikon- this precaution could the product, be or to leakage when fully discharged. water. iii Observe the water. Charging AC Adapter EH-69P (...If liquid from you are using the • Keep dry. following precautions when handling the Charging AC • Before replacing the battery, turn the Adapter product off. Should the insulation be sure to remove the result in electric shock. • Do not short or disassemble the...

User Manual
Page 6
For Your Safety Use appropriate cables When connecting cables to the input and output jacks, use only the cables provided or sold by Nikon for the purpose, to maintain compliance with liquid crystal Should the monitor break, care should be taken to avoid injury caused by broken glass and... by this camera may disrupt the electronic systems of the airplane or the instruments of the hospital when using inside an airplane or the hospital Turn the power off while inside the airplane during take off or landing. Follow the instructions of the hospital. Particular care should be observed if ...
For Your Safety Use appropriate cables When connecting cables to the input and output jacks, use only the cables provided or sold by Nikon for the purpose, to maintain compliance with liquid crystal Should the monitor break, care should be taken to avoid injury caused by broken glass and... by this camera may disrupt the electronic systems of the airplane or the instruments of the hospital when using inside an airplane or the hospital Turn the power off while inside the airplane during take off or landing. Follow the instructions of the hospital. Particular care should be observed if ...
User Manual
Page 7
... modifications made to this device that interference will not occur in a residential installation. DANGER - These limits are not expressly approved by Nikon for Customers in the U.S.A., use an attachment plug adapter of the following measures: • Reorient or relocate the receiving antenna. &#...if not installed and used in a vertical or floor mount position. If this equipment does cause harmful COOLPIX P500 CAUTIONS Modifications The FCC requires the user to be determined by turning the equipment off and on, the user is intended to a supply not in the U.S.A. However, ...
... modifications made to this device that interference will not occur in a residential installation. DANGER - These limits are not expressly approved by Nikon for Customers in the U.S.A., use an attachment plug adapter of the following measures: • Reorient or relocate the receiving antenna. &#...if not installed and used in a vertical or floor mount position. If this equipment does cause harmful COOLPIX P500 CAUTIONS Modifications The FCC requires the user to be determined by turning the equipment off and on, the user is intended to a supply not in the U.S.A. However, ...

User Manual
Page 9
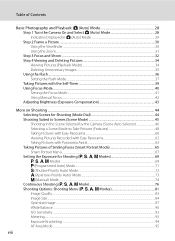
.../All the Way 15 x (Monitor) Button ...16 s (Display) Button ...17 First Steps ...18 Inserting the Battery...18 Removing the Battery...19 Charging the Battery ...20 Turning On and Off the Camera...23 Setting the Display Language, Date and Time 24 Inserting the Memory Card ...26 Removing the Memory Card...26 vii
.../All the Way 15 x (Monitor) Button ...16 s (Display) Button ...17 First Steps ...18 Inserting the Battery...18 Removing the Battery...19 Charging the Battery ...20 Turning On and Off the Camera...23 Setting the Display Language, Date and Time 24 Inserting the Memory Card ...26 Removing the Memory Card...26 vii
User Manual
Page 10
Table of Contents Basic Photography and Playback: A (Auto) Mode 28 Step 1 Turn the Camera On and Select A (Auto) Mode 28 Indicators Displayed in A (Auto) Mode 29 Step 2 Frame a Picture...30 Using the Viewfinder ...30 Using the Zoom......
Table of Contents Basic Photography and Playback: A (Auto) Mode 28 Step 1 Turn the Camera On and Select A (Auto) Mode 28 Indicators Displayed in A (Auto) Mode 29 Step 2 Frame a Picture...30 Using the Viewfinder ...30 Using the Zoom......
User Manual
Page 33
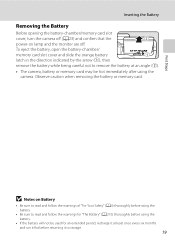
First Steps Inserting the Battery Removing the Battery Before opening the battery-chamber/memory card slot cover, turn the camera off . Observe caution when removing the battery or memory card. B Notes on lamp and the monitor are off (A23) and confirm that the ...
First Steps Inserting the Battery Removing the Battery Before opening the battery-chamber/memory card slot cover, turn the camera off . Observe caution when removing the battery or memory card. B Notes on lamp and the monitor are off (A23) and confirm that the ...
User Manual
Page 34
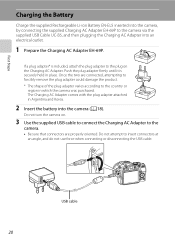
... a plug adapter* is securely held in Argentina and Korea. 2 Insert the battery into an electrical outlet. 1 Prepare the Charging AC Adapter EH-69P. Do not turn the camera on the Charging AC Adapter. The Charging AC Adapter comes with the plug adapter attached in place. Push the plug adapter firmly until...
... a plug adapter* is securely held in Argentina and Korea. 2 Insert the battery into an electrical outlet. 1 Prepare the Charging AC Adapter EH-69P. Do not turn the camera on the Charging AC Adapter. The Charging AC Adapter comes with the plug adapter attached in place. Push the plug adapter firmly until...

User Manual
Page 35
... not charging. Power-on lamp status when the camera is a problem with the battery. When charging is complete, the poweron lamp stops blinking orange and turns off. • The ambient temperature is not suited to indicate that the battery is charging. Disconnect the USB cable or unplug the Charging AC Adapter...
... not charging. Power-on lamp status when the camera is a problem with the battery. When charging is complete, the poweron lamp stops blinking orange and turns off. • The ambient temperature is not suited to indicate that the battery is charging. Disconnect the USB cable or unplug the Charging AC Adapter...

User Manual
Page 36
...). 22 C AC Power Source • If the AC Adapter EH-62A (available separately; D Charging Using Computer or Battery Charger • Connecting the COOLPIX P500 to the camera. When the camera is supplied to an electrical outlet with compatible devices. Failure to observe this precaution could result in overheating or... or in damage to a computer also charges the Rechargeable Li-ion Battery EN-EL5 (A178, 202). • The EN-EL5 can be turned on Charging AC Adapter • The Charging AC Adapter EH-69P is compatible with another make or model of device. • Be sure ...
...). 22 C AC Power Source • If the AC Adapter EH-62A (available separately; D Charging Using Computer or Battery Charger • Connecting the COOLPIX P500 to the camera. When the camera is supplied to an electrical outlet with compatible devices. Failure to observe this precaution could result in overheating or... or in damage to a computer also charges the Rechargeable Li-ion Battery EN-EL5 (A178, 202). • The EN-EL5 can be turned on Charging AC Adapter • The Charging AC Adapter EH-69P is compatible with another make or model of device. • Be sure ...
User Manual
Page 37
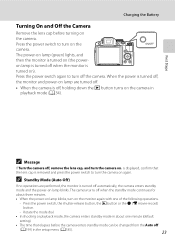
... c button or the b (e movie-record) button. - C Standby Mode (Auto Off) If no operations are turned off. • When the camera is turned off , holding down the c button turns on lamp blinks. When the power is turned off, the monitor and power-on lamp are performed, the monitor is off automatically, the camera...enters standby mode and the power-on the camera in the setup menu (A185). 23 Press the power switch to turn the camera on the camera. Charging the Battery Turning On and Off the Camera Remove the lens cap before the camera enters standby mode can be changed from the ...
... c button or the b (e movie-record) button. - C Standby Mode (Auto Off) If no operations are turned off. • When the camera is turned off , holding down the c button turns on lamp blinks. When the power is turned off, the monitor and power-on lamp are performed, the monitor is off automatically, the camera...enters standby mode and the power-on the camera in the setup menu (A185). 23 Press the power switch to turn the camera on the camera. Charging the Battery Turning On and Off the Camera Remove the lens cap before the camera enters standby mode can be changed from the ...
User Manual
Page 38
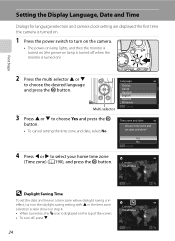
... set the date and time in a time zone where daylight saving is in step 4. • When turned on, the W icon is turned on the daylight saving setting with H in the time zone selection screen shown in effect, turn off, press I to choose Yes and press the k button. • To cancel setting the time... and camera clock setting are displayed the first time the camera is turned on. 1 Press the power switch to turn on the camera. • The power-on lamp lights, and then the monitor is turned on (the power-on lamp is turned off when the monitor is displayed on the top of the screen...
... set the date and time in a time zone where daylight saving is in step 4. • When turned on, the W icon is turned on the daylight saving setting with H in the time zone selection screen shown in effect, turn off, press I to choose Yes and press the k button. • To cancel setting the time... and camera clock setting are displayed the first time the camera is turned on. 1 Press the power switch to turn on the camera. • The power-on lamp lights, and then the monitor is turned on (the power-on lamp is turned off when the monitor is displayed on the top of the screen...
User Manual
Page 40
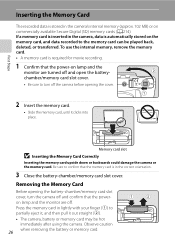
Removing the Memory Card Before opening the battery-chamber/memory card slot cover, turn the camera off and confirm that the poweron lamp and the monitor are turned off and open the batterychamber/memory card slot cover. • Be sure to turn off . First Steps Inserting the Memory Card The recorded data is stored...
Removing the Memory Card Before opening the battery-chamber/memory card slot cover, turn the camera off and confirm that the poweron lamp and the monitor are turned off and open the batterychamber/memory card slot cover. • Be sure to turn off . First Steps Inserting the Memory Card The recorded data is stored...
User Manual
Page 41
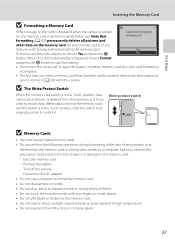
... slot cover until formatting is not formatted. formatting (A200) permanently deletes all pictures and other data on the right is displayed when the camera is turned Card is complete. • The first time you insert a memory card that Format card? Failure to observe this camera. B The Write Protect ... , or deleted from the memory card, or during data transfer to keep before use the multi selector to start formatting. • Do not turn the camera off the camera - Be sure to make copies of data or in the "Lock" position, data cannot be formatted before formatting the...
... slot cover until formatting is not formatted. formatting (A200) permanently deletes all pictures and other data on the right is displayed when the camera is turned Card is complete. • The first time you insert a memory card that Format card? Failure to observe this camera. B The Write Protect ... , or deleted from the memory card, or during data transfer to keep before use the multi selector to start formatting. • Do not turn the camera off the camera - Be sure to make copies of data or in the "Lock" position, data cannot be formatted before formatting the...
User Manual
Page 42
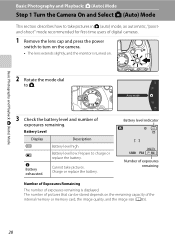
...slightly, and the monitor is displayed. Basic Photography and Playback: A (Auto) Mode Basic Photography and Playback: A (Auto) Mode Step 1 Turn the Camera On and Select A (Auto) Mode This section describes how to take pictures. The number of pictures that can be stored depends on...to A. Cannot take pictures in A (auto) mode, an automatic, "pointand-shoot" mode recommended for first-time users of exposures remaining is turned on the remaining capacity of exposures remaining. Charge or replace the battery. N Battery exhausted. B Battery level low. Auto mode 3 Check ...
...slightly, and the monitor is displayed. Basic Photography and Playback: A (Auto) Mode Basic Photography and Playback: A (Auto) Mode Step 1 Turn the Camera On and Select A (Auto) Mode This section describes how to take pictures. The number of pictures that can be stored depends on...to A. Cannot take pictures in A (auto) mode, an automatic, "pointand-shoot" mode recommended for first-time users of exposures remaining is turned on the remaining capacity of exposures remaining. Charge or replace the battery. N Battery exhausted. B Battery level low. Auto mode 3 Check ...

User Manual
Page 43
... (A43) can be sure to the memory card. Movie options Only when a memory card is inserted, the type of movie is blinking) (A199), turn on the Flash When the flash is lowered, the flash setting is displayed in A (auto) mode. Press the power switch, the shutter-release button,... monitor again with one of the following operations. - Rotate the mode dial. When the monitor has been turned off and W appears at the top of the monitor. Basic Photography and Playback: A (Auto) Mode Step 1 Turn the Camera On and Select A (Auto) Mode Indicators Displayed in A (Auto) Mode Shooting mode A...
... (A43) can be sure to the memory card. Movie options Only when a memory card is inserted, the type of movie is blinking) (A199), turn on the Flash When the flash is lowered, the flash setting is displayed in A (auto) mode. Press the power switch, the shutter-release button,... monitor again with one of the following operations. - Rotate the mode dial. When the monitor has been turned off and W appears at the top of the monitor. Basic Photography and Playback: A (Auto) Mode Step 1 Turn the Camera On and Select A (Auto) Mode Indicators Displayed in A (Auto) Mode Shooting mode A...

User Manual
Page 45
... Digital Zoom When the camera is applied at g triggers digital zoom. Interpolation is zoomed in the frame. • When the camera is turned on, the zoom is possible to the maximum optical zoom position, rotating and holding the zoom control at zoom positions beyond the V position,... interpolation is initiated and the zoom indicator turns yellow to magnify images, resulting in increasing the size of the zoom positions at the current image mode setting. Rotate the zoom control ...
... Digital Zoom When the camera is applied at g triggers digital zoom. Interpolation is zoomed in the frame. • When the camera is turned on, the zoom is possible to the maximum optical zoom position, rotating and holding the zoom control at zoom positions beyond the V position,... interpolation is initiated and the zoom indicator turns yellow to magnify images, resulting in increasing the size of the zoom positions at the current image mode setting. Rotate the zoom control ...

User Manual
Page 48
... the c button to view the next image. C Pressing the c Button to scroll quickly through pictures. Press I , J or K to Turn on the camera in playback mode. Multi selector • Pictures may be briefly displayed at low resolution immediately after switching to the previous or next... c button again or press the shutter-release button or b (e movie-record) button. • C is off, holding down the c button turns on the Camera When the camera is displayed when pictures stored in Playback Mode For details, see "Playing Images Captured Using Continuous Shooting Mode (Sequence...
... the c button to view the next image. C Pressing the c Button to scroll quickly through pictures. Press I , J or K to Turn on the camera in playback mode. Multi selector • Pictures may be briefly displayed at low resolution immediately after switching to the previous or next... c button again or press the shutter-release button or b (e movie-record) button. • C is off, holding down the c button turns on the Camera When the camera is displayed when pictures stored in Playback Mode For details, see "Playing Images Captured Using Continuous Shooting Mode (Sequence...
User Manual
Page 50
... for flash mode is stored in A (auto) mode When shooting with V (Auto with red-eye reduction) in the camera's memory even after the camera is turned off. - You can shoot pictures with red-eye reduction) - to 14 ft.) at the telephoto zoom position (when ISO sensitivity is set a flash mode that...
... for flash mode is stored in A (auto) mode When shooting with V (Auto with red-eye reduction) in the camera's memory even after the camera is turned off. - You can shoot pictures with red-eye reduction) - to 14 ft.) at the telephoto zoom position (when ISO sensitivity is set a flash mode that...
User Manual
Page 51
...; The mode selected for the flash is displayed. • When U (Auto) is applied, D is only displayed for a few seconds even if monitor indicators (A17) are turned on. • If a setting is fixed at W (Off ).
...; The mode selected for the flash is displayed. • When U (Auto) is applied, D is only displayed for a few seconds even if monitor indicators (A17) are turned on. • If a setting is fixed at W (Off ).


