P100 User's Manual
Page 12
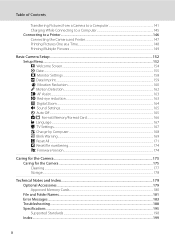
......146 Connecting the Camera and Printer...147 Printing Pictures One at a Time...148 Printing Multiple Pictures ...149 Basic Camera Setup ...152 Setup Menu...152 c Welcome Screen...154 d Date ...155 e Monitor Settings...158 f Date Imprint ...159 g Vibration Reduction...160 U Motion Detection...162 h AF Assist ...163 K Red-eye reduction...163 u Digital Zoom...164...
......146 Connecting the Camera and Printer...147 Printing Pictures One at a Time...148 Printing Multiple Pictures ...149 Basic Camera Setup ...152 Setup Menu...152 c Welcome Screen...154 d Date ...155 e Monitor Settings...158 f Date Imprint ...159 g Vibration Reduction...160 U Motion Detection...162 h AF Assist ...163 K Red-eye reduction...163 u Digital Zoom...164...

P100 User's Manual
Page 13
...the camera monitor, and the names of Nikon COOLPIX P100 digital camera. The memory card must be removed before use, and keep it easier to as the "default setting". • The names of menu items displayed in the Quick Start Guide. Screen Samples In this camera can be formatted... use , to prevent damage to help you need, the following symbols and conventions are sometimes omitted from actual display. Illustrations and Screen Display Illustrations and text displays shown in the camera's internal memory or on the memory card. Read this manual may be read ...
...the camera monitor, and the names of Nikon COOLPIX P100 digital camera. The memory card must be removed before use, and keep it easier to as the "default setting". • The names of menu items displayed in the Quick Start Guide. Screen Samples In this camera can be formatted... use , to prevent damage to help you need, the following symbols and conventions are sometimes omitted from actual display. Illustrations and Screen Display Illustrations and text displays shown in the camera's internal memory or on the memory card. Read this manual may be read ...

P100 User's Manual
Page 15
..., checks, gift certificates, etc.), commuter passes or coupon tickets, except when a minimum of necessary copies are stamped "Sample". Care should be provided for the welcome screen (A154). Deleted files can sometimes be recovered from being copied or reproduced Do not copy or reproduce paper money, coins, securities, government bonds or local...
..., checks, gift certificates, etc.), commuter passes or coupon tickets, except when a minimum of necessary copies are stamped "Sample". Care should be provided for the welcome screen (A154). Deleted files can sometimes be recovered from being copied or reproduced Do not copy or reproduce paper money, coins, securities, government bonds or local...

P100 User's Manual
Page 23
... K to choose and configure any of the following functions. Basic Operations The Command Dial You can rotate the command dial to select items from a menu screen or to 71 select a different option) Use Description Choose a picture Choose a date A 32, 101, 104 105 Playback zoom During sequence playback or pause During movie...
... K to choose and configure any of the following functions. Basic Operations The Command Dial You can rotate the command dial to select items from a menu screen or to 71 select a different option) Use Description Choose a picture Choose a date A 32, 101, 104 105 Playback zoom During sequence playback or pause During movie...
P100 User's Manual
Page 24
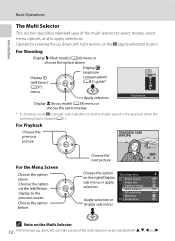
... multi selector may be indicated with H, I, J and K. For Playback Choose the previous picture 15/05/2010 15:30 0004.JPG For the Menu Screen Choose the option above Display o (exposure Display n (self-timer) compensation) (A41) guide* (A37) menu Apply selection Flash mode Display D (focus... Shooting menu Image quality Image size Optimize image White balance ISO sensitivity Metering Continuous C Note on the left/Return display to the previous screen Choose the option below * In shooting mode D (manual), select whether to apply selections. Operate by pressing the up , down ,...
... multi selector may be indicated with H, I, J and K. For Playback Choose the previous picture 15/05/2010 15:30 0004.JPG For the Menu Screen Choose the option above Display o (exposure Display n (self-timer) compensation) (A41) guide* (A37) menu Apply selection Flash mode Display D (focus... Shooting menu Image quality Image size Optimize image White balance ISO sensitivity Metering Continuous C Note on the left/Return display to the previous screen Choose the option below * In shooting mode D (manual), select whether to apply selections. Operate by pressing the up , down ,...

P100 User's Manual
Page 25
... Optimize image White balance ISO sensitivity Metering Continuous Shooting menu Image quality Image size Optimize image White balance ISO sensitivity Metering Continuous Set up Welcome screen Date Monitor settings Date imprint Vibration reduction Motion detection AF assist Press the multi selector J to exit the menu. The chosen menu is displayed. 13...
... Optimize image White balance ISO sensitivity Metering Continuous Shooting menu Image quality Image size Optimize image White balance ISO sensitivity Metering Continuous Set up Welcome screen Date Monitor settings Date imprint Vibration reduction Motion detection AF assist Press the multi selector J to exit the menu. The chosen menu is displayed. 13...

P100 User's Manual
Page 26
... x (monitor) button to g (j) again. While looking into the viewfinder, rotate the diopter adjustment control until the display is displayed at the bottom of the menu screen to view a description of focus and the display is difficult to see , adjust the diopter with your eye with the diopter adjustment control.
... x (monitor) button to g (j) again. While looking into the viewfinder, rotate the diopter adjustment control until the display is displayed at the bottom of the menu screen to view a description of focus and the display is difficult to see , adjust the diopter with your eye with the diopter adjustment control.

P100 User's Manual
Page 34
Yes No London Casablanca Back D Daylight Saving Time If daylight saving time is in effect, press the multi selector H in the time zone selection screen displayed in step 4 to select your home time zone (A157), and press the k button. To turn on the camera. • The power-on lamp (green) ...
Yes No London Casablanca Back D Daylight Saving Time If daylight saving time is in effect, press the multi selector H in the time zone selection screen displayed in step 4 to select your home time zone (A157), and press the k button. To turn on the camera. • The power-on lamp (green) ...

P100 User's Manual
Page 51
... AF, the camera will continually focus until you press the shutter-release button halfway and the focus locks. A sound will not be displayed on the screen. 39 C Infinity If you set to infinity while using A (auto) mode, the A, B, C, D and M modes, or d (Sport continuous) mode, the focus area will be heard while...
... AF, the camera will continually focus until you press the shutter-release button halfway and the focus locks. A sound will not be displayed on the screen. 39 C Infinity If you set to infinity while using A (auto) mode, the A, B, C, D and M modes, or d (Sport continuous) mode, the focus area will be heard while...
P100 User's Manual
Page 52
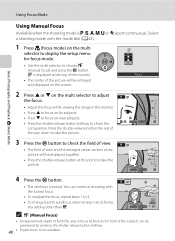
... check the field of view. • The field of view and the enlarged center section of the subject) can be enlarged and displayed on the screen. 2 Press H or I on near subjects. • Press the shutter-release button halfway to take the picture. 1/250 F5.6 4 Press the k button. • The set focus...
... check the field of view. • The field of view and the enlarged center section of the subject) can be enlarged and displayed on the screen. 2 Press H or I on near subjects. • Press the shutter-release button halfway to take the picture. 1/250 F5.6 4 Press the k button. • The set focus...

P100 User's Manual
Page 57
.... The following scene modes are automatically optimized for the selected subject type. The default setting is b (portrait). 2 Press the d button to display the scene menu screen, choose the desired scene with the multi selector and press the k button. • Switch to the C tab when the scene menu is not displayed (A13...
.... The following scene modes are automatically optimized for the selected subject type. The default setting is b (portrait). 2 Press the d button to display the scene menu screen, choose the desired scene with the multi selector and press the k button. • Switch to the C tab when the scene menu is not displayed (A13...
P100 User's Manual
Page 61
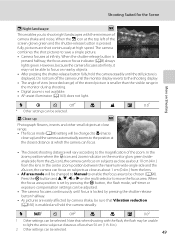
... set by pressing the k button, the flash mode, self-timer or exposure compensation settings can be sure that when shooting with the minimum of the screen glows green and the shutter-release button is pressed halfway, the focus area or focus indicator (A8) always lights green. X U1 n Off2 p p o 0.02 1 Other settings...
... set by pressing the k button, the flash mode, self-timer or exposure compensation settings can be sure that when shooting with the minimum of the screen glows green and the shutter-release button is pressed halfway, the focus area or focus indicator (A8) always lights green. X U1 n Off2 p p o 0.02 1 Other settings...
P100 User's Manual
Page 74
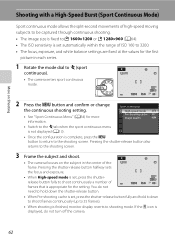
... do not turn off the camera. 62 If the O icon is set , press the shutterrelease button fully to the shooting screen. Pressing the shutter-release button also returns to the shooting screen. 3 Frame the subject and shoot. • The camera focuses on Shooting Shooting with a High-Speed Burst (Sport Continuous Mode) Sport...
... do not turn off the camera. 62 If the O icon is set , press the shutterrelease button fully to the shooting screen. Pressing the shutter-release button also returns to the shooting screen. 3 Frame the subject and shoot. • The camera focuses on Shooting Shooting with a High-Speed Burst (Sport Continuous Mode) Sport...
P100 User's Manual
Page 88
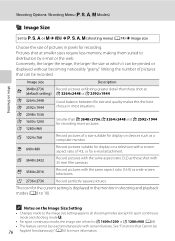
... than those shot with 35 mm film cameras. f 640×480 Record pictures suitable for recording. I 3648×2432 Record pictures with a screen aspect ratio of pictures in pixels for display on devices such as a computer monitor. C Notes on the Image Size Setting • Changes made...icon for the current setting is fixed to all shooting modes (except for display on a television with the same aspect ratio (3:2) as wide-screen televisions. J 1024×768 Record pictures of pictures that Cannot be used simultaneously with the same aspect ratio (16:9) as those shot at ...
... than those shot with 35 mm film cameras. f 640×480 Record pictures suitable for recording. I 3648×2432 Record pictures with a screen aspect ratio of pictures in pixels for display on devices such as a computer monitor. C Notes on the Image Size Setting • Changes made...icon for the current setting is fixed to all shooting modes (except for display on a television with the same aspect ratio (3:2) as wide-screen televisions. J 1024×768 Record pictures of pictures that Cannot be used simultaneously with the same aspect ratio (16:9) as those shot at ...

P100 User's Manual
Page 97
... letting lighting conditions at magnifications of frame determine exposure. Ensures that the subject is selected for Metering (A8). 85 More on Shooting B Notes on the screen. When digital zoom is in effect, the metered area is not shown in effect, at magnifications of 1.2× to 1.8×, Metering is set to Spot...
... letting lighting conditions at magnifications of frame determine exposure. Ensures that the subject is selected for Metering (A8). 85 More on Shooting B Notes on the screen. When digital zoom is in effect, the metered area is not shown in effect, at magnifications of 1.2× to 1.8×, Metering is set to Spot...

P100 User's Manual
Page 102
... people are available. 90 The camera automatically selects the focus area containing the subject closest to the camera. Focus area Selectable areas area selection screen, press the k button again. • At an Image size setting (A76) of the frame. If the camera detects multiple faces, ... situations in which no face can be displayed in the center focus area regardless of 99 focus areas displayed in the monitor's focus-area selection screen, and shoot. More on Shooting Shooting Options: Shooting Menu (A, B, C, D Modes) G AF-Area Mode Set to nine areas). 1/250 F5.6 17 ...
... people are available. 90 The camera automatically selects the focus area containing the subject closest to the camera. Focus area Selectable areas area selection screen, press the k button again. • At an Image size setting (A76) of the frame. If the camera detects multiple faces, ... situations in which no face can be displayed in the center focus area regardless of 99 focus areas displayed in the monitor's focus-area selection screen, and shoot. More on Shooting Shooting Options: Shooting Menu (A, B, C, D Modes) G AF-Area Mode Set to nine areas). 1/250 F5.6 17 ...

P100 User's Manual
Page 111
... Mode) Save the Settings in M (user setting) mode • Rotate the mode dial to M to choose Save user settings and press the k button. • Done screen is not displayed (A13). 4 Use the multi selector to shoot with the saved settings. • The settings can be changed settings can be saved even...
... Mode) Save the Settings in M (user setting) mode • Rotate the mode dial to M to choose Save user settings and press the k button. • Done screen is not displayed (A13). 4 Use the multi selector to shoot with the saved settings. • The settings can be changed settings can be saved even...

P100 User's Manual
Page 112
Shooting menu Save user settings Reset user settings 2 Choose Yes and press the k button. • The saved settings have been reset. OK? Reset user settings User settings will revert back to default values. Yes No More on Shooting 100 Using M (User Setting Mode) Resetting Saved Settings The saved setting will be reset to the default setting of shooting mode A. 1 Choose Reset user settings in the shooting menu screen and press the k button.
Shooting menu Save user settings Reset user settings 2 Choose Yes and press the k button. • The saved settings have been reset. OK? Reset user settings User settings will revert back to default values. Yes No More on Shooting 100 Using M (User Setting Mode) Resetting Saved Settings The saved setting will be reset to the default setting of shooting mode A. 1 Choose Reset user settings in the shooting menu screen and press the k button.
P100 User's Manual
Page 121
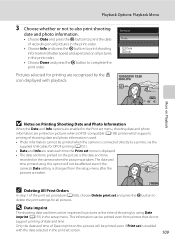
... menu after the pictures are taken. 15.05.2010 C Deleting All Print Orders In step 1 of the print set procedure (A108), choose Delete print set screen. 109 Pictures selected for all pictures in the print order. • Choose Done and press the k button to complete the print order. Print set Done...
... menu after the pictures are taken. 15.05.2010 C Deleting All Print Orders In step 1 of the print set procedure (A108), choose Delete print set screen. 109 Pictures selected for all pictures in the print order. • Choose Done and press the k button to complete the print order. Print set Done...

P100 User's Manual
Page 123
... deletion. Playback Options: Playback Menu c Delete: Deleting Multiple Pictures Press the d button M c (Playback menu) (A107) M c Delete Delete a picture. Erase selected images In the picture selection screen, choose the pictures for more information. • When a sequence (A102) that is set to a computer before deletion. • Pictures marked with the s icon are deleted...
... deletion. Playback Options: Playback Menu c Delete: Deleting Multiple Pictures Press the d button M c (Playback menu) (A107) M c Delete Delete a picture. Erase selected images In the picture selection screen, choose the pictures for more information. • When a sequence (A102) that is set to a computer before deletion. • Pictures marked with the s icon are deleted...


