
P100 User's Manual
Page 2
...shall be obtained from a video provider licensed to provide AVC video. Additional information may be implied for the personal and non-commercial use . See http://www.mpegla.com. AVC Patent Portfolio License This product is licensed under the AVC Patent Portfolio License for any ...other documentation provided with your Nikon product are trademarks or registered trademarks of a consumer to (i) encode video in compliance with the AVC standard ("AVC video") and/or...
...shall be obtained from a video provider licensed to provide AVC video. Additional information may be implied for the personal and non-commercial use . See http://www.mpegla.com. AVC Patent Portfolio License This product is licensed under the AVC Patent Portfolio License for any ...other documentation provided with your Nikon product are trademarks or registered trademarks of a consumer to (i) encode video in compliance with the AVC standard ("AVC video") and/or...
P100 User's Manual
Page 4
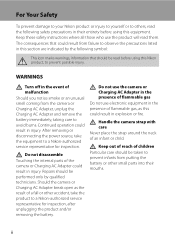
... could result in their mouths. ii For Your Safety To prevent damage to your Nikon product or injury to yourself or to others, read them. Keep these safety instructions where all those who use electronic equipment in the presence of flammable gas, as the result of flammable gas ...Do not use the product will read the following symbol: This icon marks warnings, information that could result in this Nikon product, to prevent possible injury. Should the camera or Charging AC Adapter break open as...
... could result in their mouths. ii For Your Safety To prevent damage to your Nikon product or injury to yourself or to others, read them. Keep these safety instructions where all those who use electronic equipment in the presence of flammable gas, as the result of flammable gas ...Do not use the product will read the following symbol: This icon marks warnings, information that could result in this Nikon product, to prevent possible injury. Should the camera or Charging AC Adapter break open as...
P100 User's Manual
Page 5
...inverters. To avoid damage to convert from the damaged battery the battery comes in contact with plenty of the plug should you are using the • Keep dry. Failure to observe this product: Observe the following precautions when handling the battery for • Replace the...; When inserting the battery, do not attempt to insert it is prone to a Nikon- such as discoloration or deformation. battery when no charge remains. • Do not use with travel converters or • Discontinue use could result in the battery, such as necklaces or hairpins. • Do not ...
...inverters. To avoid damage to convert from the damaged battery the battery comes in contact with plenty of the plug should you are using the • Keep dry. Failure to observe this product: Observe the following precautions when handling the battery for • Replace the...; When inserting the battery, do not attempt to insert it is prone to a Nikon- such as discoloration or deformation. battery when no charge remains. • Do not use with travel converters or • Discontinue use could result in the battery, such as necklaces or hairpins. • Do not ...
P100 User's Manual
Page 6
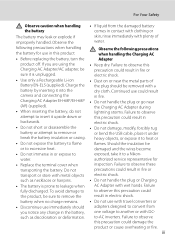
...damage the equipment. Turn the power off or landing. Avoid contact with product regulations. For Your Safety Use appropriate cables When connecting cables to the input and output jacks, use only the cables provided or sold by this camera may disrupt the electronic systems of the airplane or... the instruments of the hospital when using while in burns or fire. The electromagnetic waves given out by Nikon for the purpose, to maintain compliance with liquid crystal Should the monitor break, care should be taken...
...damage the equipment. Turn the power off or landing. Avoid contact with product regulations. For Your Safety Use appropriate cables When connecting cables to the input and output jacks, use only the cables provided or sold by this camera may disrupt the electronic systems of the airplane or... the instruments of the hospital when using while in burns or fire. The electromagnetic waves given out by Nikon for the purpose, to maintain compliance with liquid crystal Should the monitor break, care should be taken...
P100 User's Manual
Page 7
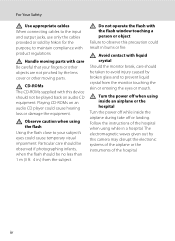
...user's authority to cause birth defects or other interface cables may exceed the limits of Class B Part 15 of the FCC rules. COOLPIX P100 CAUTIONS Modifications The FCC requires the user to be determined by turning the equipment off and on, the user is encouraged to try ... USA Tel: 631-547-4200 v Wash hands after handling. These limits are not expressly approved by Nikon for a Class B digital device, pursuant to radio communications. This equipment generates, uses, and can be notified that are designed to radio or television reception, which can radiate radio frequency ...
...user's authority to cause birth defects or other interface cables may exceed the limits of Class B Part 15 of the FCC rules. COOLPIX P100 CAUTIONS Modifications The FCC requires the user to be determined by turning the equipment off and on, the user is encouraged to try ... USA Tel: 631-547-4200 v Wash hands after handling. These limits are not expressly approved by Nikon for a Class B digital device, pursuant to radio communications. This equipment generates, uses, and can be notified that are designed to radio or television reception, which can radiate radio frequency ...
P100 User's Manual
Page 9
... A (Auto) Mode 26 Step 1 Turn the Camera On and Select A (Auto) Mode 26 Indicators Displayed in A (Auto) Mode 27 Step 2 Frame a Picture...28 Using the Electronic Viewfinder ...28 Using the Zoom...29 Step 3 Focus and Shoot ...30 Pressing the Shutter-Release Button Halfway/All the Way Down 30 Step 4 Viewing and Deleting... Pictures 32 Viewing Pictures (Playback Mode) ...32 Deleting Pictures...32 Using the Flash...34 Setting the Flash Mode...35 Taking Pictures with the Self-Timer 37 Using Focus Mode ...38 vii
... A (Auto) Mode 26 Step 1 Turn the Camera On and Select A (Auto) Mode 26 Indicators Displayed in A (Auto) Mode 27 Step 2 Frame a Picture...28 Using the Electronic Viewfinder ...28 Using the Zoom...29 Step 3 Focus and Shoot ...30 Pressing the Shutter-Release Button Halfway/All the Way Down 30 Step 4 Viewing and Deleting... Pictures 32 Viewing Pictures (Playback Mode) ...32 Deleting Pictures...32 Using the Flash...34 Setting the Flash Mode...35 Taking Pictures with the Self-Timer 37 Using Focus Mode ...38 vii
P100 User's Manual
Page 10
... Subject in Full-Frame Playback 101 viii Comp...93 M Noise Reduction ...94 Q Distortion Control ...94 J Active D-Lighting ...95 Functions that Cannot be Applied Simultaneously 96 Using M (User Setting Mode)...98 Save the Settings in M ...99 Resetting Saved Settings ...100 More on Playback ...101 Operations in Subject Tracking Mode 59 Subject Tracking...
... Subject in Full-Frame Playback 101 viii Comp...93 M Noise Reduction ...94 Q Distortion Control ...94 J Active D-Lighting ...95 Functions that Cannot be Applied Simultaneously 96 Using M (User Setting Mode)...98 Save the Settings in M ...99 Resetting Saved Settings ...100 More on Playback ...101 Operations in Subject Tracking Mode 59 Subject Tracking...

P100 User's Manual
Page 13
Introduction Introduction About This Manual Thank you for your Nikon digital camera. D This icon marks tips, additional information that may differ from monitor and electronic viewfinder display samples so that should be read before use, to prevent damage to the pictures on the memory card.... C Memory Cards Pictures taken with your purchase of buttons or messages displayed in a computer monitor are indicated in the camera monitor, and the names of Nikon COOLPIX P100 digital camera. Symbols...
Introduction Introduction About This Manual Thank you for your Nikon digital camera. D This icon marks tips, additional information that may differ from monitor and electronic viewfinder display samples so that should be read before use, to prevent damage to the pictures on the memory card.... C Memory Cards Pictures taken with your purchase of buttons or messages displayed in a computer monitor are indicated in the camera monitor, and the names of Nikon COOLPIX P100 digital camera. Symbols...
P100 User's Manual
Page 14
... not be reproduced, transmitted, transcribed, stored in a retrieval system, or translated into any language in any form, by Nikon specifically for contact information: http://imaging.nikon.com/ Use Only Nikon Brand Electronic Accessories Nikon COOLPIX cameras are engineered and proven to operate within the operational and safety requirements of this device as at weddings or before...
... not be reproduced, transmitted, transcribed, stored in a retrieval system, or translated into any language in any form, by Nikon specifically for contact information: http://imaging.nikon.com/ Use Only Nikon Brand Electronic Accessories Nikon COOLPIX cameras are engineered and proven to operate within the operational and safety requirements of this device as at weddings or before...

P100 User's Manual
Page 15
...(for example, pictures of empty sky). Before discarding a data storage device or transferring ownership to another person, erase all data using commercially available software, potentially resulting in a foreign country is prohibited. Be sure to property when physically destroying data storage devices. 3...or other device may be taken to avoid injury or damage to also replace any pictures selected for business use by a company. Do not use of personal image data. Introduction Information and Precautions Notice Concerning Prohibition of Copying or Reproduction Note that was obtained...
...(for example, pictures of empty sky). Before discarding a data storage device or transferring ownership to another person, erase all data using commercially available software, potentially resulting in a foreign country is prohibited. Be sure to property when physically destroying data storage devices. 3...or other device may be taken to avoid injury or damage to also replace any pictures selected for business use by a company. Do not use of personal image data. Introduction Information and Precautions Notice Concerning Prohibition of Copying or Reproduction Note that was obtained...
P100 User's Manual
Page 18
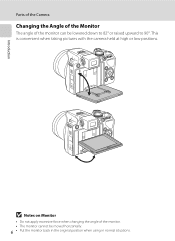
Introduction Parts of the Camera Changing the Angle of the Monitor The angle of the monitor. • The monitor cannot be lowered down to 82° or raised upward to 90°. This is convenient when taking pictures with the camera held at high or low positions. B Notes on Monitor • Do not apply excessive force when changing the angle of the monitor can be moved horizontally. 6 • Put the monitor back in the original position when using in normal situations.
Introduction Parts of the Camera Changing the Angle of the Monitor The angle of the monitor. • The monitor cannot be lowered down to 82° or raised upward to 90°. This is convenient when taking pictures with the camera held at high or low positions. B Notes on Monitor • Do not apply excessive force when changing the angle of the monitor can be moved horizontally. 6 • Put the monitor back in the original position when using in normal situations.
P100 User's Manual
Page 19
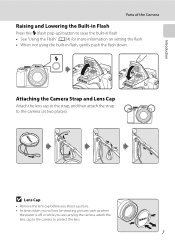
... are carrying the camera, attach the lens cap to the camera to raise the built-in flash. • See "Using the Flash" (A34) for more information on setting the flash. • When not using the built-in Flash Press the m (flash pop-up) button to protect the lens. 7 Introduction Parts of the...
... are carrying the camera, attach the lens cap to the camera to raise the built-in flash. • See "Using the Flash" (A34) for more information on setting the flash. • When not using the built-in Flash Press the m (flash pop-up) button to protect the lens. 7 Introduction Parts of the...

P100 User's Manual
Page 23
...Operations The Command Dial You can rotate the command dial to select items from a menu screen or to 71 select a different option) Use Description Choose a picture Choose a date A 32, 101, 104 105 Playback zoom During sequence playback or pause During movie pause Change the...Aperture-priority auto (mode dial set to C) Manual (mode dial set to D) For Playback Mode Full-frame playback or thumbnail playback Calendar display Use Description A Change the flexible program 68 Adjust shutter speed 69 Adjust aperture 70 Adjust shutter speed or aperture (press the multi selector K to...
...Operations The Command Dial You can rotate the command dial to select items from a menu screen or to 71 select a different option) Use Description Choose a picture Choose a date A 32, 101, 104 105 Playback zoom During sequence playback or pause During movie pause Change the...Aperture-priority auto (mode dial set to C) Manual (mode dial set to D) For Playback Mode Full-frame playback or thumbnail playback Calendar display Use Description A Change the flexible program 68 Adjust shutter speed 69 Adjust aperture 70 Adjust shutter speed or aperture (press the multi selector K to...
P100 User's Manual
Page 24
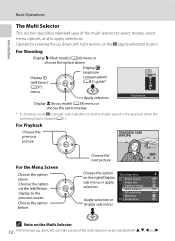
... to set the shutter speed or the aperture when the command dial is rotated (A71). Introduction Basic Operations The Multi Selector This section describes standard uses of the multi selector may be indicated with H, I, J and K.
... to set the shutter speed or the aperture when the command dial is rotated (A71). Introduction Basic Operations The Multi Selector This section describes standard uses of the multi selector may be indicated with H, I, J and K.

P100 User's Manual
Page 25
... the tab. The chosen menu is displayed. 13 Displayed when the menu contains two or more pages Displays the menus for the menu items. • Use the multi selector to navigate the menus (A12). • Menu items can also be chosen by the mode dial Displays the movie menu Displays the...
... the tab. The chosen menu is displayed. 13 Displayed when the menu contains two or more pages Displays the menus for the menu items. • Use the multi selector to navigate the menus (A12). • Menu items can also be chosen by the mode dial Displays the movie menu Displays the...

P100 User's Manual
Page 26
... difficult to see the monitor. To return to the original menu, rotate the zoom control to switch between the monitor or electronic viewfinder. For example, use the electronic viewfinder in bright locations when it is clearly visible. Back The x (monitor) Button Press the x (monitor) button to g (j) again. Take care not to...
... difficult to see the monitor. To return to the original menu, rotate the zoom control to switch between the monitor or electronic viewfinder. For example, use the electronic viewfinder in bright locations when it is clearly visible. Back The x (monitor) Button Press the x (monitor) button to g (j) again. Take care not to...

P100 User's Manual
Page 27
.... 3 The histogram is chosen. 15 The vertical axis shows the number of pixels. 4 The shooting data displayed includes the folder name, file name, shooting mode used (A, B, C or D), shutter speed, aperture, exposure compensation, ISO sensitivity, and the current file number/ total number of the image (portions that shows the brightness distribution in...
.... 3 The histogram is chosen. 15 The vertical axis shows the number of pixels. 4 The shooting data displayed includes the folder name, file name, shooting mode used (A, B, C or D), shutter speed, aperture, exposure compensation, ISO sensitivity, and the current file number/ total number of the image (portions that shows the brightness distribution in...
P100 User's Manual
Page 28
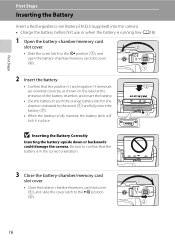
... and negative (-) terminals are oriented correctly, as shown on the label at the entrance of the battery chamber, and insert the battery. • Use the battery to push the orange battery latch in the direction indicated by the arrow (1) and fully insert the battery (2). • When the battery... First Steps First Steps Inserting the Battery Insert a Rechargeable Li-ion Battery EN-EL5 (supplied) into the camera. • Charge the battery before first use or when the battery is running low (A18). 1 Open the battery-chamber/memory card slot cover. • Slide the cover latch to the Y ...
... and negative (-) terminals are oriented correctly, as shown on the label at the entrance of the battery chamber, and insert the battery. • Use the battery to push the orange battery latch in the direction indicated by the arrow (1) and fully insert the battery (2). • When the battery... First Steps First Steps Inserting the Battery Insert a Rechargeable Li-ion Battery EN-EL5 (supplied) into the camera. • Charge the battery before first use or when the battery is running low (A18). 1 Open the battery-chamber/memory card slot cover. • Slide the cover latch to the Y ...
P100 User's Manual
Page 29
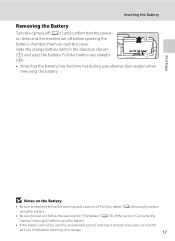
... removing the battery. First Steps B Notes on lamp and the monitor are off (A21) and confirm that the battery may become hot during use; Inserting the Battery Removing the Battery Turn the camera off before returning it to read and follow the warnings and cautions of "For Your Safety..." (Aii) thoroughly before using the battery. • Be sure to storage. 17 Slide the orange battery latch in the direction shown (1) and eject the battery. Pull the ...
... removing the battery. First Steps B Notes on lamp and the monitor are off (A21) and confirm that the battery may become hot during use; Inserting the Battery Removing the Battery Turn the camera off before returning it to read and follow the warnings and cautions of "For Your Safety..." (Aii) thoroughly before using the battery. • Be sure to storage. 17 Slide the orange battery latch in the direction shown (1) and eject the battery. Pull the ...
P100 User's Manual
Page 30
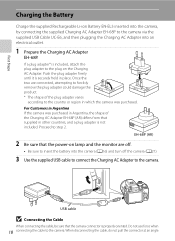
.... Once the two are off. • Be sure to insert the battery into an electrical outlet. 1 Prepare the Charging AC Adapter EH-68P. Do not use force when 18 connecting the cable to step 2. Proceed to the camera. First Steps Charging the Battery Charge the supplied Rechargeable Li-ion Battery EN... camera via the supplied USB Cable UC-E6, and then plugging the Charging AC Adapter into the camera (A16) and turn off the camera (A21). 3 Use the supplied USB cable to connect the Charging AC Adapter to the camera. USB cable B Connecting the Cable When connecting the cable, be sure that...
.... Once the two are off. • Be sure to insert the battery into an electrical outlet. 1 Prepare the Charging AC Adapter EH-68P. Do not use force when 18 connecting the cable to step 2. Proceed to the camera. First Steps Charging the Battery Charge the supplied Rechargeable Li-ion Battery EN... camera via the supplied USB Cable UC-E6, and then plugging the Charging AC Adapter into the camera (A16) and turn off the camera (A21). 3 Use the supplied USB cable to connect the Charging AC Adapter to the camera. USB cable B Connecting the Cable When connecting the cable, be sure that...


