
Reference Manual
Page 17
... 8 Shooting Mode 8 Playback Mode 10 The Basics of Shooting and Playback... 13 Preparation 1 Insert the Batteries 14 Applicable Batteries 14 Preparation 2 Insert a Memory Card.......... 16 Internal Memory and Memory Cards......... 17 Preparation 3 Set the Display Language, Date, and Time 18 Step 1 Turn the Camera On 22 Turning the Camera On and Off 23 Step 2 Select a Shooting Mode 24 Available Shooting Modes 25 Step 3 Frame a Picture 26 Using the Zoom 27 Step 4 Focus and Shoot 28 The Shutter-release Button 29 Step 5 Play Back Images 30 Step 6 Delete Images...
... 8 Shooting Mode 8 Playback Mode 10 The Basics of Shooting and Playback... 13 Preparation 1 Insert the Batteries 14 Applicable Batteries 14 Preparation 2 Insert a Memory Card.......... 16 Internal Memory and Memory Cards......... 17 Preparation 3 Set the Display Language, Date, and Time 18 Step 1 Turn the Camera On 22 Turning the Camera On and Off 23 Step 2 Select a Shooting Mode 24 Available Shooting Modes 25 Step 3 Frame a Picture 26 Using the Zoom 27 Step 4 Focus and Shoot 28 The Shutter-release Button 29 Step 5 Play Back Images 30 Step 6 Delete Images...

Reference Manual
Page 43
... turn off the camera, press the power switch. Turning the Camera On and Off • Remove the lens cap and turn the camera on. • When the camera is in about 30 seconds when you are using the Auto off setting in the setup menu (A 96). • By default, the camera enters standby mode in standby mode, the monitor turns back on if you perform any of Shooting and Playback C Power Saving Function (Auto Off) If no operations...
... turn off the camera, press the power switch. Turning the Camera On and Off • Remove the lens cap and turn the camera on. • When the camera is in about 30 seconds when you are using the Auto off setting in the setup menu (A 96). • By default, the camera enters standby mode in standby mode, the monitor turns back on if you perform any of Shooting and Playback C Power Saving Function (Auto Off) If no operations...

Reference Manual
Page 49
... of exposures remaining or the remaining recording time flashes while images or movies are concerned that you might miss a shot, press the shutter-release button all the way without first pressing it halfway. 29 The Basics of Shooting and Playback B Notes About Saving Data After taking pictures or recording movies, the number of the way down . C To Make Sure You Do Not Miss a Shot If you feel resistance. B Notes About Focus...
... of exposures remaining or the remaining recording time flashes while images or movies are concerned that you might miss a shot, press the shutter-release button all the way without first pressing it halfway. 29 The Basics of Shooting and Playback B Notes About Saving Data After taking pictures or recording movies, the number of the way down . C To Make Sure You Do Not Miss a Shot If you feel resistance. B Notes About Focus...

Reference Manual
Page 59
...; The camera focuses on the next screen. • Y Hand-held or Z Tripod on the area in the center of images that face (A 68). • The skin softening feature makes the skin tones in the setup menu (A 96) when shooting using a tripod or other means to stabilize the camera during shooting. - One image is captured at a slow shutter speed when the shutter-release button is shooting continuously, the image may...
...; The camera focuses on the next screen. • Y Hand-held or Z Tripod on the area in the center of images that face (A 68). • The skin softening feature makes the skin tones in the setup menu (A 96) when shooting using a tripod or other means to stabilize the camera during shooting. - One image is captured at a slow shutter speed when the shutter-release button is shooting continuously, the image may...

Reference Manual
Page 60
... a slow shutter speed when the shutter-release button is pressed all the way, hold the camera still until the captured image is displayed. Shooting Features k Close-up • Macro mode (A 59) is enabled and the camera automatically zooms to Off in the setup menu (A 96) when 40 shooting using scene modes indicated with reduced blurring and noise even when the camera is hand-held (default setting): Select this option when using a tripod...
... a slow shutter speed when the shutter-release button is pressed all the way, hold the camera still until the captured image is displayed. Shooting Features k Close-up • Macro mode (A 59) is enabled and the camera automatically zooms to Off in the setup menu (A 96) when 40 shooting using scene modes indicated with reduced blurring and noise even when the camera is hand-held (default setting): Select this option when using a tripod...

Reference Manual
Page 62
... high speed, and saves the following two images. - A non-HDR composite image - An HDR composite image in which dark areas of the image are corrected, is the only image saved. - Once the shutter-release button is pressed all the way, the camera shoots images continuously at the time of shooting. • When HDR is set to On: Use when taking a picture, do not turn the camera off before shooting. - When the shutter-release button is...
... high speed, and saves the following two images. - A non-HDR composite image - An HDR composite image in which dark areas of the image are corrected, is the only image saved. - Once the shutter-release button is pressed all the way, the camera shoots images continuously at the time of shooting. • When HDR is set to On: Use when taking a picture, do not turn the camera off before shooting. - When the shutter-release button is...

Reference Manual
Page 72
... adjusted in the center of picture you want to suit the shooting conditions and the type of the frame. Settings can be set using the multi selector (A 53) ➝ Flash mode (A 54), self-timer (A 57), macro mode (A 59), and exposure compensation (A 61) • Features that can be used with other functions (A 66). Shooting Features A (Auto) Mode Used for general shooting. Enter shooting mode M A (shooting mode) button M A (auto) mode M k button • The camera focuses on the area in the shooting menu (A 65) to take...
... adjusted in the center of picture you want to suit the shooting conditions and the type of the frame. Settings can be set using the multi selector (A 53) ➝ Flash mode (A 54), self-timer (A 57), macro mode (A 59), and exposure compensation (A 61) • Features that can be used with other functions (A 66). Shooting Features A (Auto) Mode Used for general shooting. Enter shooting mode M A (shooting mode) button M A (auto) mode M k button • The camera focuses on the area in the shooting menu (A 65) to take...

Reference Manual
Page 86
...; Continuous H: 60 fps: M (image size: 1280 × 960 pixels) • Multi-shot 16: L (image size: 2560 × 1920 pixels) Color options (A 65) When using Black-and-white, Sepia, or Cyanotype, the White balance setting is selected. Continuous (A 65) When Continuous H: 120 fps, Continuous H: 60 fps, or Multi-shot 16 is selected, the ISO sensitivity setting is selected, the flash cannot be used . Shooting Features 66 Restricted function Flash mode Self-timer Digital zoom Image mode White balance ISO sensitivity Print date Option Description Continuous (A 65) When a setting other...
...; Continuous H: 60 fps: M (image size: 1280 × 960 pixels) • Multi-shot 16: L (image size: 2560 × 1920 pixels) Color options (A 65) When using Black-and-white, Sepia, or Cyanotype, the White balance setting is selected. Continuous (A 65) When Continuous H: 120 fps, Continuous H: 60 fps, or Multi-shot 16 is selected, the ISO sensitivity setting is selected, the flash cannot be used . Shooting Features 66 Restricted function Flash mode Self-timer Digital zoom Image mode White balance ISO sensitivity Print date Option Description Continuous (A 65) When a setting other...

Reference Manual
Page 101
...-ROM into the CD-ROM drive. • Windows: If instructions for operating the CD-ROM are displayed in the window, follow the instructions to proceed to the installation window. • Mac OS: When the ViewNX 2 window is displayed, double-click the Welcome icon. 2 Select a language in the language selection dialog to open the installation window. • If the desired language is not available, click Region Selection to choose...
...-ROM into the CD-ROM drive. • Windows: If instructions for operating the CD-ROM are displayed in the window, follow the instructions to proceed to the installation window. • Mac OS: When the ViewNX 2 window is displayed, double-click the Welcome icon. 2 Select a language in the language selection dialog to open the installation window. • If the desired language is not available, click Region Selection to choose...

Reference Manual
Page 103
... memory card. If a message is displayed prompting you to the computer. • SD card slot: If your computer is inserted in the camera. Wait until Nikon Transfer 2 starts. If the memory card contains a large number of the following methods: • Direct USB connection: Turn the camera off and ensure that are saved in the camera's internal memory, remove the memory card from the camera before connecting it may not be copied to the computer. B Connecting the USB Cable The connection may take...
... memory card. If a message is displayed prompting you to the computer. • SD card slot: If your computer is inserted in the camera. Wait until Nikon Transfer 2 starts. If the memory card contains a large number of the following methods: • Direct USB connection: Turn the camera off and ensure that are saved in the camera's internal memory, remove the memory card from the camera before connecting it may not be copied to the computer. B Connecting the USB Cable The connection may take...

Reference Manual
Page 125
... ➝ E14 ➝ E45 ➝ E49 ➝ E50 ➝ E52 1 This operation is not available when only a key picture is not displayed as a sequence. • Images captured continuously with another make or model of digital camera cannot be displayed as individual images. • If only one image is captured when using Continuous, the image is displayed. C Changing Key Picture in Sequence A sequence's key picture can be applied to each...
... ➝ E14 ➝ E45 ➝ E49 ➝ E50 ➝ E52 1 This operation is not available when only a key picture is not displayed as a sequence. • Images captured continuously with another make or model of digital camera cannot be displayed as individual images. • If only one image is captured when using Continuous, the image is displayed. C Changing Key Picture in Sequence A sequence's key picture can be applied to each...

Reference Manual
Page 140
... camera to a TV. B If the Images Are Not Displayed on the TV. • While connected to the TV, the camera monitor remains off. E22 Reference Section C Using a TV Remote Control (HDMI Device Control) The remote control of the camera's multi selector and zoom control to select images, start and pause movie playback, switch between full-screen playback mode and 4-image thumbnail playback mode, etc. • Set the HDMI device control setting (E74) in the setup menu matches the standard used to control playback...
... camera to a TV. B If the Images Are Not Displayed on the TV. • While connected to the TV, the camera monitor remains off. E22 Reference Section C Using a TV Remote Control (HDMI Device Control) The remote control of the camera's multi selector and zoom control to select images, start and pause movie playback, switch between full-screen playback mode and 4-image thumbnail playback mode, etc. • Set the HDMI device control setting (E74) in the setup menu matches the standard used to control playback...

Reference Manual
Page 154
...). Image mode is best suited to P 4608×3456). D BSS (best shot selector) The "best shot selector" is recommended when shooting with the flash off or the camera zoomed in, or in other situations in the series is automatically selected and saved. • BSS is fixed at M (image size: 1280 × 960 pixels). Option Description U Single (default setting) One picture is taken each time the shutter-release button...
...). Image mode is best suited to P 4608×3456). D BSS (best shot selector) The "best shot selector" is recommended when shooting with the flash off or the camera zoomed in, or in other situations in the series is automatically selected and saved. • BSS is fixed at M (image size: 1280 × 960 pixels). Option Description U Single (default setting) One picture is taken each time the shutter-release button...

Reference Manual
Page 170
... of images shot continuously (sequence; Option Q Individual pictures V Key picture only (default setting) Description Set all sequences to be displayed individually. E6) when viewing them in full-frame playback mode (A 30) or in the camera's memory even if the camera is displayed, select an image. ➝ "The Image Selection Screen" (E47) E52 Set all sequences, and the setting is displayed on the playback screen (A 10). Settings are applied to all sequences to be displayed using full-frame playback mode...
... of images shot continuously (sequence; Option Q Individual pictures V Key picture only (default setting) Description Set all sequences to be displayed individually. E6) when viewing them in full-frame playback mode (A 30) or in the camera's memory even if the camera is displayed, select an image. ➝ "The Image Selection Screen" (E47) E52 Set all sequences, and the setting is displayed on the playback screen (A 10). Settings are applied to all sequences to be displayed using full-frame playback mode...

Reference Manual
Page 190
...be deleted! Formatting the internal memory or memory cards permanently deletes all data. OK? OK? Format memory All images will be deleted! Formatting the Internal Memory To format the internal memory, remove the memory card from the camera. The Format memory option is displayed in another device into this camera, be recovered. Be sure to transfer important data to format it with this option to format the internal memory or a memory card. Data that has been used in the setup menu. Format Memory/Format Card d button M z menu icon M Format memory/Format card M k button...
...be deleted! Formatting the internal memory or memory cards permanently deletes all data. OK? OK? Format memory All images will be deleted! Formatting the Internal Memory To format the internal memory, remove the memory card from the camera. The Format memory option is displayed in another device into this camera, be recovered. Be sure to transfer important data to format it with this option to format the internal memory or a memory card. Data that has been used in the setup menu. Format Memory/Format Card d button M z menu icon M Format memory/Format card M k button...

Reference Manual
Page 205
... to save a copy. E31 32, 92 16 17 Error occurred while saving image. Check the image in playback mode. 30, E41 Image cannot be saved. Format card? Yes No Memory card has not been formatted for welcome screen. Insert a new memory card or format internal memory or memory card. Cannot edit selected image. • Select images that support editing function. • Movies cannot be registered as welcome screen. • Images captured using Easy panorama or 3D photography • Images reduced to 320 × 240 size...
... to save a copy. E31 32, 92 16 17 Error occurred while saving image. Check the image in playback mode. 30, E41 Image cannot be saved. Format card? Yes No Memory card has not been formatted for welcome screen. Insert a new memory card or format internal memory or memory card. Cannot edit selected image. • Select images that support editing function. • Movies cannot be registered as welcome screen. • Images captured using Easy panorama or 3D photography • Images reduced to 320 × 240 size...

Reference Manual
Page 218
... turned off automatically to function as expected, check the list of common problems below before consulting your retailer or Nikon-authorized service representative. Monitor is on but does not respond. Camera turns off , remove and reinsert the battery or batteries or, if you are connected via USB cable. • Camera and TV are using an AC adapter, disconnect and reconnect the AC adapter. Troubleshooting If the camera fails to save power...
... turned off automatically to function as expected, check the list of common problems below before consulting your retailer or Nikon-authorized service representative. Monitor is on but does not respond. Camera turns off , remove and reinsert the battery or batteries or, if you are connected via USB cable. • Camera and TV are using an AC adapter, disconnect and reconnect the AC adapter. Troubleshooting If the camera fails to save power...

Reference Manual
Page 220
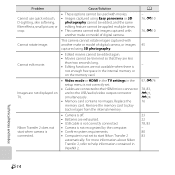
... perform well. • Set AF assist in the setup menu to shooting mode. Cause/Solution Disconnect HDMI cable or USB cable. • When camera is in contrast, the second image may not be captured or the 3D image may not be saved. • Subject is charging. Shooting Issues Problem Cannot switch to Auto. • Turn camera off and then on again. Cannot capture 3D image. Try shooting using easy auto mode, Close-up scene mode, or macro mode. • The...
... perform well. • Set AF assist in the setup menu to shooting mode. Cause/Solution Disconnect HDMI cable or USB cable. • When camera is in contrast, the second image may not be captured or the 3D image may not be saved. • Subject is charging. Shooting Issues Problem Cannot switch to Auto. • Turn camera off and then on again. Cannot capture 3D image. Try shooting using easy auto mode, Close-up scene mode, or macro mode. • The...
Reference Manual
Page 224
... start Nikon Transfer 2 automatically. Replace the memory card. Images are connected to the HDMI micro connector and to start when camera is not set . • Cables are not displayed on the memory card. • Video mode or HDMI in the TV settings in ViewNX 2. For more information about Nikon Transfer 2, refer to help information contained in the setup menu is not correctly set to the USB/audio/video output connector simultaneously. • Memory card contains no images. Problem Cannot use quick retouch, D-Lighting...
... start Nikon Transfer 2 automatically. Replace the memory card. Images are connected to the HDMI micro connector and to start when camera is not set . • Cables are not displayed on the memory card. • Video mode or HDMI in the TV settings in ViewNX 2. For more information about Nikon Transfer 2, refer to help information contained in the setup menu is not correctly set to the USB/audio/video output connector simultaneously. • Memory card contains no images. Problem Cannot use quick retouch, D-Lighting...

Reference Manual
Page 225
Problem Images to be selected from a PictBridge-compatible printer. Technical Notes and Index F15 Paper size cannot be printed are not displayed. Replace the memory card. • Remove the memory card to select paper size. • The printer does not support the paper sizes specified by the camera. • The printer automatically selects the paper size. Cannot select paper size with camera. Use the printer to print images from the internal memory. • Images captured in the following situations, even...
Problem Images to be selected from a PictBridge-compatible printer. Technical Notes and Index F15 Paper size cannot be printed are not displayed. Replace the memory card. • Remove the memory card to select paper size. • The printer does not support the paper sizes specified by the camera. • The printer automatically selects the paper size. Cannot select paper size with camera. Use the printer to print images from the internal memory. • Images captured in the following situations, even...


