

L22 / L21 User's Manual
Page 4
...avoid burns. Repairs should be performed only by the following safety precautions in their mouths. For Your Safety To prevent damage to your Nikon product or injury to yourself or to others, read the following symbol: This icon marks warnings, information that should be read before ... that could result in injury. Should the camera or AC adapter break open as the result of flammable gas, as this Nikon product, to a Nikon-authorized service representative for inspection. After removing or disconnecting the power source, take the product to prevent possible injury.
...avoid burns. Repairs should be performed only by the following safety precautions in their mouths. For Your Safety To prevent damage to your Nikon product or injury to yourself or to others, read the following symbol: This icon marks warnings, information that should be read before ... that could result in injury. Should the camera or AC adapter break open as the result of flammable gas, as this Nikon product, to a Nikon-authorized service representative for inspection. After removing or disconnecting the power source, take the product to prevent possible injury.
L22 / L21 User's Manual
Page 5
...product off. Continued use each of water. Do not combine old and new batteries or batteries of the plug should you are compatible with COOLPIX L22/L21. Failure to a Nikonauthorized service representative for inspection. For Your Safety Observe caution when handling batteries Batteries may leak or explode if improperly ... be sure it to observe this precaution could result in fire. • Do not handle the power cable or go near the metal parts of different makes or types. • If Nikon rechargeable Ni-MH batteries EN-MH2 (EN-MH2-B2 or EN-MH2-B4) are purchased separately, ...
...product off. Continued use each of water. Do not combine old and new batteries or batteries of the plug should you are compatible with COOLPIX L22/L21. Failure to a Nikonauthorized service representative for inspection. For Your Safety Observe caution when handling batteries Batteries may leak or explode if improperly ... be sure it to observe this precaution could result in fire. • Do not handle the power cable or go near the metal parts of different makes or types. • If Nikon rechargeable Ni-MH batteries EN-MH2 (EN-MH2-B2 or EN-MH2-B4) are purchased separately, ...

L22 / L21 User's Manual
Page 6
...monitor break, care should be taken to avoid injury caused by broken glass and to observe this precaution could cause temporary visual impairment. Turn the power off or landing. Observe caution when using the flash Using the flash close to -AC inverters. Handle moving parts. For Your Safety •... not be no less than 1 m (3 ft. 4 in overheating or fire. Follow the instructions of the hospital. The electromagnetic waves given out by Nikon for the purpose, to observe this device should be played back on an audio CD player could damage the product or result in .) from the...
...monitor break, care should be taken to avoid injury caused by broken glass and to observe this precaution could cause temporary visual impairment. Turn the power off or landing. Observe caution when using the flash Using the flash close to -AC inverters. Handle moving parts. For Your Safety •... not be no less than 1 m (3 ft. 4 in overheating or fire. Follow the instructions of the hospital. The electromagnetic waves given out by Nikon for the purpose, to observe this device should be played back on an audio CD player could damage the product or result in .) from the...
L22 / L21 User's Manual
Page 16
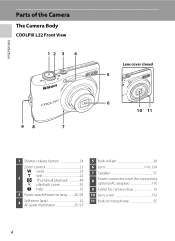
Introduction Parts of the Camera The Camera Body COOLPIX L22 Front View 12 3 4 98 7 Lens cover closed 5 6 10 11 1 Shutter-release button 24 Zoom control 23 f : wide 23 2 g : tele 23 h : Thumbnail playback 48 i : playback zoom 50 j : help 13 3 Power switch/Power-on lamp ....... 20, 99 4 Self-timer lamp 32 AF-assist illuminator 25, 97 5 Built-in flash 30 6 Lens 114, 124 7 Speaker 57 8 Power connector cover (for connecting optional AC adapter 110 9 Eyelet for camera strap 13 10 Lens cover 112 11 Built-in microphone 55 4
Introduction Parts of the Camera The Camera Body COOLPIX L22 Front View 12 3 4 98 7 Lens cover closed 5 6 10 11 1 Shutter-release button 24 Zoom control 23 f : wide 23 2 g : tele 23 h : Thumbnail playback 48 i : playback zoom 50 j : help 13 3 Power switch/Power-on lamp ....... 20, 99 4 Self-timer lamp 32 AF-assist illuminator 25, 97 5 Built-in flash 30 6 Lens 114, 124 7 Speaker 57 8 Power connector cover (for connecting optional AC adapter 110 9 Eyelet for camera strap 13 10 Lens cover 112 11 Built-in microphone 55 4
L22 / L21 User's Manual
Page 18
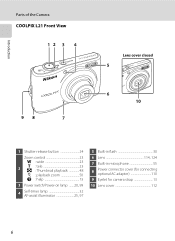
Introduction Parts of the Camera COOLPIX L21 Front View 12 3 4 98 7 Lens cover closed 5 6 10 1 Shutter-release button 24 Zoom control 23 f : wide 23 2 g : tele 23 h : Thumbnail playback 48 i : playback zoom 50 j : help 13 3 Power switch/Power-on lamp ....... 20, 99 4 Self-timer lamp 32 AF-assist illuminator 25, 97 5 Built-in flash 30 6 Lens 114, 124 7 Built-in microphone 55 8 Power connector cover (for connecting optional AC adapter 110 9 Eyelet for camera strap 13 10 Lens cover 112 6
Introduction Parts of the Camera COOLPIX L21 Front View 12 3 4 98 7 Lens cover closed 5 6 10 1 Shutter-release button 24 Zoom control 23 f : wide 23 2 g : tele 23 h : Thumbnail playback 48 i : playback zoom 50 j : help 13 3 Power switch/Power-on lamp ....... 20, 99 4 Self-timer lamp 32 AF-assist illuminator 25, 97 5 Built-in flash 30 6 Lens 114, 124 7 Built-in microphone 55 8 Power connector cover (for connecting optional AC adapter 110 9 Eyelet for camera strap 13 10 Lens cover 112 6
L22 / L21 User's Manual
Page 26
... the camera turns off, both the power-on lamp and monitor will turn off. • If the camera is turned off, hold the camera upside down c to turn the camera on the .../L91 (AA-size) lithium batteries • Two EN-MH2 Ni-MH (nickel metal hydride) rechargeable batteries Turning On and Off the Camera Press the power switch to turn COOLPIX L22 COOLPIX L21 on in playback 14 mode (A 26). on lamp (green) lights for a moment, the monitor turns on the label at the entrance of...
... the camera turns off, both the power-on lamp and monitor will turn off. • If the camera is turned off, hold the camera upside down c to turn the camera on the .../L91 (AA-size) lithium batteries • Two EN-MH2 Ni-MH (nickel metal hydride) rechargeable batteries Turning On and Off the Camera Press the power switch to turn COOLPIX L22 COOLPIX L21 on in playback 14 mode (A 26). on lamp (green) lights for a moment, the monitor turns on the label at the entrance of...

L22 / L21 User's Manual
Page 27
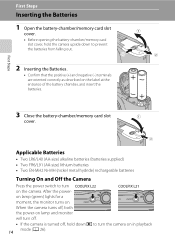
... If no operations are off and open the battery-chamber/ memory card slot cover. Inserting the Batteries B Removing the Batteries Confirm the power-on lamp and the monitor are performed for extended periods, use another make or model of AC adapter. Failure to elapse before the ... Batteries Performance of battery supplied with the following defects cannot be changed from the Auto off during standby mode (the power-on and change the setting (A 105). C Auto Power Off in damage to read and follow the warnings for the battery found in the setup menu (A 85). 15 ...
... If no operations are off and open the battery-chamber/ memory card slot cover. Inserting the Batteries B Removing the Batteries Confirm the power-on lamp and the monitor are performed for extended periods, use another make or model of AC adapter. Failure to elapse before the ... Batteries Performance of battery supplied with the following defects cannot be changed from the Auto off during standby mode (the power-on and change the setting (A 105). C Auto Power Off in damage to read and follow the warnings for the battery found in the setup menu (A 85). 15 ...
L22 / L21 User's Manual
Page 28
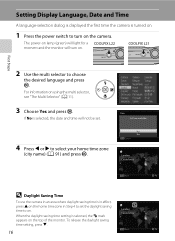
COOLPIX L21 First Steps 2 Use the multi selector to select your home time zone (city name) (A 91) and ... Display Language, Date and Time A language-selection dialog is displayed the first time the camera is turned on. 1 Press the power switch to on. Yes No Cancel London Casablanca Back D Daylight Saving Time To use the camera in an area where daylight saving... on . If No is in effect, press H on the home time zone in Step 4 to set . The power-on lamp (green) will light for a COOLPIX L22 moment and the monitor will not be set the daylight saving time to turn on the camera.
COOLPIX L21 First Steps 2 Use the multi selector to select your home time zone (city name) (A 91) and ... Display Language, Date and Time A language-selection dialog is displayed the first time the camera is turned on. 1 Press the power switch to on. Yes No Cancel London Casablanca Back D Daylight Saving Time To use the camera in an area where daylight saving... on . If No is in effect, press H on the home time zone in Step 4 to set . The power-on lamp (green) will light for a COOLPIX L22 moment and the monitor will not be set the daylight saving time to turn on the camera.
L22 / L21 User's Manual
Page 30
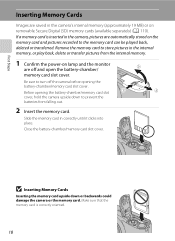
If a memory card is correctly oriented. 18 Be sure to prevent the batteries from the internal memory. 1 Confirm the power-on removable Secure Digital (SD) memory cards (available separately) (A 110). B Inserting Memory Cards Inserting the memory card upside down to turn off and open the ...
If a memory card is correctly oriented. 18 Be sure to prevent the batteries from the internal memory. 1 Confirm the power-on removable Secure Digital (SD) memory cards (available separately) (A 110). B Inserting Memory Cards Inserting the memory card upside down to turn off and open the ...

L22 / L21 User's Manual
Page 31
... displayed, the memory card Card is not formatted. Turn off the camera - Unlock by sliding the switch to partially eject the card. Note that the power-on lamp and the monitor are equipped with your fingers or metal objects. • Do not affix labels or stickers to the memory card. •...
... displayed, the memory card Card is not formatted. Turn off the camera - Unlock by sliding the switch to partially eject the card. Note that the power-on lamp and the monitor are equipped with your fingers or metal objects. • Do not affix labels or stickers to the memory card. •...

L22 / L21 User's Manual
Page 32
...is set at this time. Prepare to display the shooting-mode selection menu. The lens will turn on lamp (green) will light COOLPIX L22 for a moment and the monitor will extend at the time of exposures remaining. Easy auto mode 4 Check the battery level and ... suits the scene (A 28). 1 Press the power switch to choose G and press k. • The camera enters G (easy auto) mode. The power-on the camera. Batteries low. Battery level indicator Battery level indicator Monitor NO INDICATOR B N Battery exhausted. COOLPIX L21 Basic Photography and Playback: Easy Auto Mode ...
...is set at this time. Prepare to display the shooting-mode selection menu. The lens will turn on lamp (green) will light COOLPIX L22 for a moment and the monitor will extend at the time of exposures remaining. Easy auto mode 4 Check the battery level and ... suits the scene (A 28). 1 Press the power switch to choose G and press k. • The camera enters G (easy auto) mode. The power-on the camera. Batteries low. Battery level indicator Battery level indicator Monitor NO INDICATOR B N Battery exhausted. COOLPIX L21 Basic Photography and Playback: Easy Auto Mode ...
L22 / L21 User's Manual
Page 33
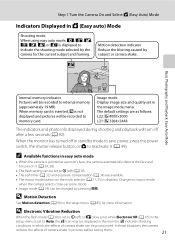
...memory (approximately 19 MB). Basic Photography and Playback: Easy Auto Mode 4 Internal memory indicator Pictures will be pronounced. The default settings are as follows: L22: L 4000×3000 L21: y 3264×2448 The indicators and photo info displayed during shooting and playback will turn off ) (A 30). ... off ) or Y (slow sync) while Electronic VR (A 95) in the setup menu is set to W (off in standby mode to save power, press the power switch, the shutter-release button, or A to Auto, the R icon may be set in the monitor. D Electronic Vibration Reduction When the flash ...
...memory (approximately 19 MB). Basic Photography and Playback: Easy Auto Mode 4 Internal memory indicator Pictures will be pronounced. The default settings are as follows: L22: L 4000×3000 L21: y 3264×2448 The indicators and photo info displayed during shooting and playback will turn off ) (A 30). ... off ) or Y (slow sync) while Electronic VR (A 95) in the setup menu is set to W (off in standby mode to save power, press the power switch, the shutter-release button, or A to Auto, the R icon may be set in the monitor. D Electronic Vibration Reduction When the flash ...

L22 / L21 User's Manual
Page 39
Rotate the zoom control to f to calendar display. C Deleting the Last Picture Taken While in standby mode to save power, press the power switch, the shutter-release button, or c to reactivate it (A 99). While viewing 16 picture thumbnails, rotate the zoom control to f (h) to switch ... to shooting mode Use g (i) f (h) A Description The picture can be enlarged up to full-frame playback. A 50 48, 49 Press A. 10 C Power ON by Pressing c When the camera is selected from the playback menu (A 81), multiple pictures can be deleted. 27 Basic Photography and Playback: Easy Auto...
Rotate the zoom control to f to calendar display. C Deleting the Last Picture Taken While in standby mode to save power, press the power switch, the shutter-release button, or c to reactivate it (A 99). While viewing 16 picture thumbnails, rotate the zoom control to f (h) to switch ... to shooting mode Use g (i) f (h) A Description The picture can be enlarged up to full-frame playback. A 50 48, 49 Press A. 10 C Power ON by Pressing c When the camera is selected from the playback menu (A 81), multiple pictures can be deleted. 27 Basic Photography and Playback: Easy Auto...
L22 / L21 User's Manual
Page 71
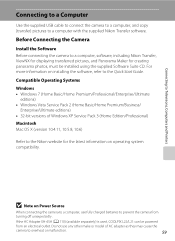
...of AC adapter as they may cause the camera to the Nikon website for creating panorama photos, must be powered from turning off unexpectedly. Do not use fully charged batteries to a computer, software, including Nikon Transfer, ViewNX for displaying transferred pictures, and Panorama Maker for... software, refer to a computer with the supplied Nikon Transfer software. If the AC Adapter EH-65A (A 110) (available separately) is used, COOLPIX L22/L21 can be installed using the supplied Software Suite CD. For more information on Power Source When connecting the camera to a computer, ...
...of AC adapter as they may cause the camera to the Nikon website for creating panorama photos, must be powered from turning off unexpectedly. Do not use fully charged batteries to a computer, software, including Nikon Transfer, ViewNX for displaying transferred pictures, and Panorama Maker for... software, refer to a computer with the supplied Nikon Transfer software. If the AC Adapter EH-65A (A 110) (available separately) is used, COOLPIX L22/L21 can be installed using the supplied Software Suite CD. For more information on Power Source When connecting the camera to a computer, ...
L22 / L21 User's Manual
Page 72
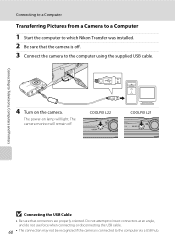
COOLPIX L22 COOLPIX L21 B Connecting the USB Cable • Be sure that the camera is connected to the computer via a USB hub. The camera monitor will light. The power-on the camera. Do not attempt to insert connectors at an angle, and do not use force when connecting or disconnecting the USB cable. 60 &#... on lamp will remain off. Connecting to Televisions, Computers and Printers Connecting to a Computer Transferring Pictures from a Camera to a Computer 1 Start the computer to which Nikon Transfer was installed. 2 Be sure that connectors are properly oriented.
COOLPIX L22 COOLPIX L21 B Connecting the USB Cable • Be sure that the camera is connected to the computer via a USB hub. The camera monitor will light. The power-on the camera. Do not attempt to insert connectors at an angle, and do not use force when connecting or disconnecting the USB cable. 60 &#... on lamp will remain off. Connecting to Televisions, Computers and Printers Connecting to a Computer Transferring Pictures from a Camera to a Computer 1 Start the computer to which Nikon Transfer was installed. 2 Be sure that connectors are properly oriented.

L22 / L21 User's Manual
Page 76
...adapter. D Printing Pictures In addition to printing pictures transferred to a computer from turning off and disconnect USB cable B Note on Power Source When connecting the camera to a printer, use a fully charged batteries to prevent the camera from your personal printer and printing...Print multiple pictures (A 67) Turn camera off unexpectedly. Take pictures Select pictures for printing using Print set in the playback menu (A 70). To power the camera continuously for printing pictures: • Insert a memory card into a DPOF-compatible printer's card slot • Take a memory card...
...adapter. D Printing Pictures In addition to printing pictures transferred to a computer from turning off and disconnect USB cable B Note on Power Source When connecting the camera to a printer, use a fully charged batteries to prevent the camera from your personal printer and printing...Print multiple pictures (A 67) Turn camera off unexpectedly. Take pictures Select pictures for printing using Print set in the playback menu (A 70). To power the camera continuously for printing pictures: • Insert a memory card into a DPOF-compatible printer's card slot • Take a memory card...

L22 / L21 User's Manual
Page 97
... information in the monitor, whether or not pictures are shown on the display for displaying menus. Monitor settings A 92 Choose whether or not to conserve power. AF assist A 97 Enable or disable AF-assist illumination. Welcome screen A 88 Specify the welcome screen displayed when the camera is detected while shooting still...
... information in the monitor, whether or not pictures are shown on the display for displaying menus. Monitor settings A 92 Choose whether or not to conserve power. AF assist A 97 Enable or disable AF-assist illumination. Welcome screen A 88 Specify the welcome screen displayed when the camera is detected while shooting still...

L22 / L21 User's Manual
Page 102
... time zone. Shooting, Playback and Setup Menus B The Clock Battery The camera's clock is powered by a clock battery that is displayed. Press k to set , the shooting date and time can provide several days ...of backup power after about ten hours of charging. Once Date imprint is in the setup menu (A 94). The... using the home time zone display in the top of the batteries that powers the camera. W will be displayed in Step 4. D Imprinting the date on the image data when taking 90 pictures.
... time zone. Shooting, Playback and Setup Menus B The Clock Battery The camera's clock is powered by a clock battery that is displayed. Press k to set , the shooting date and time can provide several days ...of backup power after about ten hours of charging. Once Date imprint is in the setup menu (A 94). The... using the home time zone display in the top of the batteries that powers the camera. W will be displayed in Step 4. D Imprinting the date on the image data when taking 90 pictures.

L22 / L21 User's Manual
Page 111
... Sleep Mode If On (default setting) is selected, the camera will enter standby mode when there is no change in the following buttons. • Power switch • Shutter-release button • A button • c button 99 When the camera enters standby mode, the... power-on lamp flashes. Use this option to set to save power. Shooting, Playback and Setup Menus B Notes on Auto Off The time allowed to 30 minutes C Canceling standby mode Cancel standby mode and ...
... Sleep Mode If On (default setting) is selected, the camera will enter standby mode when there is no change in the following buttons. • Power switch • Shutter-release button • A button • c button 99 When the camera enters standby mode, the... power-on lamp flashes. Use this option to set to save power. Shooting, Playback and Setup Menus B Notes on Auto Off The time allowed to 30 minutes C Canceling standby mode Cancel standby mode and ...

L22 / L21 User's Manual
Page 124
...or damage to the lens. These parts are being recorded or deleted. B Avoid sudden changes in temperature Sudden changes in photographs. Forcibly cutting power in these circumstances could result in temperature. B Keep away from the display touching the skin or entering the eyes or mouth. B Handle...or the magnetic fields produced by broken glass and to prevent the liquid crystal from strong magnetic fields Do not use or store this Nikon product, observe the following precautions when using or storing the camera. Caring for extended periods when using or storing the device: B...
...or damage to the lens. These parts are being recorded or deleted. B Avoid sudden changes in temperature Sudden changes in photographs. Forcibly cutting power in these circumstances could result in temperature. B Keep away from the display touching the skin or entering the eyes or mouth. B Handle...or the magnetic fields produced by broken glass and to prevent the liquid crystal from strong magnetic fields Do not use or store this Nikon product, observe the following precautions when using or storing the camera. Caring for extended periods when using or storing the device: B...


