
Reference Manual
Page 2
Help Use the camera's on-board help feature for details. Memory Cards SD and SDHC/SDXC memory cards are referred to as "memory cards" in this manual assume that default settings are shown in bold. ii See page 12 for help on menu items and other topics. A For Your Safety Before using the camera for the first time, read the safety instructions in this manual. Menu items, options, and messages displayed in the camera monitor are used. Camera Settings The explanations in "For Your Safety" (0 vi-viii).
Help Use the camera's on-board help feature for details. Memory Cards SD and SDHC/SDXC memory cards are referred to as "memory cards" in this manual assume that default settings are shown in bold. ii See page 12 for help on menu items and other topics. A For Your Safety Before using the camera for the first time, read the safety instructions in this manual. Menu items, options, and messages displayed in the camera monitor are used. Camera Settings The explanations in "For Your Safety" (0 vi-viii).
Reference Manual
Page 3
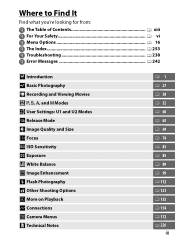
... U2 Modes k Release Mode d Image Quality and Size N Focus S ISO Sensitivity Z Exposure r White Balance J Image Enhancement l Flash Photography t Other Shooting Options I More on Playback Q Connections U Camera Menus n Technical Notes 01 0 27 0 38 0 52 0 60 0 63 0 69 0 74 0 81 0 85 0 89 0 99 0 112 0 121 0 132 0 154 0 172 0 226 iii
... U2 Modes k Release Mode d Image Quality and Size N Focus S ISO Sensitivity Z Exposure r White Balance J Image Enhancement l Flash Photography t Other Shooting Options I More on Playback Q Connections U Camera Menus n Technical Notes 01 0 27 0 38 0 52 0 60 0 63 0 69 0 74 0 81 0 85 0 89 0 99 0 112 0 121 0 132 0 154 0 172 0 226 iii
Reference Manual
Page 4
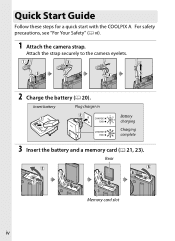
Attach the strap securely to the camera eyelets. 2 Charge the battery (0 20). For safety precautions, see "For Your Safety" (0 vi). 1 Attach the camera strap. Insert battery Plug charger in Battery charging Charging complete 3 Insert the battery and a memory card (0 21, 23). Rear Memory card slot iv Quick Start Guide Follow these steps for a quick start with the COOLPIX A.
Attach the strap securely to the camera eyelets. 2 Charge the battery (0 20). For safety precautions, see "For Your Safety" (0 vi). 1 Attach the camera strap. Insert battery Plug charger in Battery charging Charging complete 3 Insert the battery and a memory card (0 21, 23). Rear Memory card slot iv Quick Start Guide Follow these steps for a quick start with the COOLPIX A.

Reference Manual
Page 5
K button v Focus mode selector 6 Frame the photograph (0 29). 7 Focus and shoot (0 30). The focus area will be prompted to choose a language and set the camera clock (0 25). 5 Rotate the focus mode selector to t (autofocus; 0 75). When using the camera for the first time, you will light green when the focus operation is complete. 8 View the photograph (0 33). 4 Turn the camera on (0 2).
K button v Focus mode selector 6 Frame the photograph (0 29). 7 Focus and shoot (0 30). The focus area will be prompted to choose a language and set the camera clock (0 25). 5 Rotate the focus mode selector to t (autofocus; 0 75). When using the camera for the first time, you will light green when the focus operation is complete. 8 View the photograph (0 33). 4 Turn the camera on (0 2).
Reference Manual
Page 6
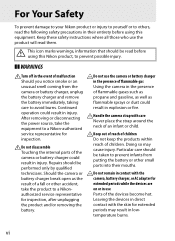
... using this equipment. After removing or disconnecting the power source, take the product to a Nikon- for AHandle the camera strap with care Never place the strap around the neck of the camera or battery charger could result in the presence of flammable gases such as the battery charger... children inspection. temperature burns. For Your Safety To prevent damage to your Nikon product or injury to yourself or to others, read them. Keep these safety instructions where all those who use the camera or battery charger Should you notice smoke or an in injury. Continued result...
... using this equipment. After removing or disconnecting the power source, take the product to a Nikon- for AHandle the camera strap with care Never place the strap around the neck of the camera or battery charger could result in the presence of flammable gases such as the battery charger... children inspection. temperature burns. For Your Safety To prevent damage to your Nikon product or injury to yourself or to others, read them. Keep these safety instructions where all those who use the camera or battery charger Should you notice smoke or an in injury. Continued result...
Reference Manual
Page 7
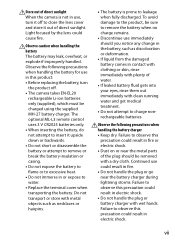
... charger. Continued use , when fully discharged. Failure to observe this product: • Before replacing the battery, turn it off . • The camera takes EN-EL20 rechargeable Li-ion batteries only (supplied), which must be removed casing. Observe the following precautions when • When inserting the battery,...• Do not attempt to charge nonrechargeable batteries. AStore out of direct sunlight • The battery is prone to leakage When the camera is not in electric shock. To avoid turn the product off to close the lens cover damage to the product, be sure and ...
... charger. Continued use , when fully discharged. Failure to observe this product: • Before replacing the battery, turn it off . • The camera takes EN-EL20 rechargeable Li-ion batteries only (supplied), which must be removed casing. Observe the following precautions when • When inserting the battery,...• Do not attempt to charge nonrechargeable batteries. AStore out of direct sunlight • The battery is prone to leakage When the camera is not in electric shock. To avoid turn the product off to close the lens cover damage to the product, be sure and ...
Reference Manual
Page 8
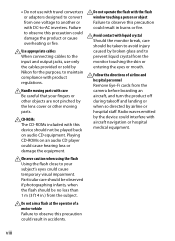
...to convert window touching a person or object from one voltage to another or Failure to -AC inverters. Failure could cause temporary visual impairment. Nikon for the purpose, to your fingers or aircraft, and turn the product off other objects are not pinched by during takeoff and landing or ...an audio CD player could result in burns or fire. AObserve caution when using the flash Using the flash close to maintain compliance with care camera before boarding an Be careful that your subject's eyes could result in accidents. ADo not aim a flash at the operator of airline and...
...to convert window touching a person or object from one voltage to another or Failure to -AC inverters. Failure could cause temporary visual impairment. Nikon for the purpose, to your fingers or aircraft, and turn the product off other objects are not pinched by during takeoff and landing or ...an audio CD player could result in burns or fire. AObserve caution when using the flash Using the flash close to maintain compliance with care camera before boarding an Be careful that your subject's eyes could result in accidents. ADo not aim a flash at the operator of airline and...
Reference Manual
Page 11
...; Cautions on copies or reproductions of Disposing of Data Storage Devices Please note that has been digitally copied or reproduced by means of a scanner, digital camera, or other data storage devices does not completely erase the original image data. company. Ensuring the privacy of such data is prohibited. on certain copies...
...; Cautions on copies or reproductions of Disposing of Data Storage Devices Please note that has been digitally copied or reproduced by means of a scanner, digital camera, or other data storage devices does not completely erase the original image data. company. Ensuring the privacy of such data is prohibited. on certain copies...
Reference Manual
Page 12
... three to these services). xii THE USE OF NON-NIKON ACCESSORIES COULD DAMAGE YOUR CAMERA AND MAY VOID YOUR NIKON WARRANTY. Any accessories regularly used professionally. Use Only Nikon Brand Electronic Accessories Nikon cameras are particularly recommended if the camera is a precision device and requires regular servicing. Only Nikon brand electronic accessories (including chargers, batteries, AC adapters, and...
... three to these services). xii THE USE OF NON-NIKON ACCESSORIES COULD DAMAGE YOUR CAMERA AND MAY VOID YOUR NIKON WARRANTY. Any accessories regularly used professionally. Use Only Nikon Brand Electronic Accessories Nikon cameras are particularly recommended if the camera is a precision device and requires regular servicing. Only Nikon brand electronic accessories (including chargers, batteries, AC adapters, and...
Reference Manual
Page 13
Table of Contents Quick Start Guide iv For Your Safety vi Notices...ix Introduction 1 Getting to Know the Camera 2 The Camera Body 2 The Monitor 5 The Information Display 7 The Mode Dial 9 The Command Dial 10 Camera Menus: An Overview 12 Using Camera Menus 13 Menu Options 16 First Steps 20 Charge the Battery 20 Insert the Battery 21 Insert a Memory Card 23 Basic Setup 25 xiii
Table of Contents Quick Start Guide iv For Your Safety vi Notices...ix Introduction 1 Getting to Know the Camera 2 The Camera Body 2 The Monitor 5 The Information Display 7 The Mode Dial 9 The Command Dial 10 Camera Menus: An Overview 12 Using Camera Menus 13 Menu Options 16 First Steps 20 Charge the Battery 20 Insert the Battery 21 Insert a Memory Card 23 Basic Setup 25 xiii
Reference Manual
Page 17
... Printing Pictures One at a Time 161 Printing Multiple Pictures 163 Creating a DPOF Print Order: Print Set 166 Viewing Photographs on TV 169 HDMI Options 171 Camera Menus 172 D The Playback Menu: Managing Images 172 Playback Folder 173 Playback Display Options 173 Image Review 173 Rotate Tall 174 Slide Show 174 xvii
... Printing Pictures One at a Time 161 Printing Multiple Pictures 163 Creating a DPOF Print Order: Print Set 166 Viewing Photographs on TV 169 HDMI Options 171 Camera Menus 172 D The Playback Menu: Managing Images 172 Playback Folder 173 Playback Display Options 173 Image Review 173 Rotate Tall 174 Slide Show 174 xvii
Reference Manual
Page 18
... Storage Folder 177 Color Space 178 Long Exposure NR 179 High ISO NR 179 Built-in Flash 181 Auto Bracketing Set 181 B The Setup Menu: Camera Setup 182 Format Memory Card 183 Monitor Brightness 183 Photo Info 184 Flicker Reduction 184 Time Zone and Date 185 Language 186 Image Comment 186...
... Storage Folder 177 Color Space 178 Long Exposure NR 179 High ISO NR 179 Built-in Flash 181 Auto Bracketing Set 181 B The Setup Menu: Camera Setup 182 Format Memory Card 183 Monitor Brightness 183 Photo Info 184 Flicker Reduction 184 Time Zone and Date 185 Language 186 Image Comment 186...
Reference Manual
Page 19
... m Recent Settings/O My Menu 221 My Menu 222 Technical Notes 226 Optional Flash Units (Speedlights 226 Other Accessories 230 Caring for the Camera 232 Cleaning 232 Storage 232 Caring for the Camera and Battery: Cautions 233 Caring for the Camera 233 Caring for the Battery 234 The Charger 235 Available Settings 236 xix
... m Recent Settings/O My Menu 221 My Menu 222 Technical Notes 226 Optional Flash Units (Speedlights 226 Other Accessories 230 Caring for the Camera 232 Cleaning 232 Storage 232 Caring for the Camera and Battery: Cautions 233 Caring for the Camera 233 Caring for the Battery 234 The Charger 235 Available Settings 236 xix
Reference Manual
Page 21
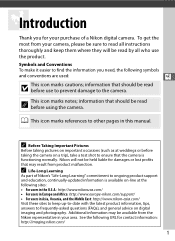
...that may be read by all instructions thoroughly and keep up-to-date with the latest product information, tips, answers to the camera. Nikon will be held liable for damages or lost profits that should be available from product malfunction. A This icon marks notes; ...A Life-Long Learning As part of a Nikon digital camera. XIntroduction Thank you need, the following URL for contact information: http://imaging.nikon.com/ 1 Symbols and Conventions To make it easier to ongoing product support and education, ...
...that may be read by all instructions thoroughly and keep up-to-date with the latest product information, tips, answers to the camera. Nikon will be held liable for damages or lost profits that should be available from product malfunction. A This icon marks notes; ...A Life-Long Learning As part of a Nikon digital camera. XIntroduction Thank you need, the following URL for contact information: http://imaging.nikon.com/ 1 Symbols and Conventions To make it easier to ongoing product support and education, ...

Reference Manual
Page 22
... switch. To turn off , rotate the power switch; Getting to Know the Camera The Camera Body 2 3 1 4 X 4 5 10 9 6 8 7 1 Built-in flash 112 2 Shutter-release button Taking photographs 29 Recording movies 38 3 Power switch 2 4 Eyelets for camera strap iv 5 Command dial 10 6 Power-on lamp 25 7 Mode dial ...9 8 Accessory Shoe Cover BS-1 .......... 226 9 Accessory shoe 226 10 Flash pop-up control 112 A The Power Switch To turn the camera on for playback without extending the ...
... switch. To turn off , rotate the power switch; Getting to Know the Camera The Camera Body 2 3 1 4 X 4 5 10 9 6 8 7 1 Built-in flash 112 2 Shutter-release button Taking photographs 29 Recording movies 38 3 Power switch 2 4 Eyelets for camera strap iv 5 Command dial 10 6 Power-on lamp 25 7 Mode dial ...9 8 Accessory Shoe Cover BS-1 .......... 226 9 Accessory shoe 226 10 Flash pop-up control 112 A The Power Switch To turn the camera on for playback without extending the ...
Reference Manual
Page 27
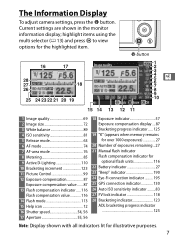
The Information Display To adjust camera settings, press the P button. highlight items using the multi selector (0 13) and press J to view options for illustrative purposes. 7 P button X 1 Image quality 69 2 Image size ...
The Information Display To adjust camera settings, press the P button. highlight items using the multi selector (0 13) and press J to view options for illustrative purposes. 7 P button X 1 Image quality 69 2 Image size ...
Reference Manual
Page 29
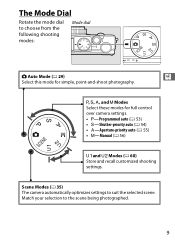
... selected scene. P, S, A, and M Modes Select these modes for simple, point-and-shoot photography. Scene Modes (0 35) The camera automatically optimizes settings to the scene being photographed. 9 The Mode Dial Rotate the mode dial to choose from the following shooting modes: ...Mode dial i Auto Mode (0 29) X Select this mode for full control over camera settings. • P-Programmed auto (0 53) • S-Shutter-priority auto (0 54) • A-Aperture-priority auto (0 55) • M-Manual (0 56) d ...
... selected scene. P, S, A, and M Modes Select these modes for simple, point-and-shoot photography. Scene Modes (0 35) The camera automatically optimizes settings to the scene being photographed. 9 The Mode Dial Rotate the mode dial to choose from the following shooting modes: ...Mode dial i Auto Mode (0 29) X Select this mode for full control over camera settings. • P-Programmed auto (0 53) • S-Shutter-priority auto (0 54) • A-Aperture-priority auto (0 55) • M-Manual (0 56) d ...
Reference Manual
Page 32
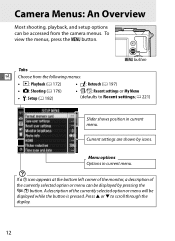
.... 12 Press 1 or 3 to Recent settings; 0 221) Slider shows position in current menu. Menu options Options in current menu. G button Tabs X Choose from the camera menus. Camera Menus: An Overview Most shooting, playback, and setup options can be displayed by icons. To view the menus, press the G button. A description of the currently...
.... 12 Press 1 or 3 to Recent settings; 0 221) Slider shows position in current menu. Menu options Options in current menu. G button Tabs X Choose from the camera menus. Camera Menus: An Overview Most shooting, playback, and setup options can be displayed by icons. To view the menus, press the G button. A description of the currently...

Reference Manual
Page 33
Press the G button to navigate the menus. 1 Display the menus. Follow the steps below to display the menus. 2 Highlight the icon for the current menu. G button 13 Press 4 to Move cursor up J button: select navigate the camera highlighted menus. Using Camera Menus The multi selector and J button are used to highlight the icon for the current menu. Cancel and item return to Select previous highlighted menu item or display Move cursor sub-menu down Items can also be highlighted by rotating X multi selector.
Press the G button to navigate the menus. 1 Display the menus. Follow the steps below to display the menus. 2 Highlight the icon for the current menu. G button 13 Press 4 to Move cursor up J button: select navigate the camera highlighted menus. Using Camera Menus The multi selector and J button are used to highlight the icon for the current menu. Cancel and item return to Select previous highlighted menu item or display Move cursor sub-menu down Items can also be highlighted by rotating X multi selector.
Reference Manual
Page 38
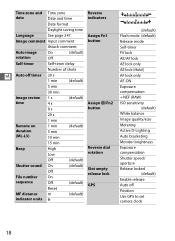
.../size Metering Active D-Lighting Auto bracketing Monitor brightness Exposure compensation Shutter speed/ aperture Release locked (default) Enable release Auto off Position Use GPS to set camera clock 18
.../size Metering Active D-Lighting Auto bracketing Monitor brightness Exposure compensation Shutter speed/ aperture Release locked (default) Enable release Auto off Position Use GPS to set camera clock 18


