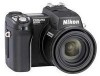
User Manual
Page 2
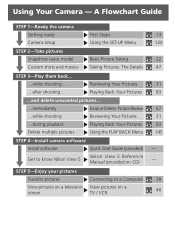
...back... ...while shooting... ...after shooting... Using Your Camera - Reviewing Your Pictures Playing Back Your Pictures ...and delete unwanted pictures... ...immediately Keep or Delete: Picture Review ...while shooting Reviewing Your Pictures ...during playback Playing Back Your Pictures ...Delete multiple pictures Using the PLAY BACK Menu STEP 4-Install camera software Install software Quick Start Guide (provided) Get to know Nikon View 5 Nikon View 5 Reference...
...back... ...while shooting... ...after shooting... Using Your Camera - Reviewing Your Pictures Playing Back Your Pictures ...and delete unwanted pictures... ...immediately Keep or Delete: Picture Review ...while shooting Reviewing Your Pictures ...during playback Playing Back Your Pictures ...Delete multiple pictures Using the PLAY BACK Menu STEP 4-Install camera software Install software Quick Start Guide (provided) Get to know Nikon View 5 Nikon View 5 Reference...

User Manual
Page 3
... Menu Using the PLAY BACK Menu Technical Notes Index i Guide to Digital Photography The Guide to Digital Photography (this product includes the manuals listed below. Nikon View 5 Reference Manual The Nikon View 5 Reference Manual can be sure to read all instructions thoroughly to...Basic Picture Taking Reviewing Your Pictures Connecting to a Computer Viewing Pictures on a TV / VCR Using the Camera Controls (All User Sets) Choosing a User Set Using the Camera Controls (User Sets 1, 2, 3) Playing Back Your Pictures List of unpacking and setting up your Nikon digital camera, taking your...
... Menu Using the PLAY BACK Menu Technical Notes Index i Guide to Digital Photography The Guide to Digital Photography (this product includes the manuals listed below. Nikon View 5 Reference Manual The Nikon View 5 Reference Manual can be sure to read all instructions thoroughly to...Basic Picture Taking Reviewing Your Pictures Connecting to a Computer Viewing Pictures on a TV / VCR Using the Camera Controls (All User Sets) Choosing a User Set Using the Camera Controls (User Sets 1, 2, 3) Playing Back Your Pictures List of unpacking and setting up your Nikon digital camera, taking your...
User Manual
Page 9
...Steps ...13 Step 1-Attach the Camera Strap 13 Step 2-Insert the Battery 14 Step 3-Insert the Memory Card 16 Step 4-Choose a Language 18 Step 5-Set the Time and Date 19 Taking and Reviewing Pictures 21 Basic Picture Taking 22 Step 1-Ready the Camera 22 Step 2-Select User Set ... 26 Step 5-Focus and Shoot 28 Step 6-Put the Camera Away 30 Reviewing Your Pictures 31 Quick Review 32 Full-Screen Review 33 Thumbnail Review 35 Doing More with Your Digital Camera 37 Connecting to a Computer 38 Before You Begin: Installing Nikon View 5 38 Making the Connection: Connecting to Your Computer...
...Steps ...13 Step 1-Attach the Camera Strap 13 Step 2-Insert the Battery 14 Step 3-Insert the Memory Card 16 Step 4-Choose a Language 18 Step 5-Set the Time and Date 19 Taking and Reviewing Pictures 21 Basic Picture Taking 22 Step 1-Ready the Camera 22 Step 2-Select User Set ... 26 Step 5-Focus and Shoot 28 Step 6-Put the Camera Away 30 Reviewing Your Pictures 31 Quick Review 32 Full-Screen Review 33 Thumbnail Review 35 Doing More with Your Digital Camera 37 Connecting to a Computer 38 Before You Begin: Installing Nikon View 5 38 Making the Connection: Connecting to Your Computer...
User Manual
Page 10
... Mode: The Button 53 Delaying Shutter Release: Self-Timer Mode 58 Optical and Digital Zoom: The Button 60 Flash Mode: The Button 62 Exposure Compensation: The Button 66 Keep or Delete: Picture Review 67 Choosing a User Set 68 Using the Camera Controls (User Sets 1,2,3 70 Controlling Shutter Speed and Aperture: Exposure Mode 70...
... Mode: The Button 53 Delaying Shutter Release: Self-Timer Mode 58 Optical and Digital Zoom: The Button 60 Flash Mode: The Button 62 Exposure Compensation: The Button 66 Keep or Delete: Picture Review 67 Choosing a User Set 68 Using the Camera Controls (User Sets 1,2,3 70 Controlling Shutter Speed and Aperture: Exposure Mode 70...

User Manual
Page 14
... operational and safety requirements of taking pictures. Taking and Reviewing Pictures: Explains the basics of this electronic circuitry. Use Only Nikon Brand Electronic Accessories Your Nikon COOLPIX digital camera is designed to use the camera's controls and User Sets. Technical Notes: Describes how to ready your camera for your camera, optional accessories, additional resources and troubleshooting information, and lists...
... operational and safety requirements of taking pictures. Taking and Reviewing Pictures: Explains the basics of this electronic circuitry. Use Only Nikon Brand Electronic Accessories Your Nikon COOLPIX digital camera is designed to use the camera's controls and User Sets. Technical Notes: Describes how to ready your camera for your camera, optional accessories, additional resources and troubleshooting information, and lists...
User Manual
Page 17
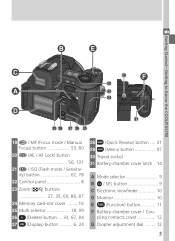
..., 86, 87 24 Memory card-slot cover ........ 16 25 Multi selector 18, 99 26 (Delete) button ... 33, 67, 84 27 (Display) button .......... 6, 24 28 (Quick Review) button .... 31 29 (Menu) button 97 30 Tripod socket 31 Battery-chamber cover latch . 14 A Mode selector 9 B / SEL button 9 C Electronic viewfinder 10 D Monitor 10 E (Function...
..., 86, 87 24 Memory card-slot cover ........ 16 25 Multi selector 18, 99 26 (Delete) button ... 33, 67, 84 27 (Display) button .......... 6, 24 28 (Quick Review) button .... 31 29 (Menu) button 97 30 Tripod socket 31 Battery-chamber cover latch . 14 A Mode selector 9 B / SEL button 9 C Electronic viewfinder 10 D Monitor 10 E (Function...

User Manual
Page 22
...-Getting to Know the COOLPIX5700 C The Electronic Viewfinder The viewfinder is a smaller version of the monitor and can be used to review the pictures that you can fold it can be folded back onto the camera body for shooting or playback. D The Monitor The monitor shows the view through the... camera lens together with icons indicating the status of the final picture. You can take self-portraits by rotating the monitor to ...
...-Getting to Know the COOLPIX5700 C The Electronic Viewfinder The viewfinder is a smaller version of the monitor and can be used to review the pictures that you can fold it can be folded back onto the camera body for shooting or playback. D The Monitor The monitor shows the view through the... camera lens together with icons indicating the status of the final picture. You can take self-portraits by rotating the monitor to ...

User Manual
Page 33
Taking and Reviewing Pictures Basic Picture Taking 22-30 Reviewing Your Pictures 31-35 This chapter is divided into the following sections : Basic Picture Taking Outlines the basic steps necessary to review your first digital picture. STEP 1 STEP 2 STEP 3 STEP 4 STEP 5 STEP 6 Ready the Camera Select User Set A Adjust Camera Settings Frame the Shot Focus and Shoot Put the Camera Away 22-24 25 25 26-27 28-29 30 Reviewing Your Pictures Illustrates how to take your pictures in the monitor or viewfinder. 21
Taking and Reviewing Pictures Basic Picture Taking 22-30 Reviewing Your Pictures 31-35 This chapter is divided into the following sections : Basic Picture Taking Outlines the basic steps necessary to review your first digital picture. STEP 1 STEP 2 STEP 3 STEP 4 STEP 5 STEP 6 Ready the Camera Select User Set A Adjust Camera Settings Frame the Shot Focus and Shoot Put the Camera Away 22-24 25 25 26-27 28-29 30 Reviewing Your Pictures Illustrates how to take your pictures in the monitor or viewfinder. 21

User Manual
Page 34
...or viewfinder will be displayed in (1) through the lens. 22 After a short pause, current settings will be set to (shooting mode) 1.4 Turn the camera on either side of the cap. 1.2 Open the monitor as shown in the control panel and the monitor or viewfinder; Step 1-Ready the... Camera Before using your camera, complete the following steps: 1.1 Remove the lens cap Remove the lens cap by default. Taking and Reviewing Pictures-Basic Picture Taking Basic Picture Taking This section details the steps for taking ...
...or viewfinder will be displayed in (1) through the lens. 22 After a short pause, current settings will be set to (shooting mode) 1.4 Turn the camera on either side of the cap. 1.2 Open the monitor as shown in the control panel and the monitor or viewfinder; Step 1-Ready the... Camera Before using your camera, complete the following steps: 1.1 Remove the lens cap Remove the lens cap by default. Taking and Reviewing Pictures-Basic Picture Taking Basic Picture Taking This section details the steps for taking ...

User Manual
Page 35
Camera functions normally. Charge EN-EL1 as soon as flash recharges. (Flashes) (Flashes) Battery exhausted. Taking and Reviewing Pictures-Basic Picture Taking 1.5 Check indicators in the monitor or viewfinder, change the memory card or delete some images ( 33, 35) to ...free up space on the card. Low battery. If the number of exposures remaining Monitor Control panel Monitor Control Panel Meaning Camera status None ...
Camera functions normally. Charge EN-EL1 as soon as flash recharges. (Flashes) (Flashes) Battery exhausted. Taking and Reviewing Pictures-Basic Picture Taking 1.5 Check indicators in the monitor or viewfinder, change the memory card or delete some images ( 33, 35) to ...free up space on the card. Low battery. If the number of exposures remaining Monitor Control panel Monitor Control Panel Meaning Camera status None ...

User Manual
Page 36
The monitor and viewfinder display the same contents. 24 Taking and Reviewing Pictures-Basic Picture Taking Auto Power Off To save power, the camera will enter "sleep" mode if no operations are deactivated. In sleep mode, the monitor or viewfinder turn off . The / SEL Button Press the / SEL button ...to switch between the monitor and viewfinder when the monitor is effectively off and all camera functions are performed for the period of time specified in the Auto Off menu (default 30 seconds; 133). The...
The monitor and viewfinder display the same contents. 24 Taking and Reviewing Pictures-Basic Picture Taking Auto Power Off To save power, the camera will enter "sleep" mode if no operations are deactivated. In sleep mode, the monitor or viewfinder turn off . The / SEL Button Press the / SEL button ...to switch between the monitor and viewfinder when the monitor is effectively off and all camera functions are performed for the period of time specified in the Auto Off menu (default 30 seconds; 133). The...

User Manual
Page 37
... Image quality NORMAL balance between quality and file size that the defaults are used. Image size FULL Pictures are also shown below. Step 3-Adjust Camera Settings (Optional) In User Set A, you first use the , , , and buttons to control the settings listed in the upper left corner... steps assume the camera is ideal for most situations, are 2,560 × 1,920 pixels in poor 62 lighting. Refer to User Set A, see "Choosing a User Set" ( 68). This section assumes that is in the automatic "point and shoot" mode, User Set A. Taking and Reviewing Pictures-Basic Picture ...
... Image quality NORMAL balance between quality and file size that the defaults are used. Image size FULL Pictures are also shown below. Step 3-Adjust Camera Settings (Optional) In User Set A, you first use the , , , and buttons to control the settings listed in the upper left corner... steps assume the camera is ideal for most situations, are 2,560 × 1,920 pixels in poor 62 lighting. Refer to User Set A, see "Choosing a User Set" ( 68). This section assumes that is in the automatic "point and shoot" mode, User Set A. Taking and Reviewing Pictures-Basic Picture ...

User Manual
Page 38
... avoid dark or partially obscured pictures, keep your fingers and other objects away from blocking the red-eye reduction lamp when holding the camera. 26 Taking and Reviewing Pictures-Basic Picture Taking Step 4-Frame the Shot After adjusting camera settings, you are ready to frame your shooting conditions, by pressing the / SEL button.
... avoid dark or partially obscured pictures, keep your fingers and other objects away from blocking the red-eye reduction lamp when holding the camera. 26 Taking and Reviewing Pictures-Basic Picture Taking Step 4-Frame the Shot After adjusting camera settings, you are ready to frame your shooting conditions, by pressing the / SEL button.

User Manual
Page 39
...up whenever the shutter-release button is pressed halfway. Zoom out Zoom in Degree of digital zoom is shown in another object obstructs the Speedlight, preventing it clicks back into place. 27 When the camera is zoomed all the way in, holding down gently until it from your subject. ...When set to auto (the default setting), red-eye reduction, or slow sync and additional light is required for two seconds activates digital zoom and "zooms" in the monitor or viewfinder. Taking and Reviewing ...
...up whenever the shutter-release button is pressed halfway. Zoom out Zoom in Degree of digital zoom is shown in another object obstructs the Speedlight, preventing it clicks back into place. 27 When the camera is zoomed all the way in, holding down gently until it from your subject. ...When set to auto (the default setting), red-eye reduction, or slow sync and additional light is required for two seconds activates digital zoom and "zooms" in the monitor or viewfinder. Taking and Reviewing ...

User Manual
Page 40
... press the shutter-release button halfway and check the status of the autofocus and flash-ready indicators. Camera unable to "off -center subject without using autofocus. Speedlight charging. Speedlight not required or set to... the status of the autofocus ( ) and flash-ready indicators ( ), shown right, in which the camera is unable to infinity, the autofocus indicator will fire when picture is set to focus on another subject...in focus. Autofocus Flash-ready indicator indicator Taking and Reviewing Pictures-Basic Picture Taking Step 5-Focus and Shoot 5.1 Focus In User Set A, the...
... press the shutter-release button halfway and check the status of the autofocus and flash-ready indicators. Camera unable to "off -center subject without using autofocus. Speedlight charging. Speedlight not required or set to... the status of the autofocus ( ) and flash-ready indicators ( ), shown right, in which the camera is unable to infinity, the autofocus indicator will fire when picture is set to focus on another subject...in focus. Autofocus Flash-ready indicator indicator Taking and Reviewing Pictures-Basic Picture Taking Step 5-Focus and Shoot 5.1 Focus In User Set A, the...
User Manual
Page 41
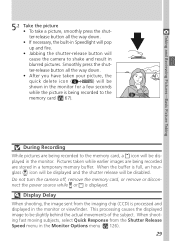
Smoothly press the shut- When the buffer is processed and displayed in a temporary memory buffer. Taking and Reviewing Pictures-Basic Picture Taking 5.2 Take the picture • To take a picture, smoothly press the shut- Pictures taken while earlier images are being recorded to ...-in blurred pictures. ter-release button all the way down . • After you have taken your picture, the quick delete icon ( ) will cause the camera to be shown in the Monitor Options menu ( 126). 29 Display Delay When shooting, the image sent from the Shutter Release Speed menu in the...
Smoothly press the shut- When the buffer is processed and displayed in a temporary memory buffer. Taking and Reviewing Pictures-Basic Picture Taking 5.2 Take the picture • To take a picture, smoothly press the shut- Pictures taken while earlier images are being recorded to ...-in blurred pictures. ter-release button all the way down . • After you have taken your picture, the quick delete icon ( ) will cause the camera to be shown in the Monitor Options menu ( 126). 29 Display Delay When shooting, the image sent from the Shutter Release Speed menu in the...

User Manual
Page 42
Taking and Reviewing Pictures-Basic Picture Taking Step 6-Put the Camera Away When you have finished using the camera, follow these steps before putting the camera away. 6.1 Turn the camera off Turn the camera off to save battery power. 6.2 Lower the built-in Speedlight If the built-in Speedlight is raised, lower it by gently pushing it down. 6.3 Close the monitor and replace the lens cap Close the monitor and replace the lens cap to protect the monitor and lens from dust and fingerprints. 30
Taking and Reviewing Pictures-Basic Picture Taking Step 6-Put the Camera Away When you have finished using the camera, follow these steps before putting the camera away. 6.1 Turn the camera off Turn the camera off to save battery power. 6.2 Lower the built-in Speedlight If the built-in Speedlight is raised, lower it by gently pushing it down. 6.3 Close the monitor and replace the lens cap Close the monitor and replace the lens cap to protect the monitor and lens from dust and fingerprints. 30
User Manual
Page 43
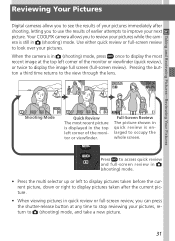
... COOLPIX camera allows you can press the shutter-release button at the top left to display pictures taken before the current picture, down or right to display pictures taken after shooting, letting you to use the results of earlier attempts to improve your next picture. Taking and Reviewing Pictures-Reviewing Your Pictures Reviewing Your Pictures Digital cameras...
... COOLPIX camera allows you can press the shutter-release button at the top left to display pictures taken before the current picture, down or right to display pictures taken after shooting, letting you to use the results of earlier attempts to improve your next picture. Taking and Reviewing Pictures-Reviewing Your Pictures Reviewing Your Pictures Digital cameras...

User Manual
Page 44
Taking and Reviewing Pictures-Reviewing Your Pictures Quick Review The following options are available in quick review. Press all the way down or right to shooting mode and take a picture. 32 To Use Description View other pictures Press multi selector up or...shooting mode Shutterrelease Press shutter-release button halfway to return to desired frame number without viewing intervening images. View picture full screen Enter full-screen review (see next section) with current picture displayed full screen. Hold multi selector down to scroll rapidly to shooting mode and focus.
Taking and Reviewing Pictures-Reviewing Your Pictures Quick Review The following options are available in quick review. Press all the way down or right to shooting mode and take a picture. 32 To Use Description View other pictures Press multi selector up or...shooting mode Shutterrelease Press shutter-release button halfway to return to desired frame number without viewing intervening images. View picture full screen Enter full-screen review (see next section) with current picture displayed full screen. Hold multi selector down to scroll rapidly to shooting mode and focus.

User Manual
Page 45
... following options are displayed in full-screen review. Taking and Reviewing Pictures-Reviewing Your Pictures To View other pictures View multiple images Delete current picture Use Description Press multi selector up to 6.0×. To cancel zoom, press . While ...
... following options are displayed in full-screen review. Taking and Reviewing Pictures-Reviewing Your Pictures To View other pictures View multiple images Delete current picture Use Description Press multi selector up to 6.0×. To cancel zoom, press . While ...
