User Manual
Page 2
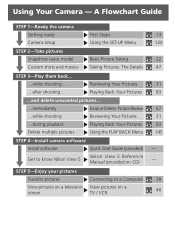
... shooting... ...after shooting... Reviewing Your Pictures Playing Back Your Pictures ...and delete unwanted pictures... ...immediately Keep or Delete: Picture Review ...while shooting Reviewing Your Pictures ...during playback Playing Back Your Pictures Delete multiple pictures Using the PLAY BACK Menu STEP 4-Install camera software Install software Quick Start Guide (provided) Get to know Nikon View 5 Nikon View 5 Reference Manual (provided on...
... shooting... ...after shooting... Reviewing Your Pictures Playing Back Your Pictures ...and delete unwanted pictures... ...immediately Keep or Delete: Picture Review ...while shooting Reviewing Your Pictures ...during playback Playing Back Your Pictures Delete multiple pictures Using the PLAY BACK Menu STEP 4-Install camera software Install software Quick Start Guide (provided) Get to know Nikon View 5 Nikon View 5 Reference Manual (provided on...

User Manual
Page 3
... viewing the Reference Manual, see "Connections" in electronic format on a TV / VCR Using the Camera Controls (All User Sets) Choosing a User Set Using the Camera Controls (User Sets 1, 2, 3) Playing Back Your Pictures List of unpacking and setting up your Nikon digital camera, taking your first photographs, and transferring them to get the most from your computer...
... viewing the Reference Manual, see "Connections" in electronic format on a TV / VCR Using the Camera Controls (All User Sets) Choosing a User Set Using the Camera Controls (User Sets 1, 2, 3) Playing Back Your Pictures List of unpacking and setting up your Nikon digital camera, taking your first photographs, and transferring them to get the most from your computer...
User Manual
Page 9
...First Steps ...13 Step 1-Attach the Camera Strap 13 Step 2-Insert the Battery 14 Step 3-Insert the Memory Card 16 Step 4-Choose a Language 18 Step 5-Set the Time and Date 19 Taking and Reviewing Pictures 21 Basic Picture Taking 22 Step 1-Ready the Camera 22 Step 2-Select User Set A 25...26 Step 5-Focus and Shoot 28 Step 6-Put the Camera Away 30 Reviewing Your Pictures 31 Quick Review 32 Full-Screen Review 33 Thumbnail Review 35 Doing More with Your Digital Camera 37 Connecting to a Computer 38 Before You Begin: Installing Nikon View 5 38 Making the Connection: Connecting to Your...
...First Steps ...13 Step 1-Attach the Camera Strap 13 Step 2-Insert the Battery 14 Step 3-Insert the Memory Card 16 Step 4-Choose a Language 18 Step 5-Set the Time and Date 19 Taking and Reviewing Pictures 21 Basic Picture Taking 22 Step 1-Ready the Camera 22 Step 2-Select User Set A 25...26 Step 5-Focus and Shoot 28 Step 6-Put the Camera Away 30 Reviewing Your Pictures 31 Quick Review 32 Full-Screen Review 33 Thumbnail Review 35 Doing More with Your Digital Camera 37 Connecting to a Computer 38 Before You Begin: Installing Nikon View 5 38 Making the Connection: Connecting to Your...
User Manual
Page 10
... Mode: The Button 53 Delaying Shutter Release: Self-Timer Mode 58 Optical and Digital Zoom: The Button 60 Flash Mode: The Button 62 Exposure Compensation: The Button 66 Keep or Delete: Picture Review 67 Choosing a User Set 68 Using the Camera Controls (User Sets 1,2,3 70 Controlling Shutter Speed and Aperture: Exposure Mode 70...
... Mode: The Button 53 Delaying Shutter Release: Self-Timer Mode 58 Optical and Digital Zoom: The Button 60 Flash Mode: The Button 62 Exposure Compensation: The Button 66 Keep or Delete: Picture Review 67 Choosing a User Set 68 Using the Camera Controls (User Sets 1,2,3 70 Controlling Shutter Speed and Aperture: Exposure Mode 70...

User Manual
Page 11
Using the SET-UP Menu 120 Organizing Your Pictures: Folders 121 Adjusting Monitor Settings: Monitor Options 126 Customizing Camera Controls: Controls 129 Controlling Zoom: Zoom Options 131 Conserving Battery Power: Auto Off 133 File Numbering: Seq. Numbers 134 Formatting... During Playback: Hide Image 152 Ordering Prints: Print Set 153 Selecting Images for Transfer: Auto Transfer 155 Technical Notes: Camera Care, Options, and Resources 157 Optional Accessories 158 Caring for the Camera and Battery 160 Web Resources 163 Troubleshooting 164 Specifications 171 Index ...175 ix
Using the SET-UP Menu 120 Organizing Your Pictures: Folders 121 Adjusting Monitor Settings: Monitor Options 126 Customizing Camera Controls: Controls 129 Controlling Zoom: Zoom Options 131 Conserving Battery Power: Auto Off 133 File Numbering: Seq. Numbers 134 Formatting... During Playback: Hide Image 152 Ordering Prints: Print Set 153 Selecting Images for Transfer: Auto Transfer 155 Technical Notes: Camera Care, Options, and Resources 157 Optional Accessories 158 Caring for the Camera and Battery 160 Web Resources 163 Troubleshooting 164 Specifications 171 Index ...175 ix

User Manual
Page 14
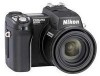
... image information displayed in the monitor or viewfinder in your pictures and details on a TV or VCR. Use Only Nikon Brand Electronic Accessories Your Nikon COOLPIX digital camera is designed to care for your camera, optional accessories, additional resources and troubleshooting information, and lists your camera for purchasing a COOLPIX5700 digital camera. Technical Notes: Describes how to the highest standards and...
... image information displayed in the monitor or viewfinder in your pictures and details on a TV or VCR. Use Only Nikon Brand Electronic Accessories Your Nikon COOLPIX digital camera is designed to care for your camera, optional accessories, additional resources and troubleshooting information, and lists your camera for purchasing a COOLPIX5700 digital camera. Technical Notes: Describes how to the highest standards and...

User Manual
Page 21
...Mode Selector The mode selector selects the operating mode. B / SEL Button Pictures can be used simultaneously) when the monitor is open it on automatically when you press the / SEL button and switch to the camera. Note that connects the monitor to the viewfinder before closing the monitor, ... on . 9 Pressing the / SEL button will not turn it again. Choose (shooting mode) to take still pictures and movies ( 22), (playback mode) to Know the COOLPIX5700 Camera Parts - Getting Started-Getting to play them back ( 84). Opening the monitor while the viewfinder is disabled in ...
...Mode Selector The mode selector selects the operating mode. B / SEL Button Pictures can be used simultaneously) when the monitor is open it on automatically when you press the / SEL button and switch to the camera. Note that connects the monitor to the viewfinder before closing the monitor, ... on . 9 Pressing the / SEL button will not turn it again. Choose (shooting mode) to take still pictures and movies ( 22), (playback mode) to Know the COOLPIX5700 Camera Parts - Getting Started-Getting to play them back ( 84). Opening the monitor while the viewfinder is disabled in ...

User Manual
Page 22
...when bright ambient lighting conditions make the display in use, you have taken ( 31, 84). the monitor will show a mirror image of various camera settings during shooting ( 6). Getting Started-Getting to Know the COOLPIX5700 C The Electronic Viewfinder The viewfinder is a smaller version of the monitor and ... The Monitor The monitor shows the view through the camera lens together with icons indicating the status of the final picture. When the monitor is not in the monitor difficult to review the pictures that you can fold it onto the camera body as the lens; When folded out as shown,...
...when bright ambient lighting conditions make the display in use, you have taken ( 31, 84). the monitor will show a mirror image of various camera settings during shooting ( 6). Getting Started-Getting to Know the COOLPIX5700 C The Electronic Viewfinder The viewfinder is a smaller version of the monitor and ... The Monitor The monitor shows the view through the camera lens together with icons indicating the status of the final picture. When the monitor is not in the monitor difficult to review the pictures that you can fold it onto the camera body as the lens; When folded out as shown,...

User Manual
Page 25
To avoid losing the lens cap, use the cord provided to attach it to the two eyelets on either side of the cap. Remove the lens cap before using your camera for the first time. Removing and Replacing the Lens Cap Remove or replace the lens cap by pressing the tabs on the camera body as shown. Getting Started-First Steps First Steps Complete the steps in this section before trying to take pictures. 13 Step 1-Attach the Camera Strap Attach the strap to the camera strap as shown below.
To avoid losing the lens cap, use the cord provided to attach it to the two eyelets on either side of the cap. Remove the lens cap before using your camera for the first time. Removing and Replacing the Lens Cap Remove or replace the lens cap by pressing the tabs on the camera body as shown. Getting Started-First Steps First Steps Complete the steps in this section before trying to take pictures. 13 Step 1-Attach the Camera Strap Attach the strap to the camera strap as shown below.

User Manual
Page 27
...Nikon EN-EL1, the COOLPIX5700 can be exchanged. Removing the Battery The battery can provide roughly three days of retail outlets. The MB-E5700 battery pack (available separately), which is charged as necessary when the main battery is reinserted into the camera, the "battery exhausted" icon may be removed without affecting pictures... stored on the memory card. After charging for the Camera and Battery" ( 160). • Note that on some ...
...Nikon EN-EL1, the COOLPIX5700 can be exchanged. Removing the Battery The battery can provide roughly three days of retail outlets. The MB-E5700 battery pack (available separately), which is charged as necessary when the main battery is reinserted into the camera, the "battery exhausted" icon may be removed without affecting pictures... stored on the memory card. After charging for the Camera and Battery" ( 160). • Note that on some ...
User Manual
Page 28
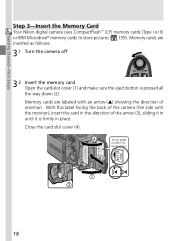
...cover (4). 16 Memory cards are labeled with the monitor), insert the card in place. With this label facing the back of the camera (the side with an arrow (v) showing the direction of the arrow (3), sliding it in until it is pressed all the way down ...camera off 3.2 Insert the memory card Open the card-slot cover (1) and make sure the eject button is firmly in the direction of insertion. Getting Started-First Steps Step 3-Insert the Memory Card Your Nikon digital camera uses CompactFlash™ (CF) memory cards (Type I or II) or IBM Microdrive® memory cards to store pictures...
...cover (4). 16 Memory cards are labeled with the monitor), insert the card in place. With this label facing the back of the camera (the side with an arrow (v) showing the direction of the arrow (3), sliding it in until it is pressed all the way down ...camera off 3.2 Insert the memory card Open the card-slot cover (1) and make sure the eject button is firmly in the direction of insertion. Getting Started-First Steps Step 3-Insert the Memory Card Your Nikon digital camera uses CompactFlash™ (CF) memory cards (Type I or II) or IBM Microdrive® memory cards to store pictures...

User Manual
Page 31
To set the camera's internal clock to the correct time and date, follow the steps below: 5.1 5.2 Highlight Date Display Date menu 19 Getting Started-First Steps 4.7 Highlight Language 4.8 Monitor ... previous section, then follow steps 4.1 to SET-UP menu Step 5-Set the Time and Date The time and date of shooting is recorded with all pictures and movies you take.
To set the camera's internal clock to the correct time and date, follow the steps below: 5.1 5.2 Highlight Date Display Date menu 19 Getting Started-First Steps 4.7 Highlight Language 4.8 Monitor ... previous section, then follow steps 4.1 to SET-UP menu Step 5-Set the Time and Date The time and date of shooting is recorded with all pictures and movies you take.

User Manual
Page 32
5.3 5.4 Getting Started-First Steps Highlight Year, Month, Day, hour, or minute (selected item highlighted in (shooting) mode. Any pictures taken before the time and date have been set , a flashing clock icon ( ) will appear in which year, month, and day will have not been set ... of "0000.00.00 00:00". 20 Flashing Clock Icon If the time and date have a time stamp of the monitor or viewfinder when the camera is in red) Edit selected item.
5.3 5.4 Getting Started-First Steps Highlight Year, Month, Day, hour, or minute (selected item highlighted in (shooting) mode. Any pictures taken before the time and date have been set , a flashing clock icon ( ) will appear in which year, month, and day will have not been set ... of "0000.00.00 00:00". 20 Flashing Clock Icon If the time and date have a time stamp of the monitor or viewfinder when the camera is in red) Edit selected item.

User Manual
Page 33
STEP 1 STEP 2 STEP 3 STEP 4 STEP 5 STEP 6 Ready the Camera Select User Set A Adjust Camera Settings Frame the Shot Focus and Shoot Put the Camera Away 22-24 25 25 26-27 28-29 30 Reviewing Your Pictures Illustrates how to take your pictures in the monitor or viewfinder. 21 Taking and Reviewing Pictures Basic Picture Taking 22-30 Reviewing Your Pictures 31-35 This chapter is divided into the following sections : Basic Picture Taking Outlines the basic steps necessary to review your first digital picture.
STEP 1 STEP 2 STEP 3 STEP 4 STEP 5 STEP 6 Ready the Camera Select User Set A Adjust Camera Settings Frame the Shot Focus and Shoot Put the Camera Away 22-24 25 25 26-27 28-29 30 Reviewing Your Pictures Illustrates how to take your pictures in the monitor or viewfinder. 21 Taking and Reviewing Pictures Basic Picture Taking 22-30 Reviewing Your Pictures 31-35 This chapter is divided into the following sections : Basic Picture Taking Outlines the basic steps necessary to review your first digital picture.

User Manual
Page 34
...be displayed in the automatic "point and shoot" mode, User Set A. the monitor or viewfinder will be set to (shooting mode) 1.4 Turn the camera on either side of the cap. 1.2 Open the monitor as shown in (1) through the lens. 22 When you first use the... camera, it will extend. Step 1-Ready the Camera Before using your camera, complete the following steps: 1.1 Remove the lens cap Remove the lens cap by default. Taking and Reviewing Pictures-Basic Picture Taking Basic Picture Taking This section details the steps for taking pictures in the control panel and the...
...be displayed in the automatic "point and shoot" mode, User Set A. the monitor or viewfinder will be set to (shooting mode) 1.4 Turn the camera on either side of the cap. 1.2 Open the monitor as shown in (1) through the lens. 22 When you first use the... camera, it will extend. Step 1-Ready the Camera Before using your camera, complete the following steps: 1.1 Remove the lens cap Remove the lens cap by default. Taking and Reviewing Pictures-Basic Picture Taking Basic Picture Taking This section details the steps for taking pictures in the control panel and the...

User Manual
Page 35
...zero, or if the "OUT OF MEMORY" message is displayed in the control panel, monitor or viewfinder Check the battery indicator to record more pictures at a different image quality or size ( 49). It may be taken until battery has been recharged or replaced. (DL245) battery. 23... Taking and Reviewing Pictures-Basic Picture Taking 1.5 Check indicators in the monitor or viewfinder, change the memory card or delete some images ( 33, 35) to free up space on the card. If the number of exposures remaining Monitor Control panel Monitor Control Panel Meaning Camera status None Battery fully...
...zero, or if the "OUT OF MEMORY" message is displayed in the control panel, monitor or viewfinder Check the battery indicator to record more pictures at a different image quality or size ( 49). It may be taken until battery has been recharged or replaced. (DL245) battery. 23... Taking and Reviewing Pictures-Basic Picture Taking 1.5 Check indicators in the monitor or viewfinder, change the memory card or delete some images ( 33, 35) to free up space on the card. If the number of exposures remaining Monitor Control panel Monitor Control Panel Meaning Camera status None Battery fully...

User Manual
Page 36
... and viewfinder when the monitor is effectively off and all camera functions are performed for the period of time specified in the Auto Off menu (default 30 seconds; 133). Taking and Reviewing Pictures-Basic Picture Taking Auto Power Off To save power, the camera will enter "sleep" mode if no operations are deactivated. In...
... and viewfinder when the monitor is effectively off and all camera functions are performed for the period of time specified in the Auto Off menu (default 30 seconds; 133). Taking and Reviewing Pictures-Basic Picture Taking Auto Power Off To save power, the camera will enter "sleep" mode if no operations are deactivated. In...

User Manual
Page 37
...on changing these settings. Image size FULL Pictures are also shown below. If a , , or appears in size. + 51 Continuous mode Single Camera records one picture each time shutter-release button is ideal for information on setting the camera to control the settings listed in the ...following steps assume the camera is in poor 62 lighting. Refer to User Set A by...
...on changing these settings. Image size FULL Pictures are also shown below. If a , , or appears in size. + 51 Continuous mode Single Camera records one picture each time shutter-release button is ideal for information on setting the camera to control the settings listed in the ...following steps assume the camera is in poor 62 lighting. Refer to User Set A by...

User Manual
Page 38
Switch between the monitor or viewfinder, whichever best suits your shot. 4.1 Ready the camera To prevent camera shake, hold the camera steadily in both hands. Ridges on camera grip Don't Block the Shot To avoid dark or partially obscured pictures, keep your fingers and other objects away from blocking the red-eye reduction lamp when holding...
Switch between the monitor or viewfinder, whichever best suits your shot. 4.1 Ready the camera To prevent camera shake, hold the camera steadily in both hands. Ridges on camera grip Don't Block the Shot To avoid dark or partially obscured pictures, keep your fingers and other objects away from blocking the red-eye reduction lamp when holding...

User Manual
Page 39
... in the monitor or viewfinder. Push the flash down for two seconds activates digital zoom and "zooms" in another object obstructs the Speedlight, preventing it from your subject. The degree of digital zoom is pressed halfway. When set to auto (the default setting), red-eye... halfway. If your subject Subjects can be lowered by hand. Press (telephoto) to adjust the camera's 8× optical zoom lens. Press (wide) to the optical zoom indicator. Taking and Reviewing Pictures-Basic Picture Taking 4.2 Frame your finger or another 4× ( 60) for a total zoom factor of...
... in the monitor or viewfinder. Push the flash down for two seconds activates digital zoom and "zooms" in another object obstructs the Speedlight, preventing it from your subject. The degree of digital zoom is pressed halfway. When set to auto (the default setting), red-eye... halfway. If your subject Subjects can be lowered by hand. Press (telephoto) to adjust the camera's 8× optical zoom lens. Press (wide) to the optical zoom indicator. Taking and Reviewing Pictures-Basic Picture Taking 4.2 Frame your finger or another 4× ( 60) for a total zoom factor of...


