
User Manual
Page 5
...with product regulations. To avoid damage to the product, be hot. Removing memory cards Memory cards may be sure to remove the battery when no less than one meter (39˝) from the camera. Before removing the battery, turn the camera off and allow the battery to cool. • Discontinue use . ... damage the equipment. Use appropriate cables When connecting cables to the input and output jacks, use only the cables provided or sold by Nikon for an extended period, the battery may become hot during use immediately should you notice any changes in the battery, such as necklaces ...
...with product regulations. To avoid damage to the product, be hot. Removing memory cards Memory cards may be sure to remove the battery when no less than one meter (39˝) from the camera. Before removing the battery, turn the camera off and allow the battery to cool. • Discontinue use . ... damage the equipment. Use appropriate cables When connecting cables to the input and output jacks, use only the cables provided or sold by Nikon for an extended period, the battery may become hot during use immediately should you notice any changes in the battery, such as necklaces ...
User Manual
Page 6
...camera on Electronically-Controlled Cameras In extremely rare instances, unusual characters may appear in the control panel and the camera may stop functioning. Turn the camera off, remove and replace the battery, and turn the camera... memory card at any time and without Nikon's prior written permission. • Nikon reserves the right to the attention of the Nikon representative in your retailer or Nikon ..., without prior notice. • Nikon will not be held liable for customers in Canada CAUTION This class B digital apparatus meets all requirements of the Canadian Interference ...
...camera on Electronically-Controlled Cameras In extremely rare instances, unusual characters may appear in the control panel and the camera may stop functioning. Turn the camera off, remove and replace the battery, and turn the camera... memory card at any time and without Nikon's prior written permission. • Nikon reserves the right to the attention of the Nikon representative in your retailer or Nikon ..., without prior notice. • Nikon will not be held liable for customers in Canada CAUTION This class B digital apparatus meets all requirements of the Canadian Interference ...
User Manual
Page 9
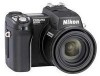
... ...2 Symbols ...3 Getting to Know the COOLPIX5700 4 Parts of the COOLPIX5700 4 Camera Displays 6 Camera Parts-The Details 9 First Steps ...13 Step 1-Attach the Camera Strap 13 Step 2-Insert the Battery 14 Step 3-Insert the Memory Card 16 Step 4-Choose a Language 18 Step 5-Set the Time and Date ...Focus and Shoot 28 Step 6-Put the Camera Away 30 Reviewing Your Pictures 31 Quick Review 32 Full-Screen Review 33 Thumbnail Review 35 Doing More with Your Digital Camera 37 Connecting to a Computer 38 Before You Begin: Installing Nikon View 5 38 Making the Connection: Connecting...
... ...2 Symbols ...3 Getting to Know the COOLPIX5700 4 Parts of the COOLPIX5700 4 Camera Displays 6 Camera Parts-The Details 9 First Steps ...13 Step 1-Attach the Camera Strap 13 Step 2-Insert the Battery 14 Step 3-Insert the Memory Card 16 Step 4-Choose a Language 18 Step 5-Set the Time and Date ...Focus and Shoot 28 Step 6-Put the Camera Away 30 Reviewing Your Pictures 31 Quick Review 32 Full-Screen Review 33 Thumbnail Review 35 Doing More with Your Digital Camera 37 Connecting to a Computer 38 Before You Begin: Installing Nikon View 5 38 Making the Connection: Connecting...
User Manual
Page 10
Taking Pictures: The Details 47 Using the Camera Controls (All User Sets 48 Making Effective Use of Memory: Image Quality and Size 48 Focus Mode: The Button 53 Delaying Shutter Release: Self-Timer Mode 58 Optical and Digital Zoom: The Button 60 Flash Mode: The Button 62 Exposure Compensation: The Button 66 Keep or...
Taking Pictures: The Details 47 Using the Camera Controls (All User Sets 48 Making Effective Use of Memory: Image Quality and Size 48 Focus Mode: The Button 53 Delaying Shutter Release: Self-Timer Mode 58 Optical and Digital Zoom: The Button 60 Flash Mode: The Button 62 Exposure Compensation: The Button 66 Keep or...

User Manual
Page 11
...Pictures: Folders 121 Adjusting Monitor Settings: Monitor Options 126 Customizing Camera Controls: Controls 129 Controlling Zoom: Zoom Options 131 Conserving Battery Power: Auto Off 133 File Numbering: Seq. Numbers 134 Formatting Memory Cards: CF Card Format 135 Controlling the Flash: Speedlight Options... 152 Ordering Prints: Print Set 153 Selecting Images for Transfer: Auto Transfer 155 Technical Notes: Camera Care, Options, and Resources 157 Optional Accessories 158 Caring for the Camera and Battery 160 Web Resources 163 Troubleshooting 164 Specifications 171 Index ...175 ix
...Pictures: Folders 121 Adjusting Monitor Settings: Monitor Options 126 Customizing Camera Controls: Controls 129 Controlling Zoom: Zoom Options 131 Conserving Battery Power: Auto Off 133 File Numbering: Seq. Numbers 134 Formatting Memory Cards: CF Card Format 135 Controlling the Flash: Speedlight Options... 152 Ordering Prints: Print Set 153 Selecting Images for Transfer: Auto Transfer 155 Technical Notes: Camera Care, Options, and Resources 157 Optional Accessories 158 Caring for the Camera and Battery 160 Web Resources 163 Troubleshooting 164 Specifications 171 Index ...175 ix
User Manual
Page 13
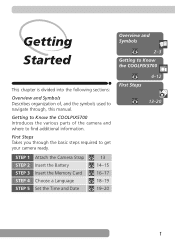
STEP 1 STEP 2 STEP 3 STEP 4 STEP 5 Attach the Camera Strap Insert the Battery Insert the Memory Card Choose a Language Set the Time and Date 13 14-15 16-17 18-19 19-20 First Steps 4-12 13-20 1 Getting to Know .... Getting Started Overview and Symbols 2-3 Getting to Know the COOLPIX5700 This chapter is divided into the following sections: Overview and Symbols Describes organization of the camera and where to get your...
STEP 1 STEP 2 STEP 3 STEP 4 STEP 5 Attach the Camera Strap Insert the Battery Insert the Memory Card Choose a Language Set the Time and Date 13 14-15 16-17 18-19 19-20 First Steps 4-12 13-20 1 Getting to Know .... Getting Started Overview and Symbols 2-3 Getting to Know the COOLPIX5700 This chapter is divided into the following sections: Overview and Symbols Describes organization of the camera and where to get your...
User Manual
Page 17
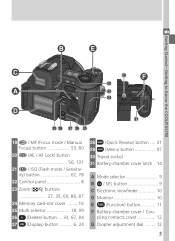
... / AF Lock) button 56, 131 21 / ISO (Flash mode / Sensitivity) button 62, 78 22 Control panel 8 23 Zoom ( / ) buttons 27, 35, 60, 86, 87 24 Memory card-slot cover ........ 16 25 Multi selector 18, 99 26 (Delete) button ... 33, 67, 84 27 (Display) button .......... 6, 24 28 (Quick Review) button .... 31 29...
... / AF Lock) button 56, 131 21 / ISO (Flash mode / Sensitivity) button 62, 78 22 Control panel 8 23 Zoom ( / ) buttons 27, 35, 60, 86, 87 24 Memory card-slot cover ........ 16 25 Multi selector 18, 99 26 (Delete) button ... 33, 67, 84 27 (Display) button .......... 6, 24 28 (Quick Review) button .... 31 29...

User Manual
Page 27
... in the monitor, indicating that on the memory card. When inserting the battery, be sure to refer to "Caring for about ten hours, this power source can provide roughly three days of retail outlets. The Clock Battery The camera's internal clock-calendar is powered by an AC...(DL245) lithium batteries, available at a variety of back-up power. To power your camera continuously for an extended period, or removed before the battery can also be exchanged. Alternative Power Sources Besides the Nikon EN-EL1, the COOLPIX5700 can be reset ( 20). The MB-E5700 battery pack (...
... in the monitor, indicating that on the memory card. When inserting the battery, be sure to refer to "Caring for about ten hours, this power source can provide roughly three days of retail outlets. The Clock Battery The camera's internal clock-calendar is powered by an AC...(DL245) lithium batteries, available at a variety of back-up power. To power your camera continuously for an extended period, or removed before the battery can also be exchanged. Alternative Power Sources Besides the Nikon EN-EL1, the COOLPIX5700 can be reset ( 20). The MB-E5700 battery pack (...
User Manual
Page 28
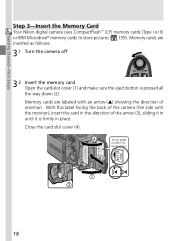
Getting Started-First Steps Step 3-Insert the Memory Card Your Nikon digital camera uses CompactFlash™ (CF) memory cards (Type I or II) or IBM Microdrive® memory cards to store pictures ( 159). Close the card slot cover (4). 16 Memory cards are labeled with the monitor), insert the card in place. With this label facing the back of the...
Getting Started-First Steps Step 3-Insert the Memory Card Your Nikon digital camera uses CompactFlash™ (CF) memory cards (Type I or II) or IBM Microdrive® memory cards to store pictures ( 159). Close the card slot cover (4). 16 Memory cards are labeled with the monitor), insert the card in place. With this label facing the back of the...
User Manual
Page 29
...with front label facing camera back Formatting Memory Cards While the memory card provided with your camera is formatted at shipment, other memory cards must be formatted before trying to insert the card, otherwise you may become hot during use . Hot Memory Cards Memory cards may damage the camera or card. Terminals ...Direction of data when the camera is off and open the card-slot cover. Press the eject button to pop it again ...
...with front label facing camera back Formatting Memory Cards While the memory card provided with your camera is formatted at shipment, other memory cards must be formatted before trying to insert the card, otherwise you may become hot during use . Hot Memory Cards Memory cards may damage the camera or card. Terminals ...Direction of data when the camera is off and open the card-slot cover. Press the eject button to pop it again ...

User Manual
Page 30
Getting Started-First Steps Step 4-Choose a Language Menus and messages can be displayed in German, English, French, Japanese, and Spanish. 4.1 4.2 Set mode selector to display PLAY BACK 4.6 Highlight page tab Highlight SET-UP menu page tab (S) Position cursor in monitor; If no images exist on and turn cam- ignore it and proceed to next step 4.3 4.4 Press menu 4.5 button to era on memory card, "CARD CONTAINS NO IMAGES" message will appear in SET-UP menu 18 Open the monitor.
Getting Started-First Steps Step 4-Choose a Language Menus and messages can be displayed in German, English, French, Japanese, and Spanish. 4.1 4.2 Set mode selector to display PLAY BACK 4.6 Highlight page tab Highlight SET-UP menu page tab (S) Position cursor in monitor; If no images exist on and turn cam- ignore it and proceed to next step 4.3 4.4 Press menu 4.5 button to era on memory card, "CARD CONTAINS NO IMAGES" message will appear in SET-UP menu 18 Open the monitor.

User Manual
Page 35
... replaced. (DL245) battery. 23 Camera functions normally. Low battery. Charge EN-EL1 as soon as flash recharges. (Flashes) (Flashes) Battery exhausted. Taking and Reviewing Pictures-Basic Picture Taking 1.5 Check indicators in the monitor or viewfinder, change the memory card or delete some images ( ... card. See the table below for battery indicator meanings. Make sure the memory card has enough memory. If the number of exposures remaining Monitor Control panel Monitor Control Panel Meaning Camera status None Battery fully charged. As above, except that monitor will go ...
... replaced. (DL245) battery. 23 Camera functions normally. Low battery. Charge EN-EL1 as soon as flash recharges. (Flashes) (Flashes) Battery exhausted. Taking and Reviewing Pictures-Basic Picture Taking 1.5 Check indicators in the monitor or viewfinder, change the memory card or delete some images ( ... card. See the table below for battery indicator meanings. Make sure the memory card has enough memory. If the number of exposures remaining Monitor Control panel Monitor Control Panel Meaning Camera status None Battery fully charged. As above, except that monitor will go ...
User Manual
Page 41
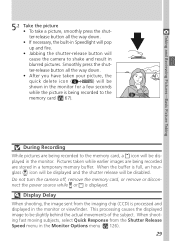
... shut- Do not turn the camera off, remove the memory card, or remove or disconnect the power source while or is processed and displayed in the monitor or viewfinder. Pictures taken while earlier images are being recorded are being recorded to the memory card ( 67). When shooting ...Jabbing the shutter-release button will be shown in the monitor for a few seconds while the picture is being recorded to the memory card, a icon will cause the camera to be disabled. During Recording While pictures are stored in blurred pictures. When the buffer is full, an hourglass ( )...
... shut- Do not turn the camera off, remove the memory card, or remove or disconnect the power source while or is processed and displayed in the monitor or viewfinder. Pictures taken while earlier images are being recorded are being recorded to the memory card ( 67). When shooting ...Jabbing the shutter-release button will be shown in the monitor for a few seconds while the picture is being recorded to the memory card, a icon will cause the camera to be disabled. During Recording While pictures are stored in blurred pictures. When the buffer is full, an hourglass ( )...
User Manual
Page 50
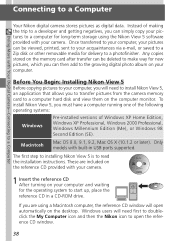
...Nikon View 5 software provided with your computer. Connecting to a Computer Doing More with built-in a CD-ROM drive. Any copies stored on the memory card after transfer can simply copy your camera. Macintosh Mac OS 9.0, 9.1, 9.2, Mac OS X (10.1.2 or later). Only models with Your Digital Camera... you can be deleted to make way for delivery to a photofinisher. The first step to installing Nikon View 5 is to a Computer Your Nikon digital camera stores pictures as digital data. Windows users will open the reference CD window. 38 Instead of Windows XP Home Edition, Windows...
...Nikon View 5 software provided with your computer. Connecting to a Computer Doing More with built-in a CD-ROM drive. Any copies stored on the memory card after transfer can simply copy your camera. Macintosh Mac OS 9.0, 9.1, 9.2, Mac OS X (10.1.2 or later). Only models with Your Digital Camera... you can be deleted to make way for delivery to a photofinisher. The first step to installing Nikon View 5 is to a Computer Your Nikon digital camera stores pictures as digital data. Windows users will open the reference CD window. 38 Instead of Windows XP Home Edition, Windows...
User Manual
Page 52
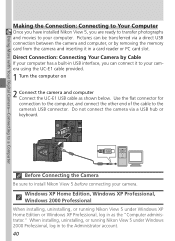
... the cable to install Nikon View 5 before connecting your camera. Doing More with Your Digital Camera-Connecting to a Computer Making the Connection: Connecting to Your Computer Once you have installed Nikon View 5, you can be transferred via a USB hub or keyboard. Direct Connection: Connecting Your Camera by removing the memory card from the camera and inserting it to...
... the cable to install Nikon View 5 before connecting your camera. Doing More with Your Digital Camera-Connecting to a Computer Making the Connection: Connecting to Your Computer Once you have installed Nikon View 5, you can be transferred via a USB hub or keyboard. Direct Connection: Connecting Your Camera by removing the memory card from the camera and inserting it to...
User Manual
Page 53
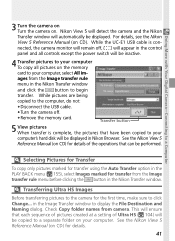
... details. 41 Transfer button 5 View pictures When transfer is connected, the camera monitor will remain off . • Remove the memory card. See the Nikon View 5 Reference Manual (on the memory card to your computer, select All images from the Image transfer rule menu... Turn the camera off , will automatically be copied to a separate folder on . Transferring Ultra HS Images Before transferring pictures to the camera for transfer using the Auto Transfer option in Nikon Browser. Doing More with Your Digital Camera-Connecting to a Computer 3 Turn the camera on Turn the camera on your...
... details. 41 Transfer button 5 View pictures When transfer is connected, the camera monitor will remain off . • Remove the memory card. See the Nikon View 5 Reference Manual (on the memory card to your computer, select All images from the Image transfer rule menu... Turn the camera off , will automatically be copied to a separate folder on . Transferring Ultra HS Images Before transferring pictures to the camera for transfer using the Auto Transfer option in Nikon Browser. Doing More with Your Digital Camera-Connecting to a Computer 3 Turn the camera on Turn the camera on your...

User Manual
Page 55
...OS 9 Before using the Nikon View 5 (version 5.1) to display pictures taken at a camera image-quality setting of RAW ( 49), allocate at least 72 MB of memory allocated to Nikon View 5, the pictures will display a message prompting you to increase the memory allocation. If you attempt to... open RAW images without increasing the amount of memory to Nikon View 5. Doing More with Your Digital Camera-Connecting to a Computer Viewing ...
...OS 9 Before using the Nikon View 5 (version 5.1) to display pictures taken at a camera image-quality setting of RAW ( 49), allocate at least 72 MB of memory allocated to Nikon View 5, the pictures will display a message prompting you to increase the memory allocation. If you attempt to... open RAW images without increasing the amount of memory to Nikon View 5. Doing More with Your Digital Camera-Connecting to a Computer Viewing ...
User Manual
Page 56
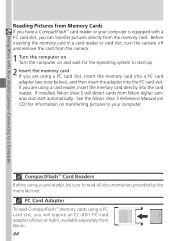
...PC card slot, you can transfer pictures directly from the memory card. Doing More with a PC card slot, you will detect cards from Nikon digital cameras and start up. 2 Insert the memory card If you are using a card reader, insert the memory card directly into the PC card slot. PC Card ...Adapter To read CompactFlash™ memory cards using a card reader, be sure to read ...
...PC card slot, you can transfer pictures directly from the memory card. Doing More with a PC card slot, you will detect cards from Nikon digital cameras and start up. 2 Insert the memory card If you are using a card reader, insert the memory card directly into the PC card slot. PC Card ...Adapter To read CompactFlash™ memory cards using a card reader, be sure to read ...
User Manual
Page 57
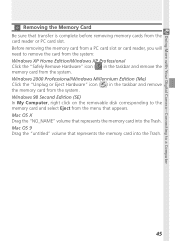
...the Trash. Windows 98 Second Edition (SE) In My Computer, right click on the removable disk corresponding to the memory card and select Eject from the system. Before removing the memory card from a PC card slot or card reader, you will need to remove the card from the system: ...Windows XP Home Edition/Windows XP Professional Click the "Safely Remove Hardware" icon ( ) in the taskbar and remove the memory card from the menu that appears. Doing More with Your Digital Camera-Connecting to a Computer Removing the Memory Card Be sure that transfer is complete before removing...
...the Trash. Windows 98 Second Edition (SE) In My Computer, right click on the removable disk corresponding to the memory card and select Eject from the system. Before removing the memory card from a PC card slot or card reader, you will need to remove the card from the system: ...Windows XP Home Edition/Windows XP Professional Click the "Safely Remove Hardware" icon ( ) in the taskbar and remove the memory card from the menu that appears. Doing More with Your Digital Camera-Connecting to a Computer Removing the Memory Card Be sure that transfer is complete before removing...
User Manual
Page 60
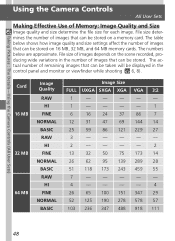
...stored. File size determines the number of remaining images that can be taken will be stored on a memory card. Taking Pictures : The Details-Using the Camera Controls (All User Sets) Using the Camera Controls All User Sets Making Effective Use of images depends on 16 MB, 32 MB, and 64 ...MB memory cards. The numbers below shows how image quality and size settings affect the number of images ...
...stored. File size determines the number of remaining images that can be taken will be stored on a memory card. Taking Pictures : The Details-Using the Camera Controls (All User Sets) Using the Camera Controls All User Sets Making Effective Use of images depends on 16 MB, 32 MB, and 64 ...MB memory cards. The numbers below shows how image quality and size settings affect the number of images ...


