
User Manual
Page 4
...Do not look at the sun through the viewfinder Viewing the sun or other accident, remove the battery and/or AC adapter and then take the equipment to a Nikon-authorized service center for inspection. Should the product break open as this equipment. Keep these safety instructions... where all those who use electronic equipment in explosion or fire. Turn off before replacing the battery. ii Do not place strap around neck Placing the camera strap...
...Do not look at the sun through the viewfinder Viewing the sun or other accident, remove the battery and/or AC adapter and then take the equipment to a Nikon-authorized service center for inspection. Should the product break open as this equipment. Keep these safety instructions... where all those who use electronic equipment in explosion or fire. Turn off before replacing the battery. ii Do not place strap around neck Placing the camera strap...

User Manual
Page 5
...or sold by Nikon for an extended period, the battery may become hot during use , attach the terminal cover and store in the battery, such as necklaces or hairpins. • Batteries are distributed should not be taken to prevent infants from the camera. CD-ROMs The CD-ROMs on battery power for the...crystal Should the monitor or viewfinder break, care should be hot. Before removing the battery, turn the camera off and allow the battery to your eye to the viewfinder, care should be sure to remove the battery when no less than one meter (39˝) from the monitor touching the ...
...or sold by Nikon for an extended period, the battery may become hot during use , attach the terminal cover and store in the battery, such as necklaces or hairpins. • Batteries are distributed should not be taken to prevent infants from the camera. CD-ROMs The CD-ROMs on battery power for the...crystal Should the monitor or viewfinder break, care should be hot. Before removing the battery, turn the camera off and allow the battery to your eye to the viewfinder, care should be sure to remove the battery when no less than one meter (39˝) from the monitor touching the ...
User Manual
Page 6
..., remove and replace the battery, and turn the camera on again, or, if you to bring any errors or omissions to the memory card will not be held liable for customers in loss of ... power source as described above may result in Canada CAUTION This class B digital apparatus meets all requirements of continued malfunction, contact your area (address provided separately). Data already recorded to the attention of the Nikon representative in your retailer or Nikon representative. ATTENTION Cet appareil numérique de la classe B respecte toutes...
..., remove and replace the battery, and turn the camera on again, or, if you to bring any errors or omissions to the memory card will not be held liable for customers in loss of ... power source as described above may result in Canada CAUTION This class B digital apparatus meets all requirements of continued malfunction, contact your area (address provided separately). Data already recorded to the attention of the Nikon representative in your retailer or Nikon representative. ATTENTION Cet appareil numérique de la classe B respecte toutes...
User Manual
Page 9
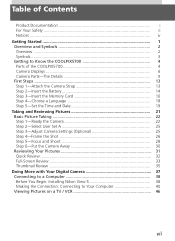
... Symbols 2 Overview ...2 Symbols ...3 Getting to Know the COOLPIX5700 4 Parts of the COOLPIX5700 4 Camera Displays 6 Camera Parts-The Details 9 First Steps ...13 Step 1-Attach the Camera Strap 13 Step 2-Insert the Battery 14 Step 3-Insert the Memory Card 16 Step 4-Choose a Language 18 Step 5-Set the Time... and Shoot 28 Step 6-Put the Camera Away 30 Reviewing Your Pictures 31 Quick Review 32 Full-Screen Review 33 Thumbnail Review 35 Doing More with Your Digital Camera 37 Connecting to a Computer 38 Before You Begin: Installing Nikon View 5 38 Making the Connection: Connecting...
... Symbols 2 Overview ...2 Symbols ...3 Getting to Know the COOLPIX5700 4 Parts of the COOLPIX5700 4 Camera Displays 6 Camera Parts-The Details 9 First Steps ...13 Step 1-Attach the Camera Strap 13 Step 2-Insert the Battery 14 Step 3-Insert the Memory Card 16 Step 4-Choose a Language 18 Step 5-Set the Time... and Shoot 28 Step 6-Put the Camera Away 30 Reviewing Your Pictures 31 Quick Review 32 Full-Screen Review 33 Thumbnail Review 35 Doing More with Your Digital Camera 37 Connecting to a Computer 38 Before You Begin: Installing Nikon View 5 38 Making the Connection: Connecting...

User Manual
Page 11
... During Playback: Hide Image 152 Ordering Prints: Print Set 153 Selecting Images for Transfer: Auto Transfer 155 Technical Notes: Camera Care, Options, and Resources 157 Optional Accessories 158 Caring for the Camera and Battery 160 Web Resources 163 Troubleshooting 164 Specifications 171 Index ...175 ix Using the SET-UP Menu 120 Organizing Your...
... During Playback: Hide Image 152 Ordering Prints: Print Set 153 Selecting Images for Transfer: Auto Transfer 155 Technical Notes: Camera Care, Options, and Resources 157 Optional Accessories 158 Caring for the Camera and Battery 160 Web Resources 163 Troubleshooting 164 Specifications 171 Index ...175 ix Using the SET-UP Menu 120 Organizing Your...
User Manual
Page 13
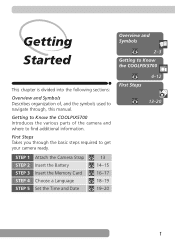
First Steps Takes you through , this manual. STEP 1 STEP 2 STEP 3 STEP 4 STEP 5 Attach the Camera Strap Insert the Battery Insert the Memory Card Choose a Language Set the Time and Date 13 14-15 16-17 18-19 19-20 First Steps 4-12 13-20 1 .... Getting Started Overview and Symbols 2-3 Getting to Know the COOLPIX5700 This chapter is divided into the following sections: Overview and Symbols Describes organization of the camera and where to get your...
First Steps Takes you through , this manual. STEP 1 STEP 2 STEP 3 STEP 4 STEP 5 Attach the Camera Strap Insert the Battery Insert the Memory Card Choose a Language Set the Time and Date 13 14-15 16-17 18-19 19-20 First Steps 4-12 13-20 1 .... Getting Started Overview and Symbols 2-3 Getting to Know the COOLPIX5700 This chapter is divided into the following sections: Overview and Symbols Describes organization of the camera and where to get your...

User Manual
Page 14
... the camera's controls and User Sets. Only Nikon brand electronic accessories (including battery chargers, batteries, and AC adapters) certified by Nikon specifically for taking and reviewing pictures. THE USE OF NON-NIKON ELECTRONIC ACCESSORIES COULD DAMAGE YOUR CAMERA AND MAY VOID YOUR NIKON WARRANTY.... to play back your pictures and details on a TV or VCR. Use Only Nikon Brand Electronic Accessories Your Nikon COOLPIX digital camera is designed to care for purchasing a COOLPIX5700 digital camera. Playing Back Your Pictures: Explains how to use it. This manual explains the...
... the camera's controls and User Sets. Only Nikon brand electronic accessories (including battery chargers, batteries, and AC adapters) certified by Nikon specifically for taking and reviewing pictures. THE USE OF NON-NIKON ELECTRONIC ACCESSORIES COULD DAMAGE YOUR CAMERA AND MAY VOID YOUR NIKON WARRANTY.... to play back your pictures and details on a TV or VCR. Use Only Nikon Brand Electronic Accessories Your Nikon COOLPIX digital camera is designed to care for purchasing a COOLPIX5700 digital camera. Playing Back Your Pictures: Explains how to use it. This manual explains the...
User Manual
Page 17
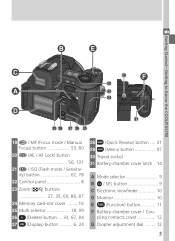
... 18, 99 26 (Delete) button ... 33, 67, 84 27 (Display) button .......... 6, 24 28 (Quick Review) button .... 31 29 (Menu) button 97 30 Tripod socket 31 Battery-chamber cover latch . 14 A Mode selector 9 B / SEL button 9 C Electronic viewfinder 10 D Monitor 10 E (Function) button 11...
... 18, 99 26 (Delete) button ... 33, 67, 84 27 (Display) button .......... 6, 24 28 (Quick Review) button .... 31 29 (Menu) button 97 30 Tripod socket 31 Battery-chamber cover latch . 14 A Mode selector 9 B / SEL button 9 C Electronic viewfinder 10 D Monitor 10 E (Function) button 11...

User Manual
Page 18
...camera settings: 1 2 8 4 Self-timer indicator 58 3 9 5 Shutter speed 73 10 11 6 Exposure mode 70 4 12 7 Metering mode 103 5 13 8 Flash-ready indicator 28 6 7 14 15 9 Flash mode 62 10 Battery level indicator1........... 23 16 17 18 11 "Date not set" icon 2 20 User Set A 12 Focus indicator 3 28 1 Digital... zoom 60 2 Zoom indicator 60, 105 3 Current folder 125 1 Appears when battery is running low. 2 Appears when clock-calendar has not been set. 3 Appears when shutter-release ...
...camera settings: 1 2 8 4 Self-timer indicator 58 3 9 5 Shutter speed 73 10 11 6 Exposure mode 70 4 12 7 Metering mode 103 5 13 8 Flash-ready indicator 28 6 7 14 15 9 Flash mode 62 10 Battery level indicator1........... 23 16 17 18 11 "Date not set" icon 2 20 User Set A 12 Focus indicator 3 28 1 Digital... zoom 60 2 Zoom indicator 60, 105 3 Current folder 125 1 Appears when battery is running low. 2 Appears when clock-calendar has not been set. 3 Appears when shutter-release ...
User Manual
Page 19
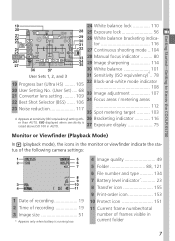
...Mode) In (playback mode), the icons in the monitor or viewfinder indicate the status of the following camera settings: 1 Date of recording 19 2 Time of recording 19 3 Image size 51 * Appears only when battery is running low. 4 Image quality 49 5 Folder 88, 121 6 File number and type .......... ...134 7 Battery level indicator 23 8 Transfer icon 155 9 Print-order icon 153 10 Protect icon 151 11 Current ...
...Mode) In (playback mode), the icons in the monitor or viewfinder indicate the status of the following camera settings: 1 Date of recording 19 2 Time of recording 19 3 Image size 51 * Appears only when battery is running low. 4 Image quality 49 5 Folder 88, 121 6 File number and type .......... ...134 7 Battery level indicator 23 8 Transfer icon 155 9 Print-order icon 153 10 Protect icon 151 11 Current ...

User Manual
Page 20
shutter-speed/aperture display shows white balance mode selected 130 3 Battery level indicator 23 4 Image quality 49 5 Exposure mode 70 6 Shutter-speed 73 Aperture 74 Image size 51 Exposure compensation value ... 66 Sensitivity 78 White balance ... control panel can be illuminated for up to Know the COOLPIX5700 Control Panel The indicators in the control panel show the status of the following camera settings. Getting Started-Getting to 8 seconds by pressing the LCD illuminator button ( 4). 8 To aid explanation, the control panel graphic below shows all icons, unlike normal...
shutter-speed/aperture display shows white balance mode selected 130 3 Battery level indicator 23 4 Image quality 49 5 Exposure mode 70 6 Shutter-speed 73 Aperture 74 Image size 51 Exposure compensation value ... 66 Sensitivity 78 White balance ... control panel can be illuminated for up to Know the COOLPIX5700 Control Panel The indicators in the control panel show the status of the following camera settings. Getting Started-Getting to 8 seconds by pressing the LCD illuminator button ( 4). 8 To aid explanation, the control panel graphic below shows all icons, unlike normal...

User Manual
Page 24
...at B-ቢ, then slide the left peg (closest to remove the battery-chamber cover before the coupling contacts cover or you must remove the coupling contacts and battery-chamber covers. To attach the MB-E5700, you may damage the camera. Do not attempt to the coupling contacts) into place (B-ባ). ... cover by pushing it out. For more information, refer to avoid accidentally putting your fingers or fingernails in your eye. 12 Hold the battery-chamber cover at about 45°, gently pull the cover in the direction of A-ቤ until the view is in the viewfinder appears blurred...
...at B-ቢ, then slide the left peg (closest to remove the battery-chamber cover before the coupling contacts cover or you must remove the coupling contacts and battery-chamber covers. To attach the MB-E5700, you may damage the camera. Do not attempt to the coupling contacts) into place (B-ባ). ... cover by pushing it out. For more information, refer to avoid accidentally putting your fingers or fingernails in your eye. 12 Hold the battery-chamber cover at about 45°, gently pull the cover in the direction of A-ቤ until the view is in the viewfinder appears blurred...

User Manual
Page 26
... manual included with the camera; To prevent the battery being dislodged during operation, be sure that you charge the battery before use. Getting Started-First Steps Step 2-Insert the Battery Your camera is powered by a single rechargeable Nikon EN-EL1 lithium-ion battery (provided) or a non-rechargeable 2CR5 (DL245) lithium battery (available separately). 2.1 Charge the battery The EN-EL1...
... manual included with the camera; To prevent the battery being dislodged during operation, be sure that you charge the battery before use. Getting Started-First Steps Step 2-Insert the Battery Your camera is powered by a single rechargeable Nikon EN-EL1 lithium-ion battery (provided) or a non-rechargeable 2CR5 (DL245) lithium battery (available separately). 2.1 Charge the battery The EN-EL1...

User Manual
Page 27
...on some occasions when an exhausted battery is installed or the camera powered by a separate, rechargeable power source, which takes six ordinary LR6 (AA) batteries, can provide roughly three days of retail outlets. The Clock Battery The camera's internal clock-calendar is powered by...Getting Started-First Steps Battery - Cautions • When using a tripod, the camera must be removed from the tripod before charging is complete, a flashing icon may be reset ( 20). After charging for extended periods. Alternative Power Sources Besides the Nikon EN-EL1, the ...
...on some occasions when an exhausted battery is installed or the camera powered by a separate, rechargeable power source, which takes six ordinary LR6 (AA) batteries, can provide roughly three days of retail outlets. The Clock Battery The camera's internal clock-calendar is powered by...Getting Started-First Steps Battery - Cautions • When using a tripod, the camera must be removed from the tripod before charging is complete, a flashing icon may be reset ( 20). After charging for extended periods. Alternative Power Sources Besides the Nikon EN-EL1, the ...

User Manual
Page 35
...quality or size ( 49). It may be taken until battery has been recharged or replaced. (DL245) battery. 23 Camera functions normally. Charge EN-EL1 as soon as flash recharges. (Flashes) (Flashes) Battery exhausted. If the number of exposures remaining Monitor Control panel... Monitor Control Panel Meaning Camera status None Battery fully charged. Make sure the memory card has enough memory. Battery indicator Number of exposures remaining reaches zero,...
...quality or size ( 49). It may be taken until battery has been recharged or replaced. (DL245) battery. 23 Camera functions normally. Charge EN-EL1 as soon as flash recharges. (Flashes) (Flashes) Battery exhausted. If the number of exposures remaining Monitor Control panel... Monitor Control Panel Meaning Camera status None Battery fully charged. Make sure the memory card has enough memory. Battery indicator Number of exposures remaining reaches zero,...

User Manual
Page 42
Taking and Reviewing Pictures-Basic Picture Taking Step 6-Put the Camera Away When you have finished using the camera, follow these steps before putting the camera away. 6.1 Turn the camera off Turn the camera off to save battery power. 6.2 Lower the built-in Speedlight If the built-in Speedlight is raised, lower it by gently pushing it down. 6.3 Close the monitor and replace the lens cap Close the monitor and replace the lens cap to protect the monitor and lens from dust and fingerprints. 30
Taking and Reviewing Pictures-Basic Picture Taking Step 6-Put the Camera Away When you have finished using the camera, follow these steps before putting the camera away. 6.1 Turn the camera off Turn the camera off to save battery power. 6.2 Lower the built-in Speedlight If the built-in Speedlight is raised, lower it by gently pushing it down. 6.3 Close the monitor and replace the lens cap Close the monitor and replace the lens cap to protect the monitor and lens from dust and fingerprints. 30

User Manual
Page 55
... 72 MB of memory allocated to Nikon View 5, the pictures will display a message prompting you attempt to open RAW images without increasing the amount of memory to increase the memory allocation. Doing More with Your Digital Camera-Connecting to a Computer Viewing RAW Pictures in doubt, recharge the battery before beginning transfer or use the...
... 72 MB of memory allocated to Nikon View 5, the pictures will display a message prompting you attempt to open RAW images without increasing the amount of memory to increase the memory allocation. Doing More with Your Digital Camera-Connecting to a Computer Viewing RAW Pictures in doubt, recharge the battery before beginning transfer or use the...

User Manual
Page 58
... a TV / VCR Using the audio/video cable provided with the EN-EL1 battery (provided) or a 2CR5 (DL245) (available separately), the camera will turn off. Auto Off When using the camera with your camera, you connect the camera. 46 For extended use, connect the camera to the TV will stop and the screen will go blank, however... for auto power off automatically if no operations are performed for a specified period of time. Output to an optional AC adapter. Doing More with Your Digital Camera-Viewing Pictures on a TV / VCR Viewing Pictures on the TV or VCR.
... a TV / VCR Using the audio/video cable provided with the EN-EL1 battery (provided) or a 2CR5 (DL245) (available separately), the camera will turn off. Auto Off When using the camera with your camera, you connect the camera. 46 For extended use, connect the camera to the TV will stop and the screen will go blank, however... for auto power off automatically if no operations are performed for a specified period of time. Output to an optional AC adapter. Doing More with Your Digital Camera-Viewing Pictures on a TV / VCR Viewing Pictures on the TV or VCR.

User Manual
Page 77
... the monitor or viewfinder will turn yellow indicating that the built-in use, it will turn Noise Reduction on while the flash charges. Low Batteries When the low battery indicator appears in the control panel ( ) and monitor or viewfinder ( ), and the built-in the Exposure Options menu ( 110), or when...-ready indicator in the monitor or viewfinder will go blank if in darker areas of a tripod is recommended. Taking Pictures : The Details-Using the Camera Controls (All User Sets) When Lighting Is Poor When lighting is poor and the flash is off when BSS is on ( 106), a setting ...
... the monitor or viewfinder will turn yellow indicating that the built-in use, it will turn Noise Reduction on while the flash charges. Low Batteries When the low battery indicator appears in the control panel ( ) and monitor or viewfinder ( ), and the built-in the Exposure Options menu ( 110), or when...-ready indicator in the monitor or viewfinder will go blank if in darker areas of a tripod is recommended. Taking Pictures : The Details-Using the Camera Controls (All User Sets) When Lighting Is Poor When lighting is poor and the flash is off when BSS is on ( 106), a setting ...

User Manual
Page 100
...File Information 2. There are five pages of frames visible in current folder * Appears only when battery is shown superimposed on images in folders automatically named with "DSCN" followed by a four-digit file number from 0001 to cycle through image information as follows: Page 1 ⇔ Page...are stored in full-screen review or full-screen playback. Playing Back Your Pictures Viewing Image Information Image information is running low. 1 Camera type 2 Firmware version 3 Metering method 4 Exposure mode 5 Shutter speed 6 Aperture 7 Exposure compensation 8 Focal length 9 Focus mode ...
...File Information 2. There are five pages of frames visible in current folder * Appears only when battery is shown superimposed on images in folders automatically named with "DSCN" followed by a four-digit file number from 0001 to cycle through image information as follows: Page 1 ⇔ Page...are stored in full-screen review or full-screen playback. Playing Back Your Pictures Viewing Image Information Image information is running low. 1 Camera type 2 Firmware version 3 Metering method 4 Exposure mode 5 Shutter speed 6 Aperture 7 Exposure compensation 8 Focal length 9 Focus mode ...


