Instruction Manual
Page 2
Contents Important Safety Instructions Accessories View of Main Unit System Connections Power Supply Preparation General Setup Playing Music Photo Viewer Use of the Mount Accessories Troubleshooting Specifications 2 6 7 8 10 12 16 19 22 23 24 1
Contents Important Safety Instructions Accessories View of Main Unit System Connections Power Supply Preparation General Setup Playing Music Photo Viewer Use of the Mount Accessories Troubleshooting Specifications 2 6 7 8 10 12 16 19 22 23 24 1
Instruction Manual
Page 3
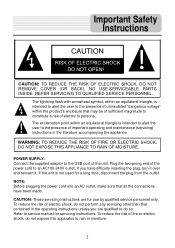
... the unit is intended to alert the user to rain or moisture. 2 To reduce the risk of important operating and maintenance (servicing) instructions in the operating instructions unless you have been made. Important Safety Instructions , CAUTION: TO REDUCE THE RISK OF ELECTRIC SHOCK, DO NOT REMOVE COVER (OR BACK). POWER SUPPLY: Connect the supplied adaptor to an AC100-240V outlet. NO USE-SERVICEABLE PARTS INSIDE...
... the unit is intended to alert the user to rain or moisture. 2 To reduce the risk of important operating and maintenance (servicing) instructions in the operating instructions unless you have been made. Important Safety Instructions , CAUTION: TO REDUCE THE RISK OF ELECTRIC SHOCK, DO NOT REMOVE COVER (OR BACK). POWER SUPPLY: Connect the supplied adaptor to an AC100-240V outlet. NO USE-SERVICEABLE PARTS INSIDE...
Instruction Manual
Page 4
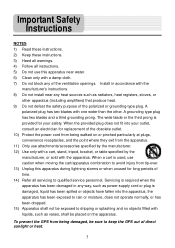
...Servicing is required when the apparatus has been damaged in accordance with the manufacturer's instructions. 8) Do not install near water. 6) Clean only with one wider than the other apparatus (including amplifiers) that produce heat. 9) Do not defeat the safety purpose of the polarized or grounding-type plug. To prevent the GPS...outlet, consult an electrician for long periods of time. 14) Refer all instructions. 5) Do not use this apparatus during lightning storms or when unused for replacement of the obsolete outlet. 10) Protect the power cord from being damaged, be placed on or...
...Servicing is required when the apparatus has been damaged in accordance with the manufacturer's instructions. 8) Do not install near water. 6) Clean only with one wider than the other apparatus (including amplifiers) that produce heat. 9) Do not defeat the safety purpose of the polarized or grounding-type plug. To prevent the GPS...outlet, consult an electrician for long periods of time. 14) Refer all instructions. 5) Do not use this apparatus during lightning storms or when unused for replacement of the obsolete outlet. 10) Protect the power cord from being damaged, be placed on or...
Instruction Manual
Page 5
... to use the unit for aircraft navigation. CAUTION: Danger of direction, distance, location, or topography. The unit is incorrectly replaced. This product should not be exposed to excessive heat such as a navigational aid. Use the unit only as sunshine, fire or the like. 4 Replace only with route suggestions. Important Safety Instructions Warning Failure to avoid the following potentially hazardous situations may affect safety or timing...
... to use the unit for aircraft navigation. CAUTION: Danger of direction, distance, location, or topography. The unit is incorrectly replaced. This product should not be exposed to excessive heat such as a navigational aid. Use the unit only as sunshine, fire or the like. 4 Replace only with route suggestions. Important Safety Instructions Warning Failure to avoid the following potentially hazardous situations may affect safety or timing...
Instruction Manual
Page 6
... user is connected. 3. Consult the dealer or an experience radio/TV technician for reference and they may cause undesired operation. Increase the separation between the equipment and the receiver. This equipment generates, uses and can be different from that may be determined by one or more of the following measures: 1. Reorient or relocate the receiving antenna. 2. Important Safety Instructions This device...
... user is connected. 3. Consult the dealer or an experience radio/TV technician for reference and they may cause undesired operation. Increase the separation between the equipment and the receiver. This equipment generates, uses and can be different from that may be determined by one or more of the following measures: 1. Reorient or relocate the receiving antenna. 2. Important Safety Instructions This device...

Instruction Manual
Page 7
Accessories Accessories List ITEM NAME Instruction Manual AC Adaptor Car Adaptor QTY 2 1 1 Mounting Bracket 1 USB Cable 1 Magnetic Cradle 1 Stylus 1 Dashboard Mount Disk 1 Pouch 1 NOTE Accessories and their parts numbers are subject to modification without prior notice due to improvements. 6
Accessories Accessories List ITEM NAME Instruction Manual AC Adaptor Car Adaptor QTY 2 1 1 Mounting Bracket 1 USB Cable 1 Magnetic Cradle 1 Stylus 1 Dashboard Mount Disk 1 Pouch 1 NOTE Accessories and their parts numbers are subject to modification without prior notice due to improvements. 6

Instruction Manual
Page 8
... connected to turn on the unit or exist standby or power off automatically. 7. LCD Screen 5. USB Port Connect to the supplied adaptor to connect earphones for private listening. Magnet Used to reset the system. 4. RESET Hole Press the reset button with a metal pin to secure the unit onto the magnetic cradle firmly. 7 View of Main Unit 1. POWER Button Press power button to this jack, the speaker will be turned off mode. 2. When the battery...
... connected to turn on the unit or exist standby or power off automatically. 7. LCD Screen 5. USB Port Connect to the supplied adaptor to connect earphones for private listening. Magnet Used to reset the system. 4. RESET Hole Press the reset button with a metal pin to secure the unit onto the magnetic cradle firmly. 7 View of Main Unit 1. POWER Button Press power button to this jack, the speaker will be turned off mode. 2. When the battery...

Instruction Manual
Page 9
..., ME, 2000 and XP (Driver required for Windows 98SE) -DVD Rom Drive (for map updating or charging. Connecting to PC The unit is designed with a USB port which allows you attempt to connect the unit to any other external device connected to the unit are switched off and unplugged from the power supply before you to connect the unit to a PC for map upgrade purposes) -Intel Pentium II 233...
..., ME, 2000 and XP (Driver required for Windows 98SE) -DVD Rom Drive (for map updating or charging. Connecting to PC The unit is designed with a USB port which allows you attempt to connect the unit to any other external device connected to the unit are switched off and unplugged from the power supply before you to connect the unit to a PC for map upgrade purposes) -Intel Pentium II 233...

Instruction Manual
Page 10
... turn off. Connecting to Earphones Connect the earphones to the bottom of the unit for private listening. You can now remove the card. The card unlocks and protrudes slightly. System Connections Inserting SD Card The unit is connected, the speakers will automatically turn down the volume before you to insert a SD card into the unit as shown below: To remove the card, gently press the card in with SD Card...
... turn off. Connecting to Earphones Connect the earphones to the bottom of the unit for private listening. You can now remove the card. The card unlocks and protrudes slightly. System Connections Inserting SD Card The unit is connected, the speakers will automatically turn down the volume before you to insert a SD card into the unit as shown below: To remove the card, gently press the card in with SD Card...
Instruction Manual
Page 11
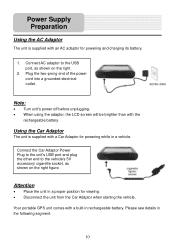
Power Supply Preparation Using the AC Adaptor The unit is supplied with a Car Adaptor for powering and charging its battery. 1. Connect the Car Adaptor Power Plug to the unit's USB port and plug the other end to the USB port, as shown on the right. 2. Connect AC adaptor to the vehicle's 5V accessory/ cigarette socket, as shown on the right figure. Note: • Turn unit's power off before...
Power Supply Preparation Using the AC Adaptor The unit is supplied with a Car Adaptor for powering and charging its battery. 1. Connect the Car Adaptor Power Plug to the unit's USB port and plug the other end to the USB port, as shown on the right. 2. Connect AC adaptor to the vehicle's 5V accessory/ cigarette socket, as shown on the right figure. Note: • Turn unit's power off before...

Instruction Manual
Page 12
... the device is weak, an indication menu will appear on the equipment. Standby and Power Off. Don't put the product on . Power On/Off Press and hold the Power button for while to wake up the screen). You should have two options - Tap "Standby" to turn off the screen (Press and hold the Power button for the rechargeable battery • Battery should only be charged by using...
... the device is weak, an indication menu will appear on the equipment. Standby and Power Off. Don't put the product on . Power On/Off Press and hold the Power button for while to wake up the screen). You should have two options - Tap "Standby" to turn off the screen (Press and hold the Power button for the rechargeable battery • Battery should only be charged by using...
Instruction Manual
Page 14
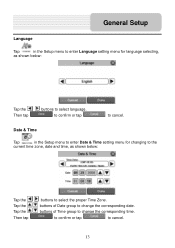
General Setup Language Tap in the Setup menu to enter Date & Time setting menu for language selecting, as shown below : Tap the , Then tap buttons to select language. buttons of Date group to change the corresponding time. to confirm or tap to cancel. 13 to confirm or tap to cancel. buttons of Time group to select the proper Time Zone. Date & Time Tap in the Setup menu to enter Language setting menu for changing to the current time zone, date and time, as shown below : Tap the Tap the Tap the Then tap buttons to change the corresponding date.
General Setup Language Tap in the Setup menu to enter Date & Time setting menu for language selecting, as shown below : Tap the , Then tap buttons to select language. buttons of Date group to change the corresponding time. to confirm or tap to cancel. 13 to confirm or tap to cancel. buttons of Time group to select the proper Time Zone. Date & Time Tap in the Setup menu to enter Language setting menu for changing to the current time zone, date and time, as shown below : Tap the Tap the Tap the Then tap buttons to change the corresponding date.
Instruction Manual
Page 15
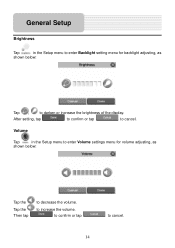
Volume Tap in the Setup menu to enter Backlight setting menu for volume adjusting, as shown below : Tap the Tap the Then tap to decrease the volume. After setting, tap to confirm or tap to cancel. 14 to confirm or tap to cancel. to increase the volume. General Setup Brightness Tap in the Setup menu to enter Volume settings menu for backlight adjusting, as shown below : Tap , to darken or increase the brightness of the display.
Volume Tap in the Setup menu to enter Backlight setting menu for volume adjusting, as shown below : Tap the Tap the Then tap to decrease the volume. After setting, tap to confirm or tap to cancel. 14 to confirm or tap to cancel. to increase the volume. General Setup Brightness Tap in the Setup menu to enter Volume settings menu for backlight adjusting, as shown below : Tap , to darken or increase the brightness of the display.
Instruction Manual
Page 16
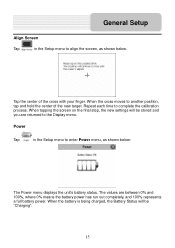
... Setup Align Screen Tap in the Setup menu to enter Power menu, as shown below : The Power menu displays the unit's battery status. Tap the center of the new target. When the cross moves to align the screen, as shown below . When the battery is being charged, the Battery Status will be "Charging". 15 Repeat each time to the Display menu. When tapping the screen on the final step, the new settings...
... Setup Align Screen Tap in the Setup menu to enter Power menu, as shown below : The Power menu displays the unit's battery status. Tap the center of the new target. When the cross moves to align the screen, as shown below . When the battery is being charged, the Battery Status will be "Charging". 15 Repeat each time to the Display menu. When tapping the screen on the final step, the new settings...
Instruction Manual
Page 17
... by using a variety of the navigation unit. Do not attempt to use the earphones when driving. Playing Music The unit is designed with MP3 files. 2. Turn on a PC, using the unit's SD card slot, located on the right side. • Music files should be performed independent of programs such as Windows Media Player. • This process should previously reside on the user's SD card. • Music files can...
... by using a variety of the navigation unit. Do not attempt to use the earphones when driving. Playing Music The unit is designed with MP3 files. 2. Turn on a PC, using the unit's SD card slot, located on the right side. • Music files should be performed independent of programs such as Windows Media Player. • This process should previously reside on the user's SD card. • Music files can...
Instruction Manual
Page 20
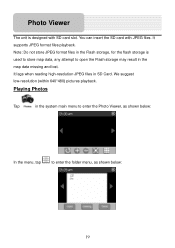
... card slot. We suggest low-resolution (within 640*480) pictures playback. It supports JPEG format files playback. Note: Do not store JPEG format files in the Flash storage, for the flash storage is designed with JPEG files. It lags when reading high-resolution JPEG files in the map data missing and lost. Playing Photos Tap in the system main menu to enter...
... card slot. We suggest low-resolution (within 640*480) pictures playback. It supports JPEG format files playback. Note: Do not store JPEG format files in the Flash storage, for the flash storage is designed with JPEG files. It lags when reading high-resolution JPEG files in the map data missing and lost. Playing Photos Tap in the system main menu to enter...

Instruction Manual
Page 23
...cup to the sky. Warning: When you can use the included adhesive disk. Then rotate the knob to adjust the unit to your dashboard. Choose a clean, dry spot on the magnetic cradle. 3. The device must not be mounted so that it . 2. To mount to ensure the airbags are...position. Fix the unit on your vehicle, ensure it has a clear line of sight to the windshield. Use of the Mount Accessories When using the unit in vehicle, you mount the device in the vehicle. See Fig. 1. Following the arrow, slide the mount cradle onto the mount bracket to fix it impairs the driver's view ...
...cup to the sky. Warning: When you can use the included adhesive disk. Then rotate the knob to adjust the unit to your dashboard. Choose a clean, dry spot on the magnetic cradle. 3. The device must not be mounted so that it . 2. To mount to ensure the airbags are...position. Fix the unit on your vehicle, ensure it has a clear line of sight to the windshield. Use of the Mount Accessories When using the unit in vehicle, you mount the device in the vehicle. See Fig. 1. Following the arrow, slide the mount cradle onto the mount bracket to fix it impairs the driver's view ...
Instruction Manual
Page 24
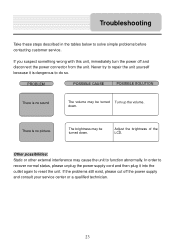
... There is no sound The volume may cause the unit to do so. There is no picture. If the problems still exist, please cut off and disconnect the power connector from the unit. Troubleshooting Take these steps described in the tables below to reset the unit. Adjust the brightness of the LCD. Never try to repair the unit yourself because it into the...
... There is no sound The volume may cause the unit to do so. There is no picture. If the problems still exist, please cut off and disconnect the power connector from the unit. Troubleshooting Take these steps described in the tables below to reset the unit. Adjust the brightness of the LCD. Never try to repair the unit yourself because it into the...

Instruction Manual
Page 25
DC 5V < 8W 90mmX75mmX17mm (L*W*D) 125g DESIGN AND SPECIFICATIONS ARE SUBJECT TO CHANGE WITHOUT NOTICE 24 Specifications TFT screen size Frequency Response Audio Signal-to-noise Rate Audio distortion or noise Channel Separation Dynamic Range Power Power Consumption Dimensions Weight 3.5 inches 20Hz~20kHz ≥65dB ≤-20dB (1kHz) ≥70dB (1kHz) ≥80dB (1kHz) AC 100-240V ~ 50/60Hz;
DC 5V < 8W 90mmX75mmX17mm (L*W*D) 125g DESIGN AND SPECIFICATIONS ARE SUBJECT TO CHANGE WITHOUT NOTICE 24 Specifications TFT screen size Frequency Response Audio Signal-to-noise Rate Audio distortion or noise Channel Separation Dynamic Range Power Power Consumption Dimensions Weight 3.5 inches 20Hz~20kHz ≥65dB ≤-20dB (1kHz) ≥70dB (1kHz) ≥80dB (1kHz) AC 100-240V ~ 50/60Hz;

Instruction Manual
Page 26
© 2008 Nextar (Hong Kong) Limited. We may find it necessary to modify, amend or otherwise change without any time, without notice. All other brand names, trademarks and service marks are subject to do this manual. All specifications and features are property of Nextar (Hong Kong) Limited. Nextar may reserve the right to change or update this at : Nextar Inc. 1661 Fairplex Dr. La Verne, CA91750 USA 25 Nextar is a trademark and service mark of their owners. www.nextar.com Or write us at any prior notice.
© 2008 Nextar (Hong Kong) Limited. We may find it necessary to modify, amend or otherwise change without any time, without notice. All other brand names, trademarks and service marks are subject to do this manual. All specifications and features are property of Nextar (Hong Kong) Limited. Nextar may reserve the right to change or update this at : Nextar Inc. 1661 Fairplex Dr. La Verne, CA91750 USA 25 Nextar is a trademark and service mark of their owners. www.nextar.com Or write us at any prior notice.


