
M3 Series Hardware Manual
Page 2
...61623; When installing the unit in every situation. Do not dispose of direction, distance, location, or topography. The directions provided by the navigation unit are over in a safe manner. Just enter information using the touch screen and let the voice prompt and detailed map guide you may...destinations, or to provide you take with your destination. Pull over ! Finding an address or any purpose requiring precise measurement of your Nextar GPS Navigator. Do not become distracted by the unit while driving. Introduction Congratulations on or near an air bag.
...61623; When installing the unit in every situation. Do not dispose of direction, distance, location, or topography. The directions provided by the navigation unit are over in a safe manner. Just enter information using the touch screen and let the voice prompt and detailed map guide you may...destinations, or to provide you take with your destination. Pull over ! Finding an address or any purpose requiring precise measurement of your Nextar GPS Navigator. Do not become distracted by the unit while driving. Introduction Congratulations on or near an air bag.
M3 Series Hardware Manual
Page 5
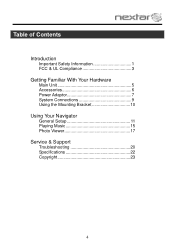
Table of Contents Introduction Important Safety Information 1 FCC & UL Compliance 3 Getting Familiar With Your Hardware Main Unit 5 Accessories 6 Power Adaptor 7 System Connections 9 Using the Mounting Bracket 10 Using Your Navigator General Setup 11 Playing Music 15 Photo Viewer 17 Service & Support Troubleshooting 20 Specifications 22 Copyright 23 4
Table of Contents Introduction Important Safety Information 1 FCC & UL Compliance 3 Getting Familiar With Your Hardware Main Unit 5 Accessories 6 Power Adaptor 7 System Connections 9 Using the Mounting Bracket 10 Using Your Navigator General Setup 11 Playing Music 15 Photo Viewer 17 Service & Support Troubleshooting 20 Specifications 22 Copyright 23 4
M3 Series Hardware Manual
Page 12
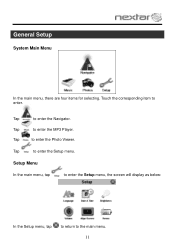
Tap to enter the Photo Viewer. Tap to enter the MP3 Player. Tap to enter. Touch the corresponding item to enter the Setup menu. Tap to the main menu. 11 Setup Menu In the main menu, tap to enter the Setup menu, the screen will display as below: In the Setup menu, tap to return to enter the Navigator. General Setup System Main Menu In the main menu, there are four items for selecting.
Tap to enter the Photo Viewer. Tap to enter the MP3 Player. Tap to enter. Touch the corresponding item to enter the Setup menu. Tap to the main menu. 11 Setup Menu In the main menu, tap to enter the Setup menu, the screen will display as below: In the Setup menu, tap to return to enter the Navigator. General Setup System Main Menu In the main menu, there are four items for selecting.
M3 Series Hardware Manual
Page 16
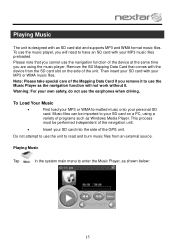
... WMA formatted music onto your SD card on the side of programs such as shown below: 15 Music files can be performed independent of the navigation unit. Insert your SD card with an SD card slot and supports MP3 and WMA format music files. Then insert your SD card... into the side of the Mapping Data Card if you remove it to use the navigation function of the device at the same time you cannot use the Music Player as the navigation function will need to have an SD card with the device from an external source. Note: Please...
... WMA formatted music onto your SD card on the side of programs such as shown below: 15 Music files can be performed independent of the navigation unit. Insert your SD card with an SD card slot and supports MP3 and WMA format music files. Then insert your SD card... into the side of the Mapping Data Card if you remove it to use the navigation function of the device at the same time you cannot use the Music Player as the navigation function will need to have an SD card with the device from an external source. Note: Please...
M3 Series Hardware Manual
Page 18
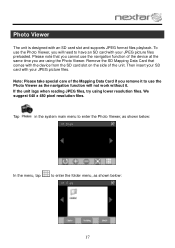
... JPEG files, try using the Photo Viewer. We suggest 640 x 480 pixel resolution files. Remove the SD Mapping Data Card that you cannot use the navigation function of the Mapping Data Card if you remove it to use the Photo Viewer, you are using lower resolution files. Note: Please take special... you will not work without it. To use the Photo Viewer as shown below : In the menu, tap to enter the folder menu, as the navigation function will need to enter the Photo Viewer, as shown below : 17 Photo Viewer The unit is designed with your JPEG picture files. Tap in...
... JPEG files, try using the Photo Viewer. We suggest 640 x 480 pixel resolution files. Remove the SD Mapping Data Card that you cannot use the navigation function of the Mapping Data Card if you remove it to use the Photo Viewer, you are using lower resolution files. Note: Please take special... you will not work without it. To use the Photo Viewer as shown below : In the menu, tap to enter the folder menu, as the navigation function will need to enter the Photo Viewer, as shown below : 17 Photo Viewer The unit is designed with your JPEG picture files. Tap in...
M3 Series Hardware Manual
Page 22
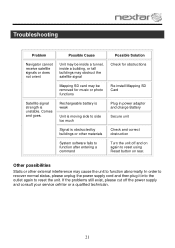
... the outlet again to side too much Plug in power adaptor and charge Battery Secure unit Signal is unstable. Troubleshooting Problem Possible Cause Possible Solution Navigator cannot receive satellite signals or does not orient Unit may be removed for music or photo functions Re-install Mapping SD Card Satellite signal strength...
... the outlet again to side too much Plug in power adaptor and charge Battery Secure unit Signal is unstable. Troubleshooting Problem Possible Cause Possible Solution Navigator cannot receive satellite signals or does not orient Unit may be removed for music or photo functions Re-install Mapping SD Card Satellite signal strength...

M3-03 Software Manual
Page 3
..., position your first destination! Getting a GPS signal To use the system to guide you have read and agreed to the warning. The screen appears. 2 Tap Navigate. To start the system: 1 Press the POWER button. GPS signals can also be obstructed by the roof of the sky. - 3 - A warning screen appears. 3 Tap "I Agree...
..., position your first destination! Getting a GPS signal To use the system to guide you have read and agreed to the warning. The screen appears. 2 Tap Navigate. To start the system: 1 Press the POWER button. GPS signals can also be obstructed by the roof of the sky. - 3 - A warning screen appears. 3 Tap "I Agree...

M3-03 Software Manual
Page 6
... the map The system gives you many ways of the map is weak. If the arrow is red, you arrive at the map. As you navigate to a destination, the top of the map displays the name of the next street, the direction of your current position, you can view any of...
... the map The system gives you many ways of the map is weak. If the arrow is red, you arrive at the map. As you navigate to a destination, the top of the map displays the name of the next street, the direction of your current position, you can view any of...
M3-03 Software Manual
Page 22
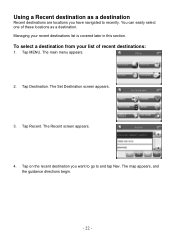
To select a destination from your recent destinations list is covered later in this section. The Set Destination screen appears. 3. Tap MENU. The Recent screen appears. 4. Managing your list of these locations as a destination Recent destinations are locations you want to go to recently. Tap Destination. Using a Recent destination as a destination. Tap on the recent destination you have navigated to and tap Nav. You can easily select one of recent destinations: 1. The main menu appears. 2. Tap Recent. The map appears, and the guidance directions begin. - 22 -
To select a destination from your recent destinations list is covered later in this section. The Set Destination screen appears. 3. Tap MENU. The Recent screen appears. 4. Managing your list of these locations as a destination Recent destinations are locations you want to go to recently. Tap Destination. Using a Recent destination as a destination. Tap on the recent destination you have navigated to and tap Nav. You can easily select one of recent destinations: 1. The main menu appears. 2. Tap Recent. The map appears, and the guidance directions begin. - 22 -
M3-03 Software Manual
Page 27
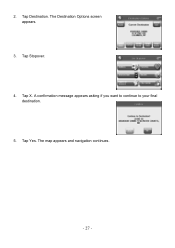
Tap Yes. 2. A confirmation message appears asking if you want to continue to your final destination. 5. Tap Destination. Tap Stopover. 4. Tap X. The map appears and navigation continues. - 27 - The Destination Options screen appears. 3.
Tap Yes. 2. A confirmation message appears asking if you want to continue to your final destination. 5. Tap Destination. Tap Stopover. 4. Tap X. The map appears and navigation continues. - 27 - The Destination Options screen appears. 3.
M3-03 Software Manual
Page 40
... and accessories, visit us on production unit sold to do this manual is a trademark and service mark of NAVTEQ ™ Navigation software copyright © 2001-2006 Netropa, Inc. Unless otherwise indicated www.nextar.com Made in any prior notice. Mapping database copyright © 2006 NAVTEQ ™. All specifications and features are subject...
... and accessories, visit us on production unit sold to do this manual is a trademark and service mark of NAVTEQ ™ Navigation software copyright © 2001-2006 Netropa, Inc. Unless otherwise indicated www.nextar.com Made in any prior notice. Mapping database copyright © 2006 NAVTEQ ™. All specifications and features are subject...
M3-03 Quick Start Guide
Page 1
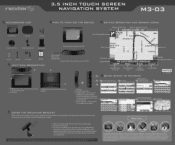
... may also prohibit drivers from or relating to connect headphones for any persons caused by Nextar's negligence, or for private listening. 3.5 INCH TOUCH SCREEN NAVIGATION SYSTEM M3-03 ACCESSORIES LIST How To TURN ON THE DEVICE EYPAD OPERATION AND SCREEN ICONS 3.5" GPS Device... you . Dashboard Mount Disk Windshield Mounting Bracket Mounting ra e Peel the protective sticker off automatically. 4. Press the power button to Start Navigation 4 Select Address 100 E COLORADO BLVD PASADENA, CA 100 W COLORADO B PASADENA, CA - USB Port 2. USING THE MOUNTING BRACKET When...
... may also prohibit drivers from or relating to connect headphones for any persons caused by Nextar's negligence, or for private listening. 3.5 INCH TOUCH SCREEN NAVIGATION SYSTEM M3-03 ACCESSORIES LIST How To TURN ON THE DEVICE EYPAD OPERATION AND SCREEN ICONS 3.5" GPS Device... you . Dashboard Mount Disk Windshield Mounting Bracket Mounting ra e Peel the protective sticker off automatically. 4. Press the power button to Start Navigation 4 Select Address 100 E COLORADO BLVD PASADENA, CA 100 W COLORADO B PASADENA, CA - USB Port 2. USING THE MOUNTING BRACKET When...


